
User Manual (English)
Page 3
... 8 1-4 Turning ON the Power 8 2 YOUR LCD TV AT A GLANCE 9 2-1 Front Panel Controls 9 2-2 Right-side Connectors 10 2-3 Back Connectors...11 3 YOUR REMOTE CONTROL AT A GLANCE 15 3-1 Remote Control Buttons 15 3-2 Using the Remote Control (Basic Operation 16 4 CONNECTING DEVICES 17 4-1 Connecting Your DVD Player 17 4-2 Connecting Your HDTV Set-top Box 18 4-3 Connecting Your...
... 8 1-4 Turning ON the Power 8 2 YOUR LCD TV AT A GLANCE 9 2-1 Front Panel Controls 9 2-2 Right-side Connectors 10 2-3 Back Connectors...11 3 YOUR REMOTE CONTROL AT A GLANCE 15 3-1 Remote Control Buttons 15 3-2 Using the Remote Control (Basic Operation 16 4 CONNECTING DEVICES 17 4-1 Connecting Your DVD Player 17 4-2 Connecting Your HDTV Set-top Box 18 4-3 Connecting Your...

User Manual (English)
Page 4
7 Setting the Channel ...31 7-1 Setting Channels Automatically (AUTO SEARCH 31 7-2 Setting Channels Manually (MANUAL SEARCH 31 7-3 Removing Unwanted Channels (MANUAL SEARCH 32 8 ADVANCED SETTINGS 33 8-1 Setting the Sleep Timer 33 8-2 Blocking Channels 33 8-3 Setting a Password 34 8-4 Displaying Closed Caption Subtitles 35 8-5 Displaying the Serial Number 36 8-6 Resetting to Factory Settings 36 9 PROGRAMMING THE REMOTE CONTROL 37 9-1 Programming to Control Other Devices 37 9-2 Component Program Codes 37 TROUBLESHOOTING AND SUPPORT 45
7 Setting the Channel ...31 7-1 Setting Channels Automatically (AUTO SEARCH 31 7-2 Setting Channels Manually (MANUAL SEARCH 31 7-3 Removing Unwanted Channels (MANUAL SEARCH 32 8 ADVANCED SETTINGS 33 8-1 Setting the Sleep Timer 33 8-2 Blocking Channels 33 8-3 Setting a Password 34 8-4 Displaying Closed Caption Subtitles 35 8-5 Displaying the Serial Number 36 8-6 Resetting to Factory Settings 36 9 PROGRAMMING THE REMOTE CONTROL 37 9-1 Programming to Control Other Devices 37 9-2 Component Program Codes 37 TROUBLESHOOTING AND SUPPORT 45
User Manual (English)
Page 7
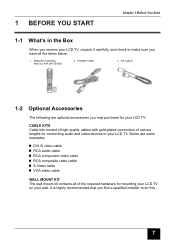
... RCA component video cable RCA composite video cable S-Video cable VGA video cable WALL MOUNT KIT The wall mount kit contains all the items below. 1 REMOTE CONTROL AND two AAA BATTERIES 2 POWER CORD 3 RF CABLE 1-2 Optional Accessories The following are optional accessories you may purchase for your LCD TV: CABLE KITS...
... RCA component video cable RCA composite video cable S-Video cable VGA video cable WALL MOUNT KIT The wall mount kit contains all the items below. 1 REMOTE CONTROL AND two AAA BATTERIES 2 POWER CORD 3 RF CABLE 1-2 Optional Accessories The following are optional accessories you may purchase for your LCD TV: CABLE KITS...

User Manual (English)
Page 8
...). WARNING! 8 If you match the + and - Press the POWER button on the front of the remote control and sliding it is ready to operate, replace the batteries with the Main Power switch instead of using... the LCD TV set for long periods of the power cord into the remote control. TO INSERT BATTERIES 1. Make sure that you will be away for an extended period of ...time, turn on the batteries with the base of your remote control. Connect the power cord to the power cord connector on your LCD TV or on the ...
...). WARNING! 8 If you match the + and - Press the POWER button on the front of the remote control and sliding it is ready to operate, replace the batteries with the Main Power switch instead of using... the LCD TV set for long periods of the power cord into the remote control. TO INSERT BATTERIES 1. Make sure that you will be away for an extended period of ...time, turn on the batteries with the base of your remote control. Connect the power cord to the power cord connector on your LCD TV or on the ...
User Manual (English)
Page 15
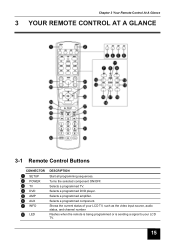
Selects a programmed amplifier. Turns the selected component ON/OFF. Selects a programmed DVD player. Chapter 3 Your Remote Control At A Glance 3 YOUR REMOTE CONTROL AT A GLANCE 3-1 Remote Control Buttons CONNECTOR SETUP POWER TV DVD AMP AUX INFO LED DESCRIPTION Start all programming sequences. Shows the current status of your LCD TV, such as the video input source, audio status, and channel number Flashes when the remote is being programmed or is sending a signal to your LCD TV. 15 15 Selects a programmed TV. Selects a programmed component.
Selects a programmed amplifier. Turns the selected component ON/OFF. Selects a programmed DVD player. Chapter 3 Your Remote Control At A Glance 3 YOUR REMOTE CONTROL AT A GLANCE 3-1 Remote Control Buttons CONNECTOR SETUP POWER TV DVD AMP AUX INFO LED DESCRIPTION Start all programming sequences. Shows the current status of your LCD TV, such as the video input source, audio status, and channel number Flashes when the remote is being programmed or is sending a signal to your LCD TV. 15 15 Selects a programmed TV. Selects a programmed component.
User Manual (English)
Page 16
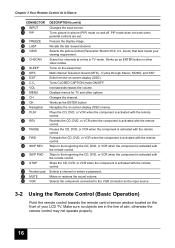
... Works as an ENTER button in the line of your viewing requirement. Stops the CD, DVD, or VCR when the component is activated with the remote control. Selects the picture format (Panoramic Stretch/16:9, 4:3, Zoom) that best meets your LCD TV. Multi channel Television Sound (MTS) - Displays menus... for TV and other video modes. Navigates the on the sleep timer. Exits from the on and off. Chapter 3 Your Remote Control At A Glance CONNECTOR INPUT PIP FREEZE LAST VIEW CHSCAN SLEEP MTS EXIT C.C. Turns picture-in TV mode. Recalls the last viewed channel. Scans...
... Works as an ENTER button in the line of your viewing requirement. Stops the CD, DVD, or VCR when the component is activated with the remote control. Selects the picture format (Panoramic Stretch/16:9, 4:3, Zoom) that best meets your LCD TV. Multi channel Television Sound (MTS) - Displays menus... for TV and other video modes. Navigates the on the sleep timer. Exits from the on and off. Chapter 3 Your Remote Control At A Glance CONNECTOR INPUT PIP FREEZE LAST VIEW CHSCAN SLEEP MTS EXIT C.C. Turns picture-in TV mode. Recalls the last viewed channel. Scans...

User Manual (English)
Page 23
... is ready to turn on the front turns green. 23 23 The Status LED on . 2. The Status LED on the front turns orange and your remote control. 5 GETTING STARTED Chapter 5 Getting Started 5-1 Plugging In Your LCD TV 1.
... is ready to turn on the front turns green. 23 23 The Status LED on . 2. The Status LED on the front turns orange and your remote control. 5 GETTING STARTED Chapter 5 Getting Started 5-1 Plugging In Your LCD TV 1.

User Manual (English)
Page 24
If you will be away for long periods of time, unplug your LCD TV with the Main Power switch instead of time, turn off your LCD TV from the wall outlet and disconnect the antenna or cable system. 24 For added protection during a lightning storm or when it is left unattended or unused for an extended period of using the remote control or front POWER button. Chapter 5 Getting Started WARNING!
If you will be away for long periods of time, unplug your LCD TV with the Main Power switch instead of time, turn off your LCD TV from the wall outlet and disconnect the antenna or cable system. 24 For added protection during a lightning storm or when it is left unattended or unused for an extended period of using the remote control or front POWER button. Chapter 5 Getting Started WARNING!

User Manual (English)
Page 25
To adjust volume from your LCD TV's front panel or by using the remote control. TO TEMPORARILY TURN OFF VOLUME (MUTE) Press the MUTE button on the remote control. TO ADJUST VOLUME FROM THE REMOTE Press the VOL buttons (see illustration for location) to increase/decrease the sound level. TO TURN VOLUME BACK ON Press the MUTE button again or press the VOL+ button. 25 25 6 ADJUSTING SETTINGS Chapter 6 Adjusting Settings 6-1 Basic Operations 6-1-1 ADJUSTING THE VOLUME You can adjust the volume in two ways - from the front panel: Press to turn up or turn down the volume.
To adjust volume from your LCD TV's front panel or by using the remote control. TO TEMPORARILY TURN OFF VOLUME (MUTE) Press the MUTE button on the remote control. TO ADJUST VOLUME FROM THE REMOTE Press the VOL buttons (see illustration for location) to increase/decrease the sound level. TO TURN VOLUME BACK ON Press the MUTE button again or press the VOL+ button. 25 25 6 ADJUSTING SETTINGS Chapter 6 Adjusting Settings 6-1 Basic Operations 6-1-1 ADJUSTING THE VOLUME You can adjust the volume in two ways - from the front panel: Press to turn up or turn down the volume.

User Manual (English)
Page 26
... twice to close the OSD. 6-3 OSD Menus and Options You can access the OSD from your LCD TV. 26 CH buttons (see illustration for your remote control. 1. With the power ON, press the TV button. 2. Press the Navigation (RIGHT/LEFT) buttons to adjust various settings for location). 6-2 Using...contrast, brightness, and other settings. Press OK on your LCD TV display or from either through the proper front display buttons or through the remote control. OSD menus may be different depending on the front panel to the previous menu option. - Press the MENU button to return to ...
... twice to close the OSD. 6-3 OSD Menus and Options You can access the OSD from your LCD TV. 26 CH buttons (see illustration for your remote control. 1. With the power ON, press the TV button. 2. Press the Navigation (RIGHT/LEFT) buttons to adjust various settings for location). 6-2 Using...contrast, brightness, and other settings. Press OK on your LCD TV display or from either through the proper front display buttons or through the remote control. OSD menus may be different depending on the front panel to the previous menu option. - Press the MENU button to return to ...

User Manual (English)
Page 27
Bass - Balance - NOTE: PIP is disabled when this option is accessible only from the remote control. Sharpness - Parental Controls - TV System - Brightness - Color - Adjusts the treble value to enhance the low frequency sounds. Turns captioning ON/ OFF and selects the ...
Bass - Balance - NOTE: PIP is disabled when this option is accessible only from the remote control. Sharpness - Parental Controls - TV System - Brightness - Color - Adjusts the treble value to enhance the low frequency sounds. Turns captioning ON/ OFF and selects the ...

User Manual (English)
Page 31
...) to open the OSD. 2. Press OK to Add Channel. 8. Press the Navigation (UP/DOWN) buttons to open the menu. 4. Press the MENU button on the remote control to the channel list. 7. Press the Navigation (UP/DOWN) buttons to start the auto scanning of channels. 6. Press OK to select the Setup menu.... 3. Select the channel to add to open the menu. 4. TO ADD CHANNELS AUTOMATICALLY 1. Press the MENU button on the remote control to select MANUAL SEARCH. 5. Press EXIT to open the OSD. 2. Press OK to close the OSD. 31 31
...) to open the OSD. 2. Press OK to Add Channel. 8. Press the Navigation (UP/DOWN) buttons to open the menu. 4. Press the MENU button on the remote control to the channel list. 7. Press the Navigation (UP/DOWN) buttons to start the auto scanning of channels. 6. Press OK to select the Setup menu.... 3. Select the channel to add to open the menu. 4. TO ADD CHANNELS AUTOMATICALLY 1. Press the MENU button on the remote control to select MANUAL SEARCH. 5. Press EXIT to open the OSD. 2. Press OK to close the OSD. 31 31

User Manual (English)
Page 32
Press the Navigation (LEFT) to select. 6. Press OK to open the menu. 4. Press OK to Erase Channel. 8. Press the Navigation (UP/DOWN) buttons to close the OSD. 32 Press EXIT to select MANUAL SEARCH. 5. Chapter 7 Setting the Channels 7-3 Removing Unwanted Channels (MANUAL SEARCH) TO REMOVE CHANNELS 1. Press the MENU button on the remote control to open the OSD. 2. Press the Navigation (UP/DOWN) buttons to delete from the channel list. 7. Select the channel you want to select the Setup menu. 3.
Press the Navigation (LEFT) to select. 6. Press OK to open the menu. 4. Press OK to Erase Channel. 8. Press the Navigation (UP/DOWN) buttons to close the OSD. 32 Press EXIT to select MANUAL SEARCH. 5. Chapter 7 Setting the Channels 7-3 Removing Unwanted Channels (MANUAL SEARCH) TO REMOVE CHANNELS 1. Press the MENU button on the remote control to open the OSD. 2. Press the Navigation (UP/DOWN) buttons to delete from the channel list. 7. Select the channel you want to select the Setup menu. 3.
User Manual (English)
Page 33
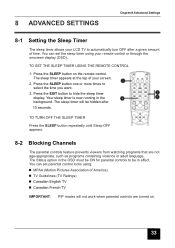
...33 33 Your sleep timer is now running in the OSD must be ON for parental controls to be hidden after a given amount of your remote control or through the onscreen display (OSD). You can set the sleep timer using : MPAA (Motion Pictures Association of America) TV Guidelines ... as programs containing violence or adult language. You can set parental control locks using your screen. 2. TO SET THE SLEEP TIMER USING THE REMOTE CONTROL 1. TO TURN OFF THE SLEEP TIMER Press the SLEEP button repeatedly until Sleep OFF appears. 8-2 Blocking Channels The parental controls feature prevents...
...33 33 Your sleep timer is now running in the OSD must be ON for parental controls to be hidden after a given amount of your remote control or through the onscreen display (OSD). You can set the sleep timer using : MPAA (Motion Pictures Association of America) TV Guidelines ... as programs containing violence or adult language. You can set parental control locks using your screen. 2. TO SET THE SLEEP TIMER USING THE REMOTE CONTROL 1. TO TURN OFF THE SLEEP TIMER Press the SLEEP button repeatedly until Sleep OFF appears. 8-2 Blocking Channels The parental controls feature prevents...

User Manual (English)
Page 34
...THE PARENTAL CONTROLS FOR MOVIES 1. Press the Navigation (UP/DOWN) buttons to the parental controls with a password. Press the MENU button on the remote control to open the menu. 4. Press EXIT when you are finished making changes to this option. 8-3 Setting a Password You control access to ...select the MPAA option. 8. Press the MENU button on the remote control to open the OSD. 2. Press the Navigation (UP/DOWN) buttons to select the Setup menu. 3. Press the Navigation (UP/DOWN) buttons ...
...THE PARENTAL CONTROLS FOR MOVIES 1. Press the Navigation (UP/DOWN) buttons to the parental controls with a password. Press the MENU button on the remote control to open the menu. 4. Press EXIT when you are finished making changes to this option. 8-3 Setting a Password You control access to ...select the MPAA option. 8. Press the MENU button on the remote control to open the OSD. 2. Press the Navigation (UP/DOWN) buttons to select the Setup menu. 3. Press the Navigation (UP/DOWN) buttons ...

User Manual (English)
Page 35
...-digit password when prompted. 10. NOTE: Not all programs are broadcast with Closed Captioning, refer to help the hearing-impaired, Closed Captioning (C.C.) displays on the remote control to open the submenu. 6. For a listing of TV programs. TO TURN ON CLOSED CAPTIONING 1. Press EXIT to close the OSD. Press OK to enter...
...-digit password when prompted. 10. NOTE: Not all programs are broadcast with Closed Captioning, refer to help the hearing-impaired, Closed Captioning (C.C.) displays on the remote control to open the submenu. 6. For a listing of TV programs. TO TURN ON CLOSED CAPTIONING 1. Press EXIT to close the OSD. Press OK to enter...

User Manual (English)
Page 36
... 1. Press the MENU button on screen. 5. Press the Navigation (UP/DOWN) buttons to select Factory Preset. 5. Press OK. 6. The serial number is displayed on the remote control to open the OSD. 2. Press EXIT to the default factory settings, follow these steps. 1. Press the Navigation (UP/DOWN) buttons to select the Options... Factory Settings To reset to close the OSD. 36 Press the Navigation (UP/DOWN) buttons to open the OSD. 2. Press the MENU button on the remote control to select the Options menu. 3. Press OK to open the menu. 4. Press OK to open the menu. 4.
... 1. Press the MENU button on screen. 5. Press the Navigation (UP/DOWN) buttons to select Factory Preset. 5. Press OK. 6. The serial number is displayed on the remote control to open the OSD. 2. Press EXIT to the default factory settings, follow these steps. 1. Press the Navigation (UP/DOWN) buttons to select the Options... Factory Settings To reset to close the OSD. 36 Press the Navigation (UP/DOWN) buttons to open the OSD. 2. Press the MENU button on the remote control to select the Options menu. 3. Press OK to open the menu. 4. Press OK to open the menu. 4.

User Manual (English)
Page 37
... try several of the codes for each brand before finding a code that works for the device and manufacturer. You can program the remote control to work with your device. 37 37 On the remote control, hold down the SETUP button and press the corresponding device button until you want to program the... remote to control. 2. Point the remote control at the device and press POWER. NOTE: Many devices have more than one that works with as seven other devices (VCR, DVD player, satellite, ...
... try several of the codes for each brand before finding a code that works for the device and manufacturer. You can program the remote control to work with your device. 37 37 On the remote control, hold down the SETUP button and press the corresponding device button until you want to program the... remote to control. 2. Point the remote control at the device and press POWER. NOTE: Many devices have more than one that works with as seven other devices (VCR, DVD player, satellite, ...

User Manual (English)
Page 38
Chapter 9 Programming the Remote Control VCR American high Admiral Adventura Aiko Aiwa Akai Amstrad Asha Audiovox Beaumark Bell & Howell Broksonic Calix Canon Capehart Carver CCE Cineral Citizen Colt Craig ...
Chapter 9 Programming the Remote Control VCR American high Admiral Adventura Aiko Aiwa Akai Amstrad Asha Audiovox Beaumark Bell & Howell Broksonic Calix Canon Capehart Carver CCE Cineral Citizen Colt Craig ...

User Manual (English)
Page 44
Chapter 9 Programming the Remote Control Technics Victor Wards Yamaha 186 189 172 177,178 HOME AUTOMATION GE 197 Lite Touch 196 Radio Shack 197 TAPE Carver 200 Denon 198 ...
Chapter 9 Programming the Remote Control Technics Victor Wards Yamaha 186 189 172 177,178 HOME AUTOMATION GE 197 Lite Touch 196 Radio Shack 197 TAPE Carver 200 Denon 198 ...


