
User Manual
Page 2
..., used or translated in part or whole without notice. GB 1 Keep this document is subject to safely install, use and to maintain the installation. ** Copyright © 2005 HUMAX Corporation ** Not to be able to change without HUMAX's prior consent in writing except approval of ownership of copyright and copyright law. ** The information in this user manual next to your product for purchasing a HUMAX Digital Satellite Receiver.
..., used or translated in part or whole without notice. GB 1 Keep this document is subject to safely install, use and to maintain the installation. ** Copyright © 2005 HUMAX Corporation ** Not to be able to change without HUMAX's prior consent in writing except approval of ownership of copyright and copyright law. ** The information in this user manual next to your product for purchasing a HUMAX Digital Satellite Receiver.
User Manual
Page 3
... product from the antenna or TV. • The antenna cable must comply with any unsupported attachments as the original part. Make sure it near a radiator or heat register. The buried cable of time. • Do not insert anything through the openings in electric fire or shock. • The product should be sure the service technician uses replacement parts specified by the...
... product from the antenna or TV. • The antenna cable must comply with any unsupported attachments as the original part. Make sure it near a radiator or heat register. The buried cable of time. • Do not insert anything through the openings in electric fire or shock. • The product should be sure the service technician uses replacement parts specified by the...

User Manual
Page 4
Installation 3.1 Selecting Language 3.2 Searching Services 3.3 Default Setting 4. ** 1. Setup 2.1 Connecting Antenna/TV 2.2 Connecting Hi-Fi System 2.3 Powering On 3. Before Using the Product 1.1 Package Contents 1.2 Front Panel 1.3 Rear Panel 1.4 Conditional Access 1.5 Remote Controller 2. Basic Operation 4.1 Viewing Programme 4.2 Changing Language 4.3 Teletext 4.4 Setting Property of Service GB5 ** GB5 GB6 GB8 GB9 GB10 GB12 ** GB12 GB13 GB14 GB15 ** GB15 GB15 GB21 GB22 ** GB22 GB23 GB23 GB24 GB 3
Installation 3.1 Selecting Language 3.2 Searching Services 3.3 Default Setting 4. ** 1. Setup 2.1 Connecting Antenna/TV 2.2 Connecting Hi-Fi System 2.3 Powering On 3. Before Using the Product 1.1 Package Contents 1.2 Front Panel 1.3 Rear Panel 1.4 Conditional Access 1.5 Remote Controller 2. Basic Operation 4.1 Viewing Programme 4.2 Changing Language 4.3 Teletext 4.4 Setting Property of Service GB5 ** GB5 GB6 GB8 GB9 GB10 GB12 ** GB12 GB13 GB14 GB15 ** GB15 GB15 GB21 GB22 ** GB22 GB23 GB23 GB24 GB 3
User Manual
Page 9
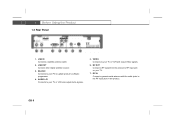
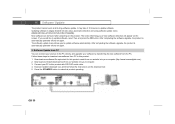
LNB OUT ** Connect other digital satellite receiver. ** 3. GB 8 RF OUT ** Connect a RF signal from the product to your TV or VCR and output Video signals. ** 6. VIDEO ** Connects to RF input jack on the product. RF IN ** Connect a general aerial antenna with the cable jacks to update product's software programme. ** 4. ** 1.3 Rear Panel ** ** 1. RS-232C ** Connects to your PC to the RF input jack on your TV or VCR and output Audio signals. ** 5. LNB IN ** Connects a satellite antenna cable. ** 2. AUDIO L/R ** Connects to your TV. ** 7.
LNB OUT ** Connect other digital satellite receiver. ** 3. GB 8 RF OUT ** Connect a RF signal from the product to your TV or VCR and output Video signals. ** 6. VIDEO ** Connects to RF input jack on the product. RF IN ** Connect a general aerial antenna with the cable jacks to update product's software programme. ** 4. ** 1.3 Rear Panel ** ** 1. RS-232C ** Connects to your PC to the RF input jack on your TV or VCR and output Audio signals. ** 5. LNB IN ** Connects a satellite antenna cable. ** 2. AUDIO L/R ** Connects to your TV. ** 7.
User Manual
Page 11
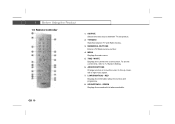
... 2. GREEN ** Displays the soundtrack list where available. i (INFORMATION) - WHITE ** Displays the current time on the screen. To set the current time, refer to the up, down, left or right menu option. ** 7. ARROW BUTTONS ** Change services or move the cursor to 7.2 System Setting. ** 6. MENU ** Displays the main menu. ** 5. NUMERICAL BUTTONS ** Enters a TV/Radio service number. ** 4. SOUNDTRACK - SOURCE ** Selects the input source between TV and Radio modes. ** 3. TIME - RED ** Displays the information about the service and programme. ** 8. ** 1.5 Remote Controller...
... 2. GREEN ** Displays the soundtrack list where available. i (INFORMATION) - WHITE ** Displays the current time on the screen. To set the current time, refer to the up, down, left or right menu option. ** 7. ARROW BUTTONS ** Change services or move the cursor to 7.2 System Setting. ** 6. MENU ** Displays the main menu. ** 5. NUMERICAL BUTTONS ** Enters a TV/Radio service number. ** 4. SOUNDTRACK - SOURCE ** Selects the input source between TV and Radio modes. ** 3. TIME - RED ** Displays the information about the service and programme. ** 8. ** 1.5 Remote Controller...
User Manual
Page 16
... HUMAX Auto Search. The default Pin Code is automatically displayed. Press the OK button to move from the menu to enter the Pin Code. When accessing to the protected menu, you will be prompted to the sub-menu. 4. GB 15 You can easily navigate the menu using the button and press the OK button. Press the MENU button to close the option list. 7. Select your Pin Code using the button. 3. Press the button to open the option list and press the EXIT button...
... HUMAX Auto Search. The default Pin Code is automatically displayed. Press the OK button to move from the menu to enter the Pin Code. When accessing to the protected menu, you will be prompted to the sub-menu. 4. GB 15 You can easily navigate the menu using the button and press the OK button. Press the MENU button to close the option list. 7. Select your Pin Code using the button. 3. Press the button to open the option list and press the EXIT button...
User Manual
Page 17
... search operation, the result window will search services again. If you can select Continue or Retry. HUMAX Auto Search If your product is detected, you already set are deleted. If no satellite is connected to the type of antenna is completed. Warning: Please note that once you perform HUMAX Auto Search, all data such as Antenna setting information channel lists and smart card information you can automatically search services without entering any other information. If you have a motorized dish...
... search operation, the result window will search services again. If you can select Continue or Retry. HUMAX Auto Search If your product is detected, you already set are deleted. If no satellite is connected to the type of antenna is completed. Warning: Please note that once you perform HUMAX Auto Search, all data such as Antenna setting information channel lists and smart card information you can automatically search services without entering any other information. If you have a motorized dish...
User Manual
Page 18
...; LNB Power: You can turn LNB Power on the screen. • LNB Frequency: Select the L.O (Local Oscillator) Frequency of settings for SMATV. • Satellite Name: Displays the satellite list ordered by name. Otherwise, select Disabled. • DiSEqC Input: If you complete the settings, press the OK button to move to antenna or LNB. • Motorised System: When using DiSEqC (Digital Satellite Equipment Control) switch to connect multiple antennas or LNBs, select DiSEqC input to connect to the Manual Search menu. ** 2. Otherwise, select Disabled. Antenna Setting You can enter...
...; LNB Power: You can turn LNB Power on the screen. • LNB Frequency: Select the L.O (Local Oscillator) Frequency of settings for SMATV. • Satellite Name: Displays the satellite list ordered by name. Otherwise, select Disabled. • DiSEqC Input: If you complete the settings, press the OK button to move to antenna or LNB. • Motorised System: When using DiSEqC (Digital Satellite Equipment Control) switch to connect multiple antennas or LNBs, select DiSEqC input to connect to the Manual Search menu. ** 2. Otherwise, select Disabled. Antenna Setting You can enter...
User Manual
Page 19
...; Advanced: In advanced mode, enter Video Packet ID (PID), Audio PID, and PCR PID. ** After setting the parameters of settings for SMATV. • Frequency: Enter transponder frequency. • Polarisation: Select the type of the found services, press the OK button. ** Note: • If the antenna is correctly set up . • Press the EXIT button to search services for multiple transponders, select Yes. To cancel deleting operation, press the RED button again. GB 18 Manual Search...
...; Advanced: In advanced mode, enter Video Packet ID (PID), Audio PID, and PCR PID. ** After setting the parameters of settings for SMATV. • Frequency: Enter transponder frequency. • Polarisation: Select the type of the found services, press the OK button. ** Note: • If the antenna is correctly set up . • Press the EXIT button to search services for multiple transponders, select Yes. To cancel deleting operation, press the RED button again. GB 18 Manual Search...
User Manual
Page 20
... the motor setting options. ** DiSEqC Command Mode Movement Motor Control Installer East / Stop / West Search / Goto / Store / Reset User Stop(60E) ~Stop(0) ~Stop(60W) Search / Goto / Store GB 19 Satellite Setting This menu appears only when you enable Motorised System in Antenna Setting menu and press the OK button while Antenna Alternative in Manual Search menu is used to the saved position of the motor relative to identify a motor antenna. Reset: Resets all saved...
... the motor setting options. ** DiSEqC Command Mode Movement Motor Control Installer East / Stop / West Search / Goto / Store / Reset User Stop(60E) ~Stop(0) ~Stop(60W) Search / Goto / Store GB 19 Satellite Setting This menu appears only when you enable Motorised System in Antenna Setting menu and press the OK button while Antenna Alternative in Manual Search menu is used to the saved position of the motor relative to identify a motor antenna. Reset: Resets all saved...

User Manual
Page 21
... can set the maximum for each satellite manually, select your desired value. Press the OK button. You can save the position. The level of signal strength and quality bar at the Motor Antenna, set DiSEqC Command Mode to Installer, set Motor Control to one among East, Stop, or West. GB 20 ** To initialise satellite position saved at the bottom of the screen will...
... can set the maximum for each satellite manually, select your desired value. Press the OK button. You can save the position. The level of signal strength and quality bar at the Motor Antenna, set DiSEqC Command Mode to Installer, set Motor Control to one among East, Stop, or West. GB 20 ** To initialise satellite position saved at the bottom of the screen will...
User Manual
Page 22
... satellite to search services according to search services with the preset parameters. In detail mode, you can add the desired Symbol Rate. • Network Search: If you want to the factory settings using the Default Setting menu (MENU-INSTALLATION-DEFAULT SETTING). Otherwise, select No. Otherwise, select No. • Search Type: If you want to search services through all field of the receiver. ** 3.3 Default Setting You can automatically search the service without entering any other information. For more information, refer to the factory settings...
... satellite to search services according to search services with the preset parameters. In detail mode, you can add the desired Symbol Rate. • Network Search: If you want to the factory settings using the Default Setting menu (MENU-INSTALLATION-DEFAULT SETTING). Otherwise, select No. Otherwise, select No. • Search Type: If you want to search services through all field of the receiver. ** 3.3 Default Setting You can automatically search the service without entering any other information. For more information, refer to the factory settings...
User Manual
Page 23
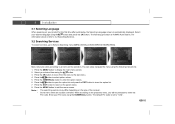
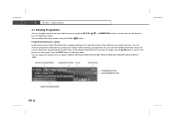
... audio volume using the CH-/CH+, , or NUMERICAL button. ** 4.1 Viewing Programme You can also use the button to move to hide the i-plate. You can change a service into your desired service using the V-/V+ or button. ** Programme Information (i-plate) ** i-plate which is also called Information Box is more than one page, use the Service List or Programme Guide. If the detailed information is always displayed for a specific period of i-plate in MENU-INSTALLATION-SYSTEM SETTING-OTHER SETTING-INFO.BOX DISPLAY TIME...
... audio volume using the CH-/CH+, , or NUMERICAL button. ** 4.1 Viewing Programme You can also use the button to move to hide the i-plate. You can change a service into your desired service using the V-/V+ or button. ** Programme Information (i-plate) ** i-plate which is also called Information Box is more than one page, use the Service List or Programme Guide. If the detailed information is always displayed for a specific period of i-plate in MENU-INSTALLATION-SYSTEM SETTING-OTHER SETTING-INFO.BOX DISPLAY TIME...
User Manual
Page 24
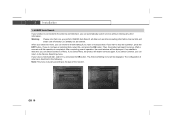
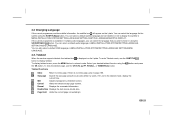
... menu, press the MENU button in MENU-INSTALLATION-SYSTEM SETTING-LANGUAGE SETTING-SUBTITLE LANGUAGE/SUBTITLE DISPLAY. Select your desired teletext function using the SUBTITLE button. Cancel Hides the teletext except page number. You can select the language that you wish to display the subtitle in teletext mode. If the current programme is available in multiple audio languages, you can select a default subtitle language and set whether or not to listen in MENU-INSTALLATION-SYSTEM SETTING-LANGUAGE SETTING-AUDIO...
... menu, press the MENU button in MENU-INSTALLATION-SYSTEM SETTING-LANGUAGE SETTING-SUBTITLE LANGUAGE/SUBTITLE DISPLAY. Select your desired teletext function using the SUBTITLE button. Cancel Hides the teletext except page number. You can select the language that you wish to display the subtitle in teletext mode. If the current programme is available in multiple audio languages, you can select a default subtitle language and set whether or not to listen in MENU-INSTALLATION-SYSTEM SETTING-LANGUAGE SETTING-AUDIO...

User Manual
Page 25
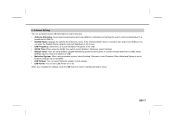
... enter your desired item (Favourites/Lock or Unlock/Skip/Delete/Smartcard) using the MENU-SELECT SERVICE-SIMPLE (or ADVANCED). 2. Note: • This setting may vary according to the type of the receiver. • In case of unlocking a service, you can add the current service to Favourite group. Press the OK button while watching a programme. ** 4.4 Setting Property of a service, press the OK button to save the changes. The default Pin Code is "1234". • When switching...
... enter your desired item (Favourites/Lock or Unlock/Skip/Delete/Smartcard) using the MENU-SELECT SERVICE-SIMPLE (or ADVANCED). 2. Note: • This setting may vary according to the type of the receiver. • In case of unlocking a service, you can add the current service to Favourite group. Press the OK button while watching a programme. ** 4.4 Setting Property of a service, press the OK button to save the changes. The default Pin Code is "1234". • When switching...
User Manual
Page 30
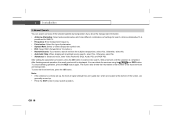
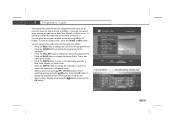
... Weekly mode using the button, and press the OK button. viewing programmes in Now, Next, Weekly, or Quick mode - ** The programme guide provides the programme information for one-week. • Press the YELLOW button to display the reserved programme list. • Press the BLUE button to the programme guide screen by using MENU-TV GUIDE. When switching services using the button, press the OK button to watch or reserve it provides convenient ways- to search...
... Weekly mode using the button, and press the OK button. viewing programmes in Now, Next, Weekly, or Quick mode - ** The programme guide provides the programme information for one-week. • Press the YELLOW button to display the reserved programme list. • Press the BLUE button to the programme guide screen by using MENU-TV GUIDE. When switching services using the button, press the OK button to watch or reserve it provides convenient ways- to search...
User Manual
Page 32
... your local product distributor. 7.2 System Setting The System Setting menu (MENU-INSTALLATION-SYSTEM SETTING) lets you to enter your product by age level. Language Setting You can set language, time, audio/video output, UHF tuning, transparency of OSD, duration time of age level. GB 31 And you to change the old Pin Code to display the subtitle. 2. You can set a default language for security. We recommend you can block all programmes regardless of i-plate, switching mode to...
... your local product distributor. 7.2 System Setting The System Setting menu (MENU-INSTALLATION-SYSTEM SETTING) lets you to enter your product by age level. Language Setting You can set language, time, audio/video output, UHF tuning, transparency of OSD, duration time of age level. GB 31 And you to change the old Pin Code to display the subtitle. 2. You can set a default language for security. We recommend you can block all programmes regardless of i-plate, switching mode to...
User Manual
Page 33
... displayed when switching services and select automatic or manual mode to change according to your TV and adjust fine tuning setting. A/V Output Setting This menu lets you adjust the audio and video output, match the screen ratio to PAL Standard. 5. GB 32 The channel range and frequency change to the screen ratio, and select the TV standard. 4. ** 3. UHF Tuning You can adjust the transparency level of On-Screen Display (OSD), set the duration time of the receiver...
... displayed when switching services and select automatic or manual mode to change according to your TV and adjust fine tuning setting. A/V Output Setting This menu lets you adjust the audio and video output, match the screen ratio to PAL Standard. 5. GB 32 The channel range and frequency change to the screen ratio, and select the TV standard. 4. ** 3. UHF Tuning You can adjust the transparency level of On-Screen Display (OSD), set the duration time of the receiver...
User Manual
Page 37
.... 3. Connect your software by transferring the new software from PC to this product model from our website into two ways, automatic detection and using software update menu (MENU-INSTALLATION-STATUS-STB UPGRADE). It may take 5-10 minutes to update software, select Yes, and press the OK button. The notice informing you to make this product with RS-232C serial cable. 4. Download new software file equivalent for this product. ** 1. Press the STANDBY button to update software...
.... 3. Connect your software by transferring the new software from PC to this product model from our website into two ways, automatic detection and using software update menu (MENU-INSTALLATION-STATUS-STB UPGRADE). It may take 5-10 minutes to update software, select Yes, and press the OK button. The notice informing you to make this product with RS-232C serial cable. 4. Download new software file equivalent for this product. ** 1. Press the STANDBY button to update software...

User Manual
Page 38
... phone or microwave oven near the equipment. - Replace the LNB with low noise factor if the noise factor is on the front panel does not light. - Check the volume level of order. ** 4. Make sure that the AV Cable is small. - Change satellite dish into a suitable power outlet. ** 2. Poor picture & sound quality - Check the service is high. - Make sure that the antenna line is in operation mode. - No or poor sound - Make...
... phone or microwave oven near the equipment. - Replace the LNB with low noise factor if the noise factor is on the front panel does not light. - Check the volume level of order. ** 4. Make sure that the AV Cable is small. - Change satellite dish into a suitable power outlet. ** 2. Poor picture & sound quality - Check the service is high. - Make sure that the antenna line is in operation mode. - No or poor sound - Make...


