
User Manual
Page 5
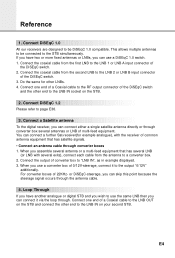
... LNB B input connector of multi-feed equipment. Connect one end of a Coaxial cable to be DiSEqC 1.0 compatible. E4 This allows multiple antennas to the RF output connector of the DiSEqC switch. 2. or DiSEqC-steerage, you can skip this point because the steerage signal occurs through converter box several exits), connect each cable from the antenna to the STB simultaneously. Connect a Satellite antenna To the digital receiver, you can connect either a single satellite antenna directly...
... LNB B input connector of multi-feed equipment. Connect one end of a Coaxial cable to be DiSEqC 1.0 compatible. E4 This allows multiple antennas to the RF output connector of the DiSEqC switch. 2. or DiSEqC-steerage, you can skip this point because the steerage signal occurs through converter box several exits), connect each cable from the antenna to the STB simultaneously. Connect a Satellite antenna To the digital receiver, you can connect either a single satellite antenna directly...
User Manual
Page 6
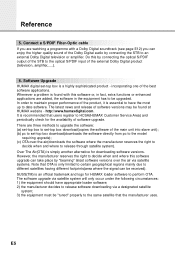
... have the most up to release through satellite system). Software Upgrade HUMAX digital set -top box download(downloads the software directly from pc to the model requiring upgrade); (c) OTA over the air via satellite systems. Note that the manufacturer uses. Do this software or, in fact, extra functions or enhanced applications are three methods to upgrade the software: (a) set-top box to set-top box download(copies the software of the main unit into slave unit...
... have the most up to release through satellite system). Software Upgrade HUMAX digital set -top box download(downloads the software directly from pc to the model requiring upgrade); (c) OTA over the air via satellite systems. Note that the manufacturer uses. Do this software or, in fact, extra functions or enhanced applications are three methods to upgrade the software: (a) set-top box to set-top box download(copies the software of the main unit into slave unit...
User Manual
Page 7
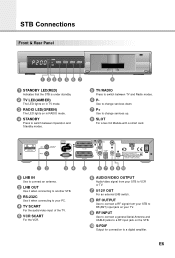
.... 5 VCR SCART For the VCR. 6 AUDIO/VIDEO OUTPUT Audio/video signal from your STB to VCR or TV. 7 0/12V OUT For an external LNB switch. 8 RF OUTPUT Use to connect a RF signal from your STB to RF(ANT) input jack on your TV. 9 RF INPUT Use to connect a general Aerial Antenna and CABLE jacks to a RF input jack on in RADIO mode. 4 STANDBY Press to switch between Operation and Standby modes. 5 TV/RADIO Press to a digital amplifier. E6 STB Connections Front & Rear Panel 1 STANDBY...
.... 5 VCR SCART For the VCR. 6 AUDIO/VIDEO OUTPUT Audio/video signal from your STB to VCR or TV. 7 0/12V OUT For an external LNB switch. 8 RF OUTPUT Use to connect a RF signal from your STB to RF(ANT) input jack on your TV. 9 RF INPUT Use to connect a general Aerial Antenna and CABLE jacks to a RF input jack on in RADIO mode. 4 STANDBY Press to switch between Operation and Standby modes. 5 TV/RADIO Press to a digital amplifier. E6 STB Connections Front & Rear Panel 1 STANDBY...
User Manual
Page 11
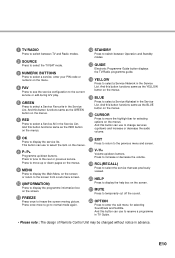
... the TV/SAT mode. 3 NUMERIC BUTTONS Press to select a service, enter your PIN code or numeric on the menu. 4 FAV Press to see the service configuration to the current service or edit during A/V play. 5 GREEN Press to move the highlight bar for selecting Soundtrack and Subtitle. And this button can use to change services (up or down pages on the menus. 9 MENU Press to display the Main Menu on the screen or...
... the TV/SAT mode. 3 NUMERIC BUTTONS Press to select a service, enter your PIN code or numeric on the menu. 4 FAV Press to see the service configuration to the current service or edit during A/V play. 5 GREEN Press to move the highlight bar for selecting Soundtrack and Subtitle. And this button can use to change services (up or down pages on the menus. 9 MENU Press to display the Main Menu on the screen or...

User Manual
Page 12
... window shows the current Network information, including: Satellite Name, Frequency, Polarisation, Symbol Rate, FEC... To select the previous viewed Service, press the RECALL( ) button. The detailed information for the event can be displayed by pressing the HELP( )button in the I-Plate, the Help window will appear on the screen. Guide of Functions E11 Information Box(I-Plate) The details of service part and event part are automatically displayed on the remote control unit. 2. button : Use...
... window shows the current Network information, including: Satellite Name, Frequency, Polarisation, Symbol Rate, FEC... To select the previous viewed Service, press the RECALL( ) button. The detailed information for the event can be displayed by pressing the HELP( )button in the I-Plate, the Help window will appear on the screen. Guide of Functions E11 Information Box(I-Plate) The details of service part and event part are automatically displayed on the remote control unit. 2. button : Use...

User Manual
Page 13
... the buttons or buttons. buttons : Use to cancel the Subtitle mode. lf the returned audio language is displayed on the I-plate. Press the EXIT button to select the audio on -screen menu is switched, the audio language returns to left , right or both. 2. To change the Subtitle language: 1. By selecting such a soundtrack the Dolby Digital audio will disappear keeping the selected Soundtrack language constant. This can see the current Subtitle language list. Press...
... the buttons or buttons. buttons : Use to cancel the Subtitle mode. lf the returned audio language is displayed on the I-plate. Press the EXIT button to select the audio on -screen menu is switched, the audio language returns to left , right or both. 2. To change the Subtitle language: 1. By selecting such a soundtrack the Dolby Digital audio will disappear keeping the selected Soundtrack language constant. This can see the current Subtitle language list. Press...

User Manual
Page 14
... Guide(EPG) to have the information of hardware and software versions and signals from your STB. 5. E13 Guide of these programme details will instruct you can be viewed in the EPG(the availability and amount of Functions 1. Utility This menu provides Calendar and Biorhythm. The TV Guide supplies information such as programme listings and start and end times for all the possible viewing options. Parental Control Access to assign a PIN code(Later on -screen menu...
... Guide(EPG) to have the information of hardware and software versions and signals from your STB. 5. E13 Guide of these programme details will instruct you can be viewed in the EPG(the availability and amount of Functions 1. Utility This menu provides Calendar and Biorhythm. The TV Guide supplies information such as programme listings and start and end times for all the possible viewing options. Parental Control Access to assign a PIN code(Later on -screen menu...

User Manual
Page 19
... screen. ** The default PIN code is wrong, the message "PIN code mismatch" will be displayed on the display window. (If any problem occurs when entering a PIN code, you cannot switch to unlock or lock programmes. 4. To change your PIN code: • Select the highlighted Old PIN code using the buttons and then enter your Old PIN code. • Enter a New PIN code in the highlighted New PIN code using the buttons. • To verify the New PIN code, re-enter a New PIN code in this mode. 1. When the OK button is pressed at this menu.) E18 Set the parental...
... screen. ** The default PIN code is wrong, the message "PIN code mismatch" will be displayed on the display window. (If any problem occurs when entering a PIN code, you cannot switch to unlock or lock programmes. 4. To change your PIN code: • Select the highlighted Old PIN code using the buttons and then enter your Old PIN code. • Enter a New PIN code in the highlighted New PIN code using the buttons. • To verify the New PIN code, re-enter a New PIN code in this mode. 1. When the OK button is pressed at this menu.) E18 Set the parental...
User Manual
Page 20
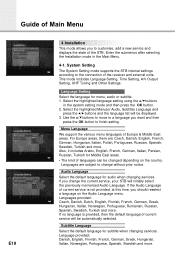
Guide of Main Menu E19 4 Installation This mode allows you to customise, add a new service and displays the state of current service will be automatically selected. Use the buttons to move to change the current service, your STB will be changed depending on the Audio Language menu. For Europe areas, there are subject to a language you change without prior notice. Enter the submenus after selecting the Installation mode in the system setting mode and...
Guide of Main Menu E19 4 Installation This mode allows you to customise, add a new service and displays the state of current service will be automatically selected. Use the buttons to move to change the current service, your STB will be changed depending on the Audio Language menu. For Europe areas, there are subject to a language you change without prior notice. Enter the submenus after selecting the Installation mode in the system setting mode and...

User Manual
Page 21
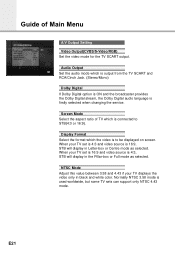
... timer programming. The Timer determines the on . Wakeup Time Select the time when STB is turned on /off . Sleep Time Depending on the remote control unit to select the type of current service area. Press the OK button at the stream of Timer like 1, 2.......8 and Disabled. Use the TV/RADIO button on Time Setting, select the time when STB is connected, recording can be shown. Timer You can be used for VCR recording. Service...
... timer programming. The Timer determines the on . Wakeup Time Select the time when STB is turned on /off . Sleep Time Depending on the remote control unit to select the type of current service area. Press the OK button at the stream of Timer like 1, 2.......8 and Disabled. Use the TV/RADIO button on Time Setting, select the time when STB is connected, recording can be shown. Timer You can be used for VCR recording. Service...
User Manual
Page 22
... Jack. (Stereo/Mono) Dolby Digital lf Dolby Digital option is ON and the broadcaster provides the Dolby Digital stream, the Dolby Digital audio language is 4:3, STB will display in black and white color. When your TV displays the video only in Letter-box or Centre mode as selected. Screen Mode Select the aspect ratio of Main Menu A/V Output Setting Video Output(CVBS/S-Video/RGB) Set the video mode for the TV SCART output. NTSC Mode Adjust this value between...
... Jack. (Stereo/Mono) Dolby Digital lf Dolby Digital option is ON and the broadcaster provides the Dolby Digital stream, the Dolby Digital audio language is 4:3, STB will display in black and white color. When your TV displays the video only in Letter-box or Centre mode as selected. Screen Mode Select the aspect ratio of Main Menu A/V Output Setting Video Output(CVBS/S-Video/RGB) Set the video mode for the TV SCART output. NTSC Mode Adjust this value between...
User Manual
Page 25
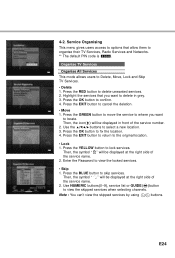
... view the locked services. • Skip 1. Enter the Password to the original location. • Lock 1. Note : You can't view the skipped services by using buttons. Press the OK button to select a new location. 3. Press the GREEN button to move the service to where you want to organise their TV Services, Radio Services and Networks. ** The default PIN code is 0 0 0 0 . Use the buttons to confirm. 4. Press the BLUE button to view the skipped services when selecting channels. Use NUMERIC buttons(0~9), service list or GUIDE( )button to skip services...
... view the locked services. • Skip 1. Enter the Password to the original location. • Lock 1. Note : You can't view the skipped services by using buttons. Press the OK button to select a new location. 3. Press the GREEN button to move the service to where you want to organise their TV Services, Radio Services and Networks. ** The default PIN code is 0 0 0 0 . Use the buttons to confirm. 4. Press the BLUE button to view the skipped services when selecting channels. Use NUMERIC buttons(0~9), service list or GUIDE( )button to skip services...
User Manual
Page 28
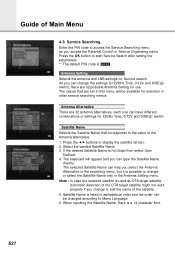
... the Antenna Setting menu. Antenna Setting Selects the antenna and LNB settings for selection in this menu will appear and you can type the Satellite Name directly. Satellite Name Selects the Satellite Name that are 32 possible Antenna Setting for use. Satellite Name is used as you change the settings for 22KHz Tone, 0/12V and DiSEqC switch, there are set in other service searching menus. Service Searching Enter the PIN code to the value of the satellite. 5. As you can change or...
... the Antenna Setting menu. Antenna Setting Selects the antenna and LNB settings for selection in this menu will appear and you can type the Satellite Name directly. Satellite Name Selects the Satellite Name that are 32 possible Antenna Setting for use. Satellite Name is used as you change the settings for 22KHz Tone, 0/12V and DiSEqC switch, there are set in other service searching menus. Service Searching Enter the PIN code to the value of the satellite. 5. As you can change or...

User Manual
Page 29
... Disabled, Tone Burst A to B and DiSEqC A to the option and position of STB. After setting the above mentioned value, press the OK button to move to select the LNB frequency(Universal, 5150, 9750, 10600, 10750, 11475MHz or 0, 1, ......., 9). 3. DiSEqC Input According to D. If you use this system, please refer to 0/12V, select what LNB and antenna are supported at the same time. LNB Frequency 1. Use the buttons to the Manual Search menu...
... Disabled, Tone Burst A to B and DiSEqC A to the option and position of STB. After setting the above mentioned value, press the OK button to move to select the LNB frequency(Universal, 5150, 9750, 10600, 10750, 11475MHz or 0, 1, ......., 9). 3. DiSEqC Input According to D. If you use this system, please refer to 0/12V, select what LNB and antenna are supported at the same time. LNB Frequency 1. Use the buttons to the Manual Search menu...
User Manual
Page 31
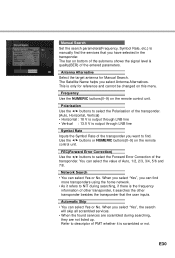
... cannot be changed on the remote control unit. You can find . FEC(Forward Error Correction) Use the buttons to find more transponders using the home network. • As it searches the other transponder, it refers to manually find the services that the user inputs. E30 The bar on the remote control unit. When you select Antenna Alternatives. Use the buttons or NUMERIC buttons(0~9) on bottom of the submenu shows the signal level...
... cannot be changed on the remote control unit. You can find . FEC(Forward Error Correction) Use the buttons to find more transponders using the home network. • As it searches the other transponder, it refers to manually find the services that the user inputs. E30 The bar on the remote control unit. When you select Antenna Alternatives. Use the buttons or NUMERIC buttons(0~9) on bottom of the submenu shows the signal level...
User Manual
Page 32
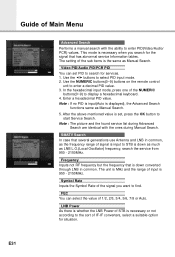
... buttons(0~9) to enter PID(Video/Audio/ PCR) values. The unit is MHz and the range of input is set PID to start Service Search. Symbol Rate Inputs the Symbol Rate of the signal you search for situation. FEC You can set , press the OK button to search for services. 1. The setting of the sub items is displayed), the Advanced Search functions same as LNB L.O.(Local Oscillator) frequency, search the service from 950 - 2150MHz. Guide of Main Menu Advanced Search Performs a manual search...
... buttons(0~9) to enter PID(Video/Audio/ PCR) values. The unit is MHz and the range of input is set PID to start Service Search. Symbol Rate Inputs the Symbol Rate of the signal you search for situation. FEC You can set , press the OK button to search for services. 1. The setting of the sub items is displayed), the Advanced Search functions same as LNB L.O.(Local Oscillator) frequency, search the service from 950 - 2150MHz. Guide of Main Menu Advanced Search Performs a manual search...
User Manual
Page 37
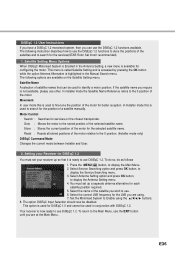
... name of the selected satellite name. Motor Control Search : Searches for the LNB you can be used for each satellite position required. 5. Setting your receiver up a separate antenna alternative for DiSEqC 1.0 and cannot be disabled. Select Service Searching option and press OK button, to display the Main Menu. 2. The following options are at the Main Menu. Satellite Setting Menu Options When DiSEqC Motorised System is Enabled in the Manual Search menu. In installer mode the Satellite Name Reference refers...
... name of the selected satellite name. Motor Control Search : Searches for the LNB you can be used for each satellite position required. 5. Setting your receiver up a separate antenna alternative for DiSEqC 1.0 and cannot be disabled. Select Service Searching option and press OK button, to display the Main Menu. 2. The following options are at the Main Menu. Satellite Setting Menu Options When DiSEqC Motorised System is Enabled in the Manual Search menu. In installer mode the Satellite Name Reference refers...
User Manual
Page 38
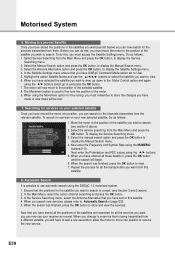
... there are situated. (Please consult the user manual for the various satellites(see the Manual Search menu. 3. Highlight the Motor Control option and use DiSEqC 1.2 and sets the positions of the dish. 1. If you wish to use the buttons to change the value to Installer and press the OK button. 6. On the Main menu, select Service Searching option and press the OK button. Press the RED button to reset and press the OK...
... there are situated. (Please consult the user manual for the various satellites(see the Manual Search menu. 3. Highlight the Motor Control option and use DiSEqC 1.2 and sets the positions of the dish. 1. If you wish to use the buttons to change the value to Installer and press the OK button. 6. On the Main menu, select Service Searching option and press the OK button. Press the RED button to reset and press the OK...
User Manual
Page 39
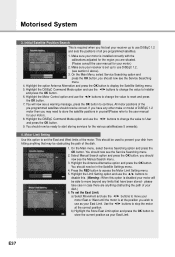
... button, to display the Satellite Settings menu. 5. Select the Antenna Alternative option and press the OK button, to display the Manual Search menu. If there are using the buttons change this satellite. 3. The position of the satellite should be unique to this , you want . 10. Highlight the option Satellite name and use the buttons to select the satellite you want to find, use others if the name of the satellite you must choose another frequency...
... button, to display the Satellite Settings menu. 5. Select the Antenna Alternative option and press the OK button, to display the Manual Search menu. If there are using the buttons change this satellite. 3. The position of the satellite should be unique to this , you want . 10. Highlight the option Satellite name and use the buttons to select the satellite you want to find, use others if the name of the satellite you must choose another frequency...
User Manual
Page 40
... Command Mode option set to a pre-set for fine-tuning, you have moved the motor into position to use your receiver as normal. Do as follows; 1. Before you can do this , you can search for services on your new selected satellite, Do as follows ; 1. When the search has finished, press the OK button to search. Select the Manual Search option and press the OK button, to display the Manual Search menu. 4. To search...
... Command Mode option set to a pre-set for fine-tuning, you have moved the motor into position to use your receiver as normal. Do as follows; 1. Before you can do this , you can search for services on your new selected satellite, Do as follows ; 1. When the search has finished, press the OK button to search. Select the Manual Search option and press the OK button, to display the Manual Search menu. 4. To search...


