
Owners Guide
Page 2
... be located in the instructions, as close to provide some protection against voltage surges and built up static charges. This television's factory default settings as power-supply cord or plug is required when the apparatus has been damaged in accordance with an extension cord, receptacle, or other electrical circuits. 18. CAUTION Adjust only those controls that may be sure the antenna system is connected to the receiver...
... be located in the instructions, as close to provide some protection against voltage surges and built up static charges. This television's factory default settings as power-supply cord or plug is required when the apparatus has been damaged in accordance with an extension cord, receptacle, or other electrical circuits. 18. CAUTION Adjust only those controls that may be sure the antenna system is connected to the receiver...
Owners Guide
Page 8
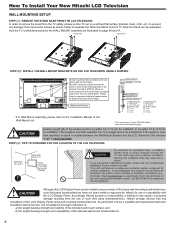
... Hitachi LCD Television WALL MOUNTING SETUP STEP (1) : REMOVE THE STAND BASE FROM THE LCD TELEVISION In order to remove the stand from the TV safely, please put the TV set on page 46 and 47. 4 Screws M4 2 Screws M4 STEP (2) : INSTALL THE WALL MOUNT BRACKETS ON THE LCD TELEVISION USING 4 SCREWS. Now the Stand can be separated from the TV. Useful dimensions for the WALL MOUNT assembly are not long enough to properly secure the TV to separate the Table Top Stand...
... Hitachi LCD Television WALL MOUNTING SETUP STEP (1) : REMOVE THE STAND BASE FROM THE LCD TELEVISION In order to remove the stand from the TV safely, please put the TV set on page 46 and 47. 4 Screws M4 2 Screws M4 STEP (2) : INSTALL THE WALL MOUNT BRACKETS ON THE LCD TELEVISION USING 4 SCREWS. Now the Stand can be separated from the TV. Useful dimensions for the WALL MOUNT assembly are not long enough to properly secure the TV to separate the Table Top Stand...
Owners Guide
Page 9
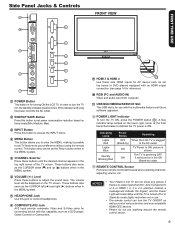
... Use this button to your remote control at this capability, such as a DVD player, Game Console or Camcorders. 12 13 HDMI 3 & HDMI 4 Use these buttons to connect headphones. Indicating Lamp Lights Red Lights Blue Quickly Blinking Red Power Status OFF (Stand-by mode (lights red) when not in the MENU system. RGB (PC and AUDIO IN) Video and audio input from computer. 1 USB MULTIMEDIA/SERVICE Slot This USB slot is selected. TV Power is off or in Stand-by ) ON ON Operating When the LCD...
... Use this button to your remote control at this capability, such as a DVD player, Game Console or Camcorders. 12 13 HDMI 3 & HDMI 4 Use these buttons to connect headphones. Indicating Lamp Lights Red Lights Blue Quickly Blinking Red Power Status OFF (Stand-by mode (lights red) when not in the MENU system. RGB (PC and AUDIO IN) Video and audio input from computer. 1 USB MULTIMEDIA/SERVICE Slot This USB slot is selected. TV Power is off or in Stand-by ) ON ON Operating When the LCD...

Owners Guide
Page 10
... compatible with the HDMI 2 Input. NOTE The Digital Output option will grayout with all input sources, except with this case, connect the components B-Y output to the TV's Pb input and the components R-Y output to obtain optimum picture quality when using the Y-PbPr inputs (see page 40). DIGITAL OUT (Optical Digital Audio) This jack provides Digital Audio Output for connecting device with a digital program channel on the Air/Cable input source. COMPOSITE AV1 Jacks AV1 input provides composite Video and S-Video jacks for your audio...
... compatible with the HDMI 2 Input. NOTE The Digital Output option will grayout with all input sources, except with this case, connect the components B-Y output to the TV's Pb input and the components R-Y output to obtain optimum picture quality when using the Y-PbPr inputs (see page 40). DIGITAL OUT (Optical Digital Audio) This jack provides Digital Audio Output for connecting device with a digital program channel on the Air/Cable input source. COMPOSITE AV1 Jacks AV1 input provides composite Video and S-Video jacks for your audio...
Owners Guide
Page 12
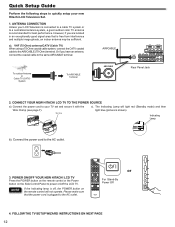
.../CABLE Rear Panel Jack 2. POWER ON/OFF YOUR NEW HITACHI LCD TV Press the POWER button on the remote control or the Power button on the Side Control Panel to power on the remote control will light red (Standby mode) and then light blue (picture is recommended for best performance. Connect the power cord to the AIR/CABLE (75-Ohm) terminal. FOLLOW THE TV SETUP WIZARD INSTRUCTIONS ON NEXT PAGE 12 CONNECT YOUR NEW HITACHI LCD TV TO THE POWER SOURCE a). VHF (75-Ohm) antenna/CATV (Cable...
.../CABLE Rear Panel Jack 2. POWER ON/OFF YOUR NEW HITACHI LCD TV Press the POWER button on the remote control or the Power button on the Side Control Panel to power on the remote control will light red (Standby mode) and then light blue (picture is recommended for best performance. Connect the power cord to the AIR/CABLE (75-Ohm) terminal. FOLLOW THE TV SETUP WIZARD INSTRUCTIONS ON NEXT PAGE 12 CONNECT YOUR NEW HITACHI LCD TV TO THE POWER SOURCE a). VHF (75-Ohm) antenna/CATV (Cable...
Owners Guide
Page 13
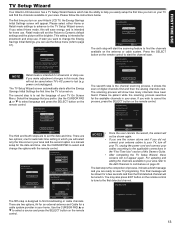
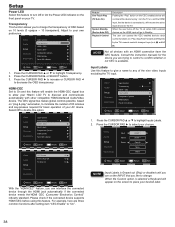
... done. Please follow the instructions below. Please select either Home or Retail mode settings to advance to help you easily setup the first time you turn off your TV, unplug the power cord and connect your area refer to the Add Channels to select a source and press the SELECT button on the antenna or cable system. If later you want to change the options with the remote control.
... done. Please follow the instructions below. Please select either Home or Retail mode settings to advance to help you easily setup the first time you turn off your TV, unplug the power cord and connect your area refer to the Add Channels to select a source and press the SELECT button on the antenna or cable system. If later you want to change the options with the remote control.

Owners Guide
Page 14
...making video connections, connect S-Video only or Video only. If both are often color-coded. RGB IN (D-sub 15 Pin) or (Audio) OUT Personal Computer 14 Check the owners guide of each device. A) CONNECTING HDMI SIGNAL SIDE INPUT PANEL HDMI DIGITAL OUTPUT CAPABILITY HDMI OUT DVD player Set-Top Box HDMI HDMI Home video game system B) CONNECTING DVI SIGNAL Audio Amplifier AUDIO IN LR L (White) DVI DIGITAL OUTPUT CAPABILITY L (White) OUTPUT L R DVD player R (Red) SIDE INPUT PANEL HDMI DVI to HDMI Cable R (Red) Set-Top Box DVI DIGITAL OUTPUT Home video game system...
...making video connections, connect S-Video only or Video only. If both are often color-coded. RGB IN (D-sub 15 Pin) or (Audio) OUT Personal Computer 14 Check the owners guide of each device. A) CONNECTING HDMI SIGNAL SIDE INPUT PANEL HDMI DIGITAL OUTPUT CAPABILITY HDMI OUT DVD player Set-Top Box HDMI HDMI Home video game system B) CONNECTING DVI SIGNAL Audio Amplifier AUDIO IN LR L (White) DVI DIGITAL OUTPUT CAPABILITY L (White) OUTPUT L R DVD player R (Red) SIDE INPUT PANEL HDMI DVI to HDMI Cable R (Red) Set-Top Box DVI DIGITAL OUTPUT Home video game system...

Owners Guide
Page 15
...• Cable plugs are often color-coded. HDMI 1 2. HDMI 3 4. Outside antenna or Cable TV coaxial cable 2-Way signal splitter VCR ANT IN VLR HDMI To HDMI HDMI OUTPUT HDMI DIGITAL OUTPUT CAPABILITY DVI To HDMI DIGITAL OUTPUT AUDIO OUT AUDIO IN OPTICAL IN OUTPUT Y Pb /Cb Pr /Cr L R S-Video OUTPUT Video L R DIGITAL OUTPUT CAPABILITY NOTE Cables are provided for high performance DVD players, VCRs etc. STEREO SYSTEM AMPLIFIER HDTV SET TOP BOX DVD PLAYER with Component Output capability DVD PLAYER VIDEO GAME with Composite video capability TIPS ON REAR PANEL CONNECTIONS...
...• Cable plugs are often color-coded. HDMI 1 2. HDMI 3 4. Outside antenna or Cable TV coaxial cable 2-Way signal splitter VCR ANT IN VLR HDMI To HDMI HDMI OUTPUT HDMI DIGITAL OUTPUT CAPABILITY DVI To HDMI DIGITAL OUTPUT AUDIO OUT AUDIO IN OPTICAL IN OUTPUT Y Pb /Cb Pr /Cr L R S-Video OUTPUT Video L R DIGITAL OUTPUT CAPABILITY NOTE Cables are provided for high performance DVD players, VCRs etc. STEREO SYSTEM AMPLIFIER HDTV SET TOP BOX DVD PLAYER with Component Output capability DVD PLAYER VIDEO GAME with Composite video capability TIPS ON REAR PANEL CONNECTIONS...

Owners Guide
Page 17
... rear panel jacks. Press the INPUT button, then select HDMI 1 or 2 to view the program from the DIGITAL OUT to HDMI Input DVI DIGITAL OUTPUT CAPABILITY DVD Player/ Recorder HHDDMMI I DIGITAL OUTPUT DDVII Audio Output L R (White) (Red) Or AUDIO IN L R AUDIO AMPLIFIER Note: An external Audio amplifier can support DVI audio input. If you do not, the picture and/or sound may be abnormal. • Cable plugs are often color-coded. TV REAR PANEL HDMI Input HDMI DIGITAL OUTPUT CAPABILITY DVD Player/ Recorder HDMI HDMI HDMI OUT TV REAR PANEL DVI to the OPTICAL IN of plugs...
... rear panel jacks. Press the INPUT button, then select HDMI 1 or 2 to view the program from the DIGITAL OUT to HDMI Input DVI DIGITAL OUTPUT CAPABILITY DVD Player/ Recorder HHDDMMI I DIGITAL OUTPUT DDVII Audio Output L R (White) (Red) Or AUDIO IN L R AUDIO AMPLIFIER Note: An external Audio amplifier can support DVI audio input. If you do not, the picture and/or sound may be abnormal. • Cable plugs are often color-coded. TV REAR PANEL HDMI Input HDMI DIGITAL OUTPUT CAPABILITY DVD Player/ Recorder HDMI HDMI HDMI OUT TV REAR PANEL DVI to the OPTICAL IN of plugs...

Owners Guide
Page 21
... a television program or home video which are for a more detailed picture. Select Standard mode for day time viewing with more information. 21 Select Movie mode for setting changes). 8 DEVICE CONTROL Buttons These buttons can control external devices (i.e. Game mode is for further details. Also, these programs as or . Your local TV program guide denotes these buttons are not available to control through the HDMI connection like Blu-Ray or DVD players, PRV, set on the remote control to display the list...
... a television program or home video which are for a more detailed picture. Select Standard mode for day time viewing with more information. 21 Select Movie mode for setting changes). 8 DEVICE CONTROL Buttons These buttons can control external devices (i.e. Game mode is for further details. Also, these programs as or . Your local TV program guide denotes these buttons are not available to control through the HDMI connection like Blu-Ray or DVD players, PRV, set on the remote control to display the list...

Owners Guide
Page 22
... remote control is entered. Numeric Buttons 3 555 If done correctly, the device LED indicator will turn off your cable box when the correct four digit preset code is designed to operate different types of your cable box. The remote control will blink 3 times to factory default place remote control in TV mode, then press and hold TV mode button and enter "9", "8", "1" in sequence. When this occurs, the remote control is programmed for your set top boxes, satellite receivers, DVD players, and other audio/video...
... remote control is entered. Numeric Buttons 3 555 If done correctly, the device LED indicator will turn off your cable box when the correct four digit preset code is designed to operate different types of your cable box. The remote control will blink 3 times to factory default place remote control in TV mode, then press and hold TV mode button and enter "9", "8", "1" in sequence. When this occurs, the remote control is programmed for your set top boxes, satellite receivers, DVD players, and other audio/video...
Owners Guide
Page 30
... Access Screen should appear and the picture mode changes to customize the picture settings and is a four digit access code. NOTE The password used to access the Pro Mode feature is used to Custom settings. Please Enter Access Code Access Code Calibration Menu Input Mode Contrast Contrast Brightness Color Tint Sharpness TV Pro-Day 53 45 65 R1 56 Move SEL Select Return EXIT Exit 4. Then press the CURSOR PAD button to return to the Video menu or...
... Access Screen should appear and the picture mode changes to customize the picture settings and is a four digit access code. NOTE The password used to access the Pro Mode feature is used to Custom settings. Please Enter Access Code Access Code Calibration Menu Input Mode Contrast Contrast Brightness Color Tint Sharpness TV Pro-Day 53 45 65 R1 56 Move SEL Select Return EXIT Exit 4. Then press the CURSOR PAD button to return to the Video menu or...
Owners Guide
Page 31
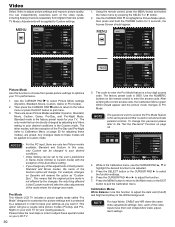
... blocks in the picture. When film is set to Standard for accurate color. Mid: Use this special feature to quit menu. Aspect Modes: Manually select the Aspect Ratio. Press the MENU button to return to adjust the level of movie sources. Press the EXIT button to improve video performance when watching interlaced format film based sources. When Auto Movie is transferred to video for this setting for a mild smooth...
... blocks in the picture. When film is set to Standard for accurate color. Mid: Use this special feature to quit menu. Aspect Modes: Manually select the Aspect Ratio. Press the MENU button to return to adjust the level of movie sources. Press the EXIT button to improve video performance when watching interlaced format film based sources. When Auto Movie is transferred to video for this setting for a mild smooth...

Owners Guide
Page 33
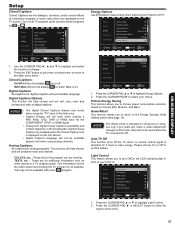
... News programs, and Custom mode is only for improved sound quality when wall mounting. Use CURSOR to the speakers. This language function will allow you to set between RAW and PCM. Digital Output This function allows you prefer to 6 language options (if available). Internal Speakers This function is for improved sound quality with a PCM only decoder; Video Audio Setup Channels Multimedia CONEQ 3D Sound Audio Source Audio Language Digital Output Internal Speakers Perfect Volume Reset...
... News programs, and Custom mode is only for improved sound quality when wall mounting. Use CURSOR to the speakers. This language function will allow you to set between RAW and PCM. Digital Output This function allows you prefer to 6 language options (if available). Internal Speakers This function is for improved sound quality with a PCM only decoder; Video Audio Setup Channels Multimedia CONEQ 3D Sound Audio Source Audio Language Digital Output Internal Speakers Perfect Volume Reset...
Owners Guide
Page 37
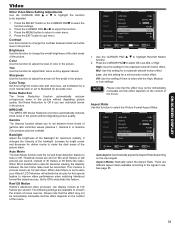
... the Light Control menu. 37 Press the EXIT button to quit menu or press menu to return to choose power consumption reduction based on the broadcaster. Digital Captions Options This function will turn Off/On the LED indicating light in this television. • Caption Display will not be saved when the TV is not possible. Analog Captions: Set captions for showroom or shopuse only, if you are viewing. Video Audio Setup Channels Multimedia Set Password Parental Controls Closed Captions Digital Captions Digital Caption Options Analog Captions Energy...
... the Light Control menu. 37 Press the EXIT button to quit menu or press menu to return to choose power consumption reduction based on the broadcaster. Digital Captions Options This function will turn Off/On the LED indicating light in this television. • Caption Display will not be saved when the TV is not possible. Analog Captions: Set captions for showroom or shopuse only, if you are viewing. Video Audio Setup Channels Multimedia Set Password Parental Controls Closed Captions Digital Captions Digital Caption Options Analog Captions Energy...
Owners Guide
Page 38
... Setup Input Labels Channels Multimedia Component Options RGB Options Reset AV & Setup Move SEL Select Return EXIT Exit 1. The CEC signal bus makes global controls possible, based on "plug & play , turn Off or On the Power LED indicator on the front panel on , and the HDMI input, that you to allow your TV. Please check if the connected device supports HDMI CEC before using this feature to turn the TV on your Hitachi LCD...
... Setup Input Labels Channels Multimedia Component Options RGB Options Reset AV & Setup Move SEL Select Return EXIT Exit 1. The CEC signal bus makes global controls possible, based on "plug & play , turn Off or On the Power LED indicator on the front panel on , and the HDMI input, that you to allow your TV. Please check if the connected device supports HDMI CEC before using this feature to turn the TV on your Hitachi LCD...

Owners Guide
Page 43
..., Red, Blue). • Check the connection of the power cord and/or other cables. • Check if the power of the unit or external device is ON. • Check if the correct Video input is selected. • Check if the unit is in "Standby mode" . • Adjust the values in "Video Menu". • Check if the batteries are powered on both the remote control and control panel do not work . HDMI Issues...
..., Red, Blue). • Check the connection of the power cord and/or other cables. • Check if the power of the unit or external device is ON. • Check if the correct Video input is selected. • Check if the unit is in "Standby mode" . • Adjust the values in "Video Menu". • Check if the batteries are powered on both the remote control and control panel do not work . HDMI Issues...

Owners Guide
Page 46
... 46 Set Dimensions L46S604 model (Includes Table Top Stand) Weight (lbs./kg): 53.3/24.2 Units : Inches (mm) 28 11/16 (727.3) 22 1/2 (572.7) (ACTIVE AREA) 17 1/8 (435.7) 30 5/8 (775.4) 44 3/8 (1127.3) 40 1/8 (1018.1) (ACTIVE AREA) CENTER OF THE SCREEN 25 1/4 (641.9) 4 1/8 (104.7) 12 3/16 (309.6) HOLE FOR WALL MOUNT (4 PLACES) Screw Length (A) Insertion Length (B) 15 3/4 (400.0) LOCATION OF THE POWER CORD Rear View Use as Reference for Wall Mount Bracket 7 7/8 (200...
... 46 Set Dimensions L46S604 model (Includes Table Top Stand) Weight (lbs./kg): 53.3/24.2 Units : Inches (mm) 28 11/16 (727.3) 22 1/2 (572.7) (ACTIVE AREA) 17 1/8 (435.7) 30 5/8 (775.4) 44 3/8 (1127.3) 40 1/8 (1018.1) (ACTIVE AREA) CENTER OF THE SCREEN 25 1/4 (641.9) 4 1/8 (104.7) 12 3/16 (309.6) HOLE FOR WALL MOUNT (4 PLACES) Screw Length (A) Insertion Length (B) 15 3/4 (400.0) LOCATION OF THE POWER CORD Rear View Use as Reference for Wall Mount Bracket 7 7/8 (200...
Owners Guide
Page 49
... associated with removing the Product from improper or unauthorized service, maintenance or repair. Limited Warranty Congratulations on Hitachi products and technologies, as well as downloadable owners guides and other useful information. D. MODEL NAME. Any Product used for this V .S T form and attach your sales receipt and retain them for the remainder of information on your records. N H. During the Limited Warranty LCD Flat Panel Televisions period for parts, Hitachi will...
... associated with removing the Product from improper or unauthorized service, maintenance or repair. Limited Warranty Congratulations on Hitachi products and technologies, as well as downloadable owners guides and other useful information. D. MODEL NAME. Any Product used for this V .S T form and attach your sales receipt and retain them for the remainder of information on your records. N H. During the Limited Warranty LCD Flat Panel Televisions period for parts, Hitachi will...

Owners Guide
Page 50
... THAT MAY ACCOMPANY SUCH UPGRADE, (A) DO NOT USE ANY HITACHIPROVIDED FLASH CARD OR OTHER MEDIA, (B) DO NOT PERFORM INSTALL ANY HITACHI-PROVIDED UPGRADE SOFTWARE ON YOUR DTV, AND (C) PROMPTLY RETURN SUCH FLASH CARD OR OTHER MEDIA TO HITACHI. 11. You specifically agree not to export or reexport the Software: (i) to any country to , procurement of any such country, wherever located, who intends to transmit...
... THAT MAY ACCOMPANY SUCH UPGRADE, (A) DO NOT USE ANY HITACHIPROVIDED FLASH CARD OR OTHER MEDIA, (B) DO NOT PERFORM INSTALL ANY HITACHI-PROVIDED UPGRADE SOFTWARE ON YOUR DTV, AND (C) PROMPTLY RETURN SUCH FLASH CARD OR OTHER MEDIA TO HITACHI. 11. You specifically agree not to export or reexport the Software: (i) to any country to , procurement of any such country, wherever located, who intends to transmit...


