Hitachi L42S504 Support Question
Hitachi L42S504 Support Question
Find answers below for this question about Hitachi L42S504 - LCD Direct View TV.Need a Hitachi L42S504 manual? We have 1 online manual for this item!
Question posted by Anonymous-129925 on January 31st, 2014
Hitachi Screws For Wall Mounting
need screw for wall mounting of hitachi model #LE55V707
Current Answers
Answer #1: Posted by hzplj9 on February 11th, 2014 5:08 AM
hzplj9

Member since:
June 25th, 2012 Points: 4,875,670

Member since:
June 25th, 2012 Points: 4,875,670
Download the manual from 'Helpowl' via this link:
http://www.hitachiserviceusa.com:8080/L32_42S504_ENG-0204-2010.pdf
Refer to page 7 of the instalation manual and you will find instructions for wall mounting which must be followed. The screws required are ISO M6 of the required legth as in the manual.
Related Hitachi L42S504 Manual Pages
Owners Guide - Page 1
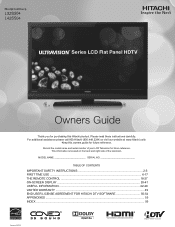
® Series LCD Flat Panel HDTV
Thank you for purchasing this owners guide for future reference. Please read these instructions carefully. Record the model name and serial number of Dolby Laboratories. Dolby and the double-D symbol are trademarks or registered trademarks of the television. MODEL NAME SERIAL NO
TABLE OF CONTENTS IMPORTANT SAFETY INSTRUCTIONS 2-5 FIRST TIME USE...
Owners Guide - Page 2
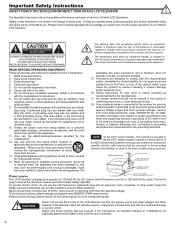
...quality, performance, and ease of service of Hitachi LCD televisions. Only use the LCD television's (polarized) plug with the recommended safety ...an equilateral triangle, is designed to 50 Hz, direct current, or anything other apparatus (including amplifiers) that... cart/apparatus combination to proper grounding for wall, shelf or ceiling mounting as shipped meet ENERGY STAR requirements. A...
Owners Guide - Page 3
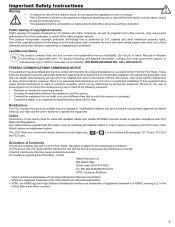
... be replaced with identical cables in the
United States and other limited payper-view uses only unless otherwise authorized. Operation is intended for a Class B digital...television closed captioning, ( or ), in a residential installation. This LCD Television receiver will not occur in accordance with the instructions, may cause undesired operation. FOR MORE INFORMATION, CALL 800.HITACHI...
Owners Guide - Page 4
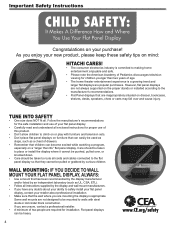
... new product, please keep these safety tips on mind:
HITACHI CARES!
• The consumer electronics industry is a growing trend and larger flat displays are mounting the display is appropriate. WALL MOUNTING: IF YOU DECIDE TO WALL MOUNT YOUR FLAT PANEL DISPLAY, ALWAYS:
• Use a mount that children can be mounted to making home entertainment enjoyable and safe.
• Please...
Owners Guide - Page 6
....2244) or visit our website at : www.hitachi.us /tv. This information is not going to be used for an extended period of the television.
Manufactured under license from vertical.
• Please see page 8 for important information related to wall mounting. A34T1051 & A15T0643) 42" (Part No. This LCD television product is not recommended.
Q1G940-12-47)
Thank...
Owners Guide - Page 7
... you purchased a wall mount bracket, please ask for example, in .
42"
10 cm.
7 FIRST TIME USE
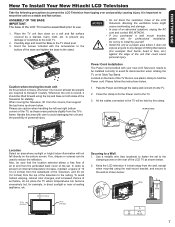
How To Install Your New Hitachi LCD Television
Take the following precautions to prevent the LCD Television from the top of personal injury. Power Cord Installation The Power cord provided with the accessories to the
bottom of the LCD TV as shown below...
Owners Guide - Page 8
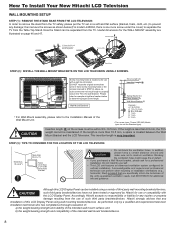
How To Install Your New Hitachi LCD Television
WALL MOUNTING SETUP
STEP (1) : REMOVE THE STAND BASE FROM THE LCD TELEVISION In order to remove the stand from the TV safely, please put the TV set on page 46 and 47.
4 Screws (M4).
CAUTION
Insertion length (B) of
the unit's specialized ventilation needs. If the length is very important. More than 30 cm (1'). Do...
Owners Guide - Page 9
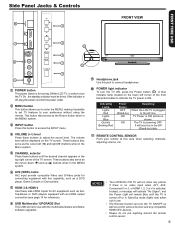
...; Your HITACHI LCD TV will soon be displayed on the lower left (◄) and right (►) buttons when in the Menu system.
Indicating Lamp Lights Red Lights Blue Quickly
Blinking Red
Power Status
OFF (Stand-by ) state.
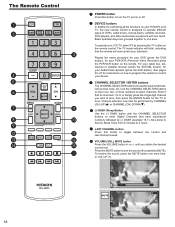
1 REMOTE CONTROL SENSOR Point your preference without using the remote. FIRST TIME USE
USB/
Side Panel Jacks...
Owners Guide - Page 11
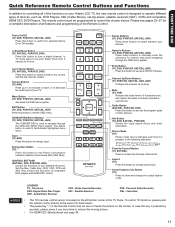
...TV, SAT/CBL)
Press to 4 hours.
Television DVD-
CURSOR PAD/Select Buttons (TV... TV functions, please point the remote control directly ...Hitachi LCD TV, the new remote control is located on the screen, in the following sequence. Please see page 38.
11 Device Buttons (TV, DVD, PVR/VCR, SAT/CBL, AVR) Press these buttons to switch between the current and the last channel viewed...
Owners Guide - Page 12
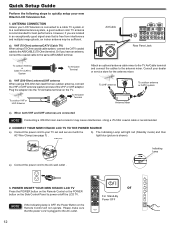
...Control Panel to the AIR/CABLE (75-Ohm) terminal. CONNECT YOUR NEW HITACHI LCD TV TO THE POWER SOURCE
a).
RGB
Quick Setup Guide
Perform the following steps to screws of ...
RGB
Rear Panel Jack
To outdoor Antenna or
Cable TV (CATV) System
To Air/Cable Terminal
b). Connect the power cord to your new Hitachi LCD Television Set.
1.
Consult your LCD Television is recommended for...
Owners Guide - Page 13
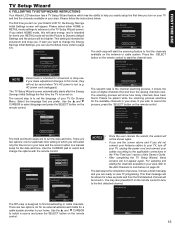
...TV SETUP WIZARD INSTRUCTIONS
Your Hitachi LCD television has a TV Setup Wizard feature which you prefer. The first time you make adjustment changes in your TV On Screen Menu. This setting is connected properly.
If you turn on your Hitachi LCD TV... to List feature on the remote control to tune to view TV programing. Setup Wizard (1/8)
Please select Home/Retail ...
Retail...
Owners Guide - Page 16
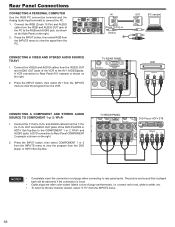
...view the program from the Y, Pb/ Cb, Pr/Cr OUT and AUDIO OUT jacks of plugs and terminals, i.e. Press the INPUT button, then select AV1 from the INPUTS menu to the AV1 (VIDEO)jacks. Connect the Y, Pb/Cb, Pr/Cr and AUDIO cables from the VCR. TV REAR PANEL... COMPONENT 1 or 2 from the INPUTS menu to the last channel viewed, select "0.TV" from the PC. The picture and sound that is played back will...
Owners Guide - Page 17
...LCD Television. NOTES
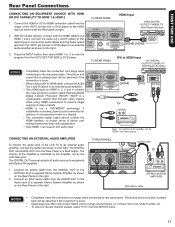
• Completely insert the connection cord plugs when connecting to prevent illegal copying of a separate Stereo System Amplifier as shown near the Rear panel at right.
2. HDCP is not a "NETWORK" technology. CONNECTING AN EXTERNAL AUDIO AMPLIFIER
To monitor the audio level of the LCD TV... the Audio Out L and R cables to view the program from the HDTV set top box or...
Owners Guide - Page 18
... on how to program the remote to control your television. To restore the sound, press the MUTE button one , two, or three numbers to select channels.
For your cable box, settop-box or satellite receiver (press the SAT/CBL button), for your HITACHI LCD TV, the new remote control is designed to operate different...
Owners Guide - Page 30
...be applied to your desired conditions.
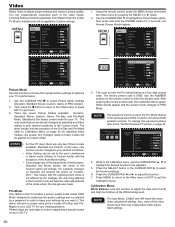
• Video Setting can be directly changed to Custom settings. Press MENU to return to the Main ... order to select the function settings.
6. Pro Mode This Hitachi LCD TV includes a picture quality mode called "PRO Mode" designed to...
3. Use the NUMBER buttons on page 30 for your viewing pleasure. NOTE
The password used to set to the user...
Owners Guide - Page 33

...TV is useful when using the internal speakers only. The other languages.
Note that can be directly...menu item.
2.
Audio Source Multi-Channel Television Sound will be passed through to the ... the left to the type of the LCD TV internal speakers and headphone jack.
Perfect Volume...so each audio input to Custom mode. Wall Mount: Select this feature to allow you ...
Owners Guide - Page 42
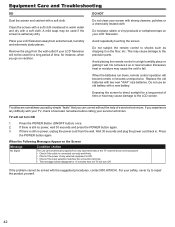
...still no power, unplug the power cord from the wall outlet if your service technician.
Press the POWER Button...LCD Television. Do not subject the remote control to the LCD screen.
Replace the old batteries with a new battery. Avoid repeatedly touching the screen. Press
the POWER button again.
Excessive heat or moisture may cause damage to direct sunlight for 15 minutes then the TV...
Owners Guide - Page 46
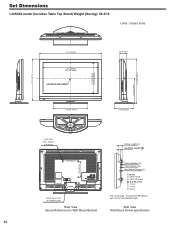
...ACTIVE AREA) CENTER OF THE SCREEN
17 13/32 (442.5)
3 9/16 (90.1) 9 7/16 (239.6)
HOLE FOR WALL MOUNT
(4 PLACES)
Screw Length (A) Insertion Length (B)
7 7/8 (200.00)
LOCATION OF THE AC POWER CORD
Rear View Use as Reference for Wall Mount Bracket
7 7/8 (200.00)
Spring Washer (C) Plane Washer (D) Wall Mount Bracket (E)
Example : A = B+C+D+E A: 13.5~15.5 mm.
D: 1 mm. B: 8.5~10.5 mm. The...
Owners Guide - Page 47
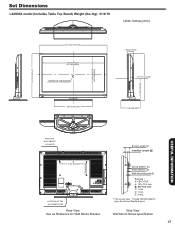
...
L42S504 model ...WALL MOUNT
(4 PLACES)
Screw Length (A) Insertion Length (B)
15 3/4 (400.00)
LOCATION OF THE AC POWER CORD
Rear View Use as Reference for Wall Mount Bracket
7 7/8 (200.00)
Spring Washer (C) Plane Washer (D) Wall Mount Bracket (E)
Example : A = B+C+D+E A: 13.5~15.5 mm. The screw type : Thread ISO M6 (Metric type, do not use Standard type).
Side View Wall Mount Screw...
Owners Guide - Page 49

...Hitachi products except: (i) 32-inch and smaller LCD Flat Panel Televisions; (ii) Products
located outside the U.S.A. Visit our website at
Hitachi...operational, hook up and delivery (at www.hitachi.us/tv : Hitachi's website features a wealth of information on...service, maintenance or repair.
MODEL NO. DATE OF PURCHASE
STATE
E Warranty Limitations
This Hitachi Limited Warranty does not cover:...
Similar Questions

What Is The Measurements On The Back Of The Tv For Wall Mount
(Posted by moenm0535 2 years ago)

How Do You Remove The Dvd From The Back Of The Flat Screen
(Posted by Eley4 10 years ago)

Tv Wall Mount
Can this model Hitachi model #37HLX99 be wall mounted? If so what kind and type of wall mount do I n...
Can this model Hitachi model #37HLX99 be wall mounted? If so what kind and type of wall mount do I n...
(Posted by Laswiacki 11 years ago)

How Can I Register My New Hitachi Tv.calling Is Worthless?
(Posted by Pozhart 11 years ago)

60' Projection Tv Won;t Power On. Red Light Flashs Once Then Nothing. 1997 Model
(Posted by vanettenroger 12 years ago)