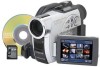

Owners Guide
Page 6
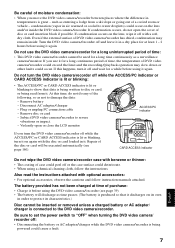
... this DVD video camera/recorder, when connected to direct sunlight: This could enter video and audio that the temperature of this does not indicate a fault. Do not use the DVD video camera/recorder near corrosive gas: • If the DVD video camera/recorder is used near strong radio waves or magnetism, such as in a hot spring area, the external or internal terminals could corrode, which would disable normal operation, or the battery connecting terminals...
... this DVD video camera/recorder, when connected to direct sunlight: This could enter video and audio that the temperature of this does not indicate a fault. Do not use the DVD video camera/recorder near corrosive gas: • If the DVD video camera/recorder is used near strong radio waves or magnetism, such as in a hot spring area, the external or internal terminals could corrode, which would disable normal operation, or the battery connecting terminals...
Owners Guide
Page 7
... use the DVD video camera/recorder for at time of purchase: • Charge it on its characteristics.) Disc cannot be inserted or removed unless a charged battery or AC adapter/ charger is connected to the DVD video camera/recorder. If this time, do not do not open or close the LCD monitor ACCESS/PC indicator If you turn the DVD video camera/recorder off while the ACCESS/PC or CARD ACCESS indicator is lit or blinking, turn it before using it again. Do not turn...
... use the DVD video camera/recorder for at time of purchase: • Charge it on its characteristics.) Disc cannot be inserted or removed unless a charged battery or AC adapter/ charger is connected to the DVD video camera/recorder. If this time, do not do not open or close the LCD monitor ACCESS/PC indicator If you turn the DVD video camera/recorder off while the ACCESS/PC or CARD ACCESS indicator is lit or blinking, turn it before using it again. Do not turn...
Owners Guide
Page 9
... stop your operation midway, or return the menu screen to the preceding one. English About This Manual ●Displays in this manual Understand that the displays are unavailable with Disc Navigation ...... 107 Connecting to PC 138 With this manual Although the external appearances of DZ-GX20A, DZ-MV780A and DZ-MV730A are used . Opening or closing the LCD monitor switches the picture to appear on "Basic Techniques" explains the basic operation of this DVD video camera/recorder...
... stop your operation midway, or return the menu screen to the preceding one. English About This Manual ●Displays in this manual Understand that the displays are unavailable with Disc Navigation ...... 107 Connecting to PC 138 With this manual Although the external appearances of DZ-GX20A, DZ-MV780A and DZ-MV730A are used . Opening or closing the LCD monitor switches the picture to appear on "Basic Techniques" explains the basic operation of this DVD video camera/recorder...
Owners Guide
Page 12
...or Card 28 RECORDABLE TIME OF MOVIE (VIDEO) ......... 28 RECORDABLE STILLS (PHOTOS) ON DISC .... 28 RECORDABLE STILLS (PHOTOS) ON CARD... 29 SIZE AND QUALITY OF PHOTOS 30 Setups Setting Up the DVD Video Camera/ Recorder 31 HOLDING DVD VIDEO CAMERA/ RECORDER 31 ATTACHING SHOULDER STRAP 32 ATTACHING LENS CAP 32 INSERTING BATTERY INTO REMOTE CONTROL 33 REMOVING BATTERY FROM REMOTE CONTROL 33 VIEWING IMAGE ON LCD MONITOR SCREEN 35 CLOSING LCD MONITOR 36 VIEWING SUBJECT THROUGH VIEWFINDER 36 SETTING DATE AND TIME 37 CHANGING DISPLAY FORMAT OF DATE AND TIME 38 Setting Up the Battery 39...
...or Card 28 RECORDABLE TIME OF MOVIE (VIDEO) ......... 28 RECORDABLE STILLS (PHOTOS) ON DISC .... 28 RECORDABLE STILLS (PHOTOS) ON CARD... 29 SIZE AND QUALITY OF PHOTOS 30 Setups Setting Up the DVD Video Camera/ Recorder 31 HOLDING DVD VIDEO CAMERA/ RECORDER 31 ATTACHING SHOULDER STRAP 32 ATTACHING LENS CAP 32 INSERTING BATTERY INTO REMOTE CONTROL 33 REMOVING BATTERY FROM REMOTE CONTROL 33 VIEWING IMAGE ON LCD MONITOR SCREEN 35 CLOSING LCD MONITOR 36 VIEWING SUBJECT THROUGH VIEWFINDER 36 SETTING DATE AND TIME 37 CHANGING DISPLAY FORMAT OF DATE AND TIME 38 Setting Up the Battery 39...
Owners Guide
Page 13
... (PHOTO INPUT 95 SELF-TIMER 96 SETTING ON-SCREEN DISPLAY OUTPUT ON OR OFF (OSD OUTPUT 97 LCD/EVF Setup 98 SETTING BRIGHTNESS OF LCD SCREEN (LCD BRIGHTNESS 98 SETTING BRIGHTNESS OF VIEWFINDER (EVF BRIGHTNESS 98 SETTING COLOR DENSITY (COLOR LEVEL 99 ALWAYS DISPLAYING IMAGE IN VIEWFINDER 99 Initial Settings 100 SWITCHING OPERATING SOUND ON OR OFF (BEEP 100 TURNING DVD VIDEO CAMERA/RECORDER OFF AUTOMATICALLY (POWER SAVE) ......100 TURNING RECORD LED ON OR OFF (RECORD LED 101 CHANGING DISPLAY LANGUAGE (LANGUAGE 101 RESETTING MENU SETTINGS TO DEFAULTS (RESET 102 Disc Navigation Using...
... (PHOTO INPUT 95 SELF-TIMER 96 SETTING ON-SCREEN DISPLAY OUTPUT ON OR OFF (OSD OUTPUT 97 LCD/EVF Setup 98 SETTING BRIGHTNESS OF LCD SCREEN (LCD BRIGHTNESS 98 SETTING BRIGHTNESS OF VIEWFINDER (EVF BRIGHTNESS 98 SETTING COLOR DENSITY (COLOR LEVEL 99 ALWAYS DISPLAYING IMAGE IN VIEWFINDER 99 Initial Settings 100 SWITCHING OPERATING SOUND ON OR OFF (BEEP 100 TURNING DVD VIDEO CAMERA/RECORDER OFF AUTOMATICALLY (POWER SAVE) ......100 TURNING RECORD LED ON OR OFF (RECORD LED 101 CHANGING DISPLAY LANGUAGE (LANGUAGE 101 RESETTING MENU SETTINGS TO DEFAULTS (RESET 102 Disc Navigation Using...

Owners Guide
Page 14
... (MOVE) ... 129 CHANGING TITLE OF PLAY LIST (TITLE) ...... 130 DELETING PLAY LIST (DELETE 130 Go To 131 TOP (END 131 Disc or Card Management 132 INITIALIZING DISC OR CARD (FORMAT DISC. Check the Following 158 Trouble Messages 160 Troubleshooting 167 System Reset 174 Major Specifications 175 To Order in the United States 178 To Order in the Canada 178 Index 179 Be sure to Video Editing Software........... 150 No DVD Video Camera/Recorder Operation -
... (MOVE) ... 129 CHANGING TITLE OF PLAY LIST (TITLE) ...... 130 DELETING PLAY LIST (DELETE 130 Go To 131 TOP (END 131 Disc or Card Management 132 INITIALIZING DISC OR CARD (FORMAT DISC. Check the Following 158 Trouble Messages 160 Troubleshooting 167 System Reset 174 Major Specifications 175 To Order in the United States 178 To Order in the Canada 178 Index 179 Be sure to Video Editing Software........... 150 No DVD Video Camera/Recorder Operation -
Owners Guide
Page 15
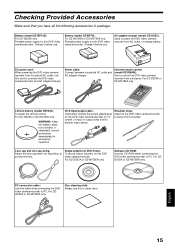
... DVD video camera/recorder. Disc cleaning cloth: Always use . Portable power supply for emergency treatment. Charge it from a distance. If swallowed, consult a physician immediately for this to another video device. Power cable: Connect between household AC outlet and AC adapter/charger. Battery (model DZ-BP7S): For DZ-MV780A or DZ-MV730A only. For DZGX20A or DZ-MV780A only. English 15 For DZGX20A or DZ-MV780A only. For DZ-GX20A or DZ-MV780A only. For DZ-GX20A or DZ-MV780A only. AV/S input/output cable: Used when viewing the picture played...
... DVD video camera/recorder. Disc cleaning cloth: Always use . Portable power supply for emergency treatment. Charge it from a distance. If swallowed, consult a physician immediately for this to another video device. Power cable: Connect between household AC outlet and AC adapter/charger. Battery (model DZ-BP7S): For DZ-MV780A or DZ-MV730A only. For DZGX20A or DZ-MV780A only. English 15 For DZGX20A or DZ-MV780A only. For DZ-GX20A or DZ-MV780A only. For DZ-GX20A or DZ-MV780A only. AV/S input/output cable: Used when viewing the picture played...

Owners Guide
Page 27
... this DVD video camera/ recorder. • The image data recorded on another device may be damaged or lost: − Do not remove the disc or card or turn DVD video camera/recorder off during reading or writing of data − Do not use DVD video camera/recorder in a place subject to touch metal. The range of image data playable on this DVD video camera/recorder. AVAILABLE CARDS SD memory card can be used on this DVD video camera/recorder is an integrated image file format of digital cameras: Image files can be used in...
... this DVD video camera/ recorder. • The image data recorded on another device may be damaged or lost: − Do not remove the disc or card or turn DVD video camera/recorder off during reading or writing of data − Do not use DVD video camera/recorder in a place subject to touch metal. The range of image data playable on this DVD video camera/recorder. AVAILABLE CARDS SD memory card can be used on this DVD video camera/recorder is an integrated image file format of digital cameras: Image files can be used in...

Owners Guide
Page 28
.... 6 Mbps *3: Fixed bit rate: Approx. 3 Mbps Note: • No movie can be recorded on SD memory card. • Although the movie quality mode or wide-screen (16:9) mode can be changed midway for the setting of photos on it, movies can also be impossible: Turn the DVD video camera/ recorder off once, wait until the ambient temperature becomes lower, and then operate it . DZ-MV780A/DZ-MV730A: Can record up to approx. 750 photos.
.... 6 Mbps *3: Fixed bit rate: Approx. 3 Mbps Note: • No movie can be recorded on SD memory card. • Although the movie quality mode or wide-screen (16:9) mode can be changed midway for the setting of photos on it, movies can also be impossible: Turn the DVD video camera/ recorder off once, wait until the ambient temperature becomes lower, and then operate it . DZ-MV780A/DZ-MV730A: Can record up to approx. 750 photos.

Owners Guide
Page 37
.... 1 Turn the DVD video camera/recorder on. 2 Press the MENU button. SETTING DATE AND TIME Set the current date and time so that is exhausted, the date and time will be reset. The date and time will be set. Da t e Se t Da t e Mode 1/ 1/ 2005 1 2 : 00AM [The digit that the date and time you have already set. Note: To stop date/time setting midway, press the C button. 6 After setting the current date and time, press the A button. ENTER RAM 7 If the displayed date and time are correct, use...
.... 1 Turn the DVD video camera/recorder on. 2 Press the MENU button. SETTING DATE AND TIME Set the current date and time so that is exhausted, the date and time will be reset. The date and time will be set. Da t e Se t Da t e Mode 1/ 1/ 2005 1 2 : 00AM [The digit that the date and time you have already set. Note: To stop date/time setting midway, press the C button. 6 After setting the current date and time, press the A button. ENTER RAM 7 If the displayed date and time are correct, use...

Owners Guide
Page 39
... AC adapter/charger. An AC plug adapter is plugged into the AC outlet again. If the CHARGE indicator still does not light, the AC adapter/charger may be used around the world. Unplug it from your dealer. • The AC adapter/charger can be faulty. Battery Power cable CHARGE indicator AC adapter/charger DC output terminal English 39 Setting Up the Battery The DZ-BP14S battery provided with DZ-GX20A or DZ-BP7S battery provided with DZ-MV780A and DZ...
... AC adapter/charger. An AC plug adapter is plugged into the AC outlet again. If the CHARGE indicator still does not light, the AC adapter/charger may be used around the world. Unplug it from your dealer. • The AC adapter/charger can be faulty. Battery Power cable CHARGE indicator AC adapter/charger DC output terminal English 39 Setting Up the Battery The DZ-BP14S battery provided with DZ-GX20A or DZ-BP7S battery provided with DZ-MV780A and DZ...
Owners Guide
Page 41
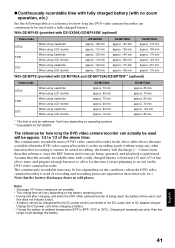
... DVD video camera/recorder is used (if recording and recording pause are repeated at temperatures other function after charging, and when the DVD video camera/recorder is being operated, and playback is only for reference: It will vary depending on recording contents. **Unavailable for DZ-GX20A. English 41 Note that the actually recordable time with a fully charged battery is between 1/2 and 1/3 of the above time, and prepare enough batteries to allow for how long the DVD video camera/recorder...
... DVD video camera/recorder is used (if recording and recording pause are repeated at temperatures other function after charging, and when the DVD video camera/recorder is being operated, and playback is only for reference: It will vary depending on recording contents. **Unavailable for DZ-GX20A. English 41 Note that the actually recordable time with a fully charged battery is between 1/2 and 1/3 of the above time, and prepare enough batteries to allow for how long the DVD video camera/recorder...
Owners Guide
Page 44
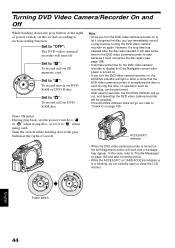
... this time, no operation, such as recording, can immediately record or play back by turning the DVD video camera/ recorder on , the self-diagnosis function will light or blink to "Check 4" on page 158. Turn the switch while holding down the gray button at the right of switch. ACCESS/PC indicator • When the DVD video camera/recorder is recognizing the disc or card: During this case, refer to "Trouble Messages" on , the ACCESS indicator will work and a message may...
... this time, no operation, such as recording, can immediately record or play back by turning the DVD video camera/ recorder on , the self-diagnosis function will light or blink to "Check 4" on page 158. Turn the switch while holding down the gray button at the right of switch. ACCESS/PC indicator • When the DVD video camera/recorder is recognizing the disc or card: During this case, refer to "Trouble Messages" on , the ACCESS indicator will work and a message may...

Owners Guide
Page 58
... DVD video camera/recorder; Adjust the sound volume using the volume control buttons (S, R). • To temporarily stop , and recording pause status will be heard from the speaker. Playback will stop playback, press the A button. also, the recorded sound may not play back, depending on the type of image data. • Image data recorded on another DVD video camera/ recorder or DVD recorder may not be played on this DVD video camera/recorder (p. 49, Before You Begin 51). • Turn the DVD video camera/recorder on (p. 44). English 58 Playing Back • Insert a disc or card...
... DVD video camera/recorder; Adjust the sound volume using the volume control buttons (S, R). • To temporarily stop , and recording pause status will be heard from the speaker. Playback will stop playback, press the A button. also, the recorded sound may not play back, depending on the type of image data. • Image data recorded on another DVD video camera/ recorder or DVD recorder may not be played on this DVD video camera/recorder (p. 49, Before You Begin 51). • Turn the DVD video camera/recorder on (p. 44). English 58 Playing Back • Insert a disc or card...

Owners Guide
Page 76
... MENU button, and choose Flash from the Camera Functions Setup menu. 2 Choose the option for Flash and decide it is recommended that you wish to DZ-GX20A, the built-in video flash in a dark place. Note: • The built-in Video Flash setting will not change even when the DVD video camera/recorder is turned off . • When recording dark subjects, the shutter speed will not emit light, though the DVD camera/recorder is recording. • Do not use...
... MENU button, and choose Flash from the Camera Functions Setup menu. 2 Choose the option for Flash and decide it is recommended that you wish to DZ-GX20A, the built-in video flash in a dark place. Note: • The built-in Video Flash setting will not change even when the DVD video camera/recorder is turned off . • When recording dark subjects, the shutter speed will not emit light, though the DVD camera/recorder is recording. • Do not use...
Owners Guide
Page 81
... playing back camera images recorded on camcorder for personal enjoyment. Note: • If you operate the DVD video camera/recorder connected to another device, always power the camera/recorder from AC outlet using the AC adapter/ charger. • If you to record clearer images. • The DZ-MV730A cannot record S-VIDEO input. • Reduce the volume of external input sound heard from a Hitachi VCR, change the remote control code of the VCR to other than "VCR2". • With DZ-GX20A or DZ-MV780A, using video selector (see "Terminology", p. 155), normal recording...
... playing back camera images recorded on camcorder for personal enjoyment. Note: • If you operate the DVD video camera/recorder connected to another device, always power the camera/recorder from AC outlet using the AC adapter/ charger. • If you to record clearer images. • The DZ-MV730A cannot record S-VIDEO input. • Reduce the volume of external input sound heard from a Hitachi VCR, change the remote control code of the VCR to other than "VCR2". • With DZ-GX20A or DZ-MV780A, using video selector (see "Terminology", p. 155), normal recording...

Owners Guide
Page 142
..., uninstall them, and then install the software from the provided CD-ROM. DISPLAYING INSTALLER SCREEN 1 Turn the PC on the provided CDROM. Installing Software Before You Begin Before installing the UDF driver (DVD-RAM driver) provided with this DVD video camera/recorder, no program with different version can coexist: If any programs with different versions. English 142 If any software is located. 4 Double-click the Setup.exe icon. Do you...
..., uninstall them, and then install the software from the provided CD-ROM. DISPLAYING INSTALLER SCREEN 1 Turn the PC on the provided CDROM. Installing Software Before You Begin Before installing the UDF driver (DVD-RAM driver) provided with this DVD video camera/recorder, no program with different version can coexist: If any programs with different versions. English 142 If any software is located. 4 Double-click the Setup.exe icon. Do you...

Owners Guide
Page 155
... DVD-Video and DVD-R discs using the DVD video format. Some DVD recorders can play back DVD-RAM discs recorded on writable DVD disc: This format has been adopted for DVD video. A DVD recorder that are compatible with DVD-RAM disc, etc. 155 English DOLBY DIGITAL: An audio recording format widely used for DVD video camera/recorders, and DVD recorders that is compatible with higher resolution (bit rate) or a longer recording time. DVD-R DISC: One-time recordable DVD disc: The recorded contents cannot be deleted or overwritten. to record video data on the DVD video camera/recorder...
... DVD-Video and DVD-R discs using the DVD video format. Some DVD recorders can play back DVD-RAM discs recorded on writable DVD disc: This format has been adopted for DVD video. A DVD recorder that are compatible with DVD-RAM disc, etc. 155 English DOLBY DIGITAL: An audio recording format widely used for DVD video camera/recorders, and DVD recorders that is compatible with higher resolution (bit rate) or a longer recording time. DVD-R DISC: One-time recordable DVD disc: The recorded contents cannot be deleted or overwritten. to record video data on the DVD video camera/recorder...

Owners Guide
Page 172
... been set. Symptom Cause and Correction The DISC EJECT While the DVD video camera/recorder is connected to PC, use button is loaded in the "Drive Select" column, and then click "OK". A disc other than DVD-RAM is started , "Disc in Drive X: cannot be used " appears. Click the "Preference" button at HS (high speed). "Hardware Removal" results in error. If your PC uses Windows® 2000 Professional, the problem may take more time because data...
... been set. Symptom Cause and Correction The DISC EJECT While the DVD video camera/recorder is connected to PC, use button is loaded in the "Drive Select" column, and then click "OK". A disc other than DVD-RAM is started , "Disc in Drive X: cannot be used " appears. Click the "Preference" button at HS (high speed). "Hardware Removal" results in error. If your PC uses Windows® 2000 Professional, the problem may take more time because data...

Owners Guide
Page 174
... press the reset button with undue force. ElS Dig.Zoom MIC.Filter Record Functions Setup VIDEO Mode Quality 16:9 Input Source PHOTO Input Self Timer OSD Output Date Setup Date Set Date Mode LCD/EVF Setup LCD Brightness EVF Brightness Color Level EVF Display Initial Setup Beep Power Save Record LED Language Demo Mode Auto Auto On 40× Off FINE FINE Off CAMERA Field Off On 1/1/2005 12:00AM M/D/Y Auto On Off On English Auto * Some items will be reset: Set the date and time again before using the DVD video camera/recorder. 1 Set the power switch to "OFF...
... press the reset button with undue force. ElS Dig.Zoom MIC.Filter Record Functions Setup VIDEO Mode Quality 16:9 Input Source PHOTO Input Self Timer OSD Output Date Setup Date Set Date Mode LCD/EVF Setup LCD Brightness EVF Brightness Color Level EVF Display Initial Setup Beep Power Save Record LED Language Demo Mode Auto Auto On 40× Off FINE FINE Off CAMERA Field Off On 1/1/2005 12:00AM M/D/Y Auto On Off On English Auto * Some items will be reset: Set the date and time again before using the DVD video camera/recorder. 1 Set the power switch to "OFF...


