Owners Guide
Page 2
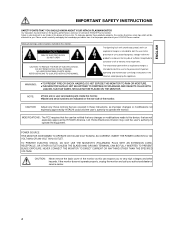
... NOT USE THE MONITOR'S (POLARIZED) PLUG WITH AN EXTENSION CORD, RECEPTACLE, OR OTHER OUTLET UNLESS THE BLADES AND GROUND TERMINAL CAN BE FULLY INSERTED TO PREVENT BLADE EXPOSURE. POWER SOURCE THIS MONITOR IS DESIGNED TO OPERATE ON 100-240 VOLT 50/60Hz, AC CURRENT. REFER SERVICING TO QUALIFIED SERVICE PERSONNEL. SAFETY POINTS THAT YOU SHOULD KNOW ABOUT YOUR HITACHI PLASMA MONITOR Our...
... NOT USE THE MONITOR'S (POLARIZED) PLUG WITH AN EXTENSION CORD, RECEPTACLE, OR OTHER OUTLET UNLESS THE BLADES AND GROUND TERMINAL CAN BE FULLY INSERTED TO PREVENT BLADE EXPOSURE. POWER SOURCE THIS MONITOR IS DESIGNED TO OPERATE ON 100-240 VOLT 50/60Hz, AC CURRENT. REFER SERVICING TO QUALIFIED SERVICE PERSONNEL. SAFETY POINTS THAT YOU SHOULD KNOW ABOUT YOUR HITACHI PLASMA MONITOR Our...
Owners Guide
Page 3
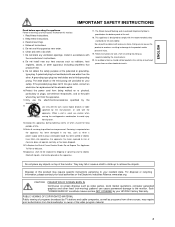
... monitor. 1. Follow instructions for wall, shelf, or ceiling mounting as video games, stock market quotations, computer generated graphics and other fixed (non-moving the cart/apparatus combination to dripping or splashing and no objects filled with the apparatus. Do not place any way, such as when a power-supply cord or plug is designed to retrieve the objects. Read these instructions. 3. Do not use...
... monitor. 1. Follow instructions for wall, shelf, or ceiling mounting as video games, stock market quotations, computer generated graphics and other fixed (non-moving the cart/apparatus combination to dripping or splashing and no objects filled with the apparatus. Do not place any way, such as when a power-supply cord or plug is designed to retrieve the objects. Read these instructions. 3. Do not use...
Owners Guide
Page 4
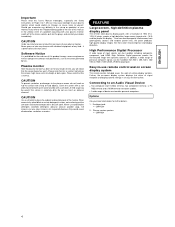
... FEATURE Large-screen, high-definition plasma display panel The 42-inch color plasma display panel, with your plasma monitor, switch off at the rear of a problem occurring with a resolution of setting display controls. Options Ask your plasma monitor, which could shorten its lifespan, or cause injury to -view fashion. A mild soap may cause damage to the Troubleshooting guide at the mains sockets, pull out the plugs, and contact your dealer immediately. Do not use acid...
... FEATURE Large-screen, high-definition plasma display panel The 42-inch color plasma display panel, with your plasma monitor, switch off at the rear of a problem occurring with a resolution of setting display controls. Options Ask your plasma monitor, which could shorten its lifespan, or cause injury to -view fashion. A mild soap may cause damage to the Troubleshooting guide at the mains sockets, pull out the plugs, and contact your dealer immediately. Do not use acid...
Owners Guide
Page 5
... Connecting to a PC or a HDMI device 14 Power Cord Connection 15 OPERATING INSTRUCTIONS 16 Turning Power On and Off 16 Input Switching 17 Volume Adjustment 17 Audio Mute 17 Size Switching 18 Input Signal Screen Desplay 18 Automatic Adjustment of Screen Pocition and the clock...... 18 Using the Menu Screen 19 Picture Menu 21 Image Menu 22 Audio Menu 24 Function Menu 25 Setup1 Menu 27 Setup2 Menu 28 OTHER FEATURE 29 Automatic Store 29 Signal Check (RGB Input 30 IMAGE RETENTION OF PLASMA DISPLAY 31 NOTES 31 TROUBLESHOOTING...
... Connecting to a PC or a HDMI device 14 Power Cord Connection 15 OPERATING INSTRUCTIONS 16 Turning Power On and Off 16 Input Switching 17 Volume Adjustment 17 Audio Mute 17 Size Switching 18 Input Signal Screen Desplay 18 Automatic Adjustment of Screen Pocition and the clock...... 18 Using the Menu Screen 19 Picture Menu 21 Image Menu 22 Audio Menu 24 Function Menu 25 Setup1 Menu 27 Setup2 Menu 28 OTHER FEATURE 29 Automatic Store 29 Signal Check (RGB Input 30 IMAGE RETENTION OF PLASMA DISPLAY 31 NOTES 31 TROUBLESHOOTING...
Owners Guide
Page 6
... could be dangerous. The contents will be used. 6 Abnormal operations such as smoke, strange odor, no image, no sound, excessive sound, damaged casing, elements, cables, penetration of the monitor and other objects such as a wobbly or inclined stand. In such case, immediately turn off the power switch, disconnect the power plug from the power outlet. The monitor contains high voltage components. If liquids or...
... could be dangerous. The contents will be used. 6 Abnormal operations such as smoke, strange odor, no image, no sound, excessive sound, damaged casing, elements, cables, penetration of the monitor and other objects such as a wobbly or inclined stand. In such case, immediately turn off the power switch, disconnect the power plug from the power outlet. The monitor contains high voltage components. If liquids or...
Owners Guide
Page 8
... move the monitor during use these features. x You are present. Placing anything on how to the user manual for instruction on top of time. x Before cleaning, turn off and unplug the monitor. Never remove the back cover of the sun to the screen in transformation, melting or fire. Do not put the monitor in the operating instructions unless you to display images. x A wet place...
... move the monitor during use these features. x You are present. Placing anything on how to the user manual for instruction on top of time. x Before cleaning, turn off and unplug the monitor. Never remove the back cover of the sun to the screen in transformation, melting or fire. Do not put the monitor in the operating instructions unless you to display images. x A wet place...
Owners Guide
Page 9
... or room lighting) onto the remote control sensors could cause the product to the international EMI standards. Precautions for wall, shelf or ceiling mounting as Radio etc. x Use only with the cart, stand, tripod, bracket, or table specified by turning off and withdraw the power plug before making or changing connections. x This product is transported. x Follow instructions for the installation x Do not use makeshift stands and NEVER fix legs...
... or room lighting) onto the remote control sensors could cause the product to the international EMI standards. Precautions for wall, shelf or ceiling mounting as Radio etc. x Use only with the cart, stand, tripod, bracket, or table specified by turning off and withdraw the power plug before making or changing connections. x This product is transported. x Follow instructions for the installation x Do not use makeshift stands and NEVER fix legs...
Owners Guide
Page 12
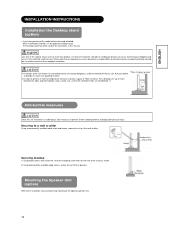
... the optional speaker unit. Securing to a wall or pillar Using a commercially available cord, chain and clamp, secure the set - ENGLISH INSTALLATION INSTRUCTIONS Installation the Desktop stand (option) • If you have purchased the model without the stand attached: When installing the monitor, use of other objects such as shown. 2) Using commercially available wood screws, secure the set to the clamping screw holes on the rear of the stand as walls, etc...
... the optional speaker unit. Securing to a wall or pillar Using a commercially available cord, chain and clamp, secure the set - ENGLISH INSTALLATION INSTRUCTIONS Installation the Desktop stand (option) • If you have purchased the model without the stand attached: When installing the monitor, use of other objects such as shown. 2) Using commercially available wood screws, secure the set to the clamping screw holes on the rear of the stand as walls, etc...
Owners Guide
Page 13
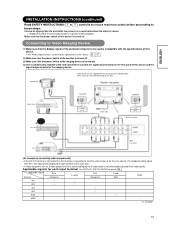
... table where the stand is possible to view the same image as on the main source. x Install the monitor to have ready access to provide finer vedio quality. CAMCORDER Monitor rear panel DVD PLAYER Set-TopBox Speaker(R) SPEAKER TERMINAL (6ȍ) 10W Power Code Speaker(L) SPEAKER TERMINAL (6ȍ) 10W Basic Connection Better Connection VCR [An example of the personal computer to be displayed on both screens at the same time. Make sure that the display signal of connecting video...
... table where the stand is possible to view the same image as on the main source. x Install the monitor to have ready access to provide finer vedio quality. CAMCORDER Monitor rear panel DVD PLAYER Set-TopBox Speaker(R) SPEAKER TERMINAL (6ȍ) 10W Power Code Speaker(L) SPEAKER TERMINAL (6ȍ) 10W Basic Connection Better Connection VCR [An example of the personal computer to be displayed on both screens at the same time. Make sure that the display signal of connecting video...
Owners Guide
Page 14
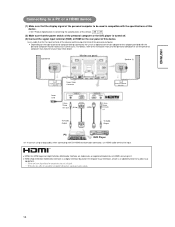
... instruction manual of HDMI Licensing LLC. Use a cable that the power switch of the personal computer or the DVD player is an added function for input. x See "Product Specifications" concerning the specifications of this device. Speaker(R) Monitor rear panel Speaker (L) SPEAKER TERMINAL (6ȍ )10W Power Cable Connector Power Cord 3.5mm Stereo mini jack (D-Sub) (HDMI) SPEAKER TERMINAL (6ȍ )10W 3.5mm Stereo mini jack ϡ1 To Audio Output To Audio Output PC DVD Player ϡ1 In case of using analog audio, when connecting with DVI-HDMI...
... instruction manual of HDMI Licensing LLC. Use a cable that the power switch of the personal computer or the DVD player is an added function for input. x See "Product Specifications" concerning the specifications of this device. Speaker(R) Monitor rear panel Speaker (L) SPEAKER TERMINAL (6ȍ )10W Power Cable Connector Power Cord 3.5mm Stereo mini jack (D-Sub) (HDMI) SPEAKER TERMINAL (6ȍ )10W 3.5mm Stereo mini jack ϡ1 To Audio Output To Audio Output PC DVD Player ϡ1 In case of using analog audio, when connecting with DVI-HDMI...

Owners Guide
Page 17
... Volume Adjustment The volume can be switched in sequence and the status will fix as Full mode and not change when receiving 720p/60, or 1080i/60 17 Volume setting value VOLUME UP/DOWN buttons SOURCE button AV1,AV2,AV3, AV4, RGB, HDMI buttons Select buttons VOLUME CONTROL button MUTE button Adjustment status guide display z When a button is muted. Size Switching Input Switching - Input can be displayed at the bottom of the remote control. Depending on the input signal format received, the picture format ratio allows you to adjust the images...
... Volume Adjustment The volume can be switched in sequence and the status will fix as Full mode and not change when receiving 720p/60, or 1080i/60 17 Volume setting value VOLUME UP/DOWN buttons SOURCE button AV1,AV2,AV3, AV4, RGB, HDMI buttons Select buttons VOLUME CONTROL button MUTE button Adjustment status guide display z When a button is muted. Size Switching Input Switching - Input can be displayed at the bottom of the remote control. Depending on the input signal format received, the picture format ratio allows you to adjust the images...

Owners Guide
Page 18
... incompatible screen mode is displayed over the entire screen in the Panoramic mode, parts of the periphery of the remote control. 埛 The display will go out in approximately 2 seconds. ENGLISH OPERATING INSTRUCTIONS (continued) Size Switching (continued) Size Switc hi ng Display area selection diagram (RGB input) When you want to Set the display size to Input signal Play a 4:3 image faithfully in a 16:9 screen in the standard vertical size Full and horizontally squeezed. (Squeeze) Display screen Remarks An image...
... incompatible screen mode is displayed over the entire screen in the Panoramic mode, parts of the periphery of the remote control. 埛 The display will go out in approximately 2 seconds. ENGLISH OPERATING INSTRUCTIONS (continued) Size Switching (continued) Size Switc hi ng Display area selection diagram (RGB input) When you want to Set the display size to Input signal Play a 4:3 image faithfully in a 16:9 screen in the standard vertical size Full and horizontally squeezed. (Squeeze) Display screen Remarks An image...
Owners Guide
Page 20
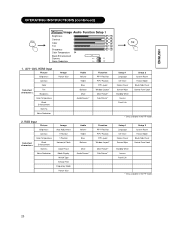
... Image Auto Adjustment H Position V Position Horizontal Clock Clock Phase Mode Display WVGA Type Vertical Filter Frequency Mode Picture Size Audio Volume Treble Bass Balance Mute Audio Source*1 Audio Volume Treble Bass Balance Mute Audio Source*1 Function PIP H Position PIP V Position PIP Layout Window Layout*1 Main Picture*1 Sub Picture*1 Function PIP H Position PIP V Position PIP Layout Window Layout*1 Main Picture*1 Sub Picture*1 Setup 1 Language Off Timer Screen Saver Screen Wipe Standby White Inverse Panel Life Setup 2 System Reset Freeze Mode Black Side Panel Control Panel Lock...
... Image Auto Adjustment H Position V Position Horizontal Clock Clock Phase Mode Display WVGA Type Vertical Filter Frequency Mode Picture Size Audio Volume Treble Bass Balance Mute Audio Source*1 Audio Volume Treble Bass Balance Mute Audio Source*1 Function PIP H Position PIP V Position PIP Layout Window Layout*1 Main Picture*1 Sub Picture*1 Function PIP H Position PIP V Position PIP Layout Window Layout*1 Main Picture*1 Sub Picture*1 Setup 1 Language Off Timer Screen Saver Screen Wipe Standby White Inverse Panel Life Setup 2 System Reset Freeze Mode Black Side Panel Control Panel Lock...
Owners Guide
Page 22
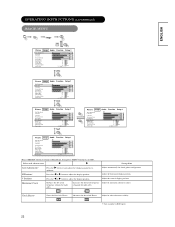
.... (* Only available in RGB input) 22 Adjust the vertical display position. Horizontal Clock Reduces the dot clock frequency (shrinks the right side). Advances the dot clock Phase. Adjust the horizontal display position. H Position* Press the W or X button to adjust the display position. ENGLISH OPERATING INSTRUCTIONS (continued) P IMAGE MENU Image Picture Image Auto Adjustment H Position V Position Horizontal Clock Clock Phase Mode Display WVGA Type Vertical Filter Frequency Mode Picture Size Audio Function On On On...
.... (* Only available in RGB input) 22 Adjust the vertical display position. Horizontal Clock Reduces the dot clock frequency (shrinks the right side). Advances the dot clock Phase. Adjust the horizontal display position. H Position* Press the W or X button to adjust the display position. ENGLISH OPERATING INSTRUCTIONS (continued) P IMAGE MENU Image Picture Image Auto Adjustment H Position V Position Horizontal Clock Clock Phase Mode Display WVGA Type Vertical Filter Frequency Mode Picture Size Audio Function On On On...
Owners Guide
Page 23
... Input Signal Screen Display is only available for W-VGA signal. Set to Size Switching 17 * Only available in RGB mode 23 Refer to Movie when viewing moving images on a personal computer. Change picture size by pressW or X button. This is not needed when switching signals. When it is set to exit OSD. ENGLISH *Press "RETURN" button to return to Main Menu, then press "MENU" button to On, the display area mode can display the Input Signal Screen Display every time the input mode...
... Input Signal Screen Display is only available for W-VGA signal. Set to Size Switching 17 * Only available in RGB mode 23 Refer to Movie when viewing moving images on a personal computer. Change picture size by pressW or X button. This is not needed when switching signals. When it is set to exit OSD. ENGLISH *Press "RETURN" button to return to Main Menu, then press "MENU" button to On, the display area mode can display the Input Signal Screen Display every time the input mode...
Owners Guide
Page 24
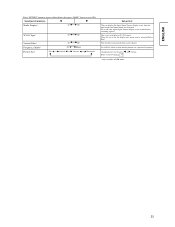
Treble Suppresses treble. Adjust to exit OSD. ENGLISH AUDIO MENU Audio Picture Image Audio Function Setup 1 Volume Treble Bass Balance Mute Audio Source On Main 029 050 050 050 Off Sub Picture Image Audio Function Setup 1 Volume Treble Bass Balance Mute Audio Source On Main 029 050 050 050 Off Sub Picture Image Audio Function Setup 1 Volume Treble Bass Balance Mute Audio Source On Main 029 050 050 050 Off Sub *Press "RETURN"" button to return to...
Treble Suppresses treble. Adjust to exit OSD. ENGLISH AUDIO MENU Audio Picture Image Audio Function Setup 1 Volume Treble Bass Balance Mute Audio Source On Main 029 050 050 050 Off Sub Picture Image Audio Function Setup 1 Volume Treble Bass Balance Mute Audio Source On Main 029 050 050 050 Off Sub Picture Image Audio Function Setup 1 Volume Treble Bass Balance Mute Audio Source On Main 029 050 050 050 Off Sub *Press "RETURN"" button to return to...

Owners Guide
Page 27
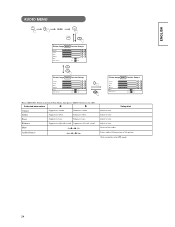
... panel image retention. When this item, the screen changes into the white pattern when the monitor enters power save mode, and it will continue for the OSD. This function can occur with stationary pictures by the white field signal. Off 30 Min. Select 30. And press the Menu or Return button to normal viewing. By this control, power consumption can be reduced or degradation of unit 0 ~ 180 min. Set...
... panel image retention. When this item, the screen changes into the white pattern when the monitor enters power save mode, and it will continue for the OSD. This function can occur with stationary pictures by the white field signal. Off 30 Min. Select 30. And press the Menu or Return button to normal viewing. By this control, power consumption can be reduced or degradation of unit 0 ~ 180 min. Set...
Owners Guide
Page 29
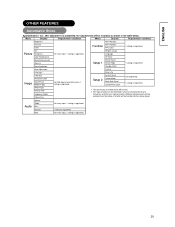
... the same signal. Volume Treble Audio Bass For every input, 1 setting is registered. WVGA Type Vertical Filter Frequency Mode Picture Size x The previously recorded items will be identified by the horizontal/vertical sync frequency and the sync signal polarity. Window Layout Language Color Temperature Off Timer Black Enhancement Gamma Screen Saver Setup 1 Screen Wipe 1 setting is registered. Noise Reduction Standby White Image Auto Adjustment H Position V Position Horizontal Clock Clock Phase Mode Display For RGB input and another input, 1 setting is...
... the same signal. Volume Treble Audio Bass For every input, 1 setting is registered. WVGA Type Vertical Filter Frequency Mode Picture Size x The previously recorded items will be identified by the horizontal/vertical sync frequency and the sync signal polarity. Window Layout Language Color Temperature Off Timer Black Enhancement Gamma Screen Saver Setup 1 Screen Wipe 1 setting is registered. Noise Reduction Standby White Image Auto Adjustment H Position V Position Horizontal Clock Clock Phase Mode Display For RGB input and another input, 1 setting is...
Owners Guide
Page 31
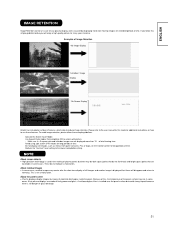
... panel screen x Plasma displays display images by displaying fixed (non-moving) images for long periods of electrical discharges inside the panel. Use Aspect Ratio modes that are too bright) in some cases. Reduce the "Contrast" level setting to the lowest acceptable setting. Avoid using split screen (PIP) modes for extended periods of this simple guideline below you follow these features. Examples of Image Retention 4x3 Image Display "Letterbox" Image Display "On-Screen Display" Hitachi has included a number...
... panel screen x Plasma displays display images by displaying fixed (non-moving) images for long periods of electrical discharges inside the panel. Use Aspect Ratio modes that are too bright) in some cases. Reduce the "Contrast" level setting to the lowest acceptable setting. Avoid using split screen (PIP) modes for extended periods of this simple guideline below you follow these features. Examples of Image Retention 4x3 Image Display "Letterbox" Image Display "On-Screen Display" Hitachi has included a number...
Owners Guide
Page 32
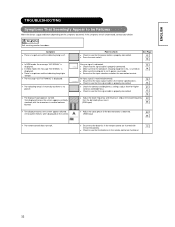
... is no picture and the indicating lamp is off. WARNING Self servicing can be Failures Make the checks suggested below depending on the screen. (RGB input) 34 Ɣ The remote control does not work. ʳ Ɣ Ensure that the batteries in power-save mode. Ɣ Ensure that the signal cable is properly connected. Ɣ Press the main switch. Text displayed across the screen appears vertically streaked...
... is no picture and the indicating lamp is off. WARNING Self servicing can be Failures Make the checks suggested below depending on the screen. (RGB input) 34 Ɣ The remote control does not work. ʳ Ɣ Ensure that the batteries in power-save mode. Ɣ Ensure that the signal cable is properly connected. Ɣ Press the main switch. Text displayed across the screen appears vertically streaked...


