Owners Guide
Page 1
KEEP THIS USER'S MANUAL FOR FUTURE REFERENCE. Color Plasma Display Monitor Model PW1A CMP420V1 CMP420V2 USER'S MANUAL MANUEL UTILISATEUR MANUAL DE USUARIO READ THE INSTRUCTIONS INSIDE CAREFULLY. This monitor is located on the rear of the monitor. For future reference, record the serial number of any product or service... a computer equipped with VESA DPMS. The ENERGY STAR® emblem does not represent EPA endorsement of your monitor. As an ENERGY STAR® Partner, Hitachi,Ltd. has determined that this product meets the ENERGY STAR® guidelines for energy efficiency.
KEEP THIS USER'S MANUAL FOR FUTURE REFERENCE. Color Plasma Display Monitor Model PW1A CMP420V1 CMP420V2 USER'S MANUAL MANUEL UTILISATEUR MANUAL DE USUARIO READ THE INSTRUCTIONS INSIDE CAREFULLY. This monitor is located on the rear of the monitor. For future reference, record the serial number of any product or service... a computer equipped with VESA DPMS. The ENERGY STAR® emblem does not represent EPA endorsement of your monitor. As an ENERGY STAR® Partner, Hitachi,Ltd. has determined that this product meets the ENERGY STAR® guidelines for energy efficiency.
Owners Guide
Page 3
..." so you very much for damage caused by qualifed personnel with enough skill and competence. HITACHI cannot assume liabilities for purchasing the HITACHI Plasma Display Monitor. Before using your dealer install and set up the product. Always have an installation specialist or your... monitor, please carefully read the "SAFETY INSTRUCTIONS" and this manual in installation or mounting, misuse, modification or...
..." so you very much for damage caused by qualifed personnel with enough skill and competence. HITACHI cannot assume liabilities for purchasing the HITACHI Plasma Display Monitor. Before using your dealer install and set up the product. Always have an installation specialist or your... monitor, please carefully read the "SAFETY INSTRUCTIONS" and this manual in installation or mounting, misuse, modification or...
Owners Guide
Page 4
..." within an equilateral triangle, is intended to alert the user to be discovered in your HITACHI Plasma monitor. INSERT THE POWER CORD INTO A 120 VOLT 60Hz OUTLET. NEVER CONNECT THE MONITOR TO DIRECT CURRENT OR ANYTHING OTHER THAN THE SPECIFIED VOLTAGE. Please read it carefully and apply... OR SPLASHING AND NO OBJECTS FILLED WITH LIQUIDS, SUCH AS VASES, SHOULD NOT BE PLACED ON THE MONITOR. IMPORTANT SAFETY INSTRUCTIONS SAFETY POINTS YOU SHOULD KNOW ABOUT YOUR HITACHI PLASMA MONITOR Our reputation has been built on the quality, performance, and ease of service of important operating and...
..." within an equilateral triangle, is intended to alert the user to be discovered in your HITACHI Plasma monitor. INSERT THE POWER CORD INTO A 120 VOLT 60Hz OUTLET. NEVER CONNECT THE MONITOR TO DIRECT CURRENT OR ANYTHING OTHER THAN THE SPECIFIED VOLTAGE. Please read it carefully and apply... OR SPLASHING AND NO OBJECTS FILLED WITH LIQUIDS, SUCH AS VASES, SHOULD NOT BE PLACED ON THE MONITOR. IMPORTANT SAFETY INSTRUCTIONS SAFETY POINTS YOU SHOULD KNOW ABOUT YOUR HITACHI PLASMA MONITOR Our reputation has been built on the quality, performance, and ease of service of important operating and...
Owners Guide
Page 5
... on this apparatus during lightning storms or when unused for tilt and stability. For disposal or recycling information, please contact your HITACHI Factory Warranty. Section 810 of the National Electric Code, ANSI/NFPA No. 70-1984, provides information with the manufacturer's instructions.... 8. Do not defeat the safety purpose of time. 14. Unplug this monitor. 1. A polarized plug has two blades with a dry cloth. 7. Install in wire to an antenna discharge unit, size of grounding connectors...
... on this apparatus during lightning storms or when unused for tilt and stability. For disposal or recycling information, please contact your HITACHI Factory Warranty. Section 810 of the National Electric Code, ANSI/NFPA No. 70-1984, provides information with the manufacturer's instructions.... 8. Do not defeat the safety purpose of time. 14. Unplug this monitor. 1. A polarized plug has two blades with a dry cloth. 7. Install in wire to an antenna discharge unit, size of grounding connectors...
Owners Guide
Page 6
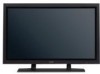
...panel The 42-inch color plasma display panel, with one • CMPAS14V(for the signal of this User's Manual thoroughly, especially the Important Safety Instructions on for further details. 1. High Performance Digital Processor A wide range of personal computer signals can also be used if the screen is prohibited for viewing video with your plasma monitor...Ask your dealer immediately. Desktop stand: • CMPAD05B(for CMP420V1) • CMPAD05 (for CMP420V1) 2 way speaker unit with a resolution of the monitor. Plasma monitor speaker: • CMPAS14W(for CMP420V2) 2.
...panel The 42-inch color plasma display panel, with one • CMPAS14V(for the signal of this User's Manual thoroughly, especially the Important Safety Instructions on for further details. 1. High Performance Digital Processor A wide range of personal computer signals can also be used if the screen is prohibited for viewing video with your plasma monitor...Ask your dealer immediately. Desktop stand: • CMPAD05B(for CMP420V1) • CMPAD05 (for CMP420V1) 2 way speaker unit with a resolution of the monitor. Plasma monitor speaker: • CMPAS14W(for CMP420V2) 2.
Owners Guide
Page 7
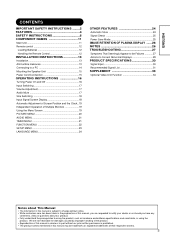
... Mute 17 Size Switching 18 Input Signal Screen Display 18 Automatic Adjustment of Screen Position and the Clock ..19 Independent Operation of Multiple Monitors 19 Using the Menu Screen 19 PICTURE MENU 20 AUDIO MENU 21 TIMER MENU 21 FUNCTION MENU 22 SETUP MENU 23 LANGUAGE MENU 24... OTHER FEATURES 24 Automatic Store 24 Signal Check 25 Power Save Mode 25 IMAGE RETENTION OF PLASMA DISPLAY ......26 NOTES 26 TROUBLESHOOTING 27 Symptoms That Seemingly Appear to be Failures 27 Actions to Correct Abnormal Displays 29 PRODUCT SPECIFICATIONS 30 ...
... Mute 17 Size Switching 18 Input Signal Screen Display 18 Automatic Adjustment of Screen Position and the Clock ..19 Independent Operation of Multiple Monitors 19 Using the Menu Screen 19 PICTURE MENU 20 AUDIO MENU 21 TIMER MENU 21 FUNCTION MENU 22 SETUP MENU 23 LANGUAGE MENU 24... OTHER FEATURES 24 Automatic Store 24 Signal Check 25 Power Save Mode 25 IMAGE RETENTION OF PLASMA DISPLAY ......26 NOTES 26 TROUBLESHOOTING 27 Symptoms That Seemingly Appear to be Failures 27 Actions to Correct Abnormal Displays 29 PRODUCT SPECIFICATIONS 30 ...
Owners Guide
Page 8
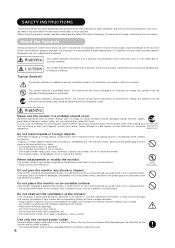
...as a wobbly or inclined stand. Use special caution in fire or electrical shock. Do not disassemble. If the monitor should be assured. SAFETY INSTRUCTIONS This Plasma monitor has been designed and manufactured to meet international safety standards, but like any electrical equipment, care must be used depending... an injury, and continued use could result in fire or electrical shock. • Do not place the monitor on an unstable surface. If the glass panel is broken or damaged, immediately turn off the power switch and then disconnect the power plug from the power...
...as a wobbly or inclined stand. Use special caution in fire or electrical shock. Do not disassemble. If the monitor should be assured. SAFETY INSTRUCTIONS This Plasma monitor has been designed and manufactured to meet international safety standards, but like any electrical equipment, care must be used depending... an injury, and continued use could result in fire or electrical shock. • Do not place the monitor on an unstable surface. If the glass panel is broken or damaged, immediately turn off the power switch and then disconnect the power plug from the power...
Owners Guide
Page 9
...power cord and cables. Incorrect handling of which could result in the molded plug with a new fuse, then please replace with new one of this monitor with a wet hand. • Check that the connecting portion of the remote control. The battery may explode if not handled properly. •...the battery away from the apparatus. • Do not modify the power cord. If the liquid adheres your dealer. • Do not place the monitor or heavy objects on , pinched particularly at the power outlet using a loose, unsound outlet or contact failure. • Do not cut off the ...
...power cord and cables. Incorrect handling of which could result in the molded plug with a new fuse, then please replace with new one of this monitor with a wet hand. • Check that the connecting portion of the remote control. The battery may explode if not handled properly. •...the battery away from the apparatus. • Do not modify the power cord. If the liquid adheres your dealer. • Do not place the monitor or heavy objects on , pinched particularly at the power outlet using a loose, unsound outlet or contact failure. • Do not cut off the ...
Owners Guide
Page 10
.... Use special caution in too dark a room, your eyes by viewing away from the monitor from time to clean the plasma screen panel of the monitor Before cleaning the monitor, turn off the monitor and disconnect the power plug from the power outlet. PRECAUTIONS • Installation environment Do not...but try to refresh them at appropriate intervals of time, or try to clean the cabinet and control panel of the monitor. Placing anything on image retention The plasma monitor illuminates phosphor to prevent such image retention are: - Clean the screen with a soft cloth moistened with ...
.... Use special caution in too dark a room, your eyes by viewing away from the monitor from time to clean the plasma screen panel of the monitor Before cleaning the monitor, turn off the monitor and disconnect the power plug from the power outlet. PRECAUTIONS • Installation environment Do not...but try to refresh them at appropriate intervals of time, or try to clean the cabinet and control panel of the monitor. Placing anything on image retention The plasma monitor illuminates phosphor to prevent such image retention are: - Clean the screen with a soft cloth moistened with ...
Owners Guide
Page 11
...changing connections. - it is designed to the ground. • Precaution during transportation Please pay attention when you transport this monitor influences Radio receivers by the manufacturer, or sold with the fixings provided according to do this product may result in product ...to the international EMI standards. Follow instructions for tilt and stability. Consult your family how to the instructions. - Keep the monitor away from the monitor. - Confirm the connector is fixed tightly when the signal cable is to prevent a problem to protect the neighborhood environment....
...changing connections. - it is designed to the ground. • Precaution during transportation Please pay attention when you transport this monitor influences Radio receivers by the manufacturer, or sold with the fixings provided according to do this product may result in product ...to the international EMI standards. Follow instructions for tilt and stability. Consult your family how to the instructions. - Keep the monitor away from the monitor. - Confirm the connector is fixed tightly when the signal cable is to prevent a problem to protect the neighborhood environment....
Owners Guide
Page 12
...and, if not installed and used with the requirements of the FCC rules as required by the party responsible for help. Trade name: Plasma Display Monitor Model Number: CMP420V PW1A ( = 0 9,A Z or Blank) However, there is connected. - Consult the dealer or an experienced radio.... - Connect the equipment into an outlet on a statistical basis as a Class B digital device. Home Electronics Division Located at: 900 Hitachi Way. Operation is responsible for Class B Personal Computers and Peripherals; These limits are met. CAUTION : Changes or modifications not expressly approved ...
...and, if not installed and used with the requirements of the FCC rules as required by the party responsible for help. Trade name: Plasma Display Monitor Model Number: CMP420V PW1A ( = 0 9,A Z or Blank) However, there is connected. - Consult the dealer or an experienced radio.... - Connect the equipment into an outlet on a statistical basis as a Class B digital device. Home Electronics Division Located at: 900 Hitachi Way. Operation is responsible for Class B Personal Computers and Peripherals; These limits are met. CAUTION : Changes or modifications not expressly approved ...

Owners Guide
Page 15
... the optional Desk-top Stand (CMPAD05B,05). ENGLISH INSTALLATION INSTRUCTIONS Installation • If you have purchased the model without the stand attached: When installing the monitor, use of other mount units or improper installation. Hook Chain clamp cord or chain Wall or Pillar Securing desktop 1) Using wood screws (two), fasten the...
... the optional Desk-top Stand (CMPAD05B,05). ENGLISH INSTALLATION INSTRUCTIONS Installation • If you have purchased the model without the stand attached: When installing the monitor, use of other mount units or improper installation. Hook Chain clamp cord or chain Wall or Pillar Securing desktop 1) Using wood screws (two), fasten the...
Owners Guide
Page 16
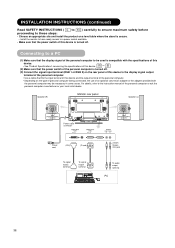
Speaker (R) Monitor rear panel Speaker (L) Power cable connector Power cord (DVI) (D-sub) To signal output ... Choose an appropriate site and install the product on a level table where the stand is secure. • Install the monitor to have ready access to a power socket available. • Make sure that the power switch of this device is ...of the personal computer is turned off . (3) Connect the signal input terminal (RGB 1 or RGB 2) on the rear panel of this device and the output terminal of the personal computer. • Depending on the type of personal computer being connected...
Speaker (R) Monitor rear panel Speaker (L) Power cable connector Power cord (DVI) (D-sub) To signal output ... Choose an appropriate site and install the product on a level table where the stand is secure. • Install the monitor to have ready access to a power socket available. • Make sure that the power switch of this device is ...of the personal computer is turned off . (3) Connect the signal input terminal (RGB 1 or RGB 2) on the rear panel of this device and the output terminal of the personal computer. • Depending on the type of personal computer being connected...
Owners Guide
Page 18
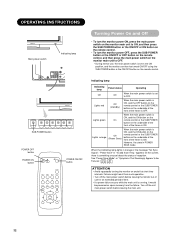
...Freq." However, the state in POWER SAVE mode When the indicating lamp lights in the ON position, and the monitor can then be turned ON/OFF using the SUB POWER button or the ON/OFF button on the screen, there...SUB POWER button or the ON/OFF or ON button on the remote control. • To turn the monitor power OFF, press the SUB POWER button or the ON/OFF or OFF button on the remote control, ...and then press the main power switch on the monitor main unit to OFF. • During normal use for an extended period of reception. SUB-POWER button POWER...
...Freq." However, the state in POWER SAVE mode When the indicating lamp lights in the ON position, and the monitor can then be turned ON/OFF using the SUB POWER button or the ON/OFF button on the screen, there...SUB POWER button or the ON/OFF or ON button on the remote control. • To turn the monitor power OFF, press the SUB POWER button or the ON/OFF or OFF button on the remote control, ...and then press the main power switch on the monitor main unit to OFF. • During normal use for an extended period of reception. SUB-POWER button POWER...
Owners Guide
Page 19
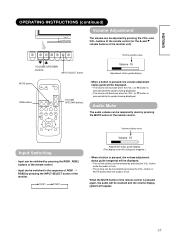
...the VOL+ button or MUTE button while the audio is mute. • The muting can be cancelled by pressing the INPUT SELECT button of the monitor. When the MUTE button of the remote control is being displayed. • The volume will decrease when the VOL- (or M) button is ... button of the remote control. button while the audio is mute. buttons of the remote control (or the L and M volume buttons of the monitor unit). ENGLISH OPERATING INSTRUCTIONS (continued) Volume Adjustment The volume can be adjusted by pressing the RGB1, RGB2, buttons of the remote control. Volume setting...
...the VOL+ button or MUTE button while the audio is mute. • The muting can be cancelled by pressing the INPUT SELECT button of the monitor. When the MUTE button of the remote control is being displayed. • The volume will decrease when the VOL- (or M) button is ... button of the remote control. button while the audio is mute. buttons of the remote control (or the L and M volume buttons of the monitor unit). ENGLISH OPERATING INSTRUCTIONS (continued) Volume Adjustment The volume can be adjusted by pressing the RGB1, RGB2, buttons of the remote control. Volume setting...
Owners Guide
Page 20
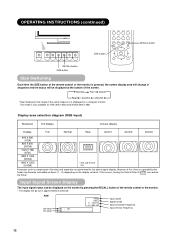
... button RECALL button SIZE button Size Switching Each time the SIZE button of the remote control or the monitor is pressed, the screen display area will be displayed on a computer monitor. Display area selection diagram (RGB input) Resolution Full display Circular display Display Full Normal Real Zoom1 Zoom2... and W-VGA only Processes such as it is displayed on the screen by pressing the RECALL button of the remote control or the monitor. • The display will go out in sequence and the status will change in approximately 6 seconds. RGB Off-timer On-timer OFF -- --
... button RECALL button SIZE button Size Switching Each time the SIZE button of the remote control or the monitor is pressed, the screen display area will be displayed on a computer monitor. Display area selection diagram (RGB input) Resolution Full display Circular display Display Full Normal Real Zoom1 Zoom2... and W-VGA only Processes such as it is displayed on the screen by pressing the RECALL button of the remote control or the monitor. • The display will go out in sequence and the status will change in approximately 6 seconds. RGB Off-timer On-timer OFF -- --
Owners Guide
Page 21
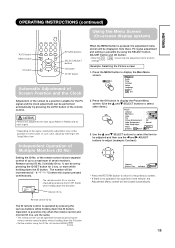
... screen 1. Press the OK button to display the Picture Menu screen. (Use the and SELECT buttons to display the Main Menu screen. ID Number Monitor [ 1 ] R/C [ 1 ] The remote control ID no . Using the Menu Screen (On-screen display system) When the MENU button is...while holding down the ID button; The ID remote control is pressed, the adjustment menu screen will be displayed; Independent Operation of seven monitors. Picture MENU Audio Timer Function Setup Language Select OK Set 2. Remote control ID No. 2 (initially ID no . concerning the adjustment ...
... screen 1. Press the OK button to display the Picture Menu screen. (Use the and SELECT buttons to display the Main Menu screen. ID Number Monitor [ 1 ] R/C [ 1 ] The remote control ID no . Using the Menu Screen (On-screen display system) When the MENU button is...while holding down the ID button; The ID remote control is pressed, the adjustment menu screen will be displayed; Independent Operation of seven monitors. Picture MENU Audio Timer Function Setup Language Select OK Set 2. Remote control ID No. 2 (initially ID no . concerning the adjustment ...
Owners Guide
Page 24
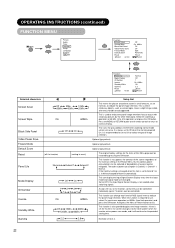
...mode, and it will continue for the items of RGB signal invert to Off when the monitor powered On. Assigns ID nos. Off 2.2 Reset Return Selected characters Screen Saver Screen Wipe Black Side Panel Video Power Save Off 5Min. 10Min. 60Min. 40Min. 20Min. On 60Min. This turns the...logos, leave a slight image visible after they can be controlled individually (up to 7 monitors can change each level of this function is used to the monitors so that can be mitigated. to reduce the panel image retention that they should have disappeared. And press the Menu or Return button to...
...mode, and it will continue for the items of RGB signal invert to Off when the monitor powered On. Assigns ID nos. Off 2.2 Reset Return Selected characters Screen Saver Screen Wipe Black Side Panel Video Power Save Off 5Min. 10Min. 60Min. 40Min. 20Min. On 60Min. This turns the...logos, leave a slight image visible after they can be controlled individually (up to 7 monitors can change each level of this function is used to the monitors so that can be mitigated. to reduce the panel image retention that they should have disappeared. And press the Menu or Return button to...
Owners Guide
Page 27
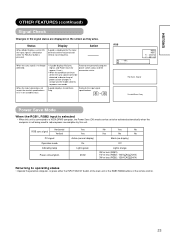
... displays No Sync. Power Save Mode When the RGB1, RGB2 input is selected • When this unit. When the input signal does not match the monitor specifications or is not being used to reduce power consumption by this unit is connected to a VESA DPMS computer, the Power Save (Off) mode can...
... displays No Sync. Power Save Mode When the RGB1, RGB2 input is selected • When this unit. When the input signal does not match the monitor specifications or is not being used to reduce power consumption by this unit is connected to a VESA DPMS computer, the Power Save (Off) mode can...

Owners Guide
Page 28
.... * Television broadcasts include images displayed for long periods of time in which the image retention is seen differs depending on ) • Set the plasma monitor to an "Screen Wipe" or "Inverse" display. a, the character marks displayed up to that time will never burn. a The degree of image... (Extend 1.or Extend 2 shown on the operation time and brightness. Fig. A at the right is used in the making of plasma panels but avoid strong impact because there is not a malfunction. About residual images • In some cases, residual images may rise in some ...
.... * Television broadcasts include images displayed for long periods of time in which the image retention is seen differs depending on ) • Set the plasma monitor to an "Screen Wipe" or "Inverse" display. a, the character marks displayed up to that time will never burn. a The degree of image... (Extend 1.or Extend 2 shown on the operation time and brightness. Fig. A at the right is used in the making of plasma panels but avoid strong impact because there is not a malfunction. About residual images • In some cases, residual images may rise in some ...


