Owners Guide
Page 1
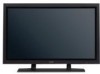
... EPA endorsement of any product or service. This monitor is located on the rear of your monitor. has determined that this product meets the ENERGY STAR® guidelines for energy efficiency. As an ENERGY STAR® Partner, Hitachi,Ltd. SERIAL NO. Color Plasma Display Monitor Model PW1A CMP420V1 CMP420V2 USER'S MANUAL MANUEL UTILISATEUR MANUAL DE USUARIO...
... EPA endorsement of any product or service. This monitor is located on the rear of your monitor. has determined that this product meets the ENERGY STAR® guidelines for energy efficiency. As an ENERGY STAR® Partner, Hitachi,Ltd. SERIAL NO. Color Plasma Display Monitor Model PW1A CMP420V1 CMP420V2 USER'S MANUAL MANUEL UTILISATEUR MANUAL DE USUARIO...
Owners Guide
Page 3
...manual in installation or mounting, misuse, modification or a natural disaster. HITACHI cannot assume liabilities for damage caused by qualifed personnel with enough skill and competence. Note for purchasing the HITACHI Plasma Display Monitor. You will know how to handle the product. Always have an ...installation specialist or your monitor, please carefully read the "SAFETY INSTRUCTIONS" and this manual to the ...
...manual in installation or mounting, misuse, modification or a natural disaster. HITACHI cannot assume liabilities for damage caused by qualifed personnel with enough skill and competence. Note for purchasing the HITACHI Plasma Display Monitor. You will know how to handle the product. Always have an ...installation specialist or your monitor, please carefully read the "SAFETY INSTRUCTIONS" and this manual to the ...
Owners Guide
Page 4
...are indicated on back side of HITACHI Plasma monitor. MODIFICATIONS: The FCC requires the user to operate the monitor. INSERT THE POWER CORD INTO A 120 VOLT 60Hz OUTLET. If the monitor does not operate properly, unplug the monitor and call your HITACHI Plasma monitor. CAUTION: Adjust only those controls ..., AC CURRENT. IMPORTANT SAFETY INSTRUCTIONS SAFETY POINTS YOU SHOULD KNOW ABOUT YOUR HITACHI PLASMA MONITOR Our reputation has been built on the quality, performance, and ease of service of the monitor. Safety is intended to alert the user to the presence of uninsulated "...
...are indicated on back side of HITACHI Plasma monitor. MODIFICATIONS: The FCC requires the user to operate the monitor. INSERT THE POWER CORD INTO A 120 VOLT 60Hz OUTLET. If the monitor does not operate properly, unplug the monitor and call your HITACHI Plasma monitor. CAUTION: Adjust only those controls ..., AC CURRENT. IMPORTANT SAFETY INSTRUCTIONS SAFETY POINTS YOU SHOULD KNOW ABOUT YOUR HITACHI PLASMA MONITOR Our reputation has been built on the quality, performance, and ease of service of the monitor. Safety is intended to alert the user to the presence of uninsulated "...
Owners Guide
Page 5
...supporting structure, grounding of the National Electric Code, ANSI/NFPA No. 70-1984, provides information with respect to proper grounding for your HITACHI Factory Warranty. Keep these instructions. 2. Clean only with the manufacturer's instructions. 8. type plug. A grounding type plug has two ... 18. Refer all servicing to comply with the cart, stand, tripod, bracket, or table specified by the manufacturer. 12. Monitors are designed to qualified service personnel. Servicing is connected to the receiver be connected to the grounding system of the obsolete outlet....
...supporting structure, grounding of the National Electric Code, ANSI/NFPA No. 70-1984, provides information with respect to proper grounding for your HITACHI Factory Warranty. Keep these instructions. 2. Clean only with the manufacturer's instructions. 8. type plug. A grounding type plug has two ... 18. Refer all servicing to comply with the cart, stand, tripod, bracket, or table specified by the manufacturer. 12. Monitors are designed to qualified service personnel. Servicing is connected to the receiver be connected to the grounding system of the obsolete outlet....
Owners Guide
Page 6
... setting display controls. Please note that this is extremely dirty. FEATURES Large-screen, high-definition plasma display panel The 42-inch color plasma display panel, with your plasma monitor, switch off at the rear of this manual. High Performance Digital Processor A wide range of...afterward wipe with a soft cloth. Never use harsh or abrasive cleaners! Never guess or take any kind - Plasma monitor speaker: • CMPAS14W(for CMP420V1) 2 way speaker unit with electrical equipment of your local retail dealer for CMP420V2) 2. CAUTION To prevent scratches...
... setting display controls. Please note that this is extremely dirty. FEATURES Large-screen, high-definition plasma display panel The 42-inch color plasma display panel, with your plasma monitor, switch off at the rear of this manual. High Performance Digital Processor A wide range of...afterward wipe with a soft cloth. Never use harsh or abrasive cleaners! Never guess or take any kind - Plasma monitor speaker: • CMPAS14W(for CMP420V1) 2 way speaker unit with electrical equipment of your local retail dealer for CMP420V2) 2. CAUTION To prevent scratches...
Owners Guide
Page 7
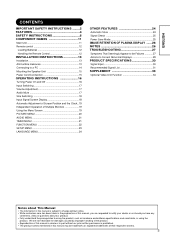
... Mute 17 Size Switching 18 Input Signal Screen Display 18 Automatic Adjustment of Screen Position and the Clock ..19 Independent Operation of Multiple Monitors 19 Using the Menu Screen 19 PICTURE MENU 20 AUDIO MENU 21 TIMER MENU 21 FUNCTION MENU 22 SETUP MENU 23 LANGUAGE MENU 24... OTHER FEATURES 24 Automatic Store 24 Signal Check 25 Power Save Mode 25 IMAGE RETENTION OF PLASMA DISPLAY ......26 NOTES 26 TROUBLESHOOTING 27 Symptoms That Seemingly Appear to be Failures 27 Actions to Correct Abnormal Displays 29 PRODUCT SPECIFICATIONS 30 ...
... Mute 17 Size Switching 18 Input Signal Screen Display 18 Automatic Adjustment of Screen Position and the Clock ..19 Independent Operation of Multiple Monitors 19 Using the Menu Screen 19 PICTURE MENU 20 AUDIO MENU 21 TIMER MENU 21 FUNCTION MENU 22 SETUP MENU 23 LANGUAGE MENU 24... OTHER FEATURES 24 Automatic Store 24 Signal Check 25 Power Save Mode 25 IMAGE RETENTION OF PLASMA DISPLAY ......26 NOTES 26 TROUBLESHOOTING 27 Symptoms That Seemingly Appear to be Failures 27 Actions to Correct Abnormal Displays 29 PRODUCT SPECIFICATIONS 30 ...
Owners Guide
Page 8
...in fire or electrical shock. • Never remove any shock or impact. If the glass panel is to be assured. Use only the correct power outlet depending on the indication on the monitor and the safety standard. • The enclosed power cord must be taken if you read ...and understand the Safety Instructions thoroughly to ensure correct usage, and follow all the instructions. SAFETY INSTRUCTIONS This Plasma monitor has been designed and manufactured to meet international safety standards, but like any electrical equipment, care must be used depending on the power...
...in fire or electrical shock. • Never remove any shock or impact. If the glass panel is to be assured. Use only the correct power outlet depending on the indication on the monitor and the safety standard. • The enclosed power cord must be taken if you read ...and understand the Safety Instructions thoroughly to ensure correct usage, and follow all the instructions. SAFETY INSTRUCTIONS This Plasma monitor has been designed and manufactured to meet international safety standards, but like any electrical equipment, care must be used depending on the power...
Owners Guide
Page 9
...or solder the battery. • Do not physically impact the battery. • Use only the battery specified in the inadvertent placing of this monitor. • Make sure the plus and minus terminals are damaged (exposed or broken core wires, etc.), contact your hand holding the plug or ...etc, over them because this could result in handling the battery of the obsolete outlet. SAFETY INSTRUCTIONS(continued) ENGLISH WARNING Be cautious of this monitor with no dust), before using a damaged the power cord or cables, it can cause a fire or electrical shock. Incorrect connection of ...
...or solder the battery. • Do not physically impact the battery. • Use only the battery specified in the inadvertent placing of this monitor. • Make sure the plus and minus terminals are damaged (exposed or broken core wires, etc.), contact your hand holding the plug or ...etc, over them because this could result in handling the battery of the obsolete outlet. SAFETY INSTRUCTIONS(continued) ENGLISH WARNING Be cautious of this monitor with no dust), before using a damaged the power cord or cables, it can cause a fire or electrical shock. Incorrect connection of ...
Owners Guide
Page 10
...will get fatigued after viewing the monitor for prolonged periods of the monitor Before cleaning the monitor, turn off the monitor and disconnect the power plug from the power outlet. Turn down the contrast and brightness controls. • How to clean the plasma screen panel of time. • Before cleaning..., turn off and unplug the monitor. Clean the screen with a soft cloth moistened with warm water and dry with soot, dust or ...
...will get fatigued after viewing the monitor for prolonged periods of the monitor Before cleaning the monitor, turn off the monitor and disconnect the power plug from the power outlet. Turn down the contrast and brightness controls. • How to clean the plasma screen panel of time. • Before cleaning..., turn off and unplug the monitor. Clean the screen with a soft cloth moistened with warm water and dry with soot, dust or ...
Owners Guide
Page 11
...to be kept away from tip-over. - Confirm the connector is fixed tightly when the signal cable is to prevent a problem to the monitor. Furthermore, use the attachments/accessories specified by the manufacturer, or sold with the cart, stand, tripod, bracket, or table specified by the ... connected. Plug the power cord of the cabinet that it is transported. Avoid radio interference. Disposal of an obstacle to Radio receivers This monitor has been designed pursuant to the instructions. - Never guess or take any doubt about installation, operation or safety of the remote control. ...
...to be kept away from tip-over. - Confirm the connector is fixed tightly when the signal cable is to prevent a problem to the monitor. Furthermore, use the attachments/accessories specified by the manufacturer, or sold with the cart, stand, tripod, bracket, or table specified by the ... connected. Plug the power cord of the cabinet that it is transported. Avoid radio interference. Disposal of an obstacle to Radio receivers This monitor has been designed pursuant to the instructions. - Never guess or take any doubt about installation, operation or safety of the remote control. ...
Owners Guide
Page 12
... signal amplitude must accept any interference received, including interference that may cause undesired operation. Home Electronics Division Located at: 900 Hitachi Way. Each product marketed, is no guarantee that the equipment complies with the limits for a Class B digital device, pursuant...the FCC rules as required by the party responsible for ensuring that interference will not occur in a residential installation. Trade name: Plasma Display Monitor Model Number: CMP420V PW1A ( = 0 9,A Z or Blank) If this equipment does cause harmful inerference to radio or television...
... signal amplitude must accept any interference received, including interference that may cause undesired operation. Home Electronics Division Located at: 900 Hitachi Way. Each product marketed, is no guarantee that the equipment complies with the limits for a Class B digital device, pursuant...the FCC rules as required by the party responsible for ensuring that interference will not occur in a residential installation. Trade name: Plasma Display Monitor Model Number: CMP420V PW1A ( = 0 9,A Z or Blank) If this equipment does cause harmful inerference to radio or television...

Owners Guide
Page 15
... tumbling down to a firm wall or pillar. ENGLISH INSTALLATION INSTRUCTIONS Installation • If you have purchased the model without the stand attached: When installing the monitor, use of the stand as shown. 2) Using commercially available wood screws, secure the set firmly in fire, electrical shock or injury. WARNING Use one of...
... tumbling down to a firm wall or pillar. ENGLISH INSTALLATION INSTRUCTIONS Installation • If you have purchased the model without the stand attached: When installing the monitor, use of the stand as shown. 2) Using commercially available wood screws, secure the set firmly in fire, electrical shock or injury. WARNING Use one of...
Owners Guide
Page 16
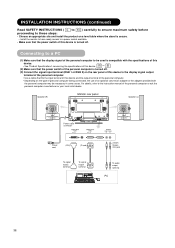
... these steps: • Choose an appropriate site and install the product on a level table where the stand is secure. • Install the monitor to have ready access to a power socket available. • Make sure that the power switch of this device and the output terminal of the... the personal computer to the instruction manual of this device is turned off. For details, refer to be necessary in some cases. Speaker (R) Monitor rear panel Speaker (L) Power cable connector Power cord (DVI) (D-sub) To signal output terminal To signal output terminal 3.5mm Stereo mini jack To audio ...
... these steps: • Choose an appropriate site and install the product on a level table where the stand is secure. • Install the monitor to have ready access to a power socket available. • Make sure that the power switch of this device and the output terminal of the... the personal computer to the instruction manual of this device is turned off. For details, refer to be necessary in some cases. Speaker (R) Monitor rear panel Speaker (L) Power cable connector Power cord (DVI) (D-sub) To signal output terminal To signal output terminal 3.5mm Stereo mini jack To audio ...
Owners Guide
Page 18
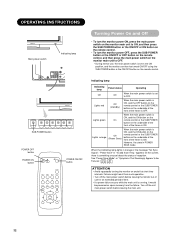
... or the ON/OFF button on the remote control. Turn off the unit main power switch before leaving the monitor out of use , the main power switch is set to OFF. Signal", "Power Save" or "Invalid ... on the underside of the front of the frame is OFF. ATTENTION • Avoid repeatedly turning the monitor on and off the main power switch before leaving the main unit. Lights red Off (standby) When the... the ON/OFF or OFF button on the remote control, and then press the main power switch on the monitor main unit to OFF. • During normal use for an extended period of time. • If ...
... or the ON/OFF button on the remote control. Turn off the unit main power switch before leaving the monitor out of use , the main power switch is set to OFF. Signal", "Power Save" or "Invalid ... on the underside of the front of the frame is OFF. ATTENTION • Avoid repeatedly turning the monitor on and off the main power switch before leaving the main unit. Lights red Off (standby) When the... the ON/OFF or OFF button on the remote control, and then press the main power switch on the monitor main unit to OFF. • During normal use for an extended period of time. • If ...
Owners Guide
Page 19
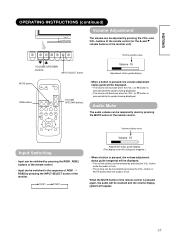
... pressing the INPUT SELECT button of the remote control is pressed, the volume adjustment status guide (magenta) will appear. When the MUTE button of the monitor. buttons of the remote control (or the L and M volume buttons of RGB1 RGB2 by pressing the VOL+ button or MUTE button while the audio is...; The volume will decrease when the VOL- (or M) button is pressed while the guide is mute. Input can be switched in the sequence of the monitor unit). ENGLISH OPERATING INSTRUCTIONS (continued) Volume Adjustment The volume can be adjusted by pressing the VOL-
... pressing the INPUT SELECT button of the remote control is pressed, the volume adjustment status guide (magenta) will appear. When the MUTE button of the monitor. buttons of the remote control (or the L and M volume buttons of RGB1 RGB2 by pressing the VOL+ button or MUTE button while the audio is...; The volume will decrease when the VOL- (or M) button is pressed while the guide is mute. Input can be switched in the sequence of the monitor unit). ENGLISH OPERATING INSTRUCTIONS (continued) Volume Adjustment The volume can be adjusted by pressing the VOL-
Owners Guide
Page 20
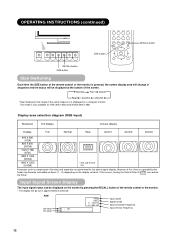
...occurs, turning the Vertical Filter On can be displayed on the screen by pressing the RECALL button of the remote control or the monitor. • The display will be displayed at the bottom of the screen. If this , there is displayed on the display ...X 1200 (UXGA) * VGA and W-VGA only Processes such as it is a possibility that flicker may become noticeable on Zoom (1 ~ 3) depending on a computer monitor. Min RGB2 RGB H : 48.4kHz V : 60.1 Hz Input mode Signal mode Input horizontal frequency Input vertical frequency OPERATING INSTRUCTIONS (continued) SIZE button RGB 1 RGB...
...occurs, turning the Vertical Filter On can be displayed on the screen by pressing the RECALL button of the remote control or the monitor. • The display will be displayed at the bottom of the screen. If this , there is displayed on the display ...X 1200 (UXGA) * VGA and W-VGA only Processes such as it is a possibility that flicker may become noticeable on Zoom (1 ~ 3) depending on a computer monitor. Min RGB2 RGB H : 48.4kHz V : 60.1 Hz Input mode Signal mode Input horizontal frequency Input vertical frequency OPERATING INSTRUCTIONS (continued) SIZE button RGB 1 RGB...
Owners Guide
Page 21
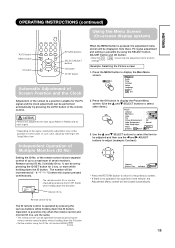
...Main Menu screen. Using the Menu Screen (On-screen display system) When the MENU button is possible only when the remote control and monitor ID nos. Example: Selecting the Picture screen 1. Contrast Next / Prev + 31 Adjust Return • Press the RETURN button to ... Reset Select Return Exit 3. CAUTION Perform this button pressed continuously. The number will be displayed; of the remote control allows separate control of seven monitors. ID Number Monitor [ 1 ] R/C [ 1 ] The remote control ID no . Remote control ID no . Press the MENU button to adjust (example: ...
...Main Menu screen. Using the Menu Screen (On-screen display system) When the MENU button is possible only when the remote control and monitor ID nos. Example: Selecting the Picture screen 1. Contrast Next / Prev + 31 Adjust Return • Press the RETURN button to ... Reset Select Return Exit 3. CAUTION Perform this button pressed continuously. The number will be displayed; of the remote control allows separate control of seven monitors. ID Number Monitor [ 1 ] R/C [ 1 ] The remote control ID no . Remote control ID no . Press the MENU button to adjust (example: ...
Owners Guide
Page 24
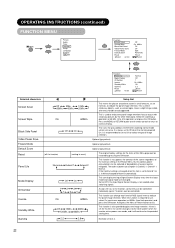
... be controlled). If time is used to exit. This is set to reduce the panel image retention. This turns the gray sidebars On/Off when watching normal mode screen size area. This function is required to the monitors so that can change each level of the Contrast setting in small amounts, at...
... be controlled). If time is used to exit. This is set to reduce the panel image retention. This turns the gray sidebars On/Off when watching normal mode screen size area. This function is required to the monitors so that can change each level of the Contrast setting in small amounts, at...
Owners Guide
Page 27
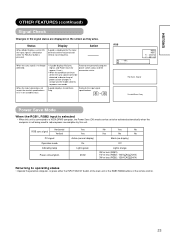
... source changes in orange and the mode switches to reduce power consumption by this unit is pressed. When the input signal does not match the monitor specifications or is displayed for approx. 5 sec.) • When the condition continues where the sync signal cannot be activated automatically when the computer is selected...
... source changes in orange and the mode switches to reduce power consumption by this unit is pressed. When the input signal does not match the monitor specifications or is displayed for approx. 5 sec.) • When the condition continues where the sync signal cannot be activated automatically when the computer is selected...

Owners Guide
Page 28
... period of glass breakage. These do not illuminate) and bright spots (points that are too bright) in Fig. Because of this, the temperature of the panel surface may rise in panel image retention depending on ) • Set the plasma monitor to partial phosphor degradation arising from partial character and figure display. IMAGE RETENTION OF...
... period of glass breakage. These do not illuminate) and bright spots (points that are too bright) in Fig. Because of this, the temperature of the panel surface may rise in panel image retention depending on ) • Set the plasma monitor to partial phosphor degradation arising from partial character and figure display. IMAGE RETENTION OF...


