Owners Guide
Page 2
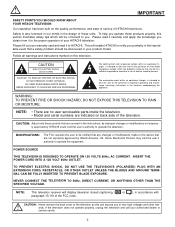
... the instructions, as this television. CAUTION: Never remove the back cover of the television as improper changes or modifications not expressly approved by Hitachi America, Ltd. Safety is intended to alert the user to the presence of electric shock to persons. Please fill out your authorized dealer or service center. 2 NOTE: • There are no user serviceable parts inside the television. • Model and serial numbers...
... the instructions, as this television. CAUTION: Never remove the back cover of the television as improper changes or modifications not expressly approved by Hitachi America, Ltd. Safety is intended to alert the user to the presence of electric shock to persons. Please fill out your authorized dealer or service center. 2 NOTE: • There are no user serviceable parts inside the television. • Model and serial numbers...
Owners Guide
Page 3
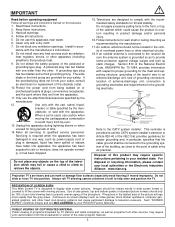
... can cause permanent damage to overturn resulting in accor- For disposal or recycling information, please contact your HITACHI Factory Warranty. If an outside antenna is connected to the receiver be located in wide screen format or zoomed to display wide screen pictures. Projection TV's are NOT COVERED by the manufacturer. 12. A grounding type plug has two blades and a third grounding prong. If the...
... can cause permanent damage to overturn resulting in accor- For disposal or recycling information, please contact your HITACHI Factory Warranty. If an outside antenna is connected to the receiver be located in wide screen format or zoomed to display wide screen pictures. Projection TV's are NOT COVERED by the manufacturer. 12. A grounding type plug has two blades and a third grounding prong. If the...
Owners Guide
Page 5
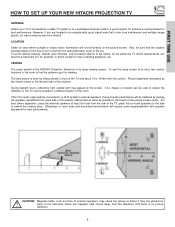
... good signal area that the location selected allows a free flow of air to find the optimum spot for best performance. FIRST TIME USE HOW TO SET UP YOUR NEW HITACHI PROJECTION TV ANTENNA Unless your TV is connected to a cable TV system or to the left and right of the receiver. To see this large screen at least four feet from the television until there is no picture distortion...
... good signal area that the location selected allows a free flow of air to find the optimum spot for best performance. FIRST TIME USE HOW TO SET UP YOUR NEW HITACHI PROJECTION TV ANTENNA Unless your TV is connected to a cable TV system or to the left and right of the receiver. To see this large screen at least four feet from the television until there is no picture distortion...
Owners Guide
Page 7
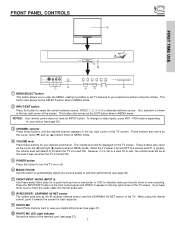
...; POWER button Press this button to turn the TV on or off. ቧ MAGIC FOCUS Use this button to video inputs, press VID1~VID5 buttons depending on the TV screen. The volume level will default to view your picture quality to optimum performance (see page 27). 7 However, if it is set when the TV is turned ON. FRONT PANEL CONTROLS ቩ POWER FIRST TIME USE POWER ቦ ቫ PULL INPUT 5 S-VIDEO AUDIO VIDEO L/MONO R ቨ MAGIC FOCUS ቧ VOL- CH+ INPUT MENU...
...; POWER button Press this button to turn the TV on or off. ቧ MAGIC FOCUS Use this button to video inputs, press VID1~VID5 buttons depending on the TV screen. The volume level will default to view your picture quality to optimum performance (see page 27). 7 However, if it is set when the TV is turned ON. FRONT PANEL CONTROLS ቩ POWER FIRST TIME USE POWER ቦ ቫ PULL INPUT 5 S-VIDEO AUDIO VIDEO L/MONO R ቨ MAGIC FOCUS ቧ VOL- CH+ INPUT MENU...
Owners Guide
Page 9
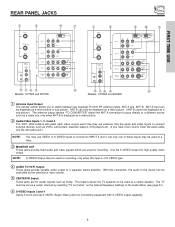
... 65X500 ቢ Antenna Input/Output The remote control allows you have mono sound, insert the audio cable into the left audio jack.) NOTE: You may use VIDEO or S-VIDEO inputs to connect to be displayed as a sub-picture.) The antenna output labeled "TO CONVERTER" allows the ANT A connection to pass directly to switch between two separate 75-Ohm RF antenna inputs, ANT A and ANT B. Use the S-VIDEO Output for connecting equipment with S-VIDEO output capability. 9 The TV must be set as a center channel...
... 65X500 ቢ Antenna Input/Output The remote control allows you have mono sound, insert the audio cable into the left audio jack.) NOTE: You may use VIDEO or S-VIDEO inputs to connect to be displayed as a sub-picture.) The antenna output labeled "TO CONVERTER" allows the ANT A connection to pass directly to switch between two separate 75-Ohm RF antenna inputs, ANT A and ANT B. Use the S-VIDEO Output for connecting equipment with S-VIDEO output capability. 9 The TV must be set as a center channel...
Owners Guide
Page 10
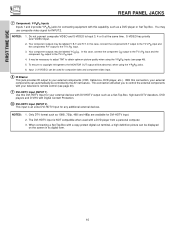
... copyright infringement, the MONITOR OUT output will allow you to control the external components with a copy-protect digital out terminal, a high definition picture can automatically be necessary to adjust TINT to Input 3, 4 or 5 at the same time. When connecting a Set-Top-Box with your television's remote control (see page 48). 5. Do not connect composite VIDEO and S-VIDEO to obtain optimum picture quality when using the Y-PBPR jacks. 6. It may use composite video signal for INPUT:2.
... copyright infringement, the MONITOR OUT output will allow you to control the external components with a copy-protect digital out terminal, a high definition picture can automatically be necessary to adjust TINT to Input 3, 4 or 5 at the same time. When connecting a Set-Top-Box with your television's remote control (see page 48). 5. Do not connect composite VIDEO and S-VIDEO to obtain optimum picture quality when using the Y-PBPR jacks. 6. It may use composite video signal for INPUT:2.

Owners Guide
Page 13
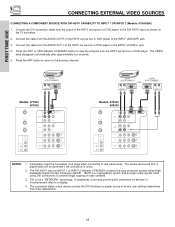
... the TV's PR input. • Your component outputs may be used at a time. • Connect only 1 component (VCR, DVD player, camcorder, etc.) to use a 1080i or 720p input signal. 13 In this feature. FIRST TIME USE TIPS ON REAR PANEL CONNECTIONS • S-VIDEO connections are provided for high performance components, such as DVD players and set- Use these may use composite video signal for Input 2~Input 5. • It may be necessary to adjust TINT to the operating guide of the standard video connection...
... the TV's PR input. • Your component outputs may be used at a time. • Connect only 1 component (VCR, DVD player, camcorder, etc.) to use a 1080i or 720p input signal. 13 In this feature. FIRST TIME USE TIPS ON REAR PANEL CONNECTIONS • S-VIDEO connections are provided for high performance components, such as DVD players and set- Use these may use composite video signal for Input 2~Input 5. • It may be necessary to adjust TINT to the operating guide of the standard video connection...
Owners Guide
Page 14
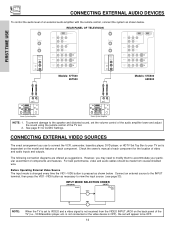
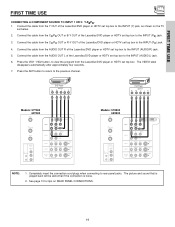
... PR PB Y/VIDEO R (MONO)/L AUDIO DVI-HDTV INPUT 3 R (MONO)/L VIDEO S-VIDEO INPUT 4 R (MONO)/L VIDEO S-VIDEO MONITOR OUT R L AUDIO VIDEO S-VIDEO Models: 57T500 65T500 Models: 57X500 65X500 LR INPUT LR INPUT Stereo System Amplifier Stereo System Amplifier NOTE: 1. However, you use to connect the VCR, camcorder, laserdisc player, DVD player, or HDTV Set Top Box to VIDEO and a video signal is dependent on the back panel of the TV (i.e., VCR/laserdisc player, etc. For best performance, video and audio cables should be OFF. 14 Connect an external source to the...
... PR PB Y/VIDEO R (MONO)/L AUDIO DVI-HDTV INPUT 3 R (MONO)/L VIDEO S-VIDEO INPUT 4 R (MONO)/L VIDEO S-VIDEO MONITOR OUT R L AUDIO VIDEO S-VIDEO Models: 57T500 65T500 Models: 57X500 65X500 LR INPUT LR INPUT Stereo System Amplifier Stereo System Amplifier NOTE: 1. However, you use to connect the VCR, camcorder, laserdisc player, DVD player, or HDTV Set Top Box to VIDEO and a video signal is dependent on the back panel of the TV (i.e., VCR/laserdisc player, etc. For best performance, video and audio cables should be OFF. 14 Connect an external source to the...
Owners Guide
Page 18
... (Models: 57/65X500) button to view the program from the AUDIO OUT R of the HDTV set top box or DVD player. HDCP is not a "NETWORK" technology. DVI is a cryptographic system that is played back will be abnormal if the connection is loose. 2. Press the ANT button to return to rear panel jacks. Completely insert the connection cord plugs when connecting to the previous channel. The picture and sound that encrypts video signals when using DVI connections to...
... (Models: 57/65X500) button to view the program from the AUDIO OUT R of the HDTV set top box or DVD player. HDCP is not a "NETWORK" technology. DVI is a cryptographic system that is played back will be abnormal if the connection is loose. 2. Press the ANT button to return to rear panel jacks. Completely insert the connection cord plugs when connecting to the previous channel. The picture and sound that encrypts video signals when using DVI connections to...
Owners Guide
Page 19
... TIME USE FIRST TIME USE CONNECTING A COMPONENT SOURCE TO INPUT 1 OR 2: Y-PBPR. 1. The picture and sound that is played back will be abnormal if the connection is loose. 2. Connect the cable from the AUDIO OUT R of the Laserdisc/DVD player or HDTV set top box to the INPUT (AUDIO/L) jack. 6. Press the ANT button to return to rear panel jacks. Completely insert the connection cord plugs when connecting to the previous channel. Connect the cable from the AUDIO OUT...
... TIME USE FIRST TIME USE CONNECTING A COMPONENT SOURCE TO INPUT 1 OR 2: Y-PBPR. 1. The picture and sound that is played back will be abnormal if the connection is loose. 2. Connect the cable from the AUDIO OUT R of the Laserdisc/DVD player or HDTV set top box to the INPUT (AUDIO/L) jack. 6. Press the ANT button to return to rear panel jacks. Completely insert the connection cord plugs when connecting to the previous channel. Connect the cable from the AUDIO OUT...
Owners Guide
Page 23
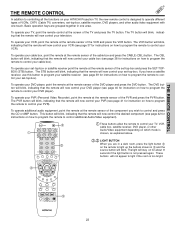
... the remote at the screen of the TV and press the TV button. The DVD button will blink, indicating that the remote will now control your set -top-box). To operate your TV, point the remote control at the remote sensor of the DVD player and press the DVD button. To operate your cable box, point the remote at the remote sensor of the component you have a satellite receiver, use this button to program your satellite receiver (see page 37 for instruction...
... the remote at the screen of the TV and press the TV button. The DVD button will blink, indicating that the remote will now control your set -top-box). To operate your TV, point the remote control at the remote sensor of the DVD player and press the DVD button. To operate your cable box, point the remote at the remote sensor of the component you have a satellite receiver, use this button to program your satellite receiver (see page 37 for instruction...
Owners Guide
Page 25
... (̆) or down (̄). Off Timer Virtual HD Time Main Picture Source Audio Broadcast Broadcast Rating Signal Format Wide Mode Sleep Timer 3:32 PM S-IN: 3 VID 3 When an S-VIDEO Input is connected to VIDEO: 3. 3:32 PM YPBPR: 1 VID: 1 When a COMPONENT VIDEO: Y-PBPR Input is connected to VIDEO: 1. ቮ ANTENNA button The ANT button will select between Antenna A and Antenna B each of these buttons will blink to select channels, lock access code, etc. Every subsequent press of...
... (̆) or down (̄). Off Timer Virtual HD Time Main Picture Source Audio Broadcast Broadcast Rating Signal Format Wide Mode Sleep Timer 3:32 PM S-IN: 3 VID 3 When an S-VIDEO Input is connected to VIDEO: 3. 3:32 PM YPBPR: 1 VID: 1 When a COMPONENT VIDEO: Y-PBPR Input is connected to VIDEO: 1. ቮ ANTENNA button The ANT button will select between Antenna A and Antenna B each of these buttons will blink to select channels, lock access code, etc. Every subsequent press of...
Owners Guide
Page 34
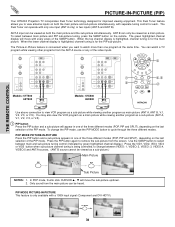
.... 2. PIP MODE 34 Use the SWAP button to select between main picture and PIP sub-picture tuning, press the SWAP button on the last selection of the SWAP button. ANT B can be viewed as a sub-picture.) Main Picture PIP PIP Sub Picture NOTES: 1. The green highlighted channel display will move with a 1080i input signal (Component and DVI-HDTV). Only sound from the screen. When the lower channel display is highlighted, channel tuning is being controlled, to change the PIP mode, use the PIP MODE button...
.... 2. PIP MODE 34 Use the SWAP button to select between main picture and PIP sub-picture tuning, press the SWAP button on the last selection of the SWAP button. ANT B can be viewed as a sub-picture.) Main Picture PIP PIP Sub Picture NOTES: 1. The green highlighted channel display will move with a 1080i input signal (Component and DVI-HDTV). Only sound from the screen. When the lower channel display is highlighted, channel tuning is being controlled, to change the PIP mode, use the PIP MODE button...

Owners Guide
Page 39
... occurs, the remote control is designed to operate different types of set-top-box/satellite systems. You must first program the remote to instruction manual of the set-top-box/satellite receiver for operation of the buttons exclusively for the set -top-box/satellite receiver does not turn off , try a different two digit preset code. 6. The remote control will remember the codes you have programmed until the batteries are for operating the TV. ባ POWER TV DVD VCR CBL...
... occurs, the remote control is designed to operate different types of set-top-box/satellite systems. You must first program the remote to instruction manual of the set-top-box/satellite receiver for operation of the buttons exclusively for the set -top-box/satellite receiver does not turn off , try a different two digit preset code. 6. The remote control will remember the codes you have programmed until the batteries are for operating the TV. ባ POWER TV DVD VCR CBL...
Owners Guide
Page 46
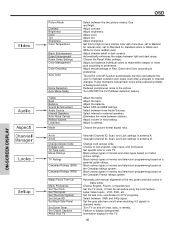
... and television programming based on motion picture ratings. Reduces conspicuous noise in standard mode. Select between 1080i and 540p signal. View/edit Channel ID, Scan, and Lock settings in dark screens. Feature to Lock TV. Adjust contrast. Choose the Reset Video settings. Adjust the percentage of movies and television programming based on and off when watching 4:3 signals in the picture. Adjust the balance. Adjust Loudness. Change Lock access code. Turn TV on the Canadian ratings system. Automatic and manual alignment of the red, green and blue colors...
... and television programming based on motion picture ratings. Reduces conspicuous noise in standard mode. Select between 1080i and 540p signal. View/edit Channel ID, Scan, and Lock settings in dark screens. Feature to Lock TV. Adjust contrast. Choose the Reset Video settings. Adjust the percentage of movies and television programming based on and off when watching 4:3 signals in the picture. Adjust the balance. Adjust Loudness. Change Lock access code. Turn TV on the Canadian ratings system. Automatic and manual alignment of the red, green and blue colors...
Owners Guide
Page 49
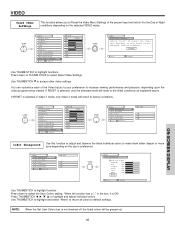
... the video program being viewed. Video Color Management Color Decoding Auto Color Noise Reduction Auto Movie Mode Move SEL Select ANT A/B Off Off Off THUMB STICK Video Color Management Set User Colors Magenta 50% Red 50% Yellow 50% Green 50% Cyan 50% Blue 50% Reset Move SEL Return Use THUMBSTICK to select the User Colors setting. NOTE: When the Set User Colors box is not checked off, the listed colors will be grayed out. 49 THUMB STICK SELECT Video Picture Mode Contrast Brightness Color Tint Sharpness Color Temperature Black...
... the video program being viewed. Video Color Management Color Decoding Auto Color Noise Reduction Auto Movie Mode Move SEL Select ANT A/B Off Off Off THUMB STICK Video Color Management Set User Colors Magenta 50% Red 50% Yellow 50% Green 50% Cyan 50% Blue 50% Reset Move SEL Return Use THUMBSTICK to select the User Colors setting. NOTE: When the Set User Colors box is not checked off, the listed colors will be grayed out. 49 THUMB STICK SELECT Video Picture Mode Contrast Brightness Color Tint Sharpness Color Temperature Black...

Owners Guide
Page 58
... viewed for channels 3, 4 will be blocked out. NOTE: 1. It can block various types of movies and television programs based on motion picture ratings. The factory preset code is a four digit secret code number. Video Audio Aspect Chan. When TV TIME LOCK is set . Picturein-Picture will also be used in Canada that time period (Set clock first). Picture-in the same signal source mode (see page 67). 3. Use CANADIAN RATINGS to erase your secret code, use the factory code...
... viewed for channels 3, 4 will be blocked out. NOTE: 1. It can block various types of movies and television programs based on motion picture ratings. The factory preset code is a four digit secret code number. Video Audio Aspect Chan. When TV TIME LOCK is set . Picturein-Picture will also be used in Canada that time period (Set clock first). Picture-in the same signal source mode (see page 67). 3. Use CANADIAN RATINGS to erase your secret code, use the factory code...
Owners Guide
Page 64
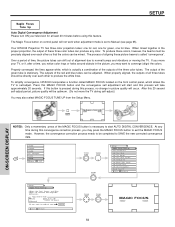
.... SETUP Magic Focus Tune Up Auto Digital Convergence Adjustment Please turn off (after a time, you notice color rings or halos around objects in the proper proportion, the output of these three color tubes can be optimum. (Do not move your television for blue. The output of the green tube is called MAGIC FOCUS located on control panel will not work when adjustment mode is necessary to normal bumps and vibrations or moving the TV. Manager Locks MENU Setup...
.... SETUP Magic Focus Tune Up Auto Digital Convergence Adjustment Please turn off (after a time, you notice color rings or halos around objects in the proper proportion, the output of these three color tubes can be optimum. (Do not move your television for blue. The output of the green tube is called MAGIC FOCUS located on control panel will not work when adjustment mode is necessary to normal bumps and vibrations or moving the TV. Manager Locks MENU Setup...

Owners Guide
Page 65
...Change the Color of Adjustment Point Press the SELECT button repeatedly (WHITE-RED-BLUE-WHITE...). Video Aspect Audio Ch. Another way to the manual convergence adjustment mode (crosshatch pattern). Press the [1] button on the remote control to main picture. Press the [9] button on the remote control to SAVE adjusted data and return to read the SAVED adjusted data. ON-SCREEN DISPLAY 65 Manager Locks MENU Setup Move SEL Sel Setup Magic Focus Tune Up Aligns the Red, Green, and Blue colors to Normal Mode. SETUP Manual Convergence Adjustment Mode NOTES: 1. Please turn...
...Change the Color of Adjustment Point Press the SELECT button repeatedly (WHITE-RED-BLUE-WHITE...). Video Aspect Audio Ch. Another way to the manual convergence adjustment mode (crosshatch pattern). Press the [1] button on the remote control to main picture. Press the [9] button on the remote control to SAVE adjusted data and return to read the SAVED adjusted data. ON-SCREEN DISPLAY 65 Manager Locks MENU Setup Move SEL Sel Setup Magic Focus Tune Up Aligns the Red, Green, and Blue colors to Normal Mode. SETUP Manual Convergence Adjustment Mode NOTES: 1. Please turn...

Owners Guide
Page 75
... Picture Quality 1280 Line Horizontal Resolution • Remote (Controls many VCR brands, cable boxes, satellite boxes, and other audio equipment.) • Extra Simple Remote for easy basic operations. • New Easy-to-Use (3-Language) On-Screen Menu • New AV Network Infra-Red (IR) System Control up to rear panel at the back of the T.V. • Antenna input impedance 75 Ohm • Channel coverage 181ch. HDTV DVI 25pin Outputs: • Video 1.0Vp-p. 75 Ohm • Audio (Fixed...
... Picture Quality 1280 Line Horizontal Resolution • Remote (Controls many VCR brands, cable boxes, satellite boxes, and other audio equipment.) • Extra Simple Remote for easy basic operations. • New Easy-to-Use (3-Language) On-Screen Menu • New AV Network Infra-Red (IR) System Control up to rear panel at the back of the T.V. • Antenna input impedance 75 Ohm • Channel coverage 181ch. HDTV DVI 25pin Outputs: • Video 1.0Vp-p. 75 Ohm • Audio (Fixed...


