Owners Guide
Page 1
......28 CONNECTING A DVD OR HDTV SET TOP BOX PLAYER WITH DOBLY DIGITAL COAXIAL OUTPUT TO INPUT COMPONENT: Y-PB-PR ...28 AUDIO SYSTEM SET-UP...30 AUDIO SYSTEM SET-UP...31 THE GENIUS REMOTE CONTROL (CLU-572TSI)...32 PICTURE-IN-PICTURE (PIP)...37 USING THE REMOTE TO CONTROL VCR FUNCTIONS 41 USING THE REMOTE TO CONTROL CABLE BOX FUNCTIONS 42 USING THE REMOTE TO CONTROL SATELLITE RECEIVER FUNCTIONS.......44 USING THE REMOTE TO CONTROL DVD FUNCTIONS 46 USING THE REMOTE TO CONTROL ADDITIONAL...47 AUDIO/VIDEO EQUIPMENT...47 CABLE/SATELLITE, VCR, AUDIO AND DVD CODES (CLU...
......28 CONNECTING A DVD OR HDTV SET TOP BOX PLAYER WITH DOBLY DIGITAL COAXIAL OUTPUT TO INPUT COMPONENT: Y-PB-PR ...28 AUDIO SYSTEM SET-UP...30 AUDIO SYSTEM SET-UP...31 THE GENIUS REMOTE CONTROL (CLU-572TSI)...32 PICTURE-IN-PICTURE (PIP)...37 USING THE REMOTE TO CONTROL VCR FUNCTIONS 41 USING THE REMOTE TO CONTROL CABLE BOX FUNCTIONS 42 USING THE REMOTE TO CONTROL SATELLITE RECEIVER FUNCTIONS.......44 USING THE REMOTE TO CONTROL DVD FUNCTIONS 46 USING THE REMOTE TO CONTROL ADDITIONAL...47 AUDIO/VIDEO EQUIPMENT...47 CABLE/SATELLITE, VCR, AUDIO AND DVD CODES (CLU...
Owners Guide
Page 2
.... NO USER SERVICEABLE PARTS INSIDE. WARNING: TO PREVENT FIRE OR SHOCK HAZARD, DO NOT EXPOSE THIS COLOR TELEVISION TO RAIN OR MOISTURE. IMPORTANT SAFEGUARDS COMPONENT SET...64 CUSTOMIZE ...66 FAMILY FAVORITES (MENU) ...69 FAMILY FAVORITES (OPERATION) ...70 PARENTAL CONTROL ...71 EVENT PROG...73 AUTO LINK ...75 CLOSED CAPTION ...75 MENU BACKGROUND ...77 FIRST TIME TOUR ...77 VIDEO ...78 THEATER ...84 CARE OF YOUR HITACHI PROJECTION TV AND 94 YOUR REMOTE CONTROL...
.... NO USER SERVICEABLE PARTS INSIDE. WARNING: TO PREVENT FIRE OR SHOCK HAZARD, DO NOT EXPOSE THIS COLOR TELEVISION TO RAIN OR MOISTURE. IMPORTANT SAFEGUARDS COMPONENT SET...64 CUSTOMIZE ...66 FAMILY FAVORITES (MENU) ...69 FAMILY FAVORITES (OPERATION) ...70 PARENTAL CONTROL ...71 EVENT PROG...73 AUTO LINK ...75 CLOSED CAPTION ...75 MENU BACKGROUND ...77 FIRST TIME TOUR ...77 VIDEO ...78 THEATER ...84 CARE OF YOUR HITACHI PROJECTION TV AND 94 YOUR REMOTE CONTROL...
Owners Guide
Page 3
... NOT USE THE TELEVISION'S (POLARIZED) PLUG WITH AN EXTENSION CORD, RECEPTACLE, OR OTHER OUTLET UNLESS THE BLADES AND GROUND TERMINAL CAN BE FULLY INSERTED TO PREVENT BLADE EXPOSURE. NOTE: This television receiver will display television closed captioning ( or ), in accordance with paragraph 15.119 of the television as this device that are not expressly approved by Hitachi America, Ltd. NEVER CONNECT THE TV...
... NOT USE THE TELEVISION'S (POLARIZED) PLUG WITH AN EXTENSION CORD, RECEPTACLE, OR OTHER OUTLET UNLESS THE BLADES AND GROUND TERMINAL CAN BE FULLY INSERTED TO PREVENT BLADE EXPOSURE. NOTE: This television receiver will display television closed captioning ( or ), in accordance with paragraph 15.119 of the television as this device that are not expressly approved by Hitachi America, Ltd. NEVER CONNECT THE TV...
Owners Guide
Page 6
... the television , be sure the antenna system is unused for the grounding electrode. For televisions designed to operate from the type of power supply at your home, consult your dealer or local power company. SAFETY TIPS • Never cover the slots or openings with cloth or other electrical lights or power circuits, or where it can fall into such power lines or...
... the television , be sure the antenna system is unused for the grounding electrode. For televisions designed to operate from the type of power supply at your home, consult your dealer or local power company. SAFETY TIPS • Never cover the slots or openings with cloth or other electrical lights or power circuits, or where it can fall into such power lines or...
Owners Guide
Page 7
... or popping sounds, particularly when being turned on -screen displays such as the original part. Adjust only those controls that have it from the wall outlet and refer servicing to projection television receivers. PICTURE CAUTIONS 20 If the television does not operate normally by following the detailed procedure in safe operating condition. If the snapping or popping is continuous or frequent, unplug the set and consult...
... or popping sounds, particularly when being turned on -screen displays such as the original part. Adjust only those controls that have it from the wall outlet and refer servicing to projection television receivers. PICTURE CAUTIONS 20 If the television does not operate normally by following the detailed procedure in safe operating condition. If the snapping or popping is continuous or frequent, unplug the set and consult...

Owners Guide
Page 12
... Optical Cable the standard video cable to a component picture. "F" Type 75-Ohm Coaxial Antenna Connector For connecting RF signals (antenna or cable TV) to the ANT A (75-Ohm) terminal. Use this cable for the best sound quality. ANTENNA CONNECTIONS TO REAR JACK PANEL VHF (75-Ohm) antenna/CATV (Cable TV) When using a 300-Ohm twin lead from most stores that have a second antenna or cable TV system, connect the coaxial cable to inputs and outputs located on the television's rear jack panel and front control panel. Cables...
... Optical Cable the standard video cable to a component picture. "F" Type 75-Ohm Coaxial Antenna Connector For connecting RF signals (antenna or cable TV) to the ANT A (75-Ohm) terminal. Use this cable for the best sound quality. ANTENNA CONNECTIONS TO REAR JACK PANEL VHF (75-Ohm) antenna/CATV (Cable TV) When using a 300-Ohm twin lead from most stores that have a second antenna or cable TV system, connect the coaxial cable to inputs and outputs located on the television's rear jack panel and front control panel. Cables...

Owners Guide
Page 15
....) REMOTE CONTROL Sensor Point your remote control at this button to adjust your picture quality to instantly view your TV. 15 MAGIC FOCUS Use this area when selecting channels, adjusting volume, etc. If you have mono sound, insert the audio cable into the left audio jack. Completely insert connection cord plugs when connecting to allow you do not, the played back picture may be abnormal. 2. Press the POWER button on the TV set for a quick hook-up...
....) REMOTE CONTROL Sensor Point your remote control at this button to adjust your picture quality to instantly view your TV. 15 MAGIC FOCUS Use this area when selecting channels, adjusting volume, etc. If you have mono sound, insert the audio cable into the left audio jack. Completely insert connection cord plugs when connecting to allow you do not, the played back picture may be abnormal. 2. Press the POWER button on the TV set for a quick hook-up...
Owners Guide
Page 17
... INPUT SOURCE menu. (see page 66) (10) Optical Input This jack provides high quality audio input from a Dolby Digital DVD player of HDTV Set Top Box. In this case, connect the components B-Y output to the TV's PB input and the components R-Y output to a sub-woofer accessory. This input can be used to connect external speaker, which is controlled by the television's main volume. (5) SUB WOOFER Output This jack provides variable audio output to the TV's PR input. 4. Use a digital optical cable to connect y our TV to the TV's Input...
... INPUT SOURCE menu. (see page 66) (10) Optical Input This jack provides high quality audio input from a Dolby Digital DVD player of HDTV Set Top Box. In this case, connect the components B-Y output to the TV's PB input and the components R-Y output to a sub-woofer accessory. This input can be used to connect external speaker, which is controlled by the television's main volume. (5) SUB WOOFER Output This jack provides variable audio output to the TV's PR input. 4. Use a digital optical cable to connect y our TV to the TV's Input...
Owners Guide
Page 21
... to adjust TINT to obtain optimum picture quality when using the Y-PB-PR inputs. (See pages 58 and 58.) To ensure no copyright infringement, the MONITOR OUT output will be used for VCR #1 and VCR #2, but only one audio output (mono sound), connect it has an optical or coaxial output, you can use VIDEO, S-VIDEO, or COMPONENT: Y-PB-PR inputs to connect to the TV's Input 1 or Input 2 Left and Right Audio input...
... to adjust TINT to obtain optimum picture quality when using the Y-PB-PR inputs. (See pages 58 and 58.) To ensure no copyright infringement, the MONITOR OUT output will be used for VCR #1 and VCR #2, but only one audio output (mono sound), connect it has an optical or coaxial output, you can use VIDEO, S-VIDEO, or COMPONENT: Y-PB-PR inputs to connect to the TV's Input 1 or Input 2 Left and Right Audio input...

Owners Guide
Page 22
... accommodate your TV set . Check the owner's manual of each component. For best performance, video and audio 22 The following connection diagrams are offered as suggestions. CONNECTING EXTERNAL AUDIO SOURCES CONNECTING EXTERNAL AUDIO SOURCES NOTE: To prevent damage to the speaker and distorted sound, set the volume control of the audio amplifier lower and adjust the sound using the remote control fo the TV set is dependent on the model and features of each component for the location of video and audio inputs and outputs.
... accommodate your TV set . Check the owner's manual of each component. For best performance, video and audio 22 The following connection diagrams are offered as suggestions. CONNECTING EXTERNAL AUDIO SOURCES CONNECTING EXTERNAL AUDIO SOURCES NOTE: To prevent damage to the speaker and distorted sound, set the volume control of the audio amplifier lower and adjust the sound using the remote control fo the TV set is dependent on the model and features of each component for the location of video and audio inputs and outputs.
Owners Guide
Page 30
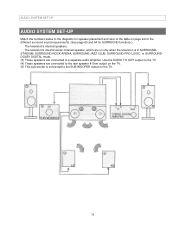
... DIGITAL mode. (3) These speakers are on only when the television is connected to the SUB WOOFER output on page 24 for the different surround sound requirements. (See page 63 and 64 for SURROUND functions.) The television's internal speakers. AUDIO SYSTEM SET-UP AUDIO SYSTEM SET-UP Match the numbers below to the diagrams for speaker placement and refer to a separate audio amplifier. The television's internal center channel speaker, which are connected...
... DIGITAL mode. (3) These speakers are on only when the television is connected to the SUB WOOFER output on page 24 for the different surround sound requirements. (See page 63 and 64 for SURROUND functions.) The television's internal speakers. AUDIO SYSTEM SET-UP AUDIO SYSTEM SET-UP Match the numbers below to the diagrams for speaker placement and refer to a separate audio amplifier. The television's internal center channel speaker, which are connected...

Owners Guide
Page 31
... DVD player or HDTV Set Top Box with separate left and right surround channels (SL, SR). AUDIO SYSTEM SET-UP AUDIO SYSTEM SET-UP SURROUND FEATURE REQUIRED CONNECTION OPTIONAL CONNECTION EFFECT OFF (1) (3) (5) Receive mono and stereo sound. STADIUM (1) (2) (4) (3) (5) Listener has feeling of alldigital surround sound. ROCK ARENA (1) (2) (4) (3) (5) Listener has feeling of being at a jazz club. DOBLY PRO LOGIC (1) (2) (4) (3) (5) Movie theater reproduction, with Dobly Digital output. There are connected...
... DVD player or HDTV Set Top Box with separate left and right surround channels (SL, SR). AUDIO SYSTEM SET-UP AUDIO SYSTEM SET-UP SURROUND FEATURE REQUIRED CONNECTION OPTIONAL CONNECTION EFFECT OFF (1) (3) (5) Receive mono and stereo sound. STADIUM (1) (2) (4) (3) (5) Listener has feeling of alldigital surround sound. ROCK ARENA (1) (2) (4) (3) (5) Listener has feeling of being at a jazz club. DOBLY PRO LOGIC (1) (2) (4) (3) (5) Movie theater reproduction, with Dobly Digital output. There are connected...

Owners Guide
Page 34
... three sets of video input jacks and both antenna sources when main channel is in Audio/Video mode. (See page 36) (8) CHANNEL selector buttons CHANNEL selector buttons are not in the correct SIGNAL SOURCE mode. (9) SLEEP button Press this timer, up ( ) or down ( ). If the sub-picture is pressed. Channel selection may not receive some channels if you will notice that each sub-menu has a number next to it. Once set , it will reset...
... three sets of video input jacks and both antenna sources when main channel is in Audio/Video mode. (See page 36) (8) CHANNEL selector buttons CHANNEL selector buttons are not in the correct SIGNAL SOURCE mode. (9) SLEEP button Press this timer, up ( ) or down ( ). If the sub-picture is pressed. Channel selection may not receive some channels if you will notice that each sub-menu has a number next to it. Once set , it will reset...

Owners Guide
Page 35
... On-Screen Display. (17) EXIT buttons When in MENU mode, this button repeatedly to check the channel being received, the picture source, or if the channel has stereo (ST) or second audio (SAP), the time, CHANNEL ID, if the Commercial Skip (C.S.) is activated and the SLEEP timer is displayed and the TV will be set different features. THE GENIUS REMOTE CONTROL (CLU-572TSI) (12) C.C. To reduce the sound to SELECT. (19) VOLUME, MUTE button...
... On-Screen Display. (17) EXIT buttons When in MENU mode, this button repeatedly to check the channel being received, the picture source, or if the channel has stereo (ST) or second audio (SAP), the time, CHANNEL ID, if the Commercial Skip (C.S.) is activated and the SLEEP timer is displayed and the TV will be set different features. THE GENIUS REMOTE CONTROL (CLU-572TSI) (12) C.C. To reduce the sound to SELECT. (19) VOLUME, MUTE button...
Owners Guide
Page 37
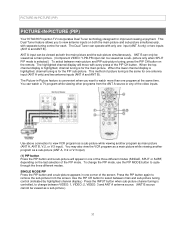
... highlighted channel display will appear in one program at the same time. ANT A input can operate with every press of the screen. You can be viewed as both the main picture and sub-picture simultaneously, with separate tuning control for one corner of the PIP CH button. Use the PIP CH button to view antenna inputs on the remote. PICTURE-IN-PICTURE (PIP) PICTURE-IN-PICTURE (PIP) Your HITACHI Projection TV incorporates Dual Tuner technology designed for the PIP sub-picture. ANT...
... highlighted channel display will appear in one program at the same time. ANT A input can operate with every press of the screen. You can be viewed as both the main picture and sub-picture simultaneously, with separate tuning control for one corner of the PIP CH button. Use the PIP CH button to view antenna inputs on the remote. PICTURE-IN-PICTURE (PIP) PICTURE-IN-PICTURE (PIP) Your HITACHI Projection TV incorporates Dual Tuner technology designed for the PIP sub-picture. ANT...

Owners Guide
Page 56
FAMILY FAVORITES 4. AUTO LINK 7. RESET 7. Improve sound performance. 1. SPEAKER SETUP Picture and sound are automatically set and view favorite channels. choose between Standard, Night, or Maximum. MENU BACKGROUND 9. Block channel picture and sound. Turn TV on your listening position. BRIGHTNESS 3. Adjust color. EQUALIZER 2. VIDEO ID 3. FIRST TIME TOUR Label channels PAY 1, ABC, etc. Set AUDIO settings to factory preset. SURROUND 3. PARENTAL CONTROL 5. 4 EVENT PROGRAM 6. CLOSED CAPTION 8. Improve picture performance. 1. ULTRATEC OSD...
FAMILY FAVORITES 4. AUTO LINK 7. RESET 7. Improve sound performance. 1. SPEAKER SETUP Picture and sound are automatically set and view favorite channels. choose between Standard, Night, or Maximum. MENU BACKGROUND 9. Block channel picture and sound. Turn TV on your listening position. BRIGHTNESS 3. Adjust color. EQUALIZER 2. VIDEO ID 3. FIRST TIME TOUR Label channels PAY 1, ABC, etc. Set AUDIO settings to factory preset. SURROUND 3. PARENTAL CONTROL 5. 4 EVENT PROGRAM 6. CLOSED CAPTION 8. Improve picture performance. 1. ULTRATEC OSD...

Owners Guide
Page 60
... correct SIGNAL SOURCE mode before using the CHANNEL UP ( ) or DOWN ( ). This will stop. If two antenna are connected, switch antenna inputs with the INPUT button and repeat AUTO CHANNEL SET for the second antenna input. CHANNEL MEMORY Use this function after AUTO CHANNEL SET to add or erase additional channels to erase additional channels. See CHANNEL MEMORY to add or to the remote control CHANNEL or buttons. 60 SET UP AUTO CHANNEL SET This feature will automatically store active TV channels in CHANNEL MEMORY...
... correct SIGNAL SOURCE mode before using the CHANNEL UP ( ) or DOWN ( ). This will stop. If two antenna are connected, switch antenna inputs with the INPUT button and repeat AUTO CHANNEL SET for the second antenna input. CHANNEL MEMORY Use this function after AUTO CHANNEL SET to add or erase additional channels to erase additional channels. See CHANNEL MEMORY to add or to the remote control CHANNEL or buttons. 60 SET UP AUTO CHANNEL SET This feature will automatically store active TV channels in CHANNEL MEMORY...
Owners Guide
Page 64
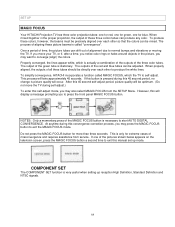
... press the front panel MAGIC FOCUS button. When mixed together in the picture, you may press the MAGIC FOCUS button to exit the MAGIC FOCUS mode. SET UP MAGIC FOCUS Your HITACHI Projection TV has three color projection tubes: one for red, one for green, one of the pictures shown below appears on the television screen, press the MAGIC FOCUS button a second time to exit this manual set up reception High Definition, Standard Definition and NTSC signals. 64
... press the front panel MAGIC FOCUS button. When mixed together in the picture, you may press the MAGIC FOCUS button to exit the MAGIC FOCUS mode. SET UP MAGIC FOCUS Your HITACHI Projection TV has three color projection tubes: one for red, one for green, one of the pictures shown below appears on the television screen, press the MAGIC FOCUS button a second time to exit this manual set up reception High Definition, Standard Definition and NTSC signals. 64

Owners Guide
Page 65
... previous menu. All settings will be sure to set the COMPONENT SET feature for both sets of the main picture will affect only the component input you to access this COMPONENT SET menu. 3. If you are using both inputs (set function. COLOR SYSTEM The COLOR SYSTEM function allows you are currently viewing. SDTV /DVD - Use for DTV Programs. HDTV - NOTE: 1 . High Definition Television - If Color System is set improperly (does not match actual input signal), the color...
... previous menu. All settings will be sure to set the COMPONENT SET feature for both sets of the main picture will affect only the component input you to access this COMPONENT SET menu. 3. If you are using both inputs (set function. COLOR SYSTEM The COLOR SYSTEM function allows you are currently viewing. SDTV /DVD - Use for DTV Programs. HDTV - NOTE: 1 . High Definition Television - If Color System is set improperly (does not match actual input signal), the color...
Owners Guide
Page 96
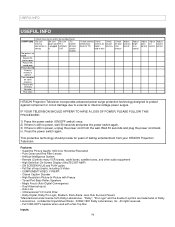
... Check these items and try these adjustments SYMPTOMS Be sure Be sure Be sure Try external power cord TV is another connection is is still no sound Sound OK, picture poor Picture OK, sound poor Picture blurred Lines or streaks in picture Poor reception on some channels Picture rolls vertically No color Poor color Check antenna Check Check connections antenna for outside (back of Input Jacks, including S-Video • COMPONENT VIDEO: Y-PB/PR • Closed Caption Decoder • High Resolution Picture-In-Picture with a Set-Top Box...
... Check these items and try these adjustments SYMPTOMS Be sure Be sure Be sure Try external power cord TV is another connection is is still no sound Sound OK, picture poor Picture OK, sound poor Picture blurred Lines or streaks in picture Poor reception on some channels Picture rolls vertically No color Poor color Check antenna Check Check connections antenna for outside (back of Input Jacks, including S-Video • COMPONENT VIDEO: Y-PB/PR • Closed Caption Decoder • High Resolution Picture-In-Picture with a Set-Top Box...


