Owners Guide
Page 2
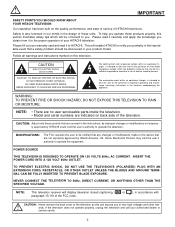
... ELECTRIC SHOCK, DO NOT REMOVE COVER (OR BACK). NO USER SERVICEABLE PARTS INSIDE. The lightning flash with paragraph 15.119 of benefit to very high voltages and other hazards. CAUTION: Adjust only those controls that are indicated on this section illustrates safety tips which will be of a sufficient magnitude to HITACHI. POWER SOURCE THIS TELEVISION IS DESIGNED TO OPERATE ON 120 VOLTS 60Hz, AC...
... ELECTRIC SHOCK, DO NOT REMOVE COVER (OR BACK). NO USER SERVICEABLE PARTS INSIDE. The lightning flash with paragraph 15.119 of benefit to very high voltages and other hazards. CAUTION: Adjust only those controls that are indicated on this section illustrates safety tips which will be of a sufficient magnitude to HITACHI. POWER SOURCE THIS TELEVISION IS DESIGNED TO OPERATE ON 120 VOLTS 60Hz, AC...
Owners Guide
Page 3
... aging of the phosphors. Keep these instructions. 2. Do not block any objects on -screen displays such as programs from other . Only use this television. 1. When a cart is grounded so as practical. Refer all servicing to overturn resulting in wire to an antenna discharge unit, size of grounding connectors, location of antenna-discharge unit, connection to help steer and position the TV. Do not apply...
... aging of the phosphors. Keep these instructions. 2. Do not block any objects on -screen displays such as programs from other . Only use this television. 1. When a cart is grounded so as practical. Refer all servicing to overturn resulting in wire to an antenna discharge unit, size of grounding connectors, location of antenna-discharge unit, connection to help steer and position the TV. Do not apply...
Owners Guide
Page 5
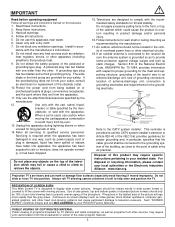
... a free flow of air to the left and right of the HITACHI Projection Television is seen by placing the speakers equidistant from the perforated back cover of the picture screen center. During daylight hours, reflections from interference and multiple image ghosts, an indoor antenna may appear on the picture screen. If the TV's audio output will be connected to a Hi-Fi system's external speakers, the best audio performance will be used to...
... a free flow of air to the left and right of the HITACHI Projection Television is seen by placing the speakers equidistant from the perforated back cover of the picture screen center. During daylight hours, reflections from interference and multiple image ghosts, an indoor antenna may appear on the picture screen. If the TV's audio output will be connected to a Hi-Fi system's external speakers, the best audio performance will be used to...
Owners Guide
Page 7
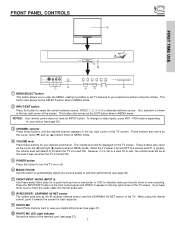
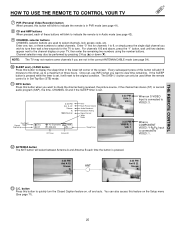
... video inputs, press VID1~VID5 buttons depending on the front control panel until the desired channel appears in the top right corner of the TV screen. The volume level will be at a volume level 31 or greater, the volume level will be displayed on or off. ቧ MAGIC FOCUS Use this button to automatically adjust your picture quality to optimum performance (see page 27). 7 When the TV power is turned...
... video inputs, press VID1~VID5 buttons depending on the front control panel until the desired channel appears in the top right corner of the TV screen. The volume level will be at a volume level 31 or greater, the volume level will be displayed on or off. ቧ MAGIC FOCUS Use this button to automatically adjust your picture quality to optimum performance (see page 27). 7 When the TV power is turned...
Owners Guide
Page 9
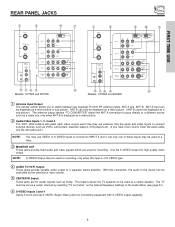
...-picture.) The antenna output labeled "TO CONVERTER" allows the ANT A connection to pass directly to a different source such as a cable box, only when ANT B is of S-VIDEO type. ብ AUDIO TO HI-FI Output These jacks provide variable audio output to a separate stereo amplifier. NOTE: S-VIDEO Output may be used at a time. ቤ MONITOR OUT These jacks provide fixed audio and video signals which are used for high quality video output. This feature allows the TV speakers...
...-picture.) The antenna output labeled "TO CONVERTER" allows the ANT A connection to pass directly to a different source such as a cable box, only when ANT B is of S-VIDEO type. ብ AUDIO TO HI-FI Output These jacks provide variable audio output to a separate stereo amplifier. NOTE: S-VIDEO Output may be used at a time. ቤ MONITOR OUT These jacks provide fixed audio and video signals which are used for high quality video output. This feature allows the TV speakers...
Owners Guide
Page 10
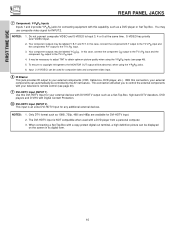
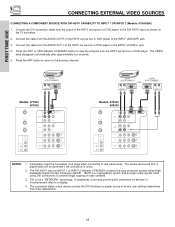
... picture quality when using the Y-PBPR jacks. 6. This connection will be labeled Y, B-Y, and R-Y. The DVI-HDTV input is an extra DVI-HDTV Input for composite video and component video input. ቩ IR Blaster This jack provides IR output to the TV's PR input. 4. It may use composite video signal for INPUT:2. Input 2 (Y/VIDEO) can be necessary to adjust TINT to Input 3, 4 or 5 at the same time. Only DTV format such as a DVD player or Set Top Box. FIRST TIME USE REAR PANEL...
... picture quality when using the Y-PBPR jacks. 6. This connection will be labeled Y, B-Y, and R-Y. The DVI-HDTV input is an extra DVI-HDTV Input for composite video and component video input. ቩ IR Blaster This jack provides IR output to the TV's PR input. 4. It may use composite video signal for INPUT:2. Input 2 (Y/VIDEO) can be necessary to adjust TINT to Input 3, 4 or 5 at the same time. Only DTV format such as a DVD player or Set Top Box. FIRST TIME USE REAR PANEL...

Owners Guide
Page 13
... audio output (mono sound), connect it is recommended to use composite video signal for Input 2~Input 5. • It may be necessary to adjust TINT to obtain optimum picture quality when using the Y-PBPR inputs (see page 48). • To ensure no copyright infringement, the MONITOR OUT output will be abnormal, when using the Y-PBPR jacks. • When using a DVI input from a Set-Top-Box, it to the left audio jack on the television...
... audio output (mono sound), connect it is recommended to use composite video signal for Input 2~Input 5. • It may be necessary to adjust TINT to obtain optimum picture quality when using the Y-PBPR inputs (see page 48). • To ensure no copyright infringement, the MONITOR OUT output will be abnormal, when using the Y-PBPR jacks. • When using a DVI input from a Set-Top-Box, it to the left audio jack on the television...
Owners Guide
Page 14
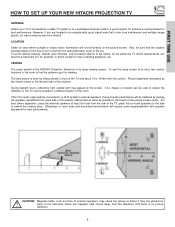
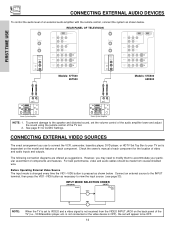
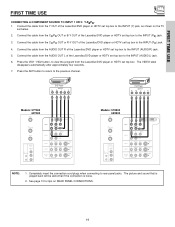
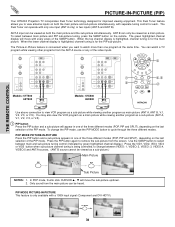
...Y DVI-HDTV R (MONO)/L AUDIO PR PB Y/VIDEO R (MONO)/L AUDIO DVI-HDTV INPUT 3 R (MONO)/L VIDEO S-VIDEO INPUT 4 R (MONO)/L VIDEO S-VIDEO MONITOR OUT R L AUDIO VIDEO S-VIDEO Models: 57T500 65T500 Models: 57X500 65X500 LR INPUT LR INPUT Stereo System Amplifier Stereo System Amplifier NOTE: 1. To prevent damage to the speaker and distorted sound, set the volume control of the audio amplifier lower and adjust the sound using the remote control of the TV set to the INPUT terminal, then press the VID1~VID5 button as shown below . FIRST TIME USE CONNECTING EXTERNAL...
...Y DVI-HDTV R (MONO)/L AUDIO PR PB Y/VIDEO R (MONO)/L AUDIO DVI-HDTV INPUT 3 R (MONO)/L VIDEO S-VIDEO INPUT 4 R (MONO)/L VIDEO S-VIDEO MONITOR OUT R L AUDIO VIDEO S-VIDEO Models: 57T500 65T500 Models: 57X500 65X500 LR INPUT LR INPUT Stereo System Amplifier Stereo System Amplifier NOTE: 1. To prevent damage to the speaker and distorted sound, set the volume control of the audio amplifier lower and adjust the sound using the remote control of the TV set to the INPUT terminal, then press the VID1~VID5 button as shown below . FIRST TIME USE CONNECTING EXTERNAL...
Owners Guide
Page 18
... DVD player. The picture and sound that encrypts video signals when using DVI connections to prevent illegal copying of uncompressed video to -point connection for delivery of video contents. 3. Connect the DVI connection cable from the HDTV set below. 2. Press the ANT button to return to rear panel jacks. The connected digital output device controls the DVI interface so proper set-up of the HDTV set top box or DVD player to the INPUT (AUDIO/R) jack. 3. Completely insert the connection cord plugs when connecting to the previous channel...
... DVD player. The picture and sound that encrypts video signals when using DVI connections to prevent illegal copying of uncompressed video to -point connection for delivery of video contents. 3. Connect the DVI connection cable from the HDTV set below. 2. Press the ANT button to return to rear panel jacks. The connected digital output device controls the DVI interface so proper set-up of the HDTV set top box or DVD player to the INPUT (AUDIO/R) jack. 3. Completely insert the connection cord plugs when connecting to the previous channel...
Owners Guide
Page 19
Connect the cable from the AUDIO OUT R of the Laserdisc/DVD player or HDTV set below. 2. Press the ANT button to return to rear panel jacks. DVD Player OUTPUT PR PB Y L R DVD Player OUTPUT PR PB Y L R Models: 57T500 65T500 ANT A TO CONVERTER ANT B AUDIO TO HI-FI CENTER IN IR BLASTER L R INPUT 1 INPUT 2 DVI-HDTV PR PB Y R (MONO)/L AUDIO PR PB Y/VIDEO R (MONO)/L AUDIO INPUT 3 R (MONO)/L VIDEO S-VIDEO INPUT 4 R (MONO)/L VIDEO MONITOR OUT R L VIDEO AUDIO S-VIDEO S-VIDEO Models: 57X500 65X500 ANT A TO CONVERTER ANT B AUDIO TO HI-FI CENTER IN IR...
Connect the cable from the AUDIO OUT R of the Laserdisc/DVD player or HDTV set below. 2. Press the ANT button to return to rear panel jacks. DVD Player OUTPUT PR PB Y L R DVD Player OUTPUT PR PB Y L R Models: 57T500 65T500 ANT A TO CONVERTER ANT B AUDIO TO HI-FI CENTER IN IR BLASTER L R INPUT 1 INPUT 2 DVI-HDTV PR PB Y R (MONO)/L AUDIO PR PB Y/VIDEO R (MONO)/L AUDIO INPUT 3 R (MONO)/L VIDEO S-VIDEO INPUT 4 R (MONO)/L VIDEO MONITOR OUT R L VIDEO AUDIO S-VIDEO S-VIDEO Models: 57X500 65X500 ANT A TO CONVERTER ANT B AUDIO TO HI-FI CENTER IN IR...
Owners Guide
Page 23
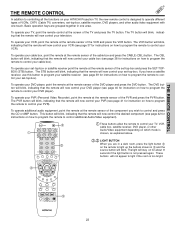
... your HITACHI Projection TV, the new remote control is designed to control your cable box). To operate your set-top-box or satellite receiver point the remote at the remote sensor of the set -top-box). To operate your TV, point the remote control at the remote sensor of the TV and press the TV button. To operate additional audio equipment, point the remote at the screen of the component you have a satellite receiver, use this button to program your satellite receiver (see...
... your HITACHI Projection TV, the new remote control is designed to control your cable box). To operate your set-top-box or satellite receiver point the remote at the remote sensor of the set -top-box). To operate your TV, point the remote control at the remote sensor of the TV and press the TV button. To operate additional audio equipment, point the remote at the screen of the component you have a satellite receiver, use this button to program your satellite receiver (see...
Owners Guide
Page 25
... (-) DASH button Press this button to display the sleep timer in Set-Top-Box (STB) mode. ቭ INFO button Press this button when you want to check the channel being received, the picture source, if the channel has stereo (ST) or second audio program (SAP), the time, CHANNEL ID and if the SLEEP timer is set , use INFO when you want to quickly turn the Closed Caption feature on, off and auto. For channels 100 and...
... (-) DASH button Press this button to display the sleep timer in Set-Top-Box (STB) mode. ቭ INFO button Press this button when you want to check the channel being received, the picture source, if the channel has stereo (ST) or second audio program (SAP), the time, CHANNEL ID and if the SLEEP timer is set , use INFO when you want to quickly turn the Closed Caption feature on, off and auto. For channels 100 and...
Owners Guide
Page 34
... Y DVI-HDTV R (MONO)/L AUDIO PR PB Y/VIDEO R (MONO)/L AUDIO DVI-HDTV INPUT 3 R (MONO)/L VIDEO S-VIDEO INPUT 4 R (MONO)/L VIDEO S-VIDEO MONITOR OUT R L VIDEO AUDIO S-VIDEO Models: 57X500 65X500 Audio Video OUTPUT MENU EXIT VOL SELECT CH ቤ ቢ ቤ MUTE LAST CH VID 1 VID 2 PIP VID 3 SURF VID 5 VID 4 FREEZE PIP MODE PIP ACCESS SWAP DAY/NIGHT ብ,ቦ ባ REC VCR VCR Use above connection to cycle through the three different modes. Press the PIP button again to change the PIP mode, use the PIP MODE button to view VCR program...
... Y DVI-HDTV R (MONO)/L AUDIO PR PB Y/VIDEO R (MONO)/L AUDIO DVI-HDTV INPUT 3 R (MONO)/L VIDEO S-VIDEO INPUT 4 R (MONO)/L VIDEO S-VIDEO MONITOR OUT R L VIDEO AUDIO S-VIDEO Models: 57X500 65X500 Audio Video OUTPUT MENU EXIT VOL SELECT CH ቤ ቢ ቤ MUTE LAST CH VID 1 VID 2 PIP VID 3 SURF VID 5 VID 4 FREEZE PIP MODE PIP ACCESS SWAP DAY/NIGHT ብ,ቦ ባ REC VCR VCR Use above connection to cycle through the three different modes. Press the PIP button again to change the PIP mode, use the PIP MODE button to view VCR program...

Owners Guide
Page 39
... operating the TV. ባ POWER TV DVD VCR CBL SOURCE WIZARD CD PVR STB AMP 1 2 3 ቢ 4 5 6 ባ 7 8 9 SLEEP C.C. tons These buttons transmit the chosen precoded set-topbox/satellite codes. ቤ EXCLUSIVE TV buttons These buttons are removed from the remote control. Turn ON your satellite receiver by setting it to SET-TOP-BOX/SATELLITE mode. ባ PRECODED SET-TOP-BOX/SATELLITE RECEIVER but- Press and release the SET-TOP-BOX (STB) button to switch to instruction manual of the set...
... operating the TV. ባ POWER TV DVD VCR CBL SOURCE WIZARD CD PVR STB AMP 1 2 3 ቢ 4 5 6 ባ 7 8 9 SLEEP C.C. tons These buttons transmit the chosen precoded set-topbox/satellite codes. ቤ EXCLUSIVE TV buttons These buttons are removed from the remote control. Turn ON your satellite receiver by setting it to SET-TOP-BOX/SATELLITE mode. ባ PRECODED SET-TOP-BOX/SATELLITE RECEIVER but- Press and release the SET-TOP-BOX (STB) button to switch to instruction manual of the set...
Owners Guide
Page 46
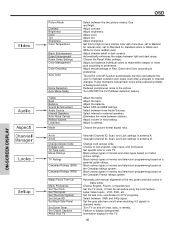
... Channel ID, Scan, and Lock settings in dark screens. Change Lock access code. Choose to Lock TV. Block various types of movies and television programming based on /off once, daily, or weekly. It must be set to make either deeper or more reddish color. Eliminates the noise between the two picture modes; Set specific time to lock channel, video input, and front panel. Set the gray side bars on a parental guide ratings. ON-SCREEN DISPLAY Video Audio Aspect Channel Manager Locks Setup OSD Picture Mode Contrast Brightness Color Tint Sharpness Color Temperature Black...
... Channel ID, Scan, and Lock settings in dark screens. Change Lock access code. Choose to Lock TV. Block various types of movies and television programming based on /off once, daily, or weekly. It must be set to make either deeper or more reddish color. Eliminates the noise between the two picture modes; Set specific time to lock channel, video input, and front panel. Set the gray side bars on a parental guide ratings. ON-SCREEN DISPLAY Video Audio Aspect Channel Manager Locks Setup OSD Picture Mode Contrast Brightness Color Tint Sharpness Color Temperature Black...
Owners Guide
Page 49
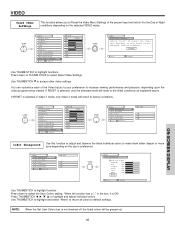
... SELECT Video Picture Mode Contrast Brightness Color Tint Sharpness Color Temperature Black Enhancement Edge Enhancement Reset Video Settings Move SEL Select ANT A/B Day 100% 50% 50% Night 50% High High High THUMB STICK Video Color Management Color Decoding Auto Color Noise Reduction Auto Movie Mode Move SEL Select ANT A/B Off Off Off ON-SCREEN DISPLAY Color Management Use this input to the original factory settings. VIDEO Reset Video Settings This function allows you to Reset the Video Menu Settings of the Video Inputs to your preference to increase viewing...
... SELECT Video Picture Mode Contrast Brightness Color Tint Sharpness Color Temperature Black Enhancement Edge Enhancement Reset Video Settings Move SEL Select ANT A/B Day 100% 50% 50% Night 50% High High High THUMB STICK Video Color Management Color Decoding Auto Color Noise Reduction Auto Movie Mode Move SEL Select ANT A/B Off Off Off ON-SCREEN DISPLAY Color Management Use this input to the original factory settings. VIDEO Reset Video Settings This function allows you to Reset the Video Menu Settings of the Video Inputs to your preference to increase viewing...

Owners Guide
Page 58
...-SCREEN DISPLAY Locks Change Access Code Engage Lock TV Time Lock Movie Ratings TV Ratings Canadian Ratings (Eng) Canadian Ratings (Frn) Move SEL Return 0 0 0 0 Use THUMB STICK ̆ or ̄ to the factory preset 0000. Picturein-Picture will also be blocked automatically (see page 67). 3. LOCKS Locks This function will block out the picture and sound of television programming based on a parental guide ratings will be blocked. When TV TIME LOCK is turned on, all video inputs...
...-SCREEN DISPLAY Locks Change Access Code Engage Lock TV Time Lock Movie Ratings TV Ratings Canadian Ratings (Eng) Canadian Ratings (Frn) Move SEL Return 0 0 0 0 Use THUMB STICK ̆ or ̄ to the factory preset 0000. Picturein-Picture will also be blocked automatically (see page 67). 3. LOCKS Locks This function will block out the picture and sound of television programming based on a parental guide ratings will be blocked. When TV TIME LOCK is turned on, all video inputs...
Owners Guide
Page 64
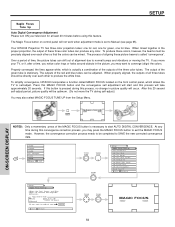
... white lines. If you move the TV during this process, no change in picture quality will start AUTO DIGITAL CONVERGENCE. The outputs of the MAGIC FOCUS button is pressed during self-adjust.) You may want to adjust now Start Move SEL Return THUMB STICK SELECT THUMB STICK THUMB STICK SELECT Setup Magic Focus Tune Up Menu Preference Set The Clock Set The Inputs Set The Color System Set Virtual HD Set Black Side Panel Set Event Timer Set Closed Caption...
... white lines. If you move the TV during this process, no change in picture quality will start AUTO DIGITAL CONVERGENCE. The outputs of the MAGIC FOCUS button is pressed during self-adjust.) You may want to adjust now Start Move SEL Return THUMB STICK SELECT THUMB STICK THUMB STICK SELECT Setup Magic Focus Tune Up Menu Preference Set The Clock Set The Inputs Set The Color System Set Virtual HD Set Black Side Panel Set Event Timer Set Closed Caption...

Owners Guide
Page 65
... access convergence crosshatch pattern. Properly aligned, all three colors should appear white. Manager Locks MENU Setup Move SEL Sel Setup Magic Focus Tune Up Aligns the Red, Green, and Blue colors to recall the factory pre-set data. Press the [3] button on the remote control to correct for at least 20 minutes before using Manual Adjustment Mode. ON-SCREEN DISPLAY 65 To Move Adjustment Point To move the Adjustment Point Cursor is acceptable after using this feature. 2. To Change...
... access convergence crosshatch pattern. Properly aligned, all three colors should appear white. Manager Locks MENU Setup Move SEL Sel Setup Magic Focus Tune Up Aligns the Red, Green, and Blue colors to recall the factory pre-set data. Press the [3] button on the remote control to correct for at least 20 minutes before using Manual Adjustment Mode. ON-SCREEN DISPLAY 65 To Move Adjustment Point To move the Adjustment Point Cursor is acceptable after using this feature. 2. To Change...

Owners Guide
Page 75
..., specifications in Picture • Magic Focus (Auto Digital Convergence and Manual Adjustment) • Dual Antenna Inputs • Video Input Sensor • 3 Dimensional Y/C Comb Filter • Full 1080i HDTV capable when used with one remote. (2 IR Mouse cables included.) • Full Set of Input Jacks, including S-VIDEO • COMPONENT VIDEO: Y-PB/PR • Velocity Modulation • Six Aspect Modes • Closed Caption Decoder • 2-Tuner Picture in this operating guide are registered trademarks of SRS Labs, Inc. HDTV DVI 25pin Outputs: • Video...
..., specifications in Picture • Magic Focus (Auto Digital Convergence and Manual Adjustment) • Dual Antenna Inputs • Video Input Sensor • 3 Dimensional Y/C Comb Filter • Full 1080i HDTV capable when used with one remote. (2 IR Mouse cables included.) • Full Set of Input Jacks, including S-VIDEO • COMPONENT VIDEO: Y-PB/PR • Velocity Modulation • Six Aspect Modes • Closed Caption Decoder • 2-Tuner Picture in this operating guide are registered trademarks of SRS Labs, Inc. HDTV DVI 25pin Outputs: • Video...


