Warranty Guide
Page 2
...years Limited parts & labor warranty HP Digital Projector Lamp Module (included with the projector) 90 days Limited hardware warranty HP Digital Projector Lamp Module (purchased separately) 90 days Limited hardware warranty HP Digital Projector Cables, Remote Control, and other parts (included with the projector) Same period as a result..., and do not apply to any hardware product covered by HP's warranty, HP shall, within a reasonable time after being replaced. 2 Product Warranty period HP Digital Projector xp7010/7030 Series warranty period marked on rear label (excluding ...
...years Limited parts & labor warranty HP Digital Projector Lamp Module (included with the projector) 90 days Limited hardware warranty HP Digital Projector Lamp Module (purchased separately) 90 days Limited hardware warranty HP Digital Projector Cables, Remote Control, and other parts (included with the projector) Same period as a result..., and do not apply to any hardware product covered by HP's warranty, HP shall, within a reasonable time after being replaced. 2 Product Warranty period HP Digital Projector xp7010/7030 Series warranty period marked on rear label (excluding ...
Support Guide
Page 2
... 24 hours a day, seven days a week, at no additional cost to your HP digital projector or solving problems with the projector. From our experience, a large percentage of information about your digital projector, including product help and user forum. This service requires access to view the on... in the owner's manual. Support options and availability vary by HP. 2 Many emails are addressed in the following order: Step 1: HP Digital Projector Documentation Use the provided CD to the Internet. The HP support process works most effectively if you can obtain a wide variety...
... 24 hours a day, seven days a week, at no additional cost to your HP digital projector or solving problems with the projector. From our experience, a large percentage of information about your digital projector, including product help and user forum. This service requires access to view the on... in the owner's manual. Support options and availability vary by HP. 2 Many emails are addressed in the following order: Step 1: HP Digital Projector Documentation Use the provided CD to the Internet. The HP support process works most effectively if you can obtain a wide variety...
Support Guide
Page 3
.... Did you are in front of this situation happened before? Obtaining HP Repair If your HP digital projector needs to these resources, call HP telephone support. Before Calling Before calling for your computer and projector. What steps have you re-create it is provided at the number...country or region. Repair covered by the limited warranty is an authorized service provider or an HP facility. Please be prepared to provide the following information: • The digital projector's model and serial numbers • The computer's model and operating system • Messages displayed...
.... Did you are in front of this situation happened before? Obtaining HP Repair If your HP digital projector needs to these resources, call HP telephone support. Before Calling Before calling for your computer and projector. What steps have you re-create it is provided at the number...country or region. Repair covered by the limited warranty is an authorized service provider or an HP facility. Please be prepared to provide the following information: • The digital projector's model and serial numbers • The computer's model and operating system • Messages displayed...
Video Port Guide
Page 1
...folder, Monitors, switch primary display by dragging white menu bar to match display device (e.g. 800x600 Simulscan for simultaneous display on PowerBook and on projector) Requires optional video card. Requires 3rd party interface. advanced sys config; Reboot Command Key + F1 Not compatible Select Monitor Icon on ... G4 PowerBook Portable 100 key command to match display device (e.g. 800x600 Simulscan for simultaneous display on PowerBook and on projector) Control Panel folder, PowerBook Display folder, activate Video Mirroring, warm reboot. No video port. system config;
...folder, Monitors, switch primary display by dragging white menu bar to match display device (e.g. 800x600 Simulscan for simultaneous display on PowerBook and on projector) Requires optional video card. Requires 3rd party interface. advanced sys config; Reboot Command Key + F1 Not compatible Select Monitor Icon on ... G4 PowerBook Portable 100 key command to match display device (e.g. 800x600 Simulscan for simultaneous display on PowerBook and on projector) Control Panel folder, PowerBook Display folder, activate Video Mirroring, warm reboot. No video port. system config;
User Guide
Page 3
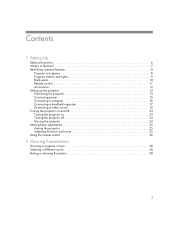
... 15 Connecting a computer 16 Connecting a handheld organizer 17 Connecting a video source 18 Turning the projector on and off 23 Turning the projector on 23 Turning the projector off 24 Moving the projector 24 Making basic adjustments 25 Aiming the projector 25 Adjusting the focus and zoom 25 Using the remote control 26 2 Showing Presentations Showing...
... 15 Connecting a computer 16 Connecting a handheld organizer 17 Connecting a video source 18 Turning the projector on and off 23 Turning the projector on 23 Turning the projector off 24 Moving the projector 24 Making basic adjustments 25 Aiming the projector 25 Adjusting the focus and zoom 25 Using the remote control 26 2 Showing Presentations Showing...

User Guide
Page 4
...31 Adjusting the picture for best color 32 Adjusting other picture settings 32 Adjusting the sound settings (certain models only 33 Adjusting the projector setup 33 Preventing unauthorized use 33 Using the on-screen menu 34 Changing settings using the on-screen menu 34 Changing the default... settings 34 Setup menu 35 Picture menu 36 Source menu 38 Help menu 38 4 Maintaining the Projector Performing routine maintenance 39 Getting the projector status 39 Cleaning the projector lens 39 Replacing the lamp module 40 Replacing the battery in the remote control 42 Upgrading the...
...31 Adjusting the picture for best color 32 Adjusting other picture settings 32 Adjusting the sound settings (certain models only 33 Adjusting the projector setup 33 Preventing unauthorized use 33 Using the on-screen menu 34 Changing settings using the on-screen menu 34 Changing the default... settings 34 Setup menu 35 Picture menu 36 Source menu 38 Help menu 38 4 Maintaining the Projector Performing routine maintenance 39 Getting the projector status 39 Cleaning the projector lens 39 Replacing the lamp module 40 Replacing the battery in the remote control 42 Upgrading the...
User Guide
Page 5
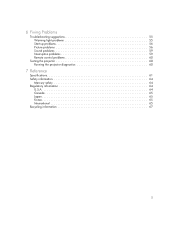
6 Fixing Problems Troubleshooting suggestions 55 Warning light problems 55 Start-up problems 56 Picture problems 56 Sound problems 59 Interruption problems 59 Remote control problems 60 Testing the projector 60 Running the projector diagnostics 60 7 Reference Specifications 61 Safety information 64 Mercury safety 64 Regulatory information 64 U.S.A 64 Canada 65 Japan 65 Korea 65 International 65 Recycling information 67 5
6 Fixing Problems Troubleshooting suggestions 55 Warning light problems 55 Start-up problems 56 Picture problems 56 Sound problems 59 Interruption problems 59 Remote control problems 60 Testing the projector 60 Running the projector diagnostics 60 7 Reference Specifications 61 Safety information 64 Mercury safety 64 Regulatory information 64 U.S.A 64 Canada 65 Japan 65 Korea 65 International 65 Recycling information 67 5
User Guide
Page 6
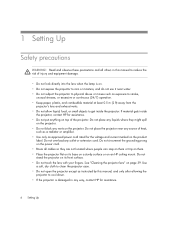
...; Do not block any outlet or extension cord. Do not stand the projector on its base on a sturdy surface or on an HP ceiling mount. 1 Setting Up Safety precautions WARNING! Do not place any way, contact HP for the voltage and current marked on the power cord. • Route ... not circumvent the grounding prong on the product label. If material gets inside the projector. Do not place the projector near water. • Do not subject the projector to get inside the projector, contact HP for assistance. • Do not put anything on top of injury and equipment damage. • Do not...
...; Do not block any outlet or extension cord. Do not stand the projector on its base on a sturdy surface or on an HP ceiling mount. 1 Setting Up Safety precautions WARNING! Do not place any way, contact HP for the voltage and current marked on the power cord. • Route ... not circumvent the grounding prong on the product label. If material gets inside the projector. Do not place the projector near water. • Do not subject the projector to get inside the projector, contact HP for assistance. • Do not put anything on top of injury and equipment damage. • Do not...
User Guide
Page 7
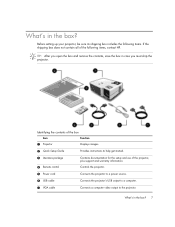
...help get started. 3 Literature package 4 Remote control Contains documentation for the setup and use of the following items, contact HP. TIP: After you must ship the projector. What's in case you open the box and remove the contents, save the box in the box? Identifying the ...contents of the box Item Function 1 Projector Displays images. 2 Quick Setup Guide Provides instructions to the projector. What's in the box? 7 Before setting up your projector, be sure its shipping box includes the following items. If the shipping box does...
...help get started. 3 Literature package 4 Remote control Contains documentation for the setup and use of the following items, contact HP. TIP: After you must ship the projector. What's in case you open the box and remove the contents, save the box in the box? Identifying the ...contents of the box Item Function 1 Projector Displays images. 2 Quick Setup Guide Provides instructions to the projector. What's in the box? 7 Before setting up your projector, be sure its shipping box includes the following items. If the shipping box does...
User Guide
Page 8
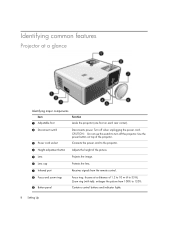
...glance Identifying major components Item Function 1 Adjustable foot Levels the projector (one foot on top of the projector. Turn off the projector. Contains control buttons and indicator lights. 8 Setting Up Connects the power cord to the projector. 4 Height adjustment button Adjusts the height of the picture.... 5 Lens Projects the image. 6 Lens cap Protects the lens. 7 Infrared port Receives signals from 100% to 120%. Identifying common features Projector at a distance of 1.2 to 10 m (4 to 33 ft). Use the power button on each rear corner). 2 Disconnect switch 3 Power ...
...glance Identifying major components Item Function 1 Adjustable foot Levels the projector (one foot on top of the projector. Turn off the projector. Contains control buttons and indicator lights. 8 Setting Up Connects the power cord to the projector. 4 Height adjustment button Adjusts the height of the picture.... 5 Lens Projects the image. 6 Lens cap Protects the lens. 7 Infrared port Receives signals from 100% to 120%. Identifying common features Projector at a distance of 1.2 to 10 m (4 to 33 ft). Use the power button on each rear corner). 2 Disconnect switch 3 Power ...

User Guide
Page 9
... and color combination-can be customized. Lit steady: the lamp is faulty. Flashing: the lamp ballast is faulty. Warns if the projector is too hot. 5 Source button 6 Back button 7 Enter button Displays the picture from a computer, or navigates the on-screen menu. Resynchronizes the... the input signal from the next input port, or navigates the on -screen menu. Projector buttons and lights Identifying the projector buttons and lights Item Function 1 Power button Turns the projector on or off. 2 Page-up and Page-down buttons 3 Lamp warning light 4 Temperature warning light Scrolls up ...
... and color combination-can be customized. Lit steady: the lamp is faulty. Flashing: the lamp ballast is faulty. Warns if the projector is too hot. 5 Source button 6 Back button 7 Enter button Displays the picture from a computer, or navigates the on-screen menu. Resynchronizes the... the input signal from the next input port, or navigates the on -screen menu. Projector buttons and lights Identifying the projector buttons and lights Item Function 1 Power button Turns the projector on or off. 2 Page-up and Page-down buttons 3 Lamp warning light 4 Temperature warning light Scrolls up ...
User Guide
Page 11
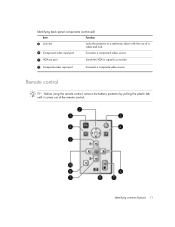
Remote control TIP: Before using the remote control, remove the battery protector by pulling the plastic tab until it comes out of a cable and lock. : Component video input port Connects a component video source. ; Identifying back panel components (continued) Item Function 9 Lock slot Locks the projector to a monitor. < Composite-video input port Connects a composite-video source. VGA-out port Sends the VGA-in signal to a stationary object with the use of the remote control. Identifying common features 11
Remote control TIP: Before using the remote control, remove the battery protector by pulling the plastic tab until it comes out of a cable and lock. : Component video input port Connects a component video source. ; Identifying back panel components (continued) Item Function 9 Lock slot Locks the projector to a monitor. < Composite-video input port Connects a composite-video source. VGA-out port Sends the VGA-in signal to a stationary object with the use of the remote control. Identifying common features 11
User Guide
Page 12
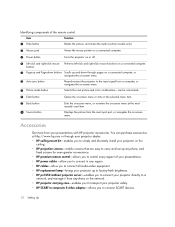
...9 Back button : Source button Exits the on-screen menu, or re-enters the on the network. • HP projector carrying case-enables you to transport your projector safely. • HP SCART to composite S-video adapter-allows you to control every aspect of the remote control Item Function 1 Hide button..., and manage it from anywhere on -screen menu at http://www.hp.com or through your projector dealer. • HP ceiling mount kit-enables you to simply and discreetly install your projector on the ceiling. • HP projection screens-mobile screens that are easy to carry and set up ...
...9 Back button : Source button Exits the on-screen menu, or re-enters the on the network. • HP projector carrying case-enables you to transport your projector safely. • HP SCART to composite S-video adapter-allows you to control every aspect of the remote control Item Function 1 Hide button..., and manage it from anywhere on -screen menu at http://www.hp.com or through your projector dealer. • HP ceiling mount kit-enables you to simply and discreetly install your projector on the ceiling. • HP projection screens-mobile screens that are easy to carry and set up ...
User Guide
Page 13
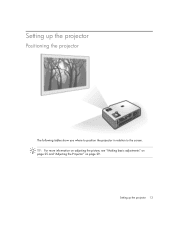
TIP: For more information on adjusting the picture, see "Making basic adjustments" on page 25 and "Adjusting the Projector" on page 29. Setting up the projector 13 Setting up the projector Positioning the projector The following tables show you where to position the projector in relation to the screen.
TIP: For more information on adjusting the picture, see "Making basic adjustments" on page 25 and "Adjusting the Projector" on page 29. Setting up the projector 13 Setting up the projector Positioning the projector The following tables show you where to position the projector in relation to the screen.
User Guide
Page 14
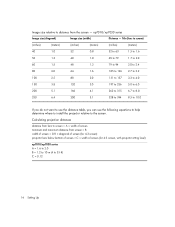
... table, you can use the following equations to help determine where to install the projector relative to the screen. Calculating projection distances distance from lens to screen = A × width of screen (for 4:3 screen, with projector sitting level) xp7010/xp7030 series A = 1.6 to 2.0 B = 1.2 to 10 m (4 to 33 ft) C = 0.12 14 Setting Up Image size relative...
... table, you can use the following equations to help determine where to install the projector relative to the screen. Calculating projection distances distance from lens to screen = A × width of screen (for 4:3 screen, with projector sitting level) xp7010/xp7030 series A = 1.6 to 2.0 B = 1.2 to 10 m (4 to 33 ft) C = 0.12 14 Setting Up Image size relative...
User Guide
Page 15
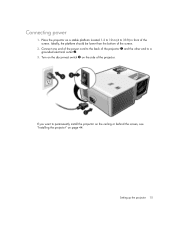
Ideally, the platform should be lower than the bottom of the projector. If you want to permanently install the projector on the ceiling or behind the screen, see "Installing the projector" on a stable platform located 1.2 to 10 m (4 to a grounded electrical outlet 2. 3. Setting up the projector 15 Connect one end of the power cord to the back of the projector 1 and the other end to 33 ft) in front of the screen. Place the projector on page 44. Turn on the disconnect switch 3 on the side of the screen. 2. Connecting power 1.
Ideally, the platform should be lower than the bottom of the projector. If you want to permanently install the projector on the ceiling or behind the screen, see "Installing the projector" on a stable platform located 1.2 to 10 m (4 to a grounded electrical outlet 2. 3. Setting up the projector 15 Connect one end of the power cord to the back of the projector 1 and the other end to 33 ft) in front of the screen. Place the projector on page 44. Turn on the disconnect switch 3 on the side of the screen. 2. Connecting power 1.

User Guide
Page 16
TIP: You can connect an external computer monitor to use the mouse and page up/down features on the projector. Connecting a computer Requires: • VGA cable or other video source cable 1 • USB cable 2 (optional) • Audio cable, mini-phone (optional) The optional USB connection ... to the user documentation provided with your computer. For example, on the computer's VGA output. TIP: If the computer display does not appear on the projector, you might have to press a combination of keys on the computer to turn on some computers you to the VGA-out port on the remote...
TIP: You can connect an external computer monitor to use the mouse and page up/down features on the projector. Connecting a computer Requires: • VGA cable or other video source cable 1 • USB cable 2 (optional) • Audio cable, mini-phone (optional) The optional USB connection ... to the user documentation provided with your computer. For example, on the computer's VGA output. TIP: If the computer display does not appear on the projector, you might have to press a combination of keys on the computer to turn on some computers you to the VGA-out port on the remote...
User Guide
Page 17
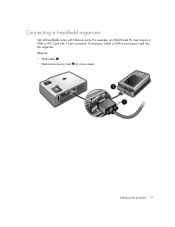
For example, an iPAQ Pocket PC may require a VGA-out PC Card with VGA-out ports. Connecting a handheld organizer Not all handhelds come with 15-pin connector. If necessary, install a VGA-out accessory card into the organizer. Requires: • VGA cable 1 • VGA-out accessory card 2 (in some cases) Setting up the projector 17
For example, an iPAQ Pocket PC may require a VGA-out PC Card with VGA-out ports. Connecting a handheld organizer Not all handhelds come with 15-pin connector. If necessary, install a VGA-out accessory card into the organizer. Requires: • VGA cable 1 • VGA-out accessory card 2 (in some cases) Setting up the projector 17

User Guide
Page 18
...-video connection • S-video connection • Composite-video connection The video and audio cables shown in the following sections are available from HP). Connecting a DVI source The DVI port is available only on certain models. Examples: Cable boxes, satellite receivers, and some computers Requires:...) 18 Setting Up When you connect the device to the projector, you want to connect a SCART video device to the projector, choose the connection that provides the best picture quality. It supports only DVI digital sources. Connecting a video source Many video devices have more...
...-video connection • S-video connection • Composite-video connection The video and audio cables shown in the following sections are available from HP). Connecting a DVI source The DVI port is available only on certain models. Examples: Cable boxes, satellite receivers, and some computers Requires:...) 18 Setting Up When you connect the device to the projector, you want to connect a SCART video device to the projector, choose the connection that provides the best picture quality. It supports only DVI digital sources. Connecting a video source Many video devices have more...
User Guide
Page 19
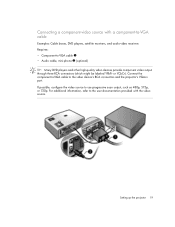
Setting up the projector 19 For additional information, refer to the user documentation provided with a component-to-VGA cable Examples: Cable boxes, DVD players, satellite receivers, and audio-video ... to use progressive scan output, such as 480p, 575p, or 720p. If possible, configure the video source to the video device's RCA connectors and the projector's VGA-in port. Connecting a component-video source with the video source.
Setting up the projector 19 For additional information, refer to the user documentation provided with a component-to-VGA cable Examples: Cable boxes, DVD players, satellite receivers, and audio-video ... to use progressive scan output, such as 480p, 575p, or 720p. If possible, configure the video source to the video device's RCA connectors and the projector's VGA-in port. Connecting a component-video source with the video source.


