HP b2600 - Workstation Research
Related Manual Pages


Related Videos

A6070A, HP B2600 Visualise Workstatsion
Duration: 1:25
Total Views: 542
Duration: 1:25
Total Views: 542
Booting a HP 9000 B2600 Workstation over Serial/COM1
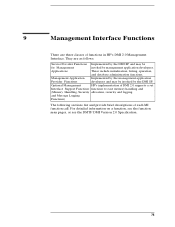
Duration: 7:27
Total Views: 499
Duration: 7:27
Total Views: 499
HP 9000 B2600 Booting HP UX (PA-RISC PA8600)!
Duration: 18:46
Total Views: 648
Duration: 18:46
Total Views: 648
Similar Questions

My Workstation Hp B2600 Has A Black Boxes On Lcd Panel
when i turned hp b2600 workstation on , i have a black boxes on LCD without any POST nor boot menui ...
when i turned hp b2600 workstation on , i have a black boxes on LCD without any POST nor boot menui ...
(Posted by esammahmoud283 4 years ago)
My Hp 2600 Workstation Shutdown Suddenly
i have a unix hp 2600 workstation shutdown suddenly at step of booting without any eeror message on ...
i have a unix hp 2600 workstation shutdown suddenly at step of booting without any eeror message on ...
(Posted by esammahmoud283 4 years ago)

Back Up Of A Hp B2600 By Usb
Is possible to make a back up in a usb memory of a HP b2600 server that used Hp Unix? I have instal...
Is possible to make a back up in a usb memory of a HP b2600 server that used Hp Unix? I have instal...
(Posted by ivanpiga 11 years ago)

Why Does The Z820 Need A 2nd Cpu To Be Able To Use Pcie Slot #4?
This feature is mentioned here: http://h18004.www1.hp.com/products/quickspecs/14264_na/14264_na.pdf
This feature is mentioned here: http://h18004.www1.hp.com/products/quickspecs/14264_na/14264_na.pdf
(Posted by maschoen 11 years ago)
I Have An Hp Jet 6600 Printer How Do I Print Using Black Cartrige Only?
I have an hp jet 6600 printer how do i print using black cartrige only? this is so frustrating, I me...
I have an hp jet 6600 printer how do i print using black cartrige only? this is so frustrating, I me...
(Posted by gideonbrothers 11 years ago)