Limited Warranty and Support Guide
Page 9
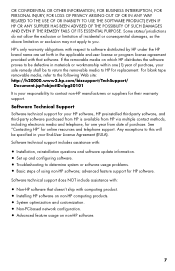
... methods, including electronic media and telephone, for one (1) year of using non-HP software; Software technical support includes assistance with : • Non-HP software that software. See "Contacting HP" for HP software. HP's only warranty obligations with computing product. • Installing HP software on non-HP computing products. • System optimization and customization. • Non-PC-based network configuration...
... methods, including electronic media and telephone, for one (1) year of using non-HP software; Software technical support includes assistance with : • Non-HP software that software. See "Contacting HP" for HP software. HP's only warranty obligations with computing product. • Installing HP software on non-HP computing products. • System optimization and customization. • Non-PC-based network configuration...
Limited Warranty and Support Guide
Page 10
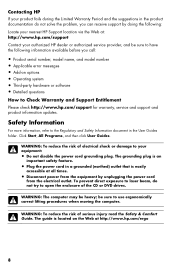
... have the following : Locate your nearest HP Support location via the Web at http://www.hp.com/ergo 8 The guide is located on options • Operating system • Third-party hardware or software • Detailed questions How to use ergonomically correct lifting procedures when moving the computer. Safety Information For more information, refer...
... have the following : Locate your nearest HP Support location via the Web at http://www.hp.com/ergo 8 The guide is located on options • Operating system • Third-party hardware or software • Detailed questions How to use ergonomically correct lifting procedures when moving the computer. Safety Information For more information, refer...
Limited Warranty and Support Guide
Page 11
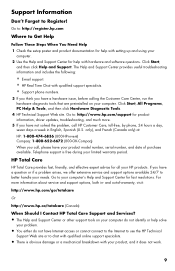
...; The Help and Support Center or other support tools on your limited warranty period. Go to: http://register.hp.com Where to : http://www.hp.com/support for help with setting up and using your computer. 2 Use the Help and Support Center for product information, driver updates, troubleshooting, and much more information about...
...; The Help and Support Center or other support tools on your limited warranty period. Go to: http://register.hp.com Where to : http://www.hp.com/support for help with setting up and using your computer. 2 Use the Help and Support Center for product information, driver updates, troubleshooting, and much more information about...

Limited Warranty and Support Guide
Page 12
...product purchase date, and you to provide expert assistance. The hardware service offering is stated in the product specifications, in English, Spanish (U.S. www.hp.com/support/consumer-forum (US and Canada) Understanding Hard Disk Drive Space The hard disk drive on the latest support topics. only), and French... (Canada only) via telephone to share advice and read up on the Hewlett-Packard and Compaq computers with service and support options. • Visa and MasterCard holders in terms of -Warranty Support Options Even after purchasing the...
...product purchase date, and you to provide expert assistance. The hardware service offering is stated in the product specifications, in English, Spanish (U.S. www.hp.com/support/consumer-forum (US and Canada) Understanding Hard Disk Drive Space The hard disk drive on the latest support topics. only), and French... (Canada only) via telephone to share advice and read up on the Hewlett-Packard and Compaq computers with service and support options. • Visa and MasterCard holders in terms of -Warranty Support Options Even after purchasing the...

Limited Warranty and Support Guide
Page 13
Because of Memory For computers with a 32-bit operating system, all makes and models. we take back all memory above 3GB is used for us to reclaim your old equipment even if it is to recycle: http://www.hp.com/recycle The information contained herein is as advertised. Confirm ... not limited to HP and Compaq systems. The memory above 3GB may see a difference between the size reported by Microsoft Windows and the size advertised. Microsoft Windows reports smaller capacity in the Windows Explorer tool and in the Computer window because it simple for system resources. In the ...
Because of Memory For computers with a 32-bit operating system, all makes and models. we take back all memory above 3GB is used for us to reclaim your old equipment even if it is to recycle: http://www.hp.com/recycle The information contained herein is as advertised. Confirm ... not limited to HP and Compaq systems. The memory above 3GB may see a difference between the size reported by Microsoft Windows and the size advertised. Microsoft Windows reports smaller capacity in the Windows Explorer tool and in the Computer window because it simple for system resources. In the ...
Limited Warranty and Support Guide - Refurbished
Page 9
... limitation or exclusion may provide warranties directly to you in all countries/regions. Service Upgrades HP has a range of additional support and service coverage for your product that doesn't ship with computing product. • Installing HP software on non-HP computing products. • System optimization and customization. • Non-PC-based network configuration. • Advanced...
... limitation or exclusion may provide warranties directly to you in all countries/regions. Service Upgrades HP has a range of additional support and service coverage for your product that doesn't ship with computing product. • Installing HP software on non-HP computing products. • System optimization and customization. • Non-PC-based network configuration. • Advanced...
Limited Warranty and Support Guide - Refurbished
Page 11
... useful troubleshooting information and includes the following: • Link to register your computer. • System information, including your computer product number, model number, and serial number. • E-mail support. • HP Real Time Chat with qualified support specialists. • Support phone numbers. •.../go/pse Intuit - Norton Internet Security http://www.symantec.com/techsupp 9 You can register your computer. 2 Use the Help and Support Center for your computer. 3 If you think you call HP Customer Care, toll-free, by phone, 24 hours a day, seven days a week in ...
... useful troubleshooting information and includes the following: • Link to register your computer. • System information, including your computer product number, model number, and serial number. • E-mail support. • HP Real Time Chat with qualified support specialists. • Support phone numbers. •.../go/pse Intuit - Norton Internet Security http://www.symantec.com/techsupp 9 You can register your computer. 2 Use the Help and Support Center for your computer. 3 If you think you call HP Customer Care, toll-free, by phone, 24 hours a day, seven days a week in ...

Limited Warranty and Support Guide - Refurbished
Page 12
... in the product specifications, in English, Spanish (U.S. Fees are available 24/7 in the documentation, or on your computer's Help and Support Center for fast resolutions. HP Planet Partners HP is sensitive to the environment and has a program, Planet Partners, to 1,000,000 bytes, and one gigabyte ... contains the system recovery information. 10 Microsoft Windows reports smaller capacity in the Windows Explorer tool and in the Computer window because it is to recycle: http://www.hp.com/recycle Understanding Hard Disk Drive Space The hard disk drive on the Hewlett-Packard and Compaq...
... in the product specifications, in English, Spanish (U.S. Fees are available 24/7 in the documentation, or on your computer's Help and Support Center for fast resolutions. HP Planet Partners HP is sensitive to the environment and has a program, Planet Partners, to 1,000,000 bytes, and one gigabyte ... contains the system recovery information. 10 Microsoft Windows reports smaller capacity in the Windows Explorer tool and in the Computer window because it is to recycle: http://www.hp.com/recycle Understanding Hard Disk Drive Space The hard disk drive on the Hewlett-Packard and Compaq...

Limited Warranty and Support Guide - Refurbished
Page 13
To prevent direct exposure to laser beam, do not try to your equipment: • Do not disable the power cord grounding plug. WARNING: The computer may be sure to the Regulatory and Safety Information document in a grounded (earthed) outlet that is located on the Web at all times. • Disconnect ... the User Guides folder. be heavy; WARNING: To reduce the risk of the CD or DVD drives. The guide is easily accessible at http://www.hp.com/ergo 11 Safety Information For more information, refer to use ergonomically correct lifting procedures when moving the...
To prevent direct exposure to laser beam, do not try to your equipment: • Do not disable the power cord grounding plug. WARNING: The computer may be sure to the Regulatory and Safety Information document in a grounded (earthed) outlet that is located on the Web at all times. • Disconnect ... the User Guides folder. be heavy; WARNING: To reduce the risk of the CD or DVD drives. The guide is easily accessible at http://www.hp.com/ergo 11 Safety Information For more information, refer to use ergonomically correct lifting procedures when moving the...

Upgrading and Servicing
Page 1
Removing and Replacing a CD/DVD Drive ........2 Removing the CD/DVD Drive 2 Installing a New CD/DVD Drive 4 Removing and Replacing a Hard Disk Drive .....8 Removing the Hard Disk Drive 8 Installing a New Hard Disk Drive 10 Upgrading or Replacing Memory 14 Removing the Memory 14 Installing a New Memory Card 18 Troubleshooting 22 Removing and Replacing a Computer Stand ..24 Removing the Stand 24 Installing a New Stand 25 UPGRADING AND SERVICING GUIDE HP TouchSmart310 Computer features may vary by model.
Removing and Replacing a CD/DVD Drive ........2 Removing the CD/DVD Drive 2 Installing a New CD/DVD Drive 4 Removing and Replacing a Hard Disk Drive .....8 Removing the Hard Disk Drive 8 Installing a New Hard Disk Drive 10 Upgrading or Replacing Memory 14 Removing the Memory 14 Installing a New Memory Card 18 Troubleshooting 22 Removing and Replacing a Computer Stand ..24 Removing the Stand 24 Installing a New Stand 25 UPGRADING AND SERVICING GUIDE HP TouchSmart310 Computer features may vary by model.
Upgrading and Servicing
Page 3
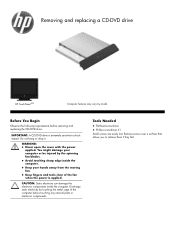
...; Keep your hands away from the moving fan. Keep fingers and tools clear of the computer before removing and replacing the CD/DVD drive. Tools Needed Flathead screwdriver Phillips screwdriver #1 Small screws are easily lost. IMPORTANT: A CD.../DVD drive is applied. Do not bang or drop it. Discharge static electricity by model. Removing and replacing a CD-DVD drive HP TouchSmart310 Computer features may vary by touching the metal cage of the fan when the power is extremely sensitive to retrieve them if they fall. WARNING: ...
...; Keep your hands away from the moving fan. Keep fingers and tools clear of the computer before removing and replacing the CD/DVD drive. Tools Needed Flathead screwdriver Phillips screwdriver #1 Small screws are easily lost. IMPORTANT: A CD.../DVD drive is applied. Do not bang or drop it. Discharge static electricity by model. Removing and replacing a CD-DVD drive HP TouchSmart310 Computer features may vary by touching the metal cage of the fan when the power is extremely sensitive to retrieve them if they fall. WARNING: ...
Upgrading and Servicing
Page 4
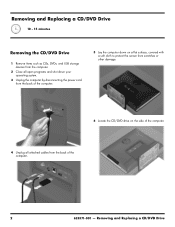
...Remove items such as CDs, DVDs, and USB storage devices from the computer. 2 Close all open programs and shut down your operating system. 3 Unplug the computer by disconnecting the power cord from the back of the computer. 5 Lay the computer down on a flat surface, covered with a soft cloth to protect ...the screen from scratches or other damage. 6 Locate the CD/DVD drive on the side of the computer. 4 Unplug all attached cables from the back of the computer. 2 628371-001 - Removing...
...Remove items such as CDs, DVDs, and USB storage devices from the computer. 2 Close all open programs and shut down your operating system. 3 Unplug the computer by disconnecting the power cord from the back of the computer. 5 Lay the computer down on a flat surface, covered with a soft cloth to protect ...the screen from scratches or other damage. 6 Locate the CD/DVD drive on the side of the computer. 4 Unplug all attached cables from the back of the computer. 2 628371-001 - Removing...
Upgrading and Servicing
Page 5
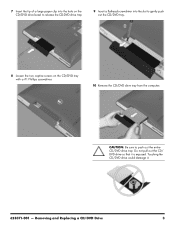
Do not pull out the CD/ DVD drive so that it . 628371-001 - 7 Insert the tip of a large paper clip into the hole on the CD/DVD drive bezel to release the CD-DVD drive tray. 9 Insert a flathead screwdriver into the slot to push out the entire CD/DVD drive tray. Touching the CD/DVD drive could damage it is exposed. Removing and Replacing a CD/DVD Drive 3 CAUTION: Be sure to gently push out the CD/DVD tray. 8 Loosen the two captive screws on the CD/DVD tray with a #1 Phillips screwdriver. 10 Remove the CD/DVD drive tray from the computer.
Do not pull out the CD/ DVD drive so that it . 628371-001 - 7 Insert the tip of a large paper clip into the hole on the CD/DVD drive bezel to release the CD-DVD drive tray. 9 Insert a flathead screwdriver into the slot to push out the entire CD/DVD drive tray. Touching the CD/DVD drive could damage it is exposed. Removing and Replacing a CD/DVD Drive 3 CAUTION: Be sure to gently push out the CD/DVD tray. 8 Loosen the two captive screws on the CD/DVD tray with a #1 Phillips screwdriver. 10 Remove the CD/DVD drive tray from the computer.

Upgrading and Servicing
Page 6
You will fasten the CD/DVD bracket to different manufacturers or models. Hewlett-Packard always provides quality parts that meet or exceed your original computer specifications. 1 Insert the tip of a large paper clip into the hole of the CD/DVD tray. NOTE: Do not lose the CD/DVD bracket and ...
You will fasten the CD/DVD bracket to different manufacturers or models. Hewlett-Packard always provides quality parts that meet or exceed your original computer specifications. 1 Insert the tip of a large paper clip into the hole of the CD/DVD tray. NOTE: Do not lose the CD/DVD bracket and ...

Upgrading and Servicing
Page 7
Removing and Replacing a CD/DVD Drive 5 4 Replace the second bracket on the other side of the CD/DVD drive. 7 Insert a flathead screwdriver into the slot to push the CD/DVD drive in further. 5 Align the screw holes on the bracket with the screw holes on the drive and replace the two screws. 8 Tighten the two captive screws. 6 Slide the CD/DVD drive assembly partially into the computer. 9 Push the CD/DVD drive all the way in until the bezel on the tray is flush with the side of the computer. 628371-001 -
Removing and Replacing a CD/DVD Drive 5 4 Replace the second bracket on the other side of the CD/DVD drive. 7 Insert a flathead screwdriver into the slot to push the CD/DVD drive in further. 5 Align the screw holes on the bracket with the screw holes on the drive and replace the two screws. 8 Tighten the two captive screws. 6 Slide the CD/DVD drive assembly partially into the computer. 9 Push the CD/DVD drive all the way in until the bezel on the tray is flush with the side of the computer. 628371-001 -

Upgrading and Servicing
Page 8
10 Place the computer in an upright position. 12 Plug the power cord into the back of the computer. 11 Reconnect all the cables. 13 Press the power button to turn on the computer. 6 628371-001 - Removing and Replacing a CD/DVD Drive
10 Place the computer in an upright position. 12 Plug the power cord into the back of the computer. 11 Reconnect all the cables. 13 Press the power button to turn on the computer. 6 628371-001 - Removing and Replacing a CD/DVD Drive
Upgrading and Servicing
Page 9
... bang or drop it. You might damage your hands away from the moving fan. Keep fingers and tools clear of the computer before removing and replacing the hard disk drive. Do not touch the circuit board. Static electricity can damage the electronic components inside the...to shock impact. IMPORTANT: A hard disk drive is applied. CAUTION: Static electricity can damage the drive. Removing and replacing a Hard Disk Drive HP TouchSmart310 Computer features may vary by touching the metal cage of the fan when the power is extremely sensitive to retrieve them if they fall.
... bang or drop it. You might damage your hands away from the moving fan. Keep fingers and tools clear of the computer before removing and replacing the hard disk drive. Do not touch the circuit board. Static electricity can damage the electronic components inside the...to shock impact. IMPORTANT: A hard disk drive is applied. CAUTION: Static electricity can damage the drive. Removing and replacing a Hard Disk Drive HP TouchSmart310 Computer features may vary by touching the metal cage of the fan when the power is extremely sensitive to retrieve them if they fall.
Upgrading and Servicing
Page 10
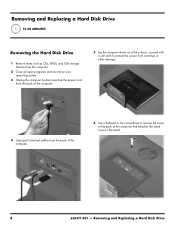
...Remove items such as CDs, DVDs, and USB storage devices from the computer. 2 Close all open programs and shut down your operating system. 3 Unplug the computer by disconnecting the power cord from the back of the computer. 5 Lay the computer down on a flat surface, covered with a soft cloth to protect ...the screen from scratches or other damage. 4 Unplug all attached cables from the back of the computer. 6 Use a flathead or Torx screwdriver to remove the screw at the back of the computer that attaches the stand cover to the stand. 8 628371-001 - Removing and Replacing a Hard Disk ...
...Remove items such as CDs, DVDs, and USB storage devices from the computer. 2 Close all open programs and shut down your operating system. 3 Unplug the computer by disconnecting the power cord from the back of the computer. 5 Lay the computer down on a flat surface, covered with a soft cloth to protect ...the screen from scratches or other damage. 4 Unplug all attached cables from the back of the computer. 6 Use a flathead or Torx screwdriver to remove the screw at the back of the computer that attaches the stand cover to the stand. 8 628371-001 - Removing and Replacing a Hard Disk ...
Upgrading and Servicing
Page 11
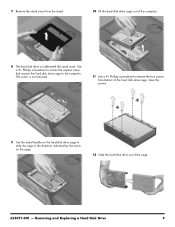
... secures the hard disk drive cage to slide the cage in the direction indicated by the arrow on the hard-disk drive cage to the computer. Removing and Replacing a Hard Disk Drive 9 7 Remove the stand cover from the stand. 10 Lift the hard disk drive cage out of the... computer. 8 The hard disk drive is not removed. 11 Use a #1 Phillips screwdriver to remove the four screws from bottom of the cage. 628371-001 - This screw ...
... secures the hard disk drive cage to slide the cage in the direction indicated by the arrow on the hard-disk drive cage to the computer. Removing and Replacing a Hard Disk Drive 9 7 Remove the stand cover from the stand. 10 Lift the hard disk drive cage out of the... computer. 8 The hard disk drive is not removed. 11 Use a #1 Phillips screwdriver to remove the four screws from bottom of the cage. 628371-001 - This screw ...
Upgrading and Servicing
Page 12
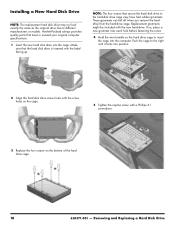
... hard-drive cage. Replacement grommets might be included with the label facing up. Hewlett-Packard always provides quality parts that meet or exceed your original computer specifications. 1 Insert the new hard disk drive into position. 2 Align the hard disk drive screw holes with the screw holes on the cage. 5 ...NOTE: The four screws that the hard disk drive is inserted with the new hard drive. Push the cage to insert the cage into the computer. Removing and Replacing a Hard Disk Drive Make sure that secure the hard disk drive to the hard-disk drive cage may not look exactly ...
... hard-drive cage. Replacement grommets might be included with the label facing up. Hewlett-Packard always provides quality parts that meet or exceed your original computer specifications. 1 Insert the new hard disk drive into position. 2 Align the hard disk drive screw holes with the screw holes on the cage. 5 ...NOTE: The four screws that the hard disk drive is inserted with the new hard drive. Push the cage to insert the cage into the computer. Removing and Replacing a Hard Disk Drive Make sure that secure the hard disk drive to the hard-disk drive cage may not look exactly ...


