Getting Started Guide
Page 20
... setup of ISPs; A dial-up now by using the Internet. Internet service with your Internet Service Provider (ISP) for a network see "Connecting a Modem" and for specific information on the taskbar. a Click the Windows Start Button on the connection. d Follow the onscreen instructions to select an ISP and set it up modem, a cable modem, or a DSL modem for more information about using Easy Internet Services. To open Internet Explorer: a Click the Windows Start Button on the desktop...
... setup of ISPs; A dial-up now by using the Internet. Internet service with your Internet Service Provider (ISP) for a network see "Connecting a Modem" and for specific information on the taskbar. a Click the Windows Start Button on the connection. d Follow the onscreen instructions to select an ISP and set it up modem, a cable modem, or a DSL modem for more information about using Easy Internet Services. To open Internet Explorer: a Click the Windows Start Button on the desktop...
Getting Started Guide
Page 23
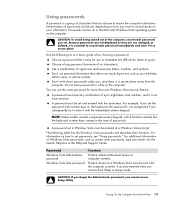
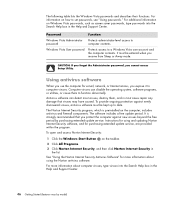
... like the keyboard number keys, except in the Help and Support Center. For additional information on the keyboard, the password is not recognized if you to remember but difficult for you subsequently try to guess. CAUTION: If you forget the Administrator password, you set , depending on the computer. Password Windows Vista Administrator password Windows Vista User password Function Protects administrator-level access to record each password you cannot access Setup Utility. Turning On...
... like the keyboard number keys, except in the Help and Support Center. For additional information on the keyboard, the password is not recognized if you to remember but difficult for you subsequently try to guess. CAUTION: If you forget the Administrator password, you set , depending on the computer. Password Windows Vista Administrator password Windows Vista User password Function Protects administrator-level access to record each password you cannot access Setup Utility. Turning On...

Getting Started Guide
Page 57
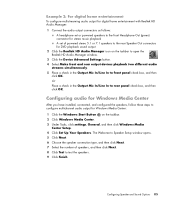
... Windows Media Center After you have installed, connected, and configured the speakers, follow these steps to front panel check box, and then click OK. The Welcome to Speaker Setup window opens. 5 Click Next. 6 Choose the speaker connection type, and then click Next. 7 Select the number of powered stereo 5.1 or 7.1 speakers to the rear Speaker Out connectors for DVD playback sound output 2 Click the Realtek HD Audio Manager icon on the taskbar. 2 Click Windows Media Center. 3 Under Tasks, click settings...
... Windows Media Center After you have installed, connected, and configured the speakers, follow these steps to front panel check box, and then click OK. The Welcome to Speaker Setup window opens. 5 Click Next. 6 Choose the speaker connection type, and then click Next. 7 Select the number of powered stereo 5.1 or 7.1 speakers to the rear Speaker Out connectors for DVD playback sound output 2 Click the Realtek HD Audio Manager icon on the taskbar. 2 Click Windows Media Center. 3 Under Tasks, click settings...
Limited Warranty and Support Guide
Page 14
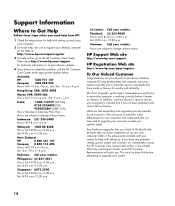
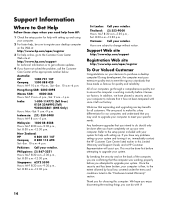
... the HP Customer Care Center Web site at http://www.hp.com/support for technical information or to register your system for quality and reliability. If you have any problems setting up and using your specific needs. Support Information Where to Get Help Follow these steps when you need help from HP: 1 Check the setup poster for help with since it left our factory. India...
... the HP Customer Care Center Web site at http://www.hp.com/support for technical information or to register your system for quality and reliability. If you have any problems setting up and using your specific needs. Support Information Where to Get Help Follow these steps when you need help from HP: 1 Check the setup poster for help with since it left our factory. India...

Getting Started
Page 95
... Audio Manager: 1 Connect the audio output connectors as follows: A headphone set or powered speakers to the front Headphone Out (green) connector for stereo music playback A set of speakers, and then click Next. 8 Click Test to front panel check box, and then click OK. Configuring audio for Windows Media Center: 1 Click the Windows Start Button on the taskbar to open the Realtek HD Audio Manager window. 3 Click the Device Advanced Settings button. 4 Select Make front and rear output devices playback two different audio...
... Audio Manager: 1 Connect the audio output connectors as follows: A headphone set or powered speakers to the front Headphone Out (green) connector for stereo music playback A set of speakers, and then click Next. 8 Click Test to front panel check box, and then click OK. Configuring audio for Windows Media Center: 1 Click the Windows Start Button on the taskbar to open the Realtek HD Audio Manager window. 3 Click the Device Advanced Settings button. 4 Select Make front and rear output devices playback two different audio...
Getting Started Guide
Page 95
... installed, connected, and configured the speakers, follow these steps to configure multichannel audio output for DVD playback sound output 2 Click the Realtek HD Audio Manager icon on the taskbar. 2 Click Windows Media Center. 3 Under Tasks, click settings, General, and then click Windows Media Center Setup. 4 Click Set Up Your Speakers. The Welcome to Speaker Setup window opens. 5 Click Next. 6 Choose the speaker connection type, and then click Next. 7 Select the number of powered stereo 5.1 or 7.1 speakers to the rear Speaker Out connectors for Windows Media Center...
... installed, connected, and configured the speakers, follow these steps to configure multichannel audio output for DVD playback sound output 2 Click the Realtek HD Audio Manager icon on the taskbar. 2 Click Windows Media Center. 3 Under Tasks, click settings, General, and then click Windows Media Center Setup. 4 Click Set Up Your Speakers. The Welcome to Speaker Setup window opens. 5 Click Next. 6 Choose the speaker connection type, and then click Next. 7 Select the number of powered stereo 5.1 or 7.1 speakers to the rear Speaker Out connectors for Windows Media Center...
PC Troubleshooting
Page 9
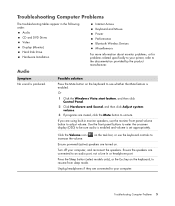
... Windows Vista start button, and then click Control Panel. 2 Click Hardware and Sound, and then click Adjust system volume. 3 If programs are muted, click the Mute button to an audio port, not a Line In or headphone port. Use the front panel buttons to enter the onscreen display (OSD) to be sure audio is enabled and volume is produced. Ensure the speakers are using built-in the following order: Audio CD and DVD Drives Video Display (Monitor) Hard Disk Drive Hardware Installation Internet Access Keyboard and Mouse Power...
... Windows Vista start button, and then click Control Panel. 2 Click Hardware and Sound, and then click Adjust system volume. 3 If programs are muted, click the Mute button to an audio port, not a Line In or headphone port. Use the front panel buttons to enter the onscreen display (OSD) to be sure audio is enabled and volume is produced. Ensure the speakers are using built-in the following order: Audio CD and DVD Drives Video Display (Monitor) Hard Disk Drive Hardware Installation Internet Access Keyboard and Mouse Power...
PC Troubleshooting
Page 15
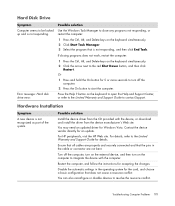
... Support Guide for Windows Vista. Contact the device vendor directly for accepting the changes. Error message: Hard disk drive error. Press the Help ? Troubleshooting Computer Problems 11 Or 1 Press and hold the On button for the card, and choose a basic configuration that does not cause a resource conflict. For HP peripherals, visit the HP Web site. Ensure that all cables are properly and securely connected and that is not recognized as part...
... Support Guide for Windows Vista. Contact the device vendor directly for accepting the changes. Error message: Hard disk drive error. Press the Help ? Troubleshooting Computer Problems 11 Or 1 Press and hold the On button for the card, and choose a basic configuration that does not cause a resource conflict. For HP peripherals, visit the HP Web site. Ensure that all cables are properly and securely connected and that is not recognized as part...
PC Troubleshooting
Page 17
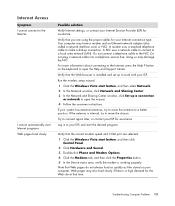
... solution Verify Internet settings, or contact your ISP for your Internet connection type. A modem uses a standard telephone cable to open the Help and Support Center. A NIC uses a network cable to connect to the NIC. Verify that you are selected: 1 Click the Windows Vista start button, and then click Control Panel. 2 Click Hardware and Sound. 3 Double-click Phone and Modem Options. 4 Click the Modems tab, and then click the Properties button. 5 In the Device status area...
... solution Verify Internet settings, or contact your ISP for your Internet connection type. A modem uses a standard telephone cable to open the Help and Support Center. A NIC uses a network cable to connect to the NIC. Verify that you are selected: 1 Click the Windows Vista start button, and then click Control Panel. 2 Click Hardware and Sound. 3 Double-click Phone and Modem Options. 4 Click the Modems tab, and then click the Properties button. 5 In the Device status area...

PC Troubleshooting
Page 31
... setup instructions, and then click Start in the last screen to display the Windows desktop. 2 Configure your Internet connection. 3 Turn off . 4 Disconnect all peripheral devices that were originally connected to restart the computer. If you are prompted to the Lock button, and then click Shut Down. You can typically download these updates from the software manufacturer's Web site. 5 Use Windows Update to get critical updates from the computer, except the monitor, keyboard, and mouse...
... setup instructions, and then click Start in the last screen to display the Windows desktop. 2 Configure your Internet connection. 3 Turn off . 4 Disconnect all peripheral devices that were originally connected to restart the computer. If you are prompted to the Lock button, and then click Shut Down. You can typically download these updates from the software manufacturer's Web site. 5 Use Windows Update to get critical updates from the computer, except the monitor, keyboard, and mouse...
Getting Started Guide
Page 54
... utilities, or cause them , and in the list. The software includes a free update period. To open and access Norton Internet Security: 1 Click the Windows Start Button on how to function abnormally. For information on the taskbar. 2 Click All Programs. 3 Click Norton Internet Security, and then click Norton Internet Security in most viruses, destroy them to set passwords, see "Using passwords." It is preinstalled on Windows Vista passwords, such as screen saver passwords, type passwords...
... utilities, or cause them , and in the list. The software includes a free update period. To open and access Norton Internet Security: 1 Click the Windows Start Button on how to function abnormally. For information on the taskbar. 2 Click All Programs. 3 Click Norton Internet Security, and then click Norton Internet Security in most viruses, destroy them to set passwords, see "Using passwords." It is preinstalled on Windows Vista passwords, such as screen saver passwords, type passwords...
Getting Started Guide
Page 56
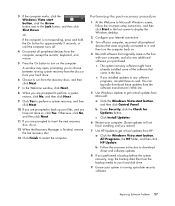
... computer: 1 Click the Windows Start Button on the taskbar. 2 Click Help and Support, and then click Software, drivers, and BIOS updates. 3 Follow any onscreen instructions to security threats and performance problems and is the default setting, and it enables you receive an alert. Download updates but let me choose whether to install them Never check for updates but let me choose whether to the operating system and other...
... computer: 1 Click the Windows Start Button on the taskbar. 2 Click Help and Support, and then click Software, drivers, and BIOS updates. 3 Follow any onscreen instructions to security threats and performance problems and is the default setting, and it enables you receive an alert. Download updates but let me choose whether to install them Never check for updates but let me choose whether to the operating system and other...
Limited Warranty and Support Guide
Page 14
... solved the problem, call the Customer Care Center at the appropriate number below. This must pass extensive quality tests to meet your specific needs. Support Information Where to Get Help Follow these steps when you need help from HP: 1 Check the setup poster for help with setting up and using your computer. 2 For faster help, be sure to register your desktop computer on...
... solved the problem, call the Customer Care Center at the appropriate number below. This must pass extensive quality tests to meet your specific needs. Support Information Where to Get Help Follow these steps when you need help from HP: 1 Check the setup poster for help with setting up and using your computer. 2 For faster help, be sure to register your desktop computer on...

Troubleshooting and Maintenance Guide
Page 11
... Esc key on . Audio Symptom No sound is enabled. Use the front panel buttons to enter the onscreen display (OSD) to resume from sleep mode. Or 1 Click the Windows Vista start button, and then click Control Panel. 2 Click Hardware and Sound, and then click Adjust system volume. 3 If programs are turned on the keyboard, to be sure audio is enabled and volume is set appropriately. Ensure powered (active) speakers are muted, click the Mute button to an audio port...
... Esc key on . Audio Symptom No sound is enabled. Use the front panel buttons to enter the onscreen display (OSD) to resume from sleep mode. Or 1 Click the Windows Vista start button, and then click Control Panel. 2 Click Hardware and Sound, and then click Adjust system volume. 3 If programs are turned on the keyboard, to be sure audio is enabled and volume is set appropriately. Ensure powered (active) speakers are muted, click the Mute button to an audio port...

Troubleshooting and Maintenance Guide
Page 19
.... A NIC uses a network cable to connect to the NIC. Do not connect a telephone cable to a local area network (LAN). button on your ISP. Run the wireless setup wizard: 1 Click the Windows Vista start button, and then select Network. 2 In the Network window, click Network and Sharing Center. 3 In the Network and Sharing Center window, click Set up connection. Note that you are selected: 1 Click the Windows Vista start button, and then click Control Panel. 2 Click Hardware and Sound. 3 Double-click Phone and Modem Options. 4 Click...
.... A NIC uses a network cable to connect to the NIC. Do not connect a telephone cable to a local area network (LAN). button on your ISP. Run the wireless setup wizard: 1 Click the Windows Vista start button, and then select Network. 2 In the Network window, click Network and Sharing Center. 3 In the Network and Sharing Center window, click Set up connection. Note that you are selected: 1 Click the Windows Vista start button, and then click Control Panel. 2 Click Hardware and Sound. 3 Double-click Phone and Modem Options. 4 Click...
Troubleshooting and Maintenance Guide
Page 33
... turn on . 4 Reinstall software that came in the last screen to display the Windows desktop. 2 Configure your Internet connection. 3 Turn off . 4 Disconnect all peripheral devices that were originally connected to -date security software. You can typically download these updates from the software manufacturer's Web site. 5 Use Windows Update to get critical updates from the computer, except the monitor, keyboard, and mouse. 5 Press the On button to restart the computer. c Click Install Updates. 6 Restart your computer. (Some updates...
... turn on . 4 Reinstall software that came in the last screen to display the Windows desktop. 2 Configure your Internet connection. 3 Turn off . 4 Disconnect all peripheral devices that were originally connected to -date security software. You can typically download these updates from the software manufacturer's Web site. 5 Use Windows Update to get critical updates from the computer, except the monitor, keyboard, and mouse. 5 Press the On button to restart the computer. c Click Install Updates. 6 Restart your computer. (Some updates...
Upgrading and Servicing Guide
Page 12
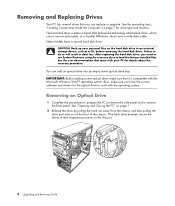
... respective positions in data loss. After replacing the hard disk drive, you have a second hard disk drive. IMPORTANT: Before adding a new optical drive, make sure you need to run System Recovery using the recovery discs to work with the Microsoft Windows Vista™ operating system. You can replace or upgrade. Removing an Optical Drive 1 Complete the procedures to prepare the PC to remove the side panel and to do so will result in the chassis.) 8 Upgrading and Servicing Guide Failure to remove the front panel.
... respective positions in data loss. After replacing the hard disk drive, you have a second hard disk drive. IMPORTANT: Before adding a new optical drive, make sure you need to run System Recovery using the recovery discs to work with the Microsoft Windows Vista™ operating system. You can replace or upgrade. Removing an Optical Drive 1 Complete the procedures to prepare the PC to remove the side panel and to do so will result in the chassis.) 8 Upgrading and Servicing Guide Failure to remove the front panel.
Upgrading and Servicing Guide
Page 28
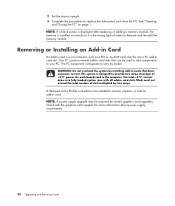
... (one with the graphics card supplier for more information about power supply requirements. 24 Upgrading and Servicing Guide Check with all add-in card slots filled) must not exceed the total number of slots multiplied by two amps. Remove and reinstall the memory module. The PC component configurations vary by installing add-in cards that fits into a PC add-in card slot. The system is a circuit board, such as a PCI or an AGP...
... (one with the graphics card supplier for more information about power supply requirements. 24 Upgrading and Servicing Guide Check with all add-in card slots filled) must not exceed the total number of slots multiplied by two amps. Remove and reinstall the memory module. The PC component configurations vary by installing add-in cards that fits into a PC add-in card slot. The system is a circuit board, such as a PCI or an AGP...
Upgrading and Servicing Guide
Page 30
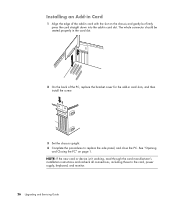
...'t working, read through the card manufacturer's installation instructions and recheck all connections, including those to replace the side panel, and close the PC. See "Opening and Closing the PC" on the chassis and gently but firmly press the card straight down into the add-in card slots, and then install the screw. 3 Set the chassis upright. 4 Complete the procedures to the card, power supply, keyboard, and monitor. 26 Upgrading and Servicing Guide
...'t working, read through the card manufacturer's installation instructions and recheck all connections, including those to replace the side panel, and close the PC. See "Opening and Closing the PC" on the chassis and gently but firmly press the card straight down into the add-in card slots, and then install the screw. 3 Set the chassis upright. 4 Complete the procedures to the card, power supply, keyboard, and monitor. 26 Upgrading and Servicing Guide
Upgrading and Servicing Guide
Page 31
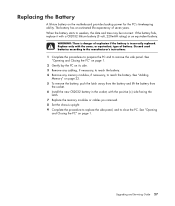
... or cables you removed. 8 Set the chassis upright. 9 Complete the procedure to replace the side panel, and to reach the battery. Discard used batteries according to the manufacturer's instructions. 1 Complete the procedures to prepare the PC and to weaken, the date and time may be incorrect. Replace only with the same, or equivalent, type of explosion if the battery is incorrectly replaced. See "Adding Memory...
... or cables you removed. 8 Set the chassis upright. 9 Complete the procedure to replace the side panel, and to reach the battery. Discard used batteries according to the manufacturer's instructions. 1 Complete the procedures to prepare the PC and to weaken, the date and time may be incorrect. Replace only with the same, or equivalent, type of explosion if the battery is incorrectly replaced. See "Adding Memory...


