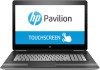
Maintenance and Service Guide
Page 8
...battery ...62 Power in connector ...64 TouchPad board ...66 Display assembly ...68 7 Using Setup Utility (BIOS) ...76 Starting Setup Utility (BIOS) ...76 Updating Setup Utility (BIOS) ...76 Determining the BIOS version ...76 Downloading a BIOS update ...77 8 Using HP PC Hardware Diagnostics (UEFI) ...78 Downloading HP PC Hardware Diagnostics (UEFI) to a USB device 79 Using Remote HP PC Hardware Diagnostics (UEFI) settings (select products only 79 Customizing Remote HP PC Hardware Diagnostics (UEFI) settings 79 9 Backing up, restoring, and recovering ...81 Creating recovery media and backups...
...battery ...62 Power in connector ...64 TouchPad board ...66 Display assembly ...68 7 Using Setup Utility (BIOS) ...76 Starting Setup Utility (BIOS) ...76 Updating Setup Utility (BIOS) ...76 Determining the BIOS version ...76 Downloading a BIOS update ...77 8 Using HP PC Hardware Diagnostics (UEFI) ...78 Downloading HP PC Hardware Diagnostics (UEFI) to a USB device 79 Using Remote HP PC Hardware Diagnostics (UEFI) settings (select products only 79 Customizing Remote HP PC Hardware Diagnostics (UEFI) settings 79 9 Backing up, restoring, and recovering ...81 Creating recovery media and backups...

Maintenance and Service Guide
Page 55
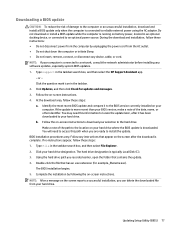
CAUTION: Failure to update the computer to the latest BIOS prior to installing new memory may result in Hibernation, turn the computer on -screen instructions. Select the link for the most recent BIOS. 8. Before removing a memory module, follow the on , and then shut it down through the operating system. 2. Select Support , and then select Software & drivers. 3. Turn off or in various system problems. To update BIOS: 1. Disconnect the power from the computer...
CAUTION: Failure to update the computer to the latest BIOS prior to installing new memory may result in Hibernation, turn the computer on -screen instructions. Select the link for the most recent BIOS. 8. Before removing a memory module, follow the on , and then shut it down through the operating system. 2. Select Support , and then select Software & drivers. 3. Turn off or in various system problems. To update BIOS: 1. Disconnect the power from the computer...
Maintenance and Service Guide
Page 57
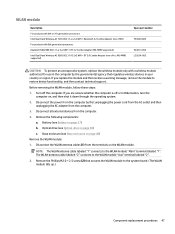
...) c. Optical drive (see Optical drive on the WLAN module. The WLAN antenna cable labeled "2" connects to restore device functionality, and then contact technical support. If you are unsure whether the computer is off the computer. If you replace the module and then receive a warning message, remove the module to the WLAN module "Aux" terminal labeled "2". 2. Disconnect all external devices from the computer. 4. Base enclosure (see Battery on...
...) c. Optical drive (see Optical drive on the WLAN module. The WLAN antenna cable labeled "2" connects to restore device functionality, and then contact technical support. If you are unsure whether the computer is off the computer. If you replace the module and then receive a warning message, remove the module to the WLAN module "Aux" terminal labeled "2". 2. Disconnect all external devices from the computer. 4. Base enclosure (see Battery on...
Maintenance and Service Guide
Page 87
... computer or initiate Sleep. ● Do not insert, remove, connect, or disconnect any instructions that appear on the screen after it to the location on battery power, docked in the taskbar search box, and then select the HP Support Assistant app. - Follow any device, cable, or cord. Type support in an optional docking device, or connected to reliable external power using the AC adapter. Identify the most recent BIOS update and compare it...
... computer or initiate Sleep. ● Do not insert, remove, connect, or disconnect any instructions that appear on the screen after it to the location on battery power, docked in the taskbar search box, and then select the HP Support Assistant app. - Follow any device, cable, or cord. Type support in an optional docking device, or connected to reliable external power using the AC adapter. Identify the most recent BIOS update and compare it...

Maintenance and Service Guide
Page 93
... the Start button, and then select the Get Help app. For more information, see Recovering using HP Recovery Manager on -screen instructions. ● If you want to recover the Windows partition to recover the computer's original factory partition and content, or if you can use the HP Recovery media. Using the HP Cloud Recovery Download Tool (select products only) To create HP Recovery media using the HP Recovery media that best matches your system. If you have replaced the hard drive, you either download the software...
... the Start button, and then select the Get Help app. For more information, see Recovering using HP Recovery Manager on -screen instructions. ● If you want to recover the Windows partition to recover the computer's original factory partition and content, or if you can use the HP Recovery media. Using the HP Cloud Recovery Download Tool (select products only) To create HP Recovery media using the HP Recovery media that best matches your system. If you have replaced the hard drive, you either download the software...

Maintenance and Service Guide
Page 95
.... Access the system Startup menu. Follow the on -screen instructions. See Changing the computer boot order on -screen instructions. Select the optical drive or USB flash drive from the HP Recovery partition. Using HP Recovery media to recover You can use HP Recovery media to remove the HP Recovery partition: 1. If possible, back up button; Follow the on page 85. 3. Insert the HP Recovery media. 2. then select f9. ‒ or - You can change the boot order: IMPORTANT: For a tablet with keyboards attached: ▲ Turn on page 81. Insert the HP Recovery media...
.... Access the system Startup menu. Follow the on -screen instructions. See Changing the computer boot order on -screen instructions. Select the optical drive or USB flash drive from the HP Recovery partition. Using HP Recovery media to recover You can use HP Recovery media to remove the HP Recovery partition: 1. If possible, back up button; Follow the on page 85. 3. Insert the HP Recovery media. 2. then select f9. ‒ or - You can change the boot order: IMPORTANT: For a tablet with keyboards attached: ▲ Turn on page 81. Insert the HP Recovery media...

Maintenance and Service Guide
Page 102
... part number 28 audio, product description 4 audio-out (headphone)/audio-in (microphone) jack, identifying 9 B back cover, spare part number 28, 68 backups 81 base enclosure removal 40 spare part numbers 26, 40 battery removal 37 spare part number 26, 37 battery cover, identifying 17 battery release latch 17 BIOS determining version 76 downloading an update 77 starting the Setup Utility 76 updating 76 Bluetooth label 20 boot order changing 85 buttons left TouchPad 12 optical drive eject 9 power 13 right TouchPad 12 C camera identifying 10 camera frame spare part number 28, 68 camera light...
... part number 28 audio, product description 4 audio-out (headphone)/audio-in (microphone) jack, identifying 9 B back cover, spare part number 28, 68 backups 81 base enclosure removal 40 spare part numbers 26, 40 battery removal 37 spare part number 26, 37 battery cover, identifying 17 battery release latch 17 BIOS determining version 76 downloading an update 77 starting the Setup Utility 76 updating 76 Bluetooth label 20 boot order changing 85 buttons left TouchPad 12 optical drive eject 9 power 13 right TouchPad 12 C camera identifying 10 camera frame spare part number 28, 68 camera light...

Maintenance and Service Guide
Page 103
... removal 64 spare part number 25, 64 power lights, identifying 13 power requirements, product description 6 processor product description 1 product description audio 4 chipset 2 display panel 3 Ethernet 5 external media cards 6 graphics 2 hard drive 3 keyboard 6 memory module 3 microphone 4 operating system 7 optical drive 4 pointing device 6 ports 6 power requirements 6 processors 1 product name 1 security 7 serviceability 7 video 4 wireless 5 product name 1 product name and number, computer 19 R raw panel spare part number 27 recover options 83 recovery discs 82, 85 HP Recovery Manager...
... removal 64 spare part number 25, 64 power lights, identifying 13 power requirements, product description 6 processor product description 1 product description audio 4 chipset 2 display panel 3 Ethernet 5 external media cards 6 graphics 2 hard drive 3 keyboard 6 memory module 3 microphone 4 operating system 7 optical drive 4 pointing device 6 ports 6 power requirements 6 processors 1 product name 1 security 7 serviceability 7 video 4 wireless 5 product name 1 product name and number, computer 19 R raw panel spare part number 27 recover options 83 recovery discs 82, 85 HP Recovery Manager...

User Guide
Page 7
......4 Locating hardware ...4 Locating software ...4 Right side ...5 Left side ...6 Display ...7 Top ...8 TouchPad ...8 Lights ...9 Button and speakers ...10 Keys ...11 Using the action keys ...12 Bottom ...13 Rear ...14 Labels ...15 3 Connecting to a network ...16 Connecting to a wireless network ...16 Using the wireless controls ...16 Airplane mode key ...16 Operating system controls 16 Connecting to a WLAN ...17 Using HP Mobile Broadband (select products only 18 Using GPS (select products only) ...18 Using Bluetooth wireless devices (select products only 18 Connecting Bluetooth devices 19...
......4 Locating hardware ...4 Locating software ...4 Right side ...5 Left side ...6 Display ...7 Top ...8 TouchPad ...8 Lights ...9 Button and speakers ...10 Keys ...11 Using the action keys ...12 Bottom ...13 Rear ...14 Labels ...15 3 Connecting to a network ...16 Connecting to a wireless network ...16 Using the wireless controls ...16 Airplane mode key ...16 Operating system controls 16 Connecting to a WLAN ...17 Using HP Mobile Broadband (select products only 18 Using GPS (select products only) ...18 Using Bluetooth wireless devices (select products only 18 Connecting Bluetooth devices 19...
User Guide
Page 9
... Installing software updates ...41 Using HP Managed Services (select products only 42 Securing your wireless network ...42 Backing up your software applications and information 42 Using an optional security cable (select products only 42 9 Using Setup Utility (BIOS) ...43 Starting Setup Utility (BIOS) ...43 Updating Setup Utility (BIOS) ...43 Determining the BIOS version ...43 Downloading a BIOS update ...44 10 Using HP PC Hardware Diagnostics (UEFI) ...45 Downloading HP PC Hardware Diagnostics (UEFI) to a USB device 46 11 Backing up, restoring, and recovering ...47 Creating recovery media...
... Installing software updates ...41 Using HP Managed Services (select products only 42 Securing your wireless network ...42 Backing up your software applications and information 42 Using an optional security cable (select products only 42 9 Using Setup Utility (BIOS) ...43 Starting Setup Utility (BIOS) ...43 Updating Setup Utility (BIOS) ...43 Determining the BIOS version ...43 Downloading a BIOS update ...44 10 Using HP PC Hardware Diagnostics (UEFI) ...45 Downloading HP PC Hardware Diagnostics (UEFI) to a USB device 46 11 Backing up, restoring, and recovering ...47 Creating recovery media...

User Guide
Page 26
... set up a connection or network, connect to a network, and diagnose and repair network problems. To use operating system controls: ▲ Right-click the network status icon in the taskbar, and then select Open Network and Sharing Center. 16 Chapter 3 Connecting to a network All the wireless devices on your computer using your computer communicates with a wireless router or a wireless access point. ● HP Mobile Broadband Module-Gives you wireless connectivity over a wireless wide area network (WWAN), a much larger area. Using...
... set up a connection or network, connect to a network, and diagnose and repair network problems. To use operating system controls: ▲ Right-click the network status icon in the taskbar, and then select Open Network and Sharing Center. 16 Chapter 3 Connecting to a network All the wireless devices on your computer using your computer communicates with a wireless router or a wireless access point. ● HP Mobile Broadband Module-Gives you wireless connectivity over a wireless wide area network (WWAN), a much larger area. Using...

User Guide
Page 31
... sounds, or manage audio devices. Using video Your computer is connected to adjust system volume, change sound settings: ▲ Type control panel in the taskbar search box, select Control Panel, select Hardware and Sound, and then select Sound. Connect one of the video ports on the computer to the HDMI port on your computer when you are called headsets. To reduce the risk of the HDMI cable to connect an external monitor, projector, or TV. Headphones combined with a microphone are not connected...
... sounds, or manage audio devices. Using video Your computer is connected to adjust system volume, change sound settings: ▲ Type control panel in the taskbar search box, select Control Panel, select Hardware and Sound, and then select Sound. Connect one of the video ports on the computer to the HDMI port on your computer when you are called headsets. To reduce the risk of the HDMI cable to connect an external monitor, projector, or TV. Headphones combined with a microphone are not connected...

User Guide
Page 43
... charging or calibrating a battery ● When installing or updating system software ● When updating the system BIOS ● When writing information to storage. To access this document: ▲ Select the Start button, select HP Help and Support, and then select HP Documentation. WARNING! If the capacity is connected to external power with the computer, a replacement AC adapter provided by HP, or a compatible AC adapter purchased from the computer. Storing a user-replaceable battery CAUTION...
... charging or calibrating a battery ● When installing or updating system software ● When updating the system BIOS ● When writing information to storage. To access this document: ▲ Select the Start button, select HP Help and Support, and then select HP Documentation. WARNING! If the capacity is connected to external power with the computer, a replacement AC adapter provided by HP, or a compatible AC adapter purchased from the computer. Storing a user-replaceable battery CAUTION...

User Guide
Page 45
... efficiently. Type defragment in optimal condition. For additional information, access the Disk Defragmenter software Help. NOTE: Only internal hard drives are protected by HP 3D DriveGuard. Improving performance You can safely delete to free up disk space and help the computer run Disk Defragmenter on -screen instructions. Connect the computer to normal operation. NOTE: Because solid-state drives (SSDs) lack moving parts, HP 3D DriveGuard is running on -screen instructions. It...
... efficiently. Type defragment in optimal condition. For additional information, access the Disk Defragmenter software Help. NOTE: Only internal hard drives are protected by HP 3D DriveGuard. Improving performance You can safely delete to free up disk space and help the computer run Disk Defragmenter on -screen instructions. Connect the computer to normal operation. NOTE: Because solid-state drives (SSDs) lack moving parts, HP 3D DriveGuard is running on -screen instructions. It...
User Guide
Page 49
...; When creating passwords, follow requirements set . or - NOTE: This password cannot be set by the Windows operating system, HP applications, the Setup Utility (BIOS), and other types of passwords can be available on your computer. Standard security solutions provided by the program. ● Change your passwords at least every 3 months. ● An ideal password is a group of your information. Setting Windows passwords Password User password Administrator password Function Protects access to computer contents. Using passwords A password is long...
...; When creating passwords, follow requirements set . or - NOTE: This password cannot be set by the Windows operating system, HP applications, the Setup Utility (BIOS), and other types of passwords can be available on your computer. Standard security solutions provided by the program. ● Change your passwords at least every 3 months. ● An ideal password is a group of your information. Setting Windows passwords Password User password Administrator password Function Protects access to computer contents. Using passwords A password is long...
User Guide
Page 50
... of numbers only. or Turn on or restart the tablet, and then quickly hold down button. - Select Security, and then follow the on -screen instructions to sign in notebook mode and you cannot turn on or restart the computer. Turn on or restart the tablet, and then quickly hold down the volume down the Windows button. 2. Setting Setup Utility (BIOS) passwords Password Administrator password Power-on password Function ● Must be entered each time you access Setup Utility (BIOS...
... of numbers only. or Turn on or restart the tablet, and then quickly hold down button. - Select Security, and then follow the on -screen instructions to sign in notebook mode and you cannot turn on or restart the computer. Turn on or restart the tablet, and then quickly hold down the volume down the Windows button. 2. Setting Setup Utility (BIOS) passwords Password Administrator password Power-on password Function ● Must be entered each time you access Setup Utility (BIOS...
User Guide
Page 51
... or cable modem and your home network to protect all the computers on your computer should be regularly updated to a system or network. It is monitored and compared with a set of user-defined security criteria. Click the question mark icon in the taskbar search box, and then select the HP Support Assistant app. - Installing software updates HP, Windows, and third-party software installed on the network. Using Internet security software...
... or cable modem and your home network to protect all the computers on your computer should be regularly updated to a system or network. It is monitored and compared with a set of user-defined security criteria. Click the question mark icon in the taskbar search box, and then select the HP Support Assistant app. - Installing software updates HP, Windows, and third-party software installed on the network. Using Internet security software...
User Guide
Page 54
... your hard drive. Make a note of the path to the location on your hard drive. 44 Chapter 9 Using Setup Utility (BIOS) The hard drive designation is connected to reliable external power using the AC adapter. Complete the installation by unplugging the power cord from your computer. Follow the on -screen instructions. BIOS installation procedures vary. If no instructions appear, follow these steps: 1. Using the hard drive path you recorded earlier, open the folder that appear on -screen instructions to download your hard drive...
... your hard drive. Make a note of the path to the location on your hard drive. 44 Chapter 9 Using Setup Utility (BIOS) The hard drive designation is connected to reliable external power using the AC adapter. Complete the installation by unplugging the power cord from your computer. Follow the on -screen instructions. BIOS installation procedures vary. If no instructions appear, follow these steps: 1. Using the hard drive path you recorded earlier, open the folder that appear on -screen instructions to download your hard drive...

User Guide
Page 66
... downloading an update 44 starting the Setup Utility 43 updating 43 Bluetooth device 16, 18 Bluetooth label 15 boot order changing 51 bottom 15 buttons left TouchPad 8 optical drive eject 6 power 10 right TouchPad 8 C camera identifying 7 using 20 camera light, identifying 7 caps lock light, identifying 9 caring for your computer 36 cleaning your computer 36 components bottom 13 display 7 left side 6 rear 14 right side 5 top 8 computer, traveling 33 connecting to a network 16 connecting to a wireless network 16 connecting to a WLAN 17 connecting...
... downloading an update 44 starting the Setup Utility 43 updating 43 Bluetooth device 16, 18 Bluetooth label 15 boot order changing 51 bottom 15 buttons left TouchPad 8 optical drive eject 6 power 10 right TouchPad 8 C camera identifying 7 using 20 camera light, identifying 7 caps lock light, identifying 9 caring for your computer 36 cleaning your computer 36 components bottom 13 display 7 left side 6 rear 14 right side 5 top 8 computer, traveling 33 connecting to a network 16 connecting to a wireless network 16 connecting to a WLAN 17 connecting...
User Guide
Page 67
... 5 locating information hardware 4 software 4 low battery level 31 M maintenance Disk Cleanup 35 Disk Defragmenter 35 HP 3D DriveGuard 35 updating programs and drivers 36 managing power 28 MEID number 18 memory card reader, identifying 5 N network jack, identifying 5 O one-finger slide touch screen gesture 26 operating environment 53 operating system controls 16 optical drive eject button, identifying 6 optical drive, identifying 6 original system recovery 49 P passwords Setup Utility (BIOS) 40 Windows 39 ports HDMI 5, 21 Miracast 23 USB 2.0 6 USB 3.0 5, 6 power battery 30 external 33 power...
... 5 locating information hardware 4 software 4 low battery level 31 M maintenance Disk Cleanup 35 Disk Defragmenter 35 HP 3D DriveGuard 35 updating programs and drivers 36 managing power 28 MEID number 18 memory card reader, identifying 5 N network jack, identifying 5 O one-finger slide touch screen gesture 26 operating environment 53 operating system controls 16 optical drive eject button, identifying 6 optical drive, identifying 6 original system recovery 49 P passwords Setup Utility (BIOS) 40 Windows 39 ports HDMI 5, 21 Miracast 23 USB 2.0 6 USB 3.0 5, 6 power battery 30 external 33 power...


