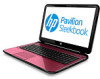
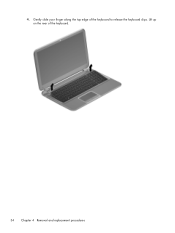
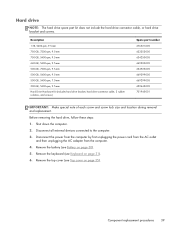
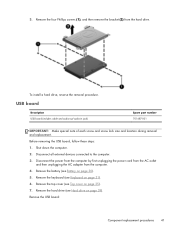
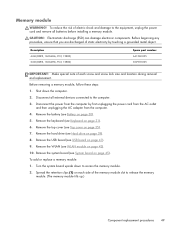
Regulatory, Safety and Environmental Notices User Guide
Page 7
User-replaceable battery notices ...28 Headset and earphone volume level notice 29 Power cord notices ...29 Cleaning the keyboard ...29 Travel notice ...29 China safety notices ...30 China: Altitude notice ...30 China: Tropical warning ...notice 30 Norway and Sweden: Cable grounding notice for products with a TV tuner 30 4 Safety notices for desktops, thin clients and personal workstations 31 Important safety information ...31 Installation conditions ...32 Battery replacement...
Regulatory, Safety and Environmental Notices User Guide
Page 37
... durations can damage one's hearing. Power cord notices WARNING! If provided with a straw extension can become trapped beneath the keys. Clean the keyboard regularly to prevent keys from sticking and to the equipment: Plug the power cord into a grounded (earthed) 3pin outlet. If the computer...power from the computer by unplugging the power cord from the AC outlet (not by unplugging the power cord from HP should only be done with the computer, a replacement AC adapter provided by attaching a 2-pin adapter. To reduce potential safety issues, only the AC adapter provided ...
Regulatory, Safety and Environmental Notices User Guide
Page 57
... declaration 41 Japan modem statement 16 Japan notice 9 Japan power cord notice 17 Japan restriction of hazardous substances notice 47 K keyboard notice 29 L laser safety notice 13 M Macrovision Corporation notice 17 Mexico Sustainable Energy Use Law 41 Mexico wireless notice 10 ...21 modifications, notebook computers Federal Communications Commission 3 N New Zealand modem statement 16 notices airline travel 12 battery 12, 41 battery, user replacement 28 Brazil 5 Canada 5 China restriction of hazardous substances 38, 44 environmental 37 equipment disposal 37 ergonomics 7, 25 European Union 6, 23...
HP Pavilion 15 Sleekbook Maintenance and Service Guide
Page 12
Category Operating system Serviceability Description Preinstalled: ● Windows 8 Professional ● Windows 8 Standard ● FreeDOS 2.0 End-user replaceable parts: ● AC adapter ● Battery ● Keyboard 4 Chapter 1 Product description
HP Pavilion 15 Sleekbook Maintenance and Service Guide
Page 30
... Kit (includes 4 rubber feet) Fan Heat sink for use only on computer models equipped with a graphics subsystem with UMA memory (includes replacement thermal material) RTC battery PCH heat sink Antenna Kit (includes left and right wireless antenna cables and transceivers) Display enclosure in ruby red...and Singapore (includes cable) Keyboard in black finish for use in Germany (includes cable) Keyboard in black finish for use in France (includes cable) Keyboard in black finish for use in Italy (includes cable) Keyboard in black finish for use in Spain (includes cable) Keyboard in black finish for ...
HP Pavilion 15 Sleekbook Maintenance and Service Guide
Page 31
... in Denmark, Finland, and Norway (includes cable) Keyboard in black finish for use in the Czech Republic and Slovakia (includes cable) TouchPad button board Power button board (includes cable) USB board (includes cable and audio-out/audio-in jack) 15.6-in, WLED, SVA, HD, BrightView, TouchScreen display... FSB, DDR3, 1.0-MB of L2 cache, dual core, 17 W), a graphics subsystem with UMA memory, and the Windows 8 Professional operating system (includes replacement thermal material) System board equipped with an AMD A6-4455M 2.10-/2.60-GHz processor (1333-MHz FSB, DDR3, 1.0-MB of L2 cache, dual core,...
HP Pavilion 15 Sleekbook Maintenance and Service Guide
Page 33
... or void the warranty. 4 Removal and replacement procedures IMPORTANT: The user-replaceable parts for this computer are: ● AC adapter ● Battery ● Keyboard For all accompanying screws) away from the work area to complete the removal and replacement procedures: ● Flat-bladed screwdriver ●...each subassembly from the computer, place the subassembly (and all parts that are not user-replaceable, only HP authorized service providers should perform the removal and replacement procedures described here. NOTE: As you must keep in mind during disassembly and assembly procedures....
HP Pavilion 15 Sleekbook Maintenance and Service Guide
Page 39
... to the base enclosure in South Korea Spare part number 701684-B31 701684-131 701684-271 701684-251 701684-171 701684-BA1 701684-AD1 Component replacement procedures 31 For use in For use in Belgium For use in Bulgaria For use in Canada For use in the Czech Republic and Slovakia... use in Russia 701684-DH1 For use in Saudi Arabia 701684-051 701684-041 For use in Slovenia For use in the locations illustrated below. Keyboard NOTE: The keyboard spare part kit includes...
HP Pavilion 15 Sleekbook Maintenance and Service Guide
Page 40
...first unplugging the power cord from the AC outlet and then unplugging the AC adapter from the computer. 4. Remove the keyboard: 1. Remove the two Phillips screws that secure the keyboard to the computer. 3. Remove the battery (see Battery on page 30). For use in For use in Greece ...-141 701684-031 701684-001 IMPORTANT: Make special note of each screw and screw lock size and location during removal and replacement. Disconnect all external devices connected to the computer. 32 Chapter 4 Removal and replacement procedures Before removing the keyboard, follow these steps: 1.
HP Pavilion 15 Sleekbook Maintenance and Service Guide
Page 41
2. Turn the computer right-side up with the front toward you . Component replacement procedures 33 Insert a thin tool through the keyboard access hole. (The keyboard icon indicates the keyboard access hole.) Push firmly on its right side. Open the display and stand the computer on the bottom of the keyboard until it disengages from the computer. 3. Turn the computer right-side up with the front toward you and open the display.
HP Pavilion 15 Sleekbook Maintenance and Service Guide
Page 42
Lift up on the rear of the keyboard to release the keyboard clips. 4. Gently slide your finger along the top edge of the keyboard. 34 Chapter 4 Removal and replacement procedures
HP Pavilion 15 Sleekbook Maintenance and Service Guide
Page 43
... zero insertion force (ZIF) connector (2) to install the keyboard. Remove the keyboard. Top cover NOTE: The top cover spare part kit includes the TouchPad support, TouchPad board and TouchPad cable. Before removing the top cover, follow these steps: 1. Shut down the computer. 2. Component replacement procedures 35 Description In ruby red finish In sparkling...
HP Pavilion 15 Sleekbook Maintenance and Service Guide
Page 44
Remove the keyboard (see Battery on page 31). Remove the top cover: 1. Disconnect the power from the computer by first unplugging the power cord from the AC outlet and then unplugging the AC adapter from the computer. 4. Disconnect the power button cable (1) and the TouchPad cable (2). 3. Close the display and turn the computer upside down. 36 Chapter 4 Removal and replacement procedures Remove the five Phillips screws that secure the top cover to the base enclosure. 2. Remove the battery (see Keyboard on page 30). 5. 3.
HP Pavilion 15 Sleekbook Maintenance and Service Guide
Page 46
...(includes cable) Spare part number 701686-001 IMPORTANT: Make special note of each screw and screw lock size and location during removal and replacement. Shut down , with the front toward you. 2. Disconnect the power from the computer by first unplugging the power cord from the AC... devices connected to install the power button board. 38 Chapter 4 Removal and replacement procedures Turn the top cover upside down the computer. 2. Remove the battery (see Battery on page 35). Remove the top cover (see Keyboard on page 31). 6. Remove the power button board: 1. Before removing the...
HP Pavilion 15 Sleekbook Maintenance and Service Guide
Page 47
Remove the top cover (see Top cover on page 31). 6. Component replacement procedures 39 Shut down the computer. 2. Disconnect all external devices connected to the computer. 3. Remove the keyboard (see Battery on page 30). 5. Description 1-TB, 5400-rpm, 9.5-mm 750-GB, 7200-rpm, 9.5-mm 750-GB, 5400-rpm,...-005 622643-005 701945-001 IMPORTANT: Make special note of each screw and screw lock size and location during removal and replacement. Remove the battery (see Keyboard on page 35). Before removing the hard drive, follow these steps: 1. Hard drive NOTE: The hard drive spare part...
HP Pavilion 15 Sleekbook Maintenance and Service Guide
Page 49
... Spare part number 701687-001 IMPORTANT: Make special note of each screw and screw lock size and location during removal and replacement. Disconnect the power from the computer by first unplugging the power cord from the AC outlet and then unplugging the AC ...35). 7. Disconnect all external devices connected to the computer. 3. Remove the USB board: Component replacement procedures 41 3. Shut down the computer. 2. Remove the keyboard (see Battery on page 31). 6. Remove the battery (see Keyboard on page 30). 5. Before removing the USB board, follow these steps: 1. To install ...
HP Pavilion 15 Sleekbook Maintenance and Service Guide
Page 51
Remove the battery (see Top cover on page 30). 5. Remove the WLAN module: 1. Remove the top cover (see Battery on page 35). The 2/white WLAN antenna cable is connected to the WLAN module 1/Main terminal. Remove the Phillips screw (2) that secures the WLAN module to the WLAN module 2/Aux terminal. 2. Remove the keyboard (see Keyboard on the WLAN module. 4. NOTE: The 1/black WLAN antenna cable is connected to the system board. (The WLAN module tilts up.) Component replacement procedures 43 Disconnect the WLAN antenna cables (1) from the terminals on page 31). 6.
HP Pavilion 15 Sleekbook Maintenance and Service Guide
Page 54
... devices connected to the computer. 3. Remove the hard drive (see USB board on page 35). 7. Remove the keyboard (see Top cover on page 41). 9. Remove the top cover (see Keyboard on page 30). 5. Remove the WLAN (see Battery on page 31). 6. Disconnect the power from the computer ...by first unplugging the power cord from the AC outlet and then unplugging the AC adapter from the defective system board and installed on the replacement system board: ...
HP Pavilion 15 Sleekbook Maintenance and Service Guide
Page 57
... from the computer by touching a grounded metal object. Shut down to release the memory module. (The memory module tilts up.) Component replacement procedures 49 Remove the WLAN (see WLAN module on page 39). 8. Remove the hard drive (see System board on page 31). ...the computer. 2. Disconnect the power from the computer. 4. Remove the keyboard (see Top cover on each screw and screw lock size and location during removal and replacement. Remove the top cover (see Keyboard on page 45). To add or replace a memory module: 1. Spread the retention clips (1) on page 35...
HP Pavilion 15 Sleekbook Maintenance and Service Guide
Page 59
...-001 IMPORTANT: Make special note of each screw and screw lock size and location during removal and replacement. Remove the system board (see Keyboard on page 30). 5. Remove the keyboard (see System board on page 35). 7. Component replacement procedures 51 Shut down , with the front toward you. Disconnect the power from the computer by...