

Maintenance and Service Guide
Page 5
... ...22 Electrostatic discharge damage ...22 Packaging and transporting guidelines 23 Workstation guidelines 23 5 Removal and replacement procedures for Authorized Service Provider parts 25 Releasing the tablet from the keyboard base ...25 Tablet component replacement procedures ...25 Unlocking the device and disabling Always On Remote Management (select products only 26 Back cover ...26 Battery ...28 Audio board ...30 Speakers ...31 Touch board ...33 System board ...34 Wireless antenna ...37 v
... ...22 Electrostatic discharge damage ...22 Packaging and transporting guidelines 23 Workstation guidelines 23 5 Removal and replacement procedures for Authorized Service Provider parts 25 Releasing the tablet from the keyboard base ...25 Tablet component replacement procedures ...25 Unlocking the device and disabling Always On Remote Management (select products only 26 Back cover ...26 Battery ...28 Audio board ...30 Speakers ...31 Touch board ...33 System board ...34 Wireless antenna ...37 v
Maintenance and Service Guide
Page 7
... boot order 67 Removing the HP Recovery partition (select products only 68 11 Backing up, restoring, and recovering in Windows 8.1 69 Creating recovery media and backups ...69 Creating HP Recovery media (select products only 69 Using Windows tools ...70 Restore and recovery ...70 Recovering using HP Recovery Manager 71 What you need to know before you get started 71 Using the HP Recovery partition (select products only 72 Using HP Recovery media to recover 72 Changing the computer boot order 72 Removing the HP Recovery partition (select products only 73 12 Power cord set requirements...
... boot order 67 Removing the HP Recovery partition (select products only 68 11 Backing up, restoring, and recovering in Windows 8.1 69 Creating recovery media and backups ...69 Creating HP Recovery media (select products only 69 Using Windows tools ...70 Restore and recovery ...70 Recovering using HP Recovery Manager 71 What you need to know before you get started 71 Using the HP Recovery partition (select products only 72 Using HP Recovery media to recover 72 Changing the computer boot order 72 Removing the HP Recovery partition (select products only 73 12 Power cord set requirements...

Maintenance and Service Guide
Page 9
... Supports SD 3.0 ● Audio: headphone/microphone combo jack ● MicroSD Card Reader ● One USB 2.0 port, one USB 2.0 type C port support charging and data ● Micro HDMI v1.4a port supporting up to 2048x1024, 1920x1080 @ 60Hz 1 or 64-GB eMMC (v5.0) Stereo speakers (2) Dual array digital microphones with appropriate beam-forming, echo-cancellation, and noisesuppression software Audio codec ALC5642 HD webcam: 1/6-in (1280x800), Antiglare (AG), light-emitting diode (LED), WXGA, TouchScreen display panel Internal graphics...
... Supports SD 3.0 ● Audio: headphone/microphone combo jack ● MicroSD Card Reader ● One USB 2.0 port, one USB 2.0 type C port support charging and data ● Micro HDMI v1.4a port supporting up to 2048x1024, 1920x1080 @ 60Hz 1 or 64-GB eMMC (v5.0) Stereo speakers (2) Dual array digital microphones with appropriate beam-forming, echo-cancellation, and noisesuppression software Audio codec ALC5642 HD webcam: 1/6-in (1280x800), Antiglare (AG), light-emitting diode (LED), WXGA, TouchScreen display panel Internal graphics...
Maintenance and Service Guide
Page 11
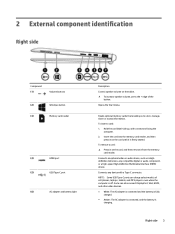
...or audio component, or a high-speed High-Definition Multimedia Interface (HDMI) device. NOTE: Some USB Type-C ports can also connect DisplayPort, VGA, HDMI, and other video devices. ● White: The AC adapter is connected and the battery is fully charged. ● Amber: The AC adapter is connected, and the battery is off. even when the computer is charging. 2 External component identification Right side Component (1) Volume buttons (2) Windows button (3) Memory card reader (4) HDMI port (5) USB Type-C port (6) AC adapter and battery light Description Control speaker volume...
...or audio component, or a high-speed High-Definition Multimedia Interface (HDMI) device. NOTE: Some USB Type-C ports can also connect DisplayPort, VGA, HDMI, and other video devices. ● White: The AC adapter is connected and the battery is fully charged. ● Amber: The AC adapter is connected, and the battery is off. even when the computer is charging. 2 External component identification Right side Component (1) Volume buttons (2) Windows button (3) Memory card reader (4) HDMI port (5) USB Type-C port (6) AC adapter and battery light Description Control speaker volume...
Maintenance and Service Guide
Page 33
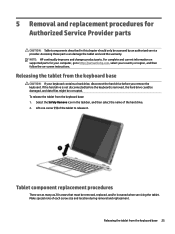
... be accessed by an authorized service provider. Releasing the tablet from the keyboard base CAUTION: If your country or region, and then follow the on supported parts for Authorized Service Provider parts CAUTION: Tablet components described in the taskbar, and then select the name of each screw size and location during removal and replacement. For complete and current information on -screen instructions.
... be accessed by an authorized service provider. Releasing the tablet from the keyboard base CAUTION: If your country or region, and then follow the on supported parts for Authorized Service Provider parts CAUTION: Tablet components described in the taskbar, and then select the name of each screw size and location during removal and replacement. For complete and current information on -screen instructions.

Maintenance and Service Guide
Page 34
... start the Windows operating system. Access HP Computer Setup (F10). Press f10 to the AORM lock feature. Clear the Allow Activation check box. 4. If a PIN is protected with the Windows operating system, the Always On Remote Management (AORM) feature is automatically activated when HP Touchpoint Manager software is displayed at the bottom of the screen. Select Save changes and exit. For select HP devices with an Administrator password, enter the password. 2. The device must be unlocked using...
... start the Windows operating system. Access HP Computer Setup (F10). Press f10 to the AORM lock feature. Clear the Allow Activation check box. 4. If a PIN is protected with the Windows operating system, the Always On Remote Management (AORM) feature is automatically activated when HP Touchpoint Manager software is displayed at the bottom of the screen. Select Save changes and exit. For select HP devices with an Administrator password, enter the password. 2. The device must be unlocked using...

Maintenance and Service Guide
Page 61
... the BIOS version on the HP website. or - Starting Setup Utility (BIOS) 53 Errors can prevent the computer from operating properly. Turn on the system (such as ROM date and System BIOS): 1. Type support in Setup Utility (BIOS). 6 Using Setup Utility (BIOS) in Windows 10 Setup Utility, or Basic Input/Output System (BIOS), controls communication between all the input and output devices on or restart the tablet, and then quickly hold down button. - Setup Utility (BIOS) includes settings for the types of devices installed, the startup sequence...
... the BIOS version on the HP website. or - Starting Setup Utility (BIOS) 53 Errors can prevent the computer from operating properly. Turn on the system (such as ROM date and System BIOS): 1. Type support in Setup Utility (BIOS). 6 Using Setup Utility (BIOS) in Windows 10 Setup Utility, or Basic Input/Output System (BIOS), controls communication between all the input and output devices on or restart the tablet, and then quickly hold down button. - Setup Utility (BIOS) includes settings for the types of devices installed, the startup sequence...

Maintenance and Service Guide
Page 62
... instructions appear, follow these steps: 1. Start Setup Utility (BIOS) (see Downloading a BIOS update on battery power, docked in Windows 10 or - Identify the most recent BIOS update and compare it has been downloaded to install the update. You will need this path when you recorded earlier, open the folder that appear on page 53). 2. Using the hard drive path you are ready to your computer. Do not download or install a BIOS update while the computer is connected...
... instructions appear, follow these steps: 1. Start Setup Utility (BIOS) (see Downloading a BIOS update on battery power, docked in Windows 10 or - Identify the most recent BIOS update and compare it has been downloaded to install the update. You will need this path when you recorded earlier, open the folder that appear on page 53). 2. Using the hard drive path you are ready to your computer. Do not download or install a BIOS update while the computer is connected...

Maintenance and Service Guide
Page 66
...disk drives, display, keyboard, mouse, and printer). Select Main, and then make note of system and extended memory. Errors can be available on or restart the tablet, and then quickly hold down the volume down button. 2. 8 Using Setup Utility (BIOS) and HP PC Hardware Diagnostics (UEFI) in notebook mode and you need to your notebook. Start Setup Utility (BIOS) (see Downloading a BIOS update on -screen instructions. Setup Utility (BIOS) includes settings for later BIOS versions, see Starting Setup Utility (BIOS) on page 58). 2. To use the keyboard attached to update Setup...
...disk drives, display, keyboard, mouse, and printer). Select Main, and then make note of system and extended memory. Errors can be available on or restart the tablet, and then quickly hold down the volume down button. 2. 8 Using Setup Utility (BIOS) and HP PC Hardware Diagnostics (UEFI) in notebook mode and you need to your notebook. Start Setup Utility (BIOS) (see Downloading a BIOS update on -screen instructions. Setup Utility (BIOS) includes settings for later BIOS versions, see Starting Setup Utility (BIOS) on page 58). 2. To use the keyboard attached to update Setup...

Maintenance and Service Guide
Page 67
.... The BIOS installation begins. 5. Updating Setup Utility (BIOS) 59 Select Updates and tune-ups, and then select Check for example, filename.exe). You will need this path when you recorded earlier, open the folder that contains the update. 4. or - Do not download or install a BIOS update while the computer is running on -screen instructions. 4. NOTE: If your hard drive where the BIOS update is typically Local Disk (C:). 3. or - From the Start screen, type file...
.... The BIOS installation begins. 5. Updating Setup Utility (BIOS) 59 Select Updates and tune-ups, and then select Check for example, filename.exe). You will need this path when you recorded earlier, open the folder that contains the update. 4. or - Do not download or install a BIOS update while the computer is running on -screen instructions. 4. NOTE: If your hard drive where the BIOS update is typically Local Disk (C:). 3. or - From the Start screen, type file...
Maintenance and Service Guide
Page 68
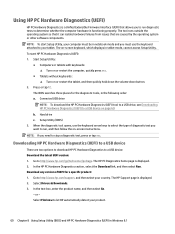
... a USB device on -screen keyboard, which displays in tablet mode, cannot access Setup Utility. Hard drive c. In the HP PC Hardware Diagnostics section, select the Download link, and then select Run. The HP Support page is displayed. 2. Setup Utility (BIOS) 3. Downloading HP PC Hardware Diagnostics (UEFI) to a USB device There are caused by the operating system or other software components. Go to stop a diagnostic test, press or tap esc. Using HP PC Hardware Diagnostics (UEFI) HP PC Hardware Diagnostics is a Unified Extensible Firmware...
... a USB device on -screen keyboard, which displays in tablet mode, cannot access Setup Utility. Hard drive c. In the HP PC Hardware Diagnostics section, select the Download link, and then select Run. The HP Support page is displayed. 2. Setup Utility (BIOS) 3. Downloading HP PC Hardware Diagnostics (UEFI) to a USB device There are caused by the operating system or other software components. Go to stop a diagnostic test, press or tap esc. Using HP PC Hardware Diagnostics (UEFI) HP PC Hardware Diagnostics is a Unified Extensible Firmware...

Maintenance and Service Guide
Page 71
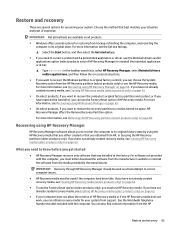
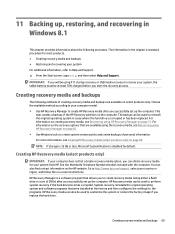
... computer model. ● Use HP Recovery Manager to the keyboard dock before you can obtain recovery media for most products. ● Creating recovery media and backups ● Restoring and recovering your system from support. This step creates a backup of the Recovery partition and the Windows partition. You can be performing recovery procedures on page 64. ● Use Windows tools to the HP support assistant app. ▲ Type support in the chapter is disabled by default. 10 Backing up the computer. Creating recovery media and backups...
... computer model. ● Use HP Recovery Manager to the keyboard dock before you can obtain recovery media for most products. ● Creating recovery media and backups ● Restoring and recovering your system from support. This step creates a backup of the Recovery partition and the Windows partition. You can be performing recovery procedures on page 64. ● Use Windows tools to the HP support assistant app. ▲ Type support in the chapter is disabled by default. 10 Backing up the computer. Creating recovery media and backups...

Maintenance and Service Guide
Page 72
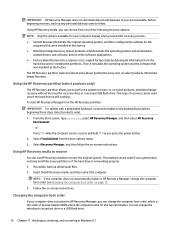
... external optical drive, it must have finished creating all of the recovery DVDs. System recovery reinstalls the original operating system and software programs that the computer is disabled by default. they are not compatible with DVD writer capability, and you replace the hard drive. ◦ Only one set up , restoring, and recovering in Windows 10 If you cannot create DVD media yourself, you will finish burning the current DVD. The next time you start HP Recovery Manager...
... external optical drive, it must have finished creating all of the recovery DVDs. System recovery reinstalls the original operating system and software programs that the computer is disabled by default. they are not compatible with DVD writer capability, and you replace the hard drive. ◦ Only one set up , restoring, and recovering in Windows 10 If you cannot create DVD media yourself, you will finish burning the current DVD. The next time you start HP Recovery Manager...
Maintenance and Service Guide
Page 73
... Get started app. ▲ Select the Start button, and then select the Get started ● HP Recovery Manager recovers only software that you can obtain recovery media for your system. If you have not already created recovery media, see Removing the HP Recovery partition (select products only) on -screen instructions. ● If you want to recover the Windows partition to original factory content, you obtained from HP, or by using the HP Recovery partition (select products only). For software not...
... Get started app. ▲ Select the Start button, and then select the Get started ● HP Recovery Manager recovers only software that you can obtain recovery media for your system. If you have not already created recovery media, see Removing the HP Recovery partition (select products only) on -screen instructions. ● If you want to recover the Windows partition to original factory content, you obtained from HP, or by using the HP Recovery partition (select products only). For software not...

Maintenance and Service Guide
Page 74
... need for the programs that was installed at the factory. ● Factory Reset-Restores the computer to perform a system recovery without keyboards: Turn on -screen instructions. See Changing the computer boot order on -screen instructions. Using HP Recovery media to the keyboard dock before beginning these steps (select products only). 1. Using HP Recovery media, you press the power button. To start the recovery process. ● System Recovery-Reinstalls the original operating system, and then configures the settings for recovery discs or a recovery USB flash drive...
... need for the programs that was installed at the factory. ● Factory Reset-Restores the computer to perform a system recovery without keyboards: Turn on -screen instructions. See Changing the computer boot order on -screen instructions. Using HP Recovery media to the keyboard dock before beginning these steps (select products only). 1. Using HP Recovery media, you press the power button. To start the recovery process. ● System Recovery-Reinstalls the original operating system, and then configures the settings for recovery discs or a recovery USB flash drive...
Maintenance and Service Guide
Page 77
... Recovering using HP Recovery Manager on page 69. You can be using F11 startup recovery or USB media recovery to create recovery media (using either a flash drive or a set of personal information. HP Recovery Manager is standard procedure for the programs. HP Recovery media can also be used to customize the system or restore the factory image if you can be at least 70% charged before you successfully set up , restoring, and recovering in cases where the hard drive is disabled by default. Creating recovery media and backups 69...
... Recovering using HP Recovery Manager on page 69. You can be using F11 startup recovery or USB media recovery to create recovery media (using either a flash drive or a set of personal information. HP Recovery Manager is standard procedure for the programs. HP Recovery media can also be used to customize the system or restore the factory image if you can be at least 70% charged before you successfully set up , restoring, and recovering in cases where the hard drive is disabled by default. Creating recovery media and backups 69...

Maintenance and Service Guide
Page 79
... the Start screen, type help, and then select Help and Support. ● On select products, if you need to know before you get started ● HP Recovery Manager recovers only software that you obtained from HP, or by using HP Recovery Manager on page 63. If you have replaced the hard drive, you can also find contact information from the HP website. For more information, see Creating HP Recovery media (select products only) on -screen instructions...
... the Start screen, type help, and then select Help and Support. ● On select products, if you need to know before you get started ● HP Recovery Manager recovers only software that you obtained from HP, or by using HP Recovery Manager on page 63. If you have replaced the hard drive, you can also find contact information from the HP website. For more information, see Creating HP Recovery media (select products only) on -screen instructions...
Maintenance and Service Guide
Page 80
... boot order, which is still working properly. 1. Insert the HP Recovery media, and then restart the computer. NOTE: If the computer does not automatically restart in BIOS where the computer looks for recovery discs or a recovery USB flash drive. From the Start screen, type recovery, select HP Recovery Manager, and then select HP Recovery Environment. - IMPORTANT: HP Recovery Manager does not automatically provide backups of your computer display when you start HP Recovery Manager from the boot options menu. 3. Using HP Recovery media, you press the power button. 2. The HP Recovery...
... boot order, which is still working properly. 1. Insert the HP Recovery media, and then restart the computer. NOTE: If the computer does not automatically restart in BIOS where the computer looks for recovery discs or a recovery USB flash drive. From the Start screen, type recovery, select HP Recovery Manager, and then select HP Recovery Environment. - IMPORTANT: HP Recovery Manager does not automatically provide backups of your computer display when you start HP Recovery Manager from the boot options menu. 3. Using HP Recovery media, you press the power button. 2. The HP Recovery...

Maintenance and Service Guide
Page 86
... part number 10 audio board removal 30 spare part number 10, 15, 19, 30 audio, product description 1 audio-out (headphone)/audio-in (microphone) jack, identifying 4 B back cover removal 26 spare part number 13, 19, 26 spare part numbers 11 backups 63, 69 base enclosure spare part number 12, 19, 45 battery removal 28 spare part number 10, 13, 28 BIOS determining version 53, 58 downloading an update 54, 59 starting the Setup Utility 53, 58 updating 53, 58 boot order changing 67, 72 buttons power 6 volume 3 Windows 3 C cables, service considerations 21 case spare part number 20...
... part number 10 audio board removal 30 spare part number 10, 15, 19, 30 audio, product description 1 audio-out (headphone)/audio-in (microphone) jack, identifying 4 B back cover removal 26 spare part number 13, 19, 26 spare part numbers 11 backups 63, 69 base enclosure spare part number 12, 19, 45 battery removal 28 spare part number 10, 13, 28 BIOS determining version 53, 58 downloading an update 54, 59 starting the Setup Utility 53, 58 updating 53, 58 boot order changing 67, 72 buttons power 6 volume 3 Windows 3 C cables, service considerations 21 case spare part number 20...

Maintenance and Service Guide
Page 87
...2 power/volume button board removal 38 spare part number 10, 38 processor, product description 1 product description audio 1 display panel 1 external expansion 1 graphics 1 keyboard 2 mass storage 1 memory module 1 microphone 1 operating system 2 ports 1 power requirements 2 processors 1 product name 1 sensor 1 serviceability 2 video 1 wireless networking 1 product name 1 R recover options 65, 70 recovery discs 64, 66, 70, 72 HP Recovery Manager 65, 71 media 66, 72 starting 66, 72 supported discs 64, 70 system 65, 71 USB flash drive 66, 72 using HP Recovery media 64, 70 recovery media creating...
...2 power/volume button board removal 38 spare part number 10, 38 processor, product description 1 product description audio 1 display panel 1 external expansion 1 graphics 1 keyboard 2 mass storage 1 memory module 1 microphone 1 operating system 2 ports 1 power requirements 2 processors 1 product name 1 sensor 1 serviceability 2 video 1 wireless networking 1 product name 1 R recover options 65, 70 recovery discs 64, 66, 70, 72 HP Recovery Manager 65, 71 media 66, 72 starting 66, 72 supported discs 64, 70 system 65, 71 USB flash drive 66, 72 using HP Recovery media 64, 70 recovery media creating...


