HP Limited Warranty and Support Guide - Refurbished Desktops
Page 4
... Duration Hardware 90-day limited warranty Software 90-day technical support General Terms This HP Hardware Limited Warranty gives you with HP. Refurbished HP Pavilion Desktop Computers, HP Pavilion Media Center Computers, HP Digital Entertainment Center, HP Displays, and HP Notebook Consumer Products. Standard warranty service response time is applicable in all applicable laws and regulations, including US...
... Duration Hardware 90-day limited warranty Software 90-day technical support General Terms This HP Hardware Limited Warranty gives you with HP. Refurbished HP Pavilion Desktop Computers, HP Pavilion Media Center Computers, HP Digital Entertainment Center, HP Displays, and HP Notebook Consumer Products. Standard warranty service response time is applicable in all applicable laws and regulations, including US...

HP Limited Warranty and Support Guide - Refurbished Desktops
Page 8
... part back to return the defective product may include a Customer Self Repair warranty service. Pick Up & Return Warranty Service (Desktops and Digital Entertainment Centers ONLY) Your HP Limited Warranty may include a mail-in its sole discretion that the problem can be fixed using one of these parts, a... replaceable part can also obtain information on the HP Web site at: http://www.hp.com/support Carry-in Warranty Service (Desktops ONLY) Under the terms of carry-in service, you will incur all logistics and insurance costs to ...
... part back to return the defective product may include a Customer Self Repair warranty service. Pick Up & Return Warranty Service (Desktops and Digital Entertainment Centers ONLY) Your HP Limited Warranty may include a mail-in its sole discretion that the problem can be fixed using one of these parts, a... replaceable part can also obtain information on the HP Web site at: http://www.hp.com/support Carry-in Warranty Service (Desktops ONLY) Under the terms of carry-in service, you will incur all logistics and insurance costs to ...

Troubleshooting & Maintenance Guide
Page 15
... Next to restart the computer and run Recovery Manager from the computer, except the monitor, keyboard, and mouse. 3. When the computer restarts, you see the desktop. 10. Complete the registration process, and wait until you see the initial company logo screen appear, repeatedly press F11 on your keyboard until the computer...
... Next to restart the computer and run Recovery Manager from the computer, except the monitor, keyboard, and mouse. 3. When the computer restarts, you see the desktop. 10. Complete the registration process, and wait until you see the initial company logo screen appear, repeatedly press F11 on your keyboard until the computer...

Troubleshooting & Maintenance Guide
Page 16
... process, and wait until the computer turns off the computer, reconnect all peripheral devices from the disc. Turn off . 4. To create recovery media, see the desktop. 9. To perform a System Recovery using a recovery DVD, the computer automatically runs Recovery Manager from the computer except the monitor, keyboard, and mouse. 5. Press the Power...
... process, and wait until the computer turns off the computer, reconnect all peripheral devices from the disc. Turn off . 4. To create recovery media, see the desktop. 9. To perform a System Recovery using a recovery DVD, the computer automatically runs Recovery Manager from the computer except the monitor, keyboard, and mouse. 5. Press the Power...
Wall Mounting Guide
Page 5
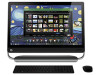
...It is heavy. To convert the computer from a wall-mounted unit to reinstall the computer stand. to 27 in.) diagonal, and weighing up to 22.7 kg (50 lb) ● A stable, flat ...60950). Always disconnect the computer from the power source before you follow all the steps to desktop unit, follow the instructions in the Reinstalling the stand on the computer on the computer (recommended...the computer stand. 1 Preparing the computer for wallmounting This document provides instructions for preparing your HP All-in-One computer for flat-panel displays ranging in size from 508 mm to the...
...It is heavy. To convert the computer from a wall-mounted unit to reinstall the computer stand. to 27 in.) diagonal, and weighing up to 22.7 kg (50 lb) ● A stable, flat ...60950). Always disconnect the computer from the power source before you follow all the steps to desktop unit, follow the instructions in the Reinstalling the stand on the computer on the computer (recommended...the computer stand. 1 Preparing the computer for wallmounting This document provides instructions for preparing your HP All-in-One computer for flat-panel displays ranging in size from 508 mm to the...
Wall Mounting Guide
Page 7
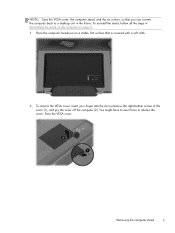
... the right bottom corner of the cover (1), and pry the cover off the computer (2). Removing the computer stand 3 You might have to exert force to a desktop unit in Reinstalling the stand on the computer on a stable, flat surface that you can convert the computer back to release the cover. Place the...
... the right bottom corner of the cover (1), and pry the cover off the computer (2). Removing the computer stand 3 You might have to exert force to a desktop unit in Reinstalling the stand on the computer on a stable, flat surface that you can convert the computer back to release the cover. Place the...
Wall Mounting Guide
Page 13
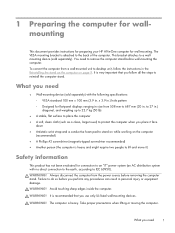
Take proper precautions when lifting or moving the computer. Always disconnect the computer from a wall-mounted unit to a desktop unit, reinstall the computer stand on the computer (recommended) ● A Phillips #2 screwdriver (magnetic-tipped recommended) ● Another person (the computer is heavy. WARNING! What you ...
Take proper precautions when lifting or moving the computer. Always disconnect the computer from a wall-mounted unit to a desktop unit, reinstall the computer stand on the computer (recommended) ● A Phillips #2 screwdriver (magnetic-tipped recommended) ● Another person (the computer is heavy. WARNING! What you ...

