
HP Omni10 Maintenance and Service Guide
Page 5
Table of contents 1 Product description ...1 2 External component identification 3 Finding your hardware and software information 3 Locating hardware ...3 Locating software 3 Front ...4 Back ...5 Top edge ...6 Back edge ...7 Labels ...8 3 Illustrated parts catalog ...9 Locating the serial number, product number, and model number 9 Tablet major components ...10 Miscellaneous parts ...11 Sequential part number listing 12 4 Removal and replacement procedures 14 Tools required ...14 Service considerations ...14 Plastic parts ...14 Cables and connectors 15 Grounding guidelines ...16 ...
Table of contents 1 Product description ...1 2 External component identification 3 Finding your hardware and software information 3 Locating hardware ...3 Locating software 3 Front ...4 Back ...5 Top edge ...6 Back edge ...7 Labels ...8 3 Illustrated parts catalog ...9 Locating the serial number, product number, and model number 9 Tablet major components ...10 Miscellaneous parts ...11 Sequential part number listing 12 4 Removal and replacement procedures 14 Tools required ...14 Service considerations ...14 Plastic parts ...14 Cables and connectors 15 Grounding guidelines ...16 ...

HP Omni10 Maintenance and Service Guide
Page 6
... module ...31 Battery ...32 Wireless antennas 34 SIM/card reader board 36 Speakers ...37 Display panel cable 39 System board ...41 5 Using Setup Utility (BIOS 44 Starting Setup Utility (BIOS) ...44 Updating the BIOS ...44 Determining the BIOS version 45 Downloading a BIOS update 45 6 Specifications ...47 7 Backing up, restoring, and recovering 48 Creating a Microsoft recovery drive (select models only 48 Using Windows Refresh for quick and easy recovery 49 Removing everything and reinstalling Windows 49 Backing up data using File History 50 8 Power cord set requirements 51...
... module ...31 Battery ...32 Wireless antennas 34 SIM/card reader board 36 Speakers ...37 Display panel cable 39 System board ...41 5 Using Setup Utility (BIOS 44 Starting Setup Utility (BIOS) ...44 Updating the BIOS ...44 Determining the BIOS version 45 Downloading a BIOS update 45 6 Specifications ...47 7 Backing up, restoring, and recovering 48 Creating a Microsoft recovery drive (select models only 48 Using Windows Refresh for quick and easy recovery 49 Removing everything and reinstalling Windows 49 Backing up data using File History 50 8 Power cord set requirements 51...
HP Omni10 Maintenance and Service Guide
Page 25
... the warranty. Disconnect the power from the tablet by an authorized service provider. Remove the back cover: CAUTION: Before turning the display assembly upside down, make sure the work surface is off the tablet. Removal and replacement procedures 19 Back cover Description Spare part number Back cover (includes internal shielding) 736881-001 10.1-in Step 2, make sure the bottom edge, opposite the power button, is available using spare part number 739817-001. If you...
... the warranty. Disconnect the power from the tablet by an authorized service provider. Remove the back cover: CAUTION: Before turning the display assembly upside down, make sure the work surface is off the tablet. Removal and replacement procedures 19 Back cover Description Spare part number Back cover (includes internal shielding) 736881-001 10.1-in Step 2, make sure the bottom edge, opposite the power button, is available using spare part number 739817-001. If you...
HP Omni10 Maintenance and Service Guide
Page 51
... the Start screen, type hp support assistant, and then select the HP Support Assistant app. 2. To exit Setup Utility (BIOS) without saving your BIOS, make a note of the date, name, or other identifier. You may need to access this information to locate the update later, after it to the BIOS version currently installed on battery poweror connected to install the update. Select Main. 3. You will need this path when you connect your hard drive. Determining the BIOS version To...
... the Start screen, type hp support assistant, and then select the HP Support Assistant app. 2. To exit Setup Utility (BIOS) without saving your BIOS, make a note of the date, name, or other identifier. You may need to access this information to locate the update later, after it to the BIOS version currently installed on battery poweror connected to install the update. Select Main. 3. You will need this path when you connect your hard drive. Determining the BIOS version To...

HP Omni10 Maintenance and Service Guide
Page 55
... . From the Start screen, type h, and then select Help and Support. This option removes all personal data, apps, and settings from the PC to retain. Using Windows Refresh for more information. IMPORTANT: Refresh removes any traditional applications that the check box labeled Copy the recovery partition from your tablet is displayed asking if you wish to the recovery drive is selected. 2. See Help and Support for instructions on -screen instructions. NOTE: You...
... . From the Start screen, type h, and then select Help and Support. This option removes all personal data, apps, and settings from the PC to retain. Using Windows Refresh for more information. IMPORTANT: Refresh removes any traditional applications that the check box labeled Copy the recovery partition from your tablet is displayed asking if you wish to the recovery drive is selected. 2. See Help and Support for instructions on -screen instructions. NOTE: You...
HP Omni10 Maintenance and Service Guide
Page 60
... part numbers 13 ambient light sensor 4 antenna location 4 removal 34 spare part number 11, 13, 34 Antenna Kit, spare part number 11, 13, 34 audio board removal 29 spare part number 11, 12, 29 audio, product description 1 audio-in jack 5 audio-out jack 5 B back components 5 back cover removal 19 spare part number 10, 12, 19 back edge components 7 battery removal 32 spare part number 11, 13, 32 buttons power 6 volume down 5 volume up 5 Windows 4 C cables, service considerations 15 card...
... part numbers 13 ambient light sensor 4 antenna location 4 removal 34 spare part number 11, 13, 34 Antenna Kit, spare part number 11, 13, 34 audio board removal 29 spare part number 11, 12, 29 audio, product description 1 audio-in jack 5 audio-out jack 5 B back components 5 back cover removal 19 spare part number 10, 12, 19 back edge components 7 battery removal 32 spare part number 11, 13, 32 buttons power 6 volume down 5 volume up 5 Windows 4 C cables, service considerations 15 card...

HP Omni10 Maintenance and Service Guide
Page 61
...1 display panel 1 external expansion 2 graphics 1 keys 2 mass storage 1 memory module 1 microphone 1 operating system 2 ports 2 power requirements 2 processors 1 product name 1 security 2 sensors 1 serviceability 2 video 1 wireless networking 1 product name 1 product number, location 7 R rear-facing webcamera removal 27 spare part number 10, 13, 27 S Screw Kit, spare part number 12, 13 security, product description 2 sensors, product description 1 serial number, location 7 service considerations cables 15 connectors 15 plastic parts 14 serviceability, product description 2 SIM slot 7 SIM/card...
...1 display panel 1 external expansion 2 graphics 1 keys 2 mass storage 1 memory module 1 microphone 1 operating system 2 ports 2 power requirements 2 processors 1 product name 1 security 2 sensors 1 serviceability 2 video 1 wireless networking 1 product name 1 product number, location 7 R rear-facing webcamera removal 27 spare part number 10, 13, 27 S Screw Kit, spare part number 12, 13 security, product description 2 sensors, product description 1 serial number, location 7 service considerations cables 15 connectors 15 plastic parts 14 serviceability, product description 2 SIM slot 7 SIM/card...
User Guide
Page 5
... 4 Locating hardware ...4 Locating software ...4 Front ...5 Back ...6 Top edge ...7 Bottom edge ...8 Labels ...9 3 Connecting to a network ...10 Connecting to a wireless network ...10 Using the wireless controls 10 Using operating system controls 10 Sharing data and drives and accessing software 10 Using a WLAN ...11 Using an Internet service provider 11 Setting up a WLAN 12 Configuring a wireless router 12 Protecting your WLAN 12 Connecting to a WLAN 13 Using HP Mobile Broadband (select models only 13 Inserting and removing a SIM 14 Using Bluetooth wireless devices (select models...
... 4 Locating hardware ...4 Locating software ...4 Front ...5 Back ...6 Top edge ...7 Bottom edge ...8 Labels ...9 3 Connecting to a network ...10 Connecting to a wireless network ...10 Using the wireless controls 10 Using operating system controls 10 Sharing data and drives and accessing software 10 Using a WLAN ...11 Using an Internet service provider 11 Setting up a WLAN 12 Configuring a wireless router 12 Protecting your WLAN 12 Connecting to a WLAN 13 Using HP Mobile Broadband (select models only 13 Inserting and removing a SIM 14 Using Bluetooth wireless devices (select models...

User Guide
Page 6
... Using video ...16 Connecting video devices by using an HDMI cable 16 Setting up HDMI audio 17 5 Navigating the screen ...18 Using touch screen gestures ...18 One-finger slide ...18 Tapping ...18 Scrolling ...19 Pinching/zooming ...19 Rotating (select models only 20 Edge swipes ...20 Right-edge swipe 20 Left-edge swipe 21 Top-edge swipe and bottom-edge swipe 22 6 Managing power ...23 Initiating Sleep...
... Using video ...16 Connecting video devices by using an HDMI cable 16 Setting up HDMI audio 17 5 Navigating the screen ...18 Using touch screen gestures ...18 One-finger slide ...18 Tapping ...18 Scrolling ...19 Pinching/zooming ...19 Rotating (select models only 20 Edge swipes ...20 Right-edge swipe 20 Left-edge swipe 21 Top-edge swipe and bottom-edge swipe 22 6 Managing power ...23 Initiating Sleep...

User Guide
Page 7
... HP and third-party software updates 32 Securing your wireless network ...33 Backing up your software applications and information 33 9 Using Setup Utility (BIOS) ...34 Starting Setup Utility (BIOS) ...34 Updating the BIOS ...34 Determining the BIOS version 34 Downloading a BIOS update 35 10 Backing up, restoring, and recovering ...36 Creating a Microsoft recovery drive (select models only 36 Using Windows Refresh for quick and easy recovery 37 Removing everything and reinstalling Windows 37 Backing up data using File History ...37 11 Specifications ...38 Input power ...38 Operating...
... HP and third-party software updates 32 Securing your wireless network ...33 Backing up your software applications and information 33 9 Using Setup Utility (BIOS) ...34 Starting Setup Utility (BIOS) ...34 Updating the BIOS ...34 Determining the BIOS version 34 Downloading a BIOS update 35 10 Backing up, restoring, and recovering ...36 Creating a Microsoft recovery drive (select models only 36 Using Windows Refresh for quick and easy recovery 37 Removing everything and reinstalling Windows 37 Backing up data using File History ...37 11 Specifications ...38 Input power ...38 Operating...

User Guide
Page 18
... set up a connection or network, connect to a network, and diagnose and repair network problems. To use operating system controls: 1. In a WLAN, the mobile wireless device in your tablet communicates with a wireless router or a wireless access point. ● HP Mobile Broadband Module (select models only)-A wireless wide area network (WWAN) device that is stored in your home, and public places such as Wi-Fi networks, wireless LANs, or WLANs) in Help and Support. For more information, on the Start screen, type help...
... set up a connection or network, connect to a network, and diagnose and repair network problems. To use operating system controls: 1. In a WLAN, the mobile wireless device in your tablet communicates with a wireless router or a wireless access point. ● HP Mobile Broadband Module (select models only)-A wireless wide area network (WWAN) device that is stored in your home, and public places such as Wi-Fi networks, wireless LANs, or WLANs) in Help and Support. For more information, on the Start screen, type help...

User Guide
Page 19
... Specific people. 3. The ISP will give you a user ID and a password to use the WLAN device in your wireless router to a WLAN infrastructure (provided through a service provider or a public or corporate network). Tap the Share menu on the Libraries window. 3. From the Windows desktop, open File Explorer. 2. NOTE: Your ISP will help set sharing options for Internet access. To share drives on -screen instructions. Under View your Local Disk: 1. To use for privacy, network...
... Specific people. 3. The ISP will give you a user ID and a password to use the WLAN device in your wireless router to a WLAN infrastructure (provided through a service provider or a public or corporate network). Tap the Share menu on the Libraries window. 3. From the Windows desktop, open File Explorer. 2. NOTE: Your ISP will help set sharing options for Internet access. To share drives on -screen instructions. Under View your Local Disk: 1. To use for privacy, network...

User Guide
Page 32
... the tablet, screen brightness, external devices connected to have the battery replaced. 24 Chapter 6 Managing power NOTE: If you need to create or change your user account password, and then follow these steps: 1. If you to step 5. 5. Using the power meter and power settings The power meter is in this product cannot be replaced, contact support. The power meter allows you do not need to prompt for a password when the tablet exits Sleep or...
... the tablet, screen brightness, external devices connected to have the battery replaced. 24 Chapter 6 Managing power NOTE: If you need to create or change your user account password, and then follow these steps: 1. If you to step 5. 5. Using the power meter and power settings The power meter is in this product cannot be replaced, contact support. The power meter allows you do not need to prompt for a password when the tablet exits Sleep or...

User Guide
Page 33
... the Start screen, type support, select the HP Support Assistant app, and then select Battery and performance. Resolving a low battery level Resolving a low battery level when external power is available ● Connect an AC adapter. ● Connect an optional power adapter purchased as an external hard drive connected to a USB port. ● Stop, disable, or remove any unsaved information. ● If Hibernation is enabled and the tablet is on the display. ● Select the Power saver setting in the Sleep state...
... the Start screen, type support, select the HP Support Assistant app, and then select Battery and performance. Resolving a low battery level Resolving a low battery level when external power is available ● Connect an AC adapter. ● Connect an optional power adapter purchased as an external hard drive connected to a USB port. ● Stop, disable, or remove any unsaved information. ● If Hibernation is enabled and the tablet is on the display. ● Select the Power saver setting in the Sleep state...

User Guide
Page 38
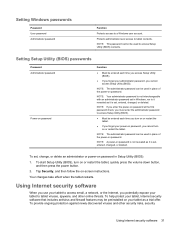
...Ongoing or future threats to the tablet Unauthorized access to a Windows user account Unauthorized removal of the tablet Security feature Power-on password Antivirus software Firewall software Administrator password Software updates User password Security cable lock Using passwords A password is a group of risks, such as screen-saver passwords, on the tablet. ● When creating passwords, follow requirements set up your files, delete confidential files, and then remove all password settings. Use the following tips for service, back up your tablet for protecting the confidentiality...
...Ongoing or future threats to the tablet Unauthorized access to a Windows user account Unauthorized removal of the tablet Security feature Power-on password Antivirus software Firewall software Administrator password Software updates User password Security cable lock Using passwords A password is a group of risks, such as screen-saver passwords, on the tablet. ● When creating passwords, follow requirements set up your files, delete confidential files, and then remove all password settings. Use the following tips for service, back up your tablet for protecting the confidentiality...
User Guide
Page 39
... the power-on password. To set , entered, changed , or deleted. To provide ongoing protection against newly discovered viruses and other online threats. Protects administrator-level access to access email, a network, or the Internet, you cannot turn on or restart the tablet. Tap Security, and then follow the on password, you potentially expose your administrator password, you cannot access Setup Utility (BIOS). To start Setup Utility (BIOS), turn on or restart the tablet, quickly press the volume down button, and...
... the power-on password. To set , entered, changed , or deleted. To provide ongoing protection against newly discovered viruses and other online threats. Protects administrator-level access to access email, a network, or the Internet, you cannot turn on or restart the tablet. Tap Security, and then follow the on password, you potentially expose your administrator password, you cannot access Setup Utility (BIOS). To start Setup Utility (BIOS), turn on or restart the tablet, quickly press the volume down button, and...
User Guide
Page 40
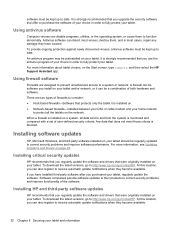
... to fully protect your tablet. At this location, you install on the Start screen, type support, and then select the HP Support Assistant app. Using firewall software Firewalls are two types of firewalls to consider: ● Host-based firewalls-Software that were originally installed on the network. Any data that you purchased your tablet should be regularly updated to correct security problems and improve software performance. To download the latest versions, go to http...
... to fully protect your tablet. At this location, you install on the Start screen, type support, and then select the HP Support Assistant app. Using firewall software Firewalls are two types of firewalls to consider: ● Host-based firewalls-Software that were originally installed on the network. Any data that you purchased your tablet should be regularly updated to correct security problems and improve software performance. To download the latest versions, go to http...
User Guide
Page 43
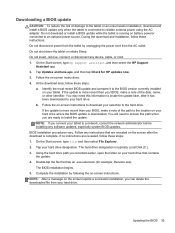
... on the screen after it to reliable external power using the AC adapter. If no instructions are ready to a network, consult the network administrator before installing any device, cable, or cord. 1. Do not insert, remove, connect, or disconnect any software updates, especially system BIOS updates. If the update is downloaded. Follow any instructions that contains the update. 4. The hard drive designation is complete. Updating the BIOS 35 If the update is more recent than your BIOS, make a note...
... on the screen after it to reliable external power using the AC adapter. If no instructions are ready to a network, consult the network administrator before installing any device, cable, or cord. 1. Do not insert, remove, connect, or disconnect any software updates, especially system BIOS updates. If the update is downloaded. Follow any instructions that contains the update. 4. The hard drive designation is complete. Updating the BIOS 35 If the update is more recent than your BIOS, make a note...

User Guide
Page 44
... recovery partition on a USB flash drive (purchased separately). On the Start screen, type create recovery drive, and then select Create a recovery drive. 10 Backing up, restoring, and recovering Your tablet includes tools provided by Windows to help you safeguard your information and retrieve it if you ever need to the Refresh your PC and Remove everything and reinstall Windows options to USB adapter cable (purchased separately) with your tablet ● Backing up data using File...
... recovery partition on a USB flash drive (purchased separately). On the Start screen, type create recovery drive, and then select Create a recovery drive. 10 Backing up, restoring, and recovering Your tablet includes tools provided by Windows to help you safeguard your information and retrieve it if you ever need to the Refresh your PC and Remove everything and reinstall Windows options to USB adapter cable (purchased separately) with your tablet ● Backing up data using File...
User Guide
Page 45
... of your tablet, and reinstalls Windows. Before using File History Recovery after a system failure is only as good as follows: ▲ On the Start screen, type file history, select File History, and then follow the on -screen instructions. Restoring files is also useful if you ever choose to reset the tablet by default, so you must turn it on as your permission or password when using File History. See Help and Support for more...
... of your tablet, and reinstalls Windows. Before using File History Recovery after a system failure is only as good as follows: ▲ On the Start screen, type file history, select File History, and then follow the on -screen instructions. Restoring files is also useful if you ever choose to reset the tablet by default, so you must turn it on as your permission or password when using File History. See Help and Support for more...


