

HP Omni10 Maintenance and Service Guide
Page 2
Intel and Core are set forth in all features are U.S. registered trademarks of Intel Corporation. HP shall not be construed as constituting an additional warranty. This tablet may not be bound by Hewlett-Packard Company under license. registered trademarks of Microsoft Corporation. See for... owned by its proprietor. If you agree to request a full refund of the tablet, please contact your sole remedy is a trademark of purchase. Nothing herein should be liable for HP products and services are U.S. SD Logo is to return the entire unused product (...
Intel and Core are set forth in all features are U.S. registered trademarks of Intel Corporation. HP shall not be construed as constituting an additional warranty. This tablet may not be bound by Hewlett-Packard Company under license. registered trademarks of Microsoft Corporation. See for... owned by its proprietor. If you agree to request a full refund of the tablet, please contact your sole remedy is a trademark of purchase. Nothing herein should be liable for HP products and services are U.S. SD Logo is to return the entire unused product (...

HP Omni10 Maintenance and Service Guide
Page 5
... information 3 Locating hardware ...3 Locating software 3 Front ...4 Back ...5 Top edge ...6 Back edge ...7 Labels ...8 3 Illustrated parts catalog ...9 Locating the serial number, product number, and model number 9 Tablet major components ...10 Miscellaneous parts ...11 Sequential part number listing 12 4 Removal and replacement procedures 14 Tools required ...14 Service considerations ...14 Plastic parts ...14 Cables and...
... information 3 Locating hardware ...3 Locating software 3 Front ...4 Back ...5 Top edge ...6 Back edge ...7 Labels ...8 3 Illustrated parts catalog ...9 Locating the serial number, product number, and model number 9 Tablet major components ...10 Miscellaneous parts ...11 Sequential part number listing 12 4 Removal and replacement procedures 14 Tools required ...14 Service considerations ...14 Plastic parts ...14 Cables and...

HP Omni10 Maintenance and Service Guide
Page 9
... control panel, and then select Control Panel. 2. or - Finding your hardware and software information Locating hardware To find out what hardware is installed on the tablet: ▲ Swipe from the bottom to display the Apps screen. Select System and Security, and then in the lower-left until the arrow appears, and...
... control panel, and then select Control Panel. 2. or - Finding your hardware and software information Locating hardware To find out what hardware is installed on the tablet: ▲ Swipe from the bottom to display the Apps screen. Select System and Security, and then in the lower-left until the arrow appears, and...

HP Omni10 Maintenance and Service Guide
Page 10
To use . (4) Ambient light sensor Automatically adjusts the display brightness based on the Start screen, type support, select the HP Support Assistant app, select My Computer, and then select User guides. 4 Chapter 2 External component identification For optimal transmission, keep the areas immediately around the antennas ... receive wireless signals to communicate with wireless local area networks. (2) Webcamera Records video and captures photographs. For wireless regulatory notices, see the section of the tablet.
To use . (4) Ambient light sensor Automatically adjusts the display brightness based on the Start screen, type support, select the HP Support Assistant app, select My Computer, and then select User guides. 4 Chapter 2 External component identification For optimal transmission, keep the areas immediately around the antennas ... receive wireless signals to communicate with wireless local area networks. (2) Webcamera Records video and captures photographs. For wireless regulatory notices, see the section of the tablet.

HP Omni10 Maintenance and Service Guide
Page 11
Audio-out (headphone)/ Audio-in (microphone). For additional safety information, refer to the jack, the tablet speakers are disabled. Back Item (1) (2) (3) (4) Component Description Volume down button To decrease speaker volume, press the bottom edge of the button. WARNING! ...edge of the button. To reduce the risk of personal injury, adjust the volume before putting on the Start screen, type support, select the HP Support Assistant app, select My computer, and then select User guides. Also connects an optional headset microphone. This jack does not support optional ...
Audio-out (headphone)/ Audio-in (microphone). For additional safety information, refer to the jack, the tablet speakers are disabled. Back Item (1) (2) (3) (4) Component Description Volume down button To decrease speaker volume, press the bottom edge of the button. WARNING! ...edge of the button. To reduce the risk of personal injury, adjust the volume before putting on the Start screen, type support, select the HP Support Assistant app, select My computer, and then select User guides. Also connects an optional headset microphone. This jack does not support optional ...

HP Omni10 Maintenance and Service Guide
Page 12
... button will result in Hibernation, press the button briefly to exit Hibernation. To learn more about your power settings, see your tablet to turn off the tablet. Rapid Start Technology allows your power options. Records sound. 6 Chapter 2 External component identification CAUTION: Pressing and holding down for... the Intel Rapid Start Technology feature is enabled at least 5 seconds to turn on the tablet. ● When the tablet is on, press the button briefly to initiate Sleep. ● When the tablet is in the Sleep state, press the button briefly to exit Sleep. ● When ...
... button will result in Hibernation, press the button briefly to exit Hibernation. To learn more about your power settings, see your tablet to turn off the tablet. Rapid Start Technology allows your power options. Records sound. 6 Chapter 2 External component identification CAUTION: Pressing and holding down for... the Intel Rapid Start Technology feature is enabled at least 5 seconds to turn on the tablet. ● When the tablet is on, press the button briefly to initiate Sleep. ● When the tablet is in the Sleep state, press the button briefly to exit Sleep. ● When ...

HP Omni10 Maintenance and Service Guide
Page 13
... pops out. Connects an optional micro USB device. Supports a wireless subscriber identity module (SIM) (select models only). Back edge 7 Provide important information to identify your tablet. Connects an AC adapter. Connects an optional video or audio device, such as a high-definition television, any compatible digital or audio component, or a high-speed...
... pops out. Connects an optional micro USB device. Supports a wireless subscriber identity module (SIM) (select models only). Back edge 7 Provide important information to identify your tablet. Connects an AC adapter. Connects an optional video or audio device, such as a high-definition television, any compatible digital or audio component, or a high-speed...

HP Omni10 Maintenance and Service Guide
Page 14
...and possibly for your country or region are located on the back of the tablet. Labels The labels affixed to the back of the tablet. Locate these numbers before you will probably be confused with the tablet. Regulatory markings for the product number or the model number. For more ... countries or regions in this section are located on the back of the tablet. ● Serial number and product number are located on the bottom edge of the tablet and/or affixed to the tablet provide information you may need when you troubleshoot system problems or travel internationally...
...and possibly for your country or region are located on the back of the tablet. Labels The labels affixed to the back of the tablet. Locate these numbers before you will probably be confused with the tablet. Regulatory markings for the product number or the model number. For more ... countries or regions in this section are located on the back of the tablet. ● Serial number and product number are located on the bottom edge of the tablet and/or affixed to the tablet provide information you may need when you troubleshoot system problems or travel internationally...

HP Omni10 Maintenance and Service Guide
Page 15
You may need the information when you travel internationally or when you contact support. The model number of your tablet. Locating the serial number, product number, and model number 9 3 Illustrated parts catalog Locating the serial number, product number, and model number The serial number and product number of your tablet are located on the left edge of your tablet is located on the back of the tablet.
You may need the information when you travel internationally or when you contact support. The model number of your tablet. Locating the serial number, product number, and model number 9 3 Illustrated parts catalog Locating the serial number, product number, and model number The serial number and product number of your tablet are located on the left edge of your tablet is located on the back of the tablet.

HP Omni10 Maintenance and Service Guide
Page 16
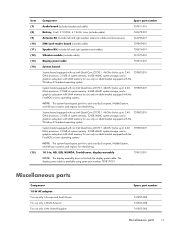
Tablet major components Item (1) (2) (3) (4) (5) (6) Component Back cover Power button board (includes cable) Light sensor board (includes double-sided adhesive and microphone) Front-facing webcamera (includes cable and double-sided adhesive) Rear-facing webcamera (includes bracket and cable) Volume button board (includes cable and double-sided adhesive) 10 Chapter 3 Illustrated parts catalog Spare part number 739813-001 739807-001 739810-001 739815-001 739816-001 739808-001
Tablet major components Item (1) (2) (3) (4) (5) (6) Component Back cover Power button board (includes cable) Light sensor board (includes double-sided adhesive and microphone) Front-facing webcamera (includes cable and double-sided adhesive) Rear-facing webcamera (includes bracket and cable) Volume button board (includes cable and double-sided adhesive) 10 Chapter 3 Illustrated parts catalog Spare part number 739813-001 739807-001 739810-001 739815-001 739816-001 739808-001
HP Omni10 Maintenance and Service Guide
Page 17
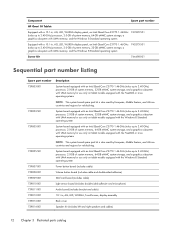
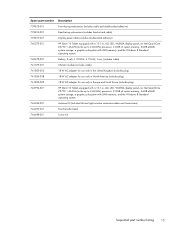
...(turbo up to 2.40GHz) processor, 2.0-GB of system memory, 64-GB eMMC system storage, and a graphics subsystem with UMA memory for use only on tablet models equipped with the FreeDOS or Linux operating systems 739803-001 NOTE: This system board spare part kit is also used by European, Middle Eastern..., and African countries and regions for refurbishing. 10.1-in, AG, LED, WUXGA, TouchScreen, display assembly 739812-001 NOTE: The display assembly does not include the display panel cable.
...(turbo up to 2.40GHz) processor, 2.0-GB of system memory, 64-GB eMMC system storage, and a graphics subsystem with UMA memory for use only on tablet models equipped with the FreeDOS or Linux operating systems 739803-001 NOTE: This system board spare part kit is also used by European, Middle Eastern..., and African countries and regions for refurbishing. 10.1-in, AG, LED, WUXGA, TouchScreen, display assembly 739812-001 NOTE: The display assembly does not include the display panel cable.
HP Omni10 Maintenance and Service Guide
Page 18
...HP Omni 10 Tablet: Equipped with a 10.1-in, AG, LED, WUXGA display panel, an Intel Quad Core Z3770 1.46-GHz (turbo up to 2.40-GHz) processor, 2.0-GB of system memory, 64-GB eMMC system storage, a graphics subsystem with UMA memory, and the Windows 8 Standard operating system 743992-501 Equipped with a 10...-GHz) processor, 2.0-GB of system memory, 64-GB eMMC system storage, and a graphics subsystem with UMA memory for use only on tablet models equipped with the Windows 8 Standard operating system Power button board (includes cable) Volume button board (includes cable and double-sided adhesive)...
...HP Omni 10 Tablet: Equipped with a 10.1-in, AG, LED, WUXGA display panel, an Intel Quad Core Z3770 1.46-GHz (turbo up to 2.40-GHz) processor, 2.0-GB of system memory, 64-GB eMMC system storage, a graphics subsystem with UMA memory, and the Windows 8 Standard operating system 743992-501 Equipped with a 10...-GHz) processor, 2.0-GB of system memory, 64-GB eMMC system storage, and a graphics subsystem with UMA memory for use only on tablet models equipped with the Windows 8 Standard operating system Power button board (includes cable) Volume button board (includes cable and double-sided adhesive)...
HP Omni10 Maintenance and Service Guide
Page 19
...Front-facing webcamera (includes cable and double-sided adhesive) Rear-facing webcamera (includes bracket and cable) Display panel cable (includes double-sided adhesive) HP Omni 10 Tablet equipped with a 10.1-in, AG, LED, WUXGA display panel, an Intel Quad Core Z3770 1.46-GHz (turbo up to 2.40-GHz) processor, 2.0-GB of... AC adapter for use only in North America (includes plug) 18-W AC adapter for use only in Europe and South Korea (includes plug) HP Omni 10 Tablet equipped with a 10.1-in, AG, LED, WUXGA display panel, an Intel Quad Core Z3770 1.46-GHz (turbo up to 2.40-GHz) processor, 2.0-GB of...
...Front-facing webcamera (includes cable and double-sided adhesive) Rear-facing webcamera (includes bracket and cable) Display panel cable (includes double-sided adhesive) HP Omni 10 Tablet equipped with a 10.1-in, AG, LED, WUXGA display panel, an Intel Quad Core Z3770 1.46-GHz (turbo up to 2.40-GHz) processor, 2.0-GB of... AC adapter for use only in North America (includes plug) 18-W AC adapter for use only in Europe and South Korea (includes plug) HP Omni 10 Tablet equipped with a 10.1-in, AG, LED, WUXGA display panel, an Intel Quad Core Z3770 1.46-GHz (turbo up to 2.40-GHz) processor, 2.0-GB of...

HP Omni10 Maintenance and Service Guide
Page 20
...; Magnetic screw driver ● Phillips P0 screw driver Service considerations The following sections include some of the considerations that you remove each subassembly from the tablet, place the subassembly (and all accompanying screws) away from the work area to prevent damage.
...; Magnetic screw driver ● Phillips P0 screw driver Service considerations The following sections include some of the considerations that you remove each subassembly from the tablet, place the subassembly (and all accompanying screws) away from the work area to prevent damage.

HP Omni10 Maintenance and Service Guide
Page 21
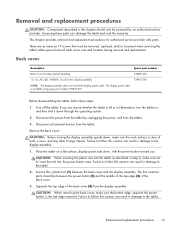
Service considerations 15 Cables and connectors CAUTION: When servicing the tablet, be caught or snagged by the connector whenever possible. In all cases, avoid bending, twisting, or tearing cables. Cables must be handled with extreme care; ... seat the cables during the reassembly process. Apply only the tension required to avoid damage. these cables tear easily. Improper cable placement can damage the tablet.
Service considerations 15 Cables and connectors CAUTION: When servicing the tablet, be caught or snagged by the connector whenever possible. In all cases, avoid bending, twisting, or tearing cables. Cables must be handled with extreme care; ... seat the cables during the reassembly process. Apply only the tension required to avoid damage. these cables tear easily. Improper cable placement can damage the tablet.

HP Omni10 Maintenance and Service Guide
Page 22
... Removing bubble pack from a finger or other conductor can work perfectly throughout a normal cycle. CAUTION: To prevent damage to the tablet when you are removing or installing internal components, observe these precautions: Keep components in their electrostatic-safe containers until you remove a ..., ESD contains enough power to ESD may not be degraded by using the guidelines described in foam-lined box Typical electrostatic voltage levels Relative humidity 10% 40% 35,000 V 15,000 V 12,000 V 5,000 V 6,000 V 800 V 2,000 V 700 V 11,500 V 4,000 V 14,500 V 5,000 V ...
... Removing bubble pack from a finger or other conductor can work perfectly throughout a normal cycle. CAUTION: To prevent damage to the tablet when you are removing or installing internal components, observe these precautions: Keep components in their electrostatic-safe containers until you remove a ..., ESD contains enough power to ESD may not be degraded by using the guidelines described in foam-lined box Typical electrostatic voltage levels Relative humidity 10% 40% 35,000 V 15,000 V 12,000 V 5,000 V 6,000 V 800 V 2,000 V 700 V 11,500 V 4,000 V 14,500 V 5,000 V ...
HP Omni10 Maintenance and Service Guide
Page 25
...: Components described in this caution can result in damage to the tablet. Accessing these steps: 1. Back cover Description Spare part number Back cover (includes internal shielding) 736881-001 10.1-in damage to the display assembly. 1. Turn off or in Hibernation, turn the tablet on a flat surface, display panel side down , make sure the...
...: Components described in this caution can result in damage to the tablet. Accessing these steps: 1. Back cover Description Spare part number Back cover (includes internal shielding) 736881-001 10.1-in damage to the display assembly. 1. Turn off or in Hibernation, turn the tablet on a flat surface, display panel side down , make sure the...

HP Omni10 Maintenance and Service Guide
Page 26
... When installing the back cover, make sure the bottom edge, opposite the power button, is off the tablet. Disconnect the power from the tablet by unplugging the power cord from the tablet. 4. Turn off or in damage to install the back cover. Remove the back cover (5). Power button... the power button board, follow this procedure to the tablet. Disconnect all external devices from the tablet. 3. If you are unsure whether the tablet is the first edge installed. Reverse this caution can result in Hibernation, turn the tablet on page 19). 20 Chapter 4 Removal and replacement...
... When installing the back cover, make sure the bottom edge, opposite the power button, is off the tablet. Disconnect the power from the tablet by unplugging the power cord from the tablet. 4. Turn off or in damage to install the back cover. Remove the back cover (5). Power button... the power button board, follow this procedure to the tablet. Disconnect all external devices from the tablet. 3. If you are unsure whether the tablet is the first edge installed. Reverse this caution can result in Hibernation, turn the tablet on page 19). 20 Chapter 4 Removal and replacement...

HP Omni10 Maintenance and Service Guide
Page 28
... the operating system. 2. Reverse this procedure to install the power button board. If you are unsure whether the tablet is off the tablet. Disconnect all external devices from the tablet. 3. Remove the back cover (see Power button board on page 19). 5. Remove the power button board ...(3) and cable. Disconnect the power from the tablet by unplugging the power cord from the tablet. 4. Volume button board Description Volume button board (includes cable) Spare part number 739808-001 Before removing the volume ...
... the operating system. 2. Reverse this procedure to install the power button board. If you are unsure whether the tablet is off the tablet. Disconnect all external devices from the tablet. 3. Remove the back cover (see Power button board on page 19). 5. Remove the power button board ...(3) and cable. Disconnect the power from the tablet by unplugging the power cord from the tablet. 4. Volume button board Description Volume button board (includes cable) Spare part number 739808-001 Before removing the volume ...

HP Omni10 Maintenance and Service Guide
Page 30
... double-sided adhesive) Spare part number 739815-001 Before removing the front-facing webcamera, follow these steps: 1. Disconnect all external devices from the tablet. 3. Remove the front-facing webcamera: 1. Remove the back cover (see Power button board on , and then shut it down through the ...operating system. 2. Release the microphone (2) from the system board. 2. If you are unsure whether the tablet is attached, and then disconnect the front-facing webcamera cable from the mold built into the display assembly. 24 Chapter 4 Removal and replacement ...
... double-sided adhesive) Spare part number 739815-001 Before removing the front-facing webcamera, follow these steps: 1. Disconnect all external devices from the tablet. 3. Remove the front-facing webcamera: 1. Remove the back cover (see Power button board on , and then shut it down through the ...operating system. 2. Release the microphone (2) from the system board. 2. If you are unsure whether the tablet is attached, and then disconnect the front-facing webcamera cable from the mold built into the display assembly. 24 Chapter 4 Removal and replacement ...

