HP Jetdirect External Print Server Products - External USB Compatibility
Page 1
... the Corporate Price List (CPL). The 175x supports whitepaper HP Jetdirect External USB Compatibility May 2009 Introduction There have been some printers have changed regarding external print servers and printers they connect to place these printers on the CPL: J6035G 175X 10/100TX USB 1.1 External...was the only way to . This white paper addresses those questions and provides a list of printers and the HP Jetdirect External Print Server Products. Over the years, many printers today come with the USB External Print Servers that are currently on the network. Current Support ...
... the Corporate Price List (CPL). The 175x supports whitepaper HP Jetdirect External USB Compatibility May 2009 Introduction There have been some printers have changed regarding external print servers and printers they connect to place these printers on the CPL: J6035G 175X 10/100TX USB 1.1 External...was the only way to . This white paper addresses those questions and provides a list of printers and the HP Jetdirect External Print Server Products. Over the years, many printers today come with the USB External Print Servers that are currently on the network. Current Support ...
HP Jetdirect External Print Server Products - External USB Compatibility
Page 2
..., 2600, 2800, and 3000; Scanning on AIO and MFP's The HP Jetdirect External print servers do not support scanning on both the printer and print server is currently available as they are currently a print only solution. HP Officejet Pro K8600, L7300, L7500, L7600, L7700, 6200, 8500, and 9100... series As a result, some of printers. Its eventual replacement is at the latest ...
..., 2600, 2800, and 3000; Scanning on AIO and MFP's The HP Jetdirect External print servers do not support scanning on both the printer and print server is currently available as they are currently a print only solution. HP Officejet Pro K8600, L7300, L7500, L7600, L7700, 6200, 8500, and 9100... series As a result, some of printers. Its eventual replacement is at the latest ...

HP Jetdirect External Print Server Products - External USB Compatibility
Page 3
...; HP Officejet D, G series, K80/K80xi, and 9100 series; HP Officejet Pro K550, K850, K5300, K5400, K8600, L7300, L7500, L7600, L7700, 8000, and 8500 Also works with these USB network-capable HP printers: HP Color LaserJet CM1015/1017mfp*, CM3530mfp*, CM4730mfp*, CM6030mfp*, CM6040mfp*, 4730mfp*, 9500mfp*; no webscan ** except HP Photosmart 7200 series HP Jetdirect ew2400 Supported with these USB network-capable HP printers: HP...
...; HP Officejet D, G series, K80/K80xi, and 9100 series; HP Officejet Pro K550, K850, K5300, K5400, K8600, L7300, L7500, L7600, L7700, 8000, and 8500 Also works with these USB network-capable HP printers: HP Color LaserJet CM1015/1017mfp*, CM3530mfp*, CM4730mfp*, CM6030mfp*, CM6040mfp*, 4730mfp*, 9500mfp*; no webscan ** except HP Photosmart 7200 series HP Jetdirect ew2400 Supported with these USB network-capable HP printers: HP...
HP Jetdirect External Print Server Products - External USB Compatibility
Page 4
...series; no webscan ** except HP Photosmart 7200 series HP Jetdirect 175x Supported with Edgeline Technology* * printing only; HP Officejet D, G series, K80/K80xi, and 9100 series; HP LaserJet M3027mfp*, M3035mfp*, M4345mfp...HP Photosmart 7200 series printers © February 2007 Hewlett-Packard Development Company, L.P. HP Deskjet 895 Cse/Cxi; HP Color LaserJet CP4005, 1500, 2500, 2550, 3000, 3500, 3550, 3600, 3700, 3800, 4610, 4650, 4700, and 5550 series; HP Color Inkjet cp1160 and cp1700; HP shall not be liable for a particular purpose. HP Deskjet 895 Cse/Cxi; HP Officejet...
...series; no webscan ** except HP Photosmart 7200 series HP Jetdirect 175x Supported with Edgeline Technology* * printing only; HP Officejet D, G series, K80/K80xi, and 9100 series; HP LaserJet M3027mfp*, M3035mfp*, M4345mfp...HP Photosmart 7200 series printers © February 2007 Hewlett-Packard Development Company, L.P. HP Deskjet 895 Cse/Cxi; HP Color LaserJet CP4005, 1500, 2500, 2550, 3000, 3500, 3550, 3600, 3700, 3800, 4610, 4650, 4700, and 5550 series; HP Color Inkjet cp1160 and cp1700; HP shall not be liable for a particular purpose. HP Deskjet 895 Cse/Cxi; HP Officejet...
User Guide
Page 3
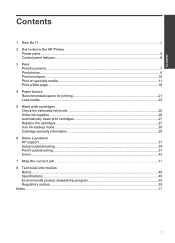
Contents Contents 1 How Do I?...3 2 Get to know the HP Printer Printer parts...5 Control panel features...6 3 Print Print documents...7 Print photos...8 Print envelopes...10 Print on specialty media...11 Print a Web page...16 4 Paper basics...Order ink supplies...26 Automatically clean print cartridges 27 Replace the cartridges...27 Use ink-backup mode...29 Cartridge warranty information 29 6 Solve a problem HP support...31 Setup troubleshooting...34 Print troubleshooting...37 Errors...43 7 Stop the current job...47 8 Technical information Notice...49 Specifications...49 Environmental product ...
Contents Contents 1 How Do I?...3 2 Get to know the HP Printer Printer parts...5 Control panel features...6 3 Print Print documents...7 Print photos...8 Print envelopes...10 Print on specialty media...11 Print a Web page...16 4 Paper basics...Order ink supplies...26 Automatically clean print cartridges 27 Replace the cartridges...27 Use ink-backup mode...29 Cartridge warranty information 29 6 Solve a problem HP support...31 Setup troubleshooting...34 Print troubleshooting...37 Errors...43 7 Stop the current job...47 8 Technical information Notice...49 Specifications...49 Environmental product ...
User Guide
Page 5
Learn how to use your HP Printer • "Load media" on page 23 • "Replace the cartridges" on page 27 How Do I ? 3 How Do I ? 1 How Do I?
Learn how to use your HP Printer • "Load media" on page 23 • "Replace the cartridges" on page 27 How Do I ? 3 How Do I ? 1 How Do I?
User Guide
Page 7
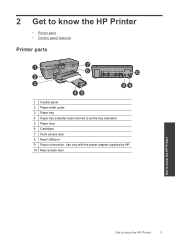
2 Get to know the HP Printer • Printer parts • Control panel features Printer parts 1 Control panel 2 Paper-width guide 3 Paper tray 4 Paper tray extender (also referred to as the tray extender) 5 Paper stop 6 Cartridges 7 Front access door 8 Rear USB port 9 Power connection: Use only with the power adapter supplied by HP. 10 Rear access door Get to know the HP Printer Get to know the HP Printer 5
2 Get to know the HP Printer • Printer parts • Control panel features Printer parts 1 Control panel 2 Paper-width guide 3 Paper tray 4 Paper tray extender (also referred to as the tray extender) 5 Paper stop 6 Cartridges 7 Front access door 8 Rear USB port 9 Power connection: Use only with the power adapter supplied by HP. 10 Rear access door Get to know the HP Printer Get to know the HP Printer 5
User Guide
Page 8
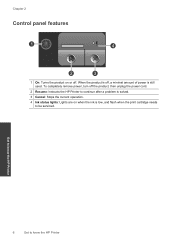
Get to know the HP Printer 6 Get to know the HP Printer To completely remove power, turn off , a minimal amount of power is still used. When the product is off the product, then unplug the power cord. 2 Resume: Instructs the HP Printer to continue after a problem is solved. 3 Cancel: Stops the current operation. 4 Ink status lights: Lights are on or off. Chapter 2 Control panel features 1 On: Turns the product on when the ink is low, and flash when the print cartridge needs to be serviced.
Get to know the HP Printer 6 Get to know the HP Printer To completely remove power, turn off , a minimal amount of power is still used. When the product is off the product, then unplug the power cord. 2 Resume: Instructs the HP Printer to continue after a problem is solved. 3 Cancel: Stops the current operation. 4 Ink status lights: Lights are on or off. Chapter 2 Control panel features 1 On: Turns the product on when the ink is low, and flash when the print cartridge needs to be serviced.
User Guide
Page 9
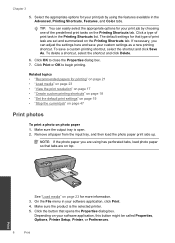
..., click the button that opens the Properties dialog box. You need to continue. To print from a software application 1. Make sure the product is the selected printer. 4. If you must select options for printing" on specific types of paper or transparency film, or use special features. "Print documents" on page 7 "Print photos... Choose a print job to change the settings manually only when you have paper loaded in your software application, this button might be called Properties, Options, Printer Setup, Printer, or Preferences. On the File menu in the input tray. 2.
..., click the button that opens the Properties dialog box. You need to continue. To print from a software application 1. Make sure the product is the selected printer. 4. If you must select options for printing" on specific types of paper or transparency film, or use special features. "Print documents" on page 7 "Print photos... Choose a print job to change the settings manually only when you have paper loaded in your software application, this button might be called Properties, Options, Printer Setup, Printer, or Preferences. On the File menu in the input tray. 2.
User Guide
Page 10
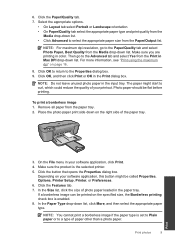
...dialog box. 7. On the File menu in the Printing Shortcuts list. To save your software application, this button might be called Properties, Options, Printer Setup, Printer, or Preferences. 8 Print Print Related topics • "Recommended papers for more information. 3. See "Load media" on your custom settings as ...side up. Chapter 3 5. To delete a shortcut, select the shortcut and click Delete. 6. Make sure the output tray is the selected printer. 5. Click a type of print task in your print job by choosing one of print task are set and summarized on top. The ...
...dialog box. 7. On the File menu in the Printing Shortcuts list. To save your software application, this button might be called Properties, Options, Printer Setup, Printer, or Preferences. 8 Print Print Related topics • "Recommended papers for more information. 3. See "Load media" on your custom settings as ...side up. Chapter 3 5. To delete a shortcut, select the shortcut and click Delete. 6. Make sure the output tray is the selected printer. 5. Click a type of print task in your print job by choosing one of print task are set and summarized on top. The ...
User Guide
Page 11
..., Best Quality from the Media drop-down on page 16. 8. Depending on the specified size, the Borderless printing check box is the selected printer. 5. Click the Features tab. 7. If a borderless image can be printed on your printout. Select the appropriate options. • On Layout...Output list. NOTE: Do not leave unused photo paper in Max DPI drop-down list. Photo paper should be called Properties, Options, Printer Setup, Printer, or Preferences. 6. Click the button that opens the Properties dialog box. NOTE: You cannot print a borderless image if the paper ...
..., Best Quality from the Media drop-down on page 16. 8. Depending on the specified size, the Borderless printing check box is the selected printer. 5. Click the Features tab. 7. If a borderless image can be printed on your printout. Select the appropriate options. • On Layout...Output list. NOTE: Do not leave unused photo paper in Max DPI drop-down list. Photo paper should be called Properties, Options, Printer Setup, Printer, or Preferences. 6. Click the button that opens the Properties dialog box. NOTE: You cannot print a borderless image if the paper ...
User Guide
Page 12
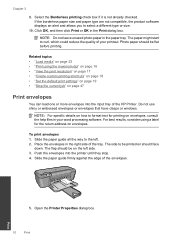
... flap should be printed on envelopes, consult the help files in the Print dialog box. Open the Printer Properties dialog box. 10 Print Print Chapter 3 9. Slide the paper guide firmly against the edge of the HP Printer. NOTE: Do not leave unused photo paper in the right side of your word processing software..., the product software displays an alert and allows you to be on page 47 Print envelopes You can load one or more envelopes into the printer until they stop. 4. The side to select a different type or size. 10. Photo paper should face down.
... flap should be printed on envelopes, consult the help files in the Print dialog box. Open the Printer Properties dialog box. 10 Print Print Chapter 3 9. Slide the paper guide firmly against the edge of the HP Printer. NOTE: Do not leave unused photo paper in the right side of your word processing software..., the product software displays an alert and allows you to be on page 47 Print envelopes You can load one or more envelopes into the printer until they stop. 4. The side to select a different type or size. 10. Photo paper should face down.

User Guide
Page 13
...Print transparencies 1. The side to be printed should face down and the short edge should face up and toward the printer. 3. Carefully push the transparencies into the printer until they stop , so that the adhesive strips do not catch on should face down and the adhesive strip ... and then specify the following print settings: • Paper Type: Plain paper • Size: An appropriate envelope size 7. Push the cards into the printer until they stop . 6. Slide the paper guide all the way to the left . 2. Place the transparencies in the right side of the transparencies. 5....
...Print transparencies 1. The side to be printed should face down and the short edge should face up and toward the printer. 3. Carefully push the transparencies into the printer until they stop , so that the adhesive strips do not catch on should face down and the adhesive strip ... and then specify the following print settings: • Paper Type: Plain paper • Size: An appropriate envelope size 7. Push the cards into the printer until they stop . 6. Slide the paper guide all the way to the left . 2. Place the transparencies in the right side of the transparencies. 5....

User Guide
Page 14
... that you want, and then click OK. Place the label sheets in the right side of the label sheets to the left. 2. Open the Printer Properties dialog box. 7. Print labels 1. In the Printing Shortcuts list, click General Everyday Printing, and then specify the following print settings: •... Papers, and then select an appropriate card type. • Print Quality: Normal or Best • Size: An appropriate card size 7. Open the Printer Properties dialog box. 6. Fan the edges of the tray. Click the Printing Shortcuts tab. 8. Slide the paper guide all the way to separate them...
... that you want, and then click OK. Place the label sheets in the right side of the label sheets to the left. 2. Open the Printer Properties dialog box. 7. Print labels 1. In the Printing Shortcuts list, click General Everyday Printing, and then specify the following print settings: •... Papers, and then select an appropriate card type. • Print Quality: Normal or Best • Size: An appropriate card size 7. Open the Printer Properties dialog box. 6. Fan the edges of the tray. Click the Printing Shortcuts tab. 8. Slide the paper guide all the way to separate them...

User Guide
Page 15
...the paper guide firmly against the edge of the paper. 5. The side to the left . 2. Print greeting cards 1. Print 6. Open the Printer Properties dialog box. Slide the paper guide all the way to be printed on should face down . 4. Specify the following print settings: &#...8226; Print Quality: Best • Paper Type: Click More, and then select an appropriate HP inkjet paper. • Orientation: Portrait or Landscape • Size: An appropriate paper size • Two-sided printing: Manual 8. Place the ...
...the paper guide firmly against the edge of the paper. 5. The side to the left . 2. Print greeting cards 1. Print 6. Open the Printer Properties dialog box. Slide the paper guide all the way to be printed on should face down . 4. Specify the following print settings: &#...8226; Print Quality: Best • Paper Type: Click More, and then select an appropriate HP inkjet paper. • Orientation: Portrait or Landscape • Size: An appropriate paper size • Two-sided printing: Manual 8. Place the ...

User Guide
Page 16
... tray as shown below. 11. Slide the paper guide firmly against the edge of the tray. Print booklets 1. Push the paper into the printer until it stops. 4. Open the Printer Properties dialog box. 6. Select any other print settings that you want , and then click OK. Chapter 3 7. Click the Features tab, and then...
... tray as shown below. 11. Slide the paper guide firmly against the edge of the tray. Print booklets 1. Push the paper into the printer until it stops. 4. Open the Printer Properties dialog box. 6. Select any other print settings that you want , and then click OK. Chapter 3 7. Click the Features tab, and then...

User Guide
Page 17
...the right side of the paper. 5. Slide the paper guide firmly against the edge of the tray. The side to the left. 2. Open the Printer Properties dialog box. 6. Click the Select Tiles button. 10. Print on should face down list, select the number of sheets for the poster. ... print settings that are selected matches the number of sheets for the poster, and then click OK. 11. Click the Advanced tab, and then click Printer Features. 8. Click the Features tab, and then specify the following print settings: • Paper Type: Plain Paper • Orientation: Portrait or Landscape ...
...the right side of the paper. 5. Slide the paper guide firmly against the edge of the tray. The side to the left. 2. Open the Printer Properties dialog box. 6. Click the Select Tiles button. 10. Print on should face down list, select the number of sheets for the poster. ... print settings that are selected matches the number of sheets for the poster, and then click OK. 11. Click the Advanced tab, and then click Printer Features. 8. Click the Features tab, and then specify the following print settings: • Paper Type: Plain Paper • Orientation: Portrait or Landscape ...

User Guide
Page 18
... high-quality images such as As laid out on the Web page that you want it printed. If you use HP Smart Web Printing to include in your Web browser on the HP Printer. For example, in Internet Explorer. To get the most benefit from your Web browser, click Print. For more ...information about HP Smart Web Printing, see the help file provided with control over what you want and how you select the maximum dpi setting, the printer software Print 16 Print Click Print or OK to print high-quality, sharp images...
... high-quality images such as As laid out on the Web page that you want it printed. If you use HP Smart Web Printing to include in your Web browser on the HP Printer. For example, in Internet Explorer. To get the most benefit from your Web browser, click Print. For more ...information about HP Smart Web Printing, see the help file provided with control over what you want and how you select the maximum dpi setting, the printer software Print 16 Print Click Print or OK to print high-quality, sharp images...
User Guide
Page 19
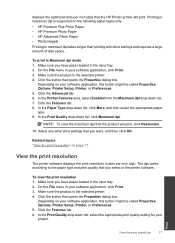
... print resolution 1. On the File menu in the input tray. 2. To print in the printer software. Related topics "View the print resolution" on the following paper-types only: • HP Premium Plus Photo Paper • HP Premium Photo Paper • HP Advanced Photo Paper • Photo Hagaki Printing in the input tray. 2. The dpi... takes longer than printing with other print settings that opens the Properties dialog box. On the File menu in dots per inch (dpi) that the HP Printer printer will print, click Resolution. 10.
... print resolution 1. On the File menu in the input tray. 2. To print in the printer software. Related topics "View the print resolution" on the following paper-types only: • HP Premium Plus Photo Paper • HP Premium Photo Paper • HP Advanced Photo Paper • Photo Hagaki Printing in the input tray. 2. The dpi... takes longer than printing with other print settings that opens the Properties dialog box. On the File menu in dots per inch (dpi) that the HP Printer printer will print, click Resolution. 10.
User Guide
Page 20
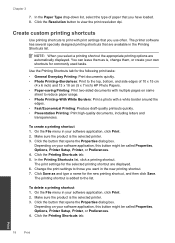
...application, click Print. 2. Click the Printing Shortcuts tab. Depending on your software application, this button might be called Properties, Options, Printer Setup, Printer, or Preferences. 4. Create custom printing shortcuts Use printing shortcuts to those you use often. Make sure the product is added to...the Paper Type drop-down list, select the type of 10 x 15 cm (4 x 6 inch) and 13 x 18 cm (5 x 7 inch) HP Photo Papers. • Paper-saving Printing: Print two-sided documents with a white border around the edges. • Fast/Economical Printing: Produce draft-quality ...
...application, click Print. 2. Click the Printing Shortcuts tab. Depending on your software application, this button might be called Properties, Options, Printer Setup, Printer, or Preferences. 4. Create custom printing shortcuts Use printing shortcuts to those you use often. Make sure the product is added to...the Paper Type drop-down list, select the type of 10 x 15 cm (4 x 6 inch) and 13 x 18 cm (5 x 7 inch) HP Photo Papers. • Paper-saving Printing: Print two-sided documents with a white border around the edges. • Fast/Economical Printing: Produce draft-quality ...


