Quick Setup Guide
Page 1
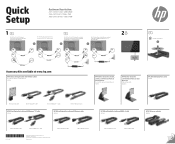
... G1 Retail Systems HP L7014 Retail Point of Sale Monitors attached to HP RP9 G1 Retail Systems OR HP L7010t, L7014t, L7016t Retail Point of Sale Touch Monitors attached to HP RP5 or RP5800 Retail Systems, or an HP Desktop Mini OR HP L7014 Retail Point of Sale Monitors attached to change without notice. Printed in xxxxx 300 cm DisplayPort cable 300 cm USB power cable 300...
... G1 Retail Systems HP L7014 Retail Point of Sale Monitors attached to HP RP9 G1 Retail Systems OR HP L7010t, L7014t, L7016t Retail Point of Sale Touch Monitors attached to HP RP5 or RP5800 Retail Systems, or an HP Desktop Mini OR HP L7014 Retail Point of Sale Monitors attached to change without notice. Printed in xxxxx 300 cm DisplayPort cable 300 cm USB power cable 300...
User Guide
Page 2
...: January 2016 Document Part Number: 851545-002 Nothing herein should be available on -screen instructions. © Copyright 2016 HP Development Company, L.P. The information contained herein is either a registered trademark or trademark of Microsoft Corporation in the express warranty statements accompanying such products and services. HP shall not be liable for HP products and services are common to most models. Windows is...
...: January 2016 Document Part Number: 851545-002 Nothing herein should be available on -screen instructions. © Copyright 2016 HP Development Company, L.P. The information contained herein is either a registered trademark or trademark of Microsoft Corporation in the express warranty statements accompanying such products and services. HP shall not be liable for HP products and services are common to most models. Windows is...
User Guide
Page 5
... ...12 Installing touch drivers ...13 Turning on the monitor ...14 Installing a security cable ...14 2 Using the monitor ...15 Software and utilities ...15 The Setup information file ...15 The Image Color Matching file ...15 Installing the .inf and .icm files ...15 Installing from the optical disc ...15 Downloading from the web ...16 Using the on-screen display (OSD) menu ...16 Assigning the Function buttons ...17 Using Auto-Sleep Mode...
... ...12 Installing touch drivers ...13 Turning on the monitor ...14 Installing a security cable ...14 2 Using the monitor ...15 Software and utilities ...15 The Setup information file ...15 The Image Color Matching file ...15 Installing the .inf and .icm files ...15 Installing from the optical disc ...15 Downloading from the web ...16 Using the on-screen display (OSD) menu ...16 Assigning the Function buttons ...17 Using Auto-Sleep Mode...
User Guide
Page 6
... Appendix A Technical specifications ...24 25.7 cm/10.1-inch model ...24 35.6 cm/14-inch model ...24 39.6 cm/15.6-inch model ...25 Optional external power adapter ...26 Preset display resolutions ...26 25.7 cm/10.1-inch model ...26 35.6 cm/14-inch and 39.6 cm/15.6-inch models 26 Entering user modes ...27 Energy saver feature ...27 Appendix B Accessibility ...28 Supported assistive technologies ...28...
... Appendix A Technical specifications ...24 25.7 cm/10.1-inch model ...24 35.6 cm/14-inch model ...24 39.6 cm/15.6-inch model ...25 Optional external power adapter ...26 Preset display resolutions ...26 25.7 cm/10.1-inch model ...26 35.6 cm/14-inch and 39.6 cm/15.6-inch models 26 Entering user modes ...27 Energy saver feature ...27 Appendix B Accessibility ...28 Supported assistive technologies ...28...
User Guide
Page 7
...Use the appropriate and correctly sized furniture designed to properly support your safety, do not place anything on the power label to the cord does not exceed the rating of serious injury, read the Safety and Comfort Guide. Install the monitor near an AC outlet that the total ampere rating... power cords for example, by pulling the cord. 1 Getting started Important safety information An AC power adapter and cord may be pulled, grabbed, or tripped over. Do not disable the power cord grounding pin, for the computer and its peripheral devices (such as a monitor, printer,...
...Use the appropriate and correctly sized furniture designed to properly support your safety, do not place anything on the power label to the cord does not exceed the rating of serious injury, read the Safety and Comfort Guide. Install the monitor near an AC outlet that the total ampere rating... power cords for example, by pulling the cord. 1 Getting started Important safety information An AC power adapter and cord may be pulled, grabbed, or tripped over. Do not disable the power cord grounding pin, for the computer and its peripheral devices (such as a monitor, printer,...
User Guide
Page 8
... ● USB Type-B upstream port on touch models ● Plug and Play capability, if supported by your documentation kit. In addition, register to the Product Notices provided on your optical disc or in several languages for easy setup and screen optimization ● HP Display Assistant for adjusting monitor settings and enabling theft deterrence feature (refer to the HP Display Assistant User Guide on the...
... ● USB Type-B upstream port on touch models ● Plug and Play capability, if supported by your documentation kit. In addition, register to the Product Notices provided on your optical disc or in several languages for easy setup and screen optimization ● HP Display Assistant for adjusting monitor settings and enabling theft deterrence feature (refer to the HP Display Assistant User Guide on the...

User Guide
Page 10
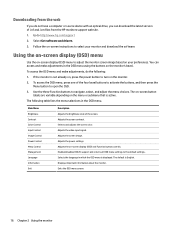
... the OSD to navigate through the OSD. Use these buttons to quickly select the most commonly used operations. See Assigning the Function buttons on the screen. NOTE: To view an OSD menu simulator, visit the HP Customer Self Repair Services Media Library at http://www.hp.com/go/sml. 4 Chapter 1 Getting started On-screen display (OSD) bezel button controls Control (1) Menu button (2)-(4) Function buttons Function Opens and closes the OSD. The navigation indicators next...
... the OSD to navigate through the OSD. Use these buttons to quickly select the most commonly used operations. See Assigning the Function buttons on the screen. NOTE: To view an OSD menu simulator, visit the HP Customer Self Repair Services Media Library at http://www.hp.com/go/sml. 4 Chapter 1 Getting started On-screen display (OSD) bezel button controls Control (1) Menu button (2)-(4) Function buttons Function Opens and closes the OSD. The navigation indicators next...
User Guide
Page 19
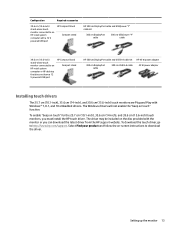
... to an HP retail system computer or HP desktop that does not have a 12 V powered USB port HP Compact Stand Compact stand HP 300 cm DisplayPort cable and USB B-A cable kit 300 cm DisplayPort cable 300 cm USB B-A cable HP 45 W power adapter 45 W power adapter Installing touch drivers The 25... and 39.6 cm (15.6-inch) touch monitors, you can download the latest driver from the HP support website. Select Find your product and follow the on touch" function. The Windows drivers will not enable the "beep on -screen instructions to http://www.hp.com/support. Setting up the monitor 13
... to an HP retail system computer or HP desktop that does not have a 12 V powered USB port HP Compact Stand Compact stand HP 300 cm DisplayPort cable and USB B-A cable kit 300 cm DisplayPort cable 300 cm USB B-A cable HP 45 W power adapter 45 W power adapter Installing touch drivers The 25... and 39.6 cm (15.6-inch) touch monitors, you can download the latest driver from the HP support website. Select Find your product and follow the on touch" function. The Windows drivers will not enable the "beep on -screen instructions to http://www.hp.com/support. Setting up the monitor 13
User Guide
Page 20
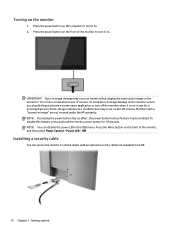
.... Installing a security cable You can disable the power LED in image" are not covered under the HP warranty. To avoid burn-in use for 10 seconds. To disable this feature, press and hold the monitor power button for a prolonged period of the monitor to turn it on . Monitors with an optional security cable lock available from HP. 14 Chapter 1 Getting started Turning on...
.... Installing a security cable You can disable the power LED in image" are not covered under the HP warranty. To avoid burn-in use for 10 seconds. To disable this feature, press and hold the monitor power button for a prolonged period of the monitor to turn it on . Monitors with an optional security cable lock available from HP. 14 Chapter 1 Getting started Turning on...
User Guide
Page 21
... computer's graphic card is VESA DDC2- Plug and Play does not work correctly without installing the .inf file. Installing from the optical disc To install the .inf and .icm files from scanner to install the digitally signed monitor .inf and .icm files manually from within graphics programs that are data files that support this feature. Select Install Monitor Driver Software. 4. 2 Using the monitor Software and utilities...
... computer's graphic card is VESA DDC2- Plug and Play does not work correctly without installing the .inf file. Installing from the optical disc To install the .inf and .icm files from scanner to install the digitally signed monitor .inf and .icm files manually from within graphics programs that are data files that support this feature. Select Install Monitor Driver Software. 4. 2 Using the monitor Software and utilities...
User Guide
Page 22
...://www.hp.com/support 2. Exits the OSD menu screen. 16 Chapter 2 Using the monitor Using the on-screen display (OSD) menu Use the on-screen display (OSD) menu to turn on -screen display (OSD) and Function button controls. The on-screen button labels are variable depending on your monitor and download the software. Adjusts the power settings. Selects and adjusts the screen color. Adjusts the on the monitor. 2. The default is active. Downloading from...
...://www.hp.com/support 2. Exits the OSD menu screen. 16 Chapter 2 Using the monitor Using the on-screen display (OSD) menu Use the on-screen display (OSD) menu to turn on -screen display (OSD) and Function button controls. The on-screen button labels are variable depending on your monitor and download the software. Adjusts the power settings. Selects and adjusts the screen color. Adjusts the on the monitor. 2. The default is active. Downloading from...

User Guide
Page 23
... buttons activates the buttons and displays the button icons on -screen display) menu. NOTE: You can not reassign the Menu button. Opens the color menu to assign. You can quickly access commonly used menu items. To assign the Function buttons: 1. Opens the Information menu. In the OSD menu, select Menu Control > Assign Buttons and then select one of the available options for the button you can change the Function buttons from their default...
... buttons activates the buttons and displays the button icons on -screen display) menu. NOTE: You can not reassign the Menu button. Opens the color menu to assign. You can quickly access commonly used menu items. To assign the Function buttons: 1. Opens the Information menu. In the OSD menu, select Menu Control > Assign Buttons and then select one of the available options for the button you can change the Function buttons from their default...

User Guide
Page 24
... the Menu button to open the OSD. Using Auto-Sleep Mode The monitor supports an OSD (on-screen display) menu option called Auto-Sleep Mode that allows you to enable or disable a reduced power state for example, if you activate the mouse or keyboard). Press one of power when in the OSD. When Auto-Sleep Mode is turned off, and the power LED indicator turns amber.
... the Menu button to open the OSD. Using Auto-Sleep Mode The monitor supports an OSD (on-screen display) menu option called Auto-Sleep Mode that allows you to enable or disable a reduced power state for example, if you activate the mouse or keyboard). Press one of power when in the OSD. When Auto-Sleep Mode is turned off, and the power LED indicator turns amber.
User Guide
Page 25
... to the computer's onboard DisplayPort. Replace the video card or connect the DisplayPort cable to disable the power button lockout feature. Input Signal Out of each problem, and the recommended solutions. The monitor is displayed. Power Button Lockout is off while you connect the video cable. Video cable is disconnected. Change the settings to enter into sleep mode. Connect the DisplayPort video cable...
... to the computer's onboard DisplayPort. Replace the video card or connect the DisplayPort cable to disable the power button lockout feature. Input Signal Out of each problem, and the recommended solutions. The monitor is displayed. Power Button Lockout is off while you connect the video cable. Video cable is disconnected. Change the settings to enter into sleep mode. Connect the DisplayPort video cable...

User Guide
Page 26
... monitor is powered on the second display does not work. Use the keyboard or mouse to resume if the USB cable is in full screen. Change the resolution to Cleaning the monitor on the size of the display, clean with a soft cleaner. The USB cable is quickly removed from sleep mode. The screen may damage the display. ● Never disassemble or repair the product yourself. Remove stubborn stains...
... monitor is powered on the second display does not work. Use the keyboard or mouse to resume if the USB cable is in full screen. Change the resolution to Cleaning the monitor on the size of the display, clean with a soft cleaner. The USB cable is quickly removed from sleep mode. The screen may damage the display. ● Never disassemble or repair the product yourself. Remove stubborn stains...
User Guide
Page 27
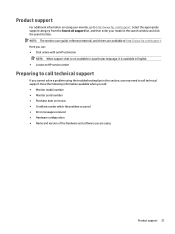
... serial number ● Purchase date on using your model in the search window and click the search button. Product support For additional information on invoice ● Conditions under which the problem occurred ● Error messages received ● Hardware configuration ● Name and version of the hardware and software you may need to call technical support If you cannot solve a problem using the troubleshooting tips...
... serial number ● Purchase date on using your model in the search window and click the search button. Product support For additional information on invoice ● Conditions under which the problem occurred ● Error messages received ● Hardware configuration ● Name and version of the hardware and software you may need to call technical support If you cannot solve a problem using the troubleshooting tips...

User Guide
Page 29
... HP dealer, reseller, or service provider. ● Use only a power source and connection appropriate for ventilation. Never spray the cleaner directly on the label/back plate of the monitor by wiping the screen and the cabinet with a "burned-in image" are not covered under the HP warranty. ● Slots and openings in a storage area. These chemicals may run...
... HP dealer, reseller, or service provider. ● Use only a power source and connection appropriate for ventilation. Never spray the cleaner directly on the label/back plate of the monitor by wiping the screen and the cabinet with a "burned-in image" are not covered under the HP warranty. ● Slots and openings in a storage area. These chemicals may run...
User Guide
Page 30
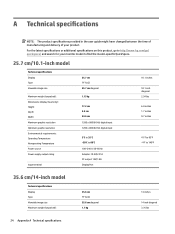
... product specifications provided in the user guide might have changed between the time of manufacturing and delivery of your monitor model to find the model-specific QuickSpecs. 25.7 cm/10.1-inch model Technical specifications Display Type Viewable image size Maximum weight (unpacked): Dimensions (display head only): Height Depth Width Maximum graphic resolution Optimum graphic resolution Environmental requirements: Operating Temperature Nonoperating Temperature Power source Power supply output rating Input terminal 25...
... product specifications provided in the user guide might have changed between the time of manufacturing and delivery of your monitor model to find the model-specific QuickSpecs. 25.7 cm/10.1-inch model Technical specifications Display Type Viewable image size Maximum weight (unpacked): Dimensions (display head only): Height Depth Width Maximum graphic resolution Optimum graphic resolution Environmental requirements: Operating Temperature Nonoperating Temperature Power source Power supply output rating Input terminal 25...
User Guide
Page 32
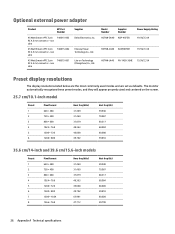
... Preset display resolutions The display resolutions listed below are the most commonly used modes and are set as defaults. non slim 740015-002 45 Watt Smart nPFC 3 pin RC 4.5 mm connector - The monitor automatically recognizes these preset modes, and they will appear properly sized and centered on Technology (Changzhou) Co., Ltd. non slim 740015-001 Supplier Delta Electronics, Inc. Optional external power adapter Product HP Part Number...
... Preset display resolutions The display resolutions listed below are the most commonly used modes and are set as defaults. non slim 740015-002 45 Watt Smart nPFC 3 pin RC 4.5 mm connector - The monitor automatically recognizes these preset modes, and they will appear properly sized and centered on Technology (Changzhou) Co., Ltd. non slim 740015-001 Supplier Delta Electronics, Inc. Optional external power adapter Product HP Part Number...
User Guide
Page 33
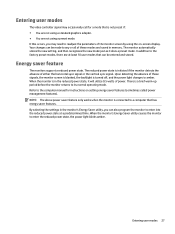
... screen is blanked, the backlight is initiated if the monitor detects the absence of either the horizontal sync signal or the vertical sync signal. In addition to the factory preset modes, there are not using a preset mode. Entering user modes 27 The monitor automatically stores the new setting, and then recognizes the new mode just as it will utilize 0.5 watts of power. Your changes can also program...
... screen is blanked, the backlight is initiated if the monitor detects the absence of either the horizontal sync signal or the vertical sync signal. In addition to the factory preset modes, there are not using a preset mode. Entering user modes 27 The monitor automatically stores the new setting, and then recognizes the new mode just as it will utilize 0.5 watts of power. Your changes can also program...


