HP L6010 Support and Manuals
Get Help and Manuals for this Hewlett-Packard item
Popular HP L6010 Manual Pages
L6010 Retail Monitor Dual Position Stand Low-Mount Instructions and HIgh-Mount Instructions - Page 1
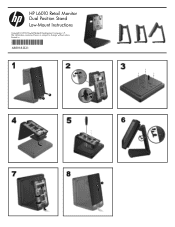
HP L6010 Retail Monitor Dual Position Stand Low-Mount Instructions
Copyright © 2012 Hewlett-Packard Development Company, L.P. The information contained herein is subject to change without notice. Printed in
*688918-B21*
688918-B21
L6010 Retail Monitor Dual Position Stand Low-Mount Instructions and HIgh-Mount Instructions - Page 2
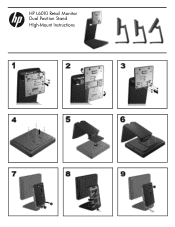
HP L6010 Retail Monitor Dual Position Stand HIgh-Mount Instructions
Setup Poster - Page 1

Printed in xxxxx
75mm VESA support
(dual position stand sold separately) First Edition May 2012 The information contained herein is subject to change without notice. HP L6010 Retail Monitor
Optimal Resolution: 1024 x 768 @ 60 Hz
1
2 VGA
DisplayPort
OR
3
4
5
DVI
OR
6
7
8
688915-B21
Copyright © 2012 Hewlett-Packard Development Company, L.P.
L6010 Retail Monitor User Guide - Page 5

... HP L6010 Retail Monitor ...1 Optional Accessories ...1
2 Setting Up the Monitor ...2 Identifying Rear Connectors ...2 Attaching an Optional Monitor Stand ...2 Attaching the Optional Monitor Stand in the Low-Mount Position 3 Attaching the Optional Monitor Stand in the High-Mount Position 7 Adjusting the Optional Monitor Stand 12 Mounting the Monitor ...12 Connecting the Cables ...12 Installing...
L6010 Retail Monitor User Guide - Page 7
... CD that includes driver software and product documentation ● Energy Star® qualified (for additional certifications and regulatory notices, refer to the HP LCD Monitors Reference Guide provided on the CD included with this product):
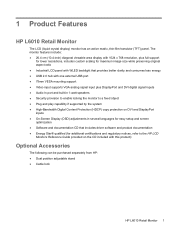
Optional Accessories
The following can be purchased separately from HP: ● Dual position adjustable stand ● Cable lock
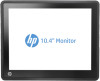
HP L6010 Retail Monitor 1
L6010 Retail Monitor User Guide - Page 8
...Connects external USB devices to the monitor.
6 USB Upstream
Connects a USB cable from HP (sold separately). Attaching an Optional Monitor Stand
The optional monitor stand is turned off to the 75mm VESA mounting holes on the rear panel.
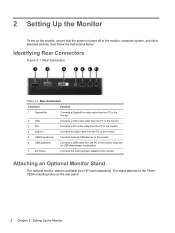
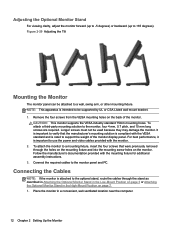
2 Chapter 2 Setting Up the Monitor The stand attaches to the monitor, computer system, and other attached devices, then follow the instructions below.
L6010 Retail Monitor User Guide - Page 9

... cover (1), then sliding the cover up (2) and pulling it off the stand (3). Attaching the Optional Monitor Stand in a low-mount or high-mount position. Figure 2-3 Removing the Rear Cover
Attaching an Optional Monitor Stand 3 Before attaching the stand, decide which position is shipped in the low-mount configuration. Figure 2-2 Monitor Stand Low-Mount and High-Mount Configurations
NOTE: The...
L6010 Retail Monitor User Guide - Page 12

... the Cables
6 Chapter 2 Setting Up the Monitor Route the cables through the upper cable access hole at the top of the stand, behind the cable security brackets, and out the cable access hole at the bottom of the stand. With the monitor in the upright position, reinsert the access plugs in the stand. NOTE: Refer to Connecting...
L6010 Retail Monitor User Guide - Page 16

Install the two Phillips mounting screws that secure the mounting bracket to the monitor. Figure 2-17 Removing the Rear Cover
10 Chapter 2 Setting Up the Monitor Figure 2-16 Securing the Mounting Bracket
7. Position the monitor and stand in the upright position, and then remove the stand rear cover by pressing on the two pressure points near the bottom of the...
L6010 Retail Monitor User Guide - Page 18
...1. CAUTION: This monitor supports the VESA industry standard 75mm mounting holes. It is rated to verify that were previously removed through the stand as described in Attaching the Optional Monitor Stand in the Low-Mount Position on the monitor.
Follow the manufacturer's documentation provided with the mounting fixture for additional assembly instructions. 3. To attach the monitor to the...
L6010 Retail Monitor User Guide - Page 24

... panel of the monitor display head.
18 Chapter 2 Setting Up the Monitor The rating labels are located on the monitor provide the spare part number, product number, and serial number. Installing a Cable Lock
You can secure the monitor to a fixed object with an optional cable lock available from HP. You may need these numbers when contacting HP about the monitor model.
L6010 Retail Monitor User Guide - Page 26
... the unlocked position.
If the OSD menu is inactive and the icons are located so that you switch the monitor off when it is off or the LED has been suppressed in the OSD
NOTE: To view an OSD menu simulator, visit the HP Customer Self Repair Services Media Library at http://www.hp.com/go...
L6010 Retail Monitor User Guide - Page 28
NOTE: The monitor user guide, reference guide, and drivers are available at http://www.hp.com/support for PC mode. For worldwide support, go /contactHP. Select your country or region, select Product Support & Troubleshooting, and then enter your monitor, go to http://www.hp.com/support. For U.S. Here you can : ● Chat online with an HP technician
NOTE: When support chat is not ...
L6010 Retail Monitor User Guide - Page 29
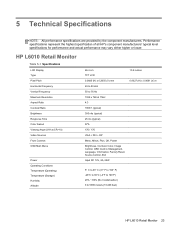
...° C (41° F to 104° F) -20°C to 60°C (-4°F to 140°F) 20% ~ 80% (No Condensation) 0 to 5000 meters (16,400 feet)
HP L6010 Retail Monitor 23 Performance specifications represent the highest specification of all HP's component manufacturers' typical level specifications for performance and actual performance may vary either higher or lower. 5 Technical...
L6010 Retail Monitor User Guide - Page 31

...not preset if: ● You are not using a standard graphics adapter. ● You are set as it does a preset mode. HP L6010 Retail Monitor
Table 5-2 Factory Preset Modes
Preset Pixel Format
1
640 × 480
2
720 × ...Entering User Modes
The video controller signal may need to any or all of the monitor screen by using a preset mode. If this occurs, you may occasionally call for...
HP L6010 Reviews
We have not received any reviews for HP yet.