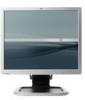
Specifications
Page 7
... are set forth in the United States and/or other countries. Windows Vista is subject to help protect the monitor against image retention, drastically lower power consumption and energy costs, and extend the lifespan of Microsoft Corporation in the express warranty statements accompanying such products and services. DA - 13124 Canada - QuickSpecs HP L1950g 19-inch LCD Monitor...
... are set forth in the United States and/or other countries. Windows Vista is subject to help protect the monitor against image retention, drastically lower power consumption and energy costs, and extend the lifespan of Microsoft Corporation in the express warranty statements accompanying such products and services. DA - 13124 Canada - QuickSpecs HP L1950g 19-inch LCD Monitor...
User Guide
Page 3
CAUTION: Text set off in this manner indicates that failure to equipment or loss of life. About This Guide This guide provides information on setting up the monitor, installing drivers, using the on-screen display menu, troubleshooting and technical specifications. Text set off in bodily harm or loss of information. WARNING! iii NOTE: Text set off in this manner indicates that failure to follow directions could result in damage to follow directions could result in this manner provides important supplemental information.
CAUTION: Text set off in this manner indicates that failure to equipment or loss of life. About This Guide This guide provides information on setting up the monitor, installing drivers, using the on-screen display menu, troubleshooting and technical specifications. Text set off in bodily harm or loss of information. WARNING! iii NOTE: Text set off in this manner indicates that failure to follow directions could result in damage to follow directions could result in this manner provides important supplemental information.
User Guide
Page 5
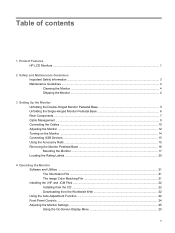
Table of contents 1 Product Features HP LCD Monitors ...1 2 Safety and Maintenance Guidelines Important Safety Information ...3 Maintenance Guidelines ...4 Cleaning the Monitor ...4 Shipping the Monitor ...4 3 Setting Up the Monitor Unfolding the Double-Hinged Monitor Pedestal Base 5 Unfolding the Single-Hinged Monitor Pedestal Base 6 Rear Components ...7 Cable Management ...9 Connecting the Cables ...10 Adjusting the Monitor ...12 Turning on the Monitor ...14 Connecting USB Devices ...15...
Table of contents 1 Product Features HP LCD Monitors ...1 2 Safety and Maintenance Guidelines Important Safety Information ...3 Maintenance Guidelines ...4 Cleaning the Monitor ...4 Shipping the Monitor ...4 3 Setting Up the Monitor Unfolding the Double-Hinged Monitor Pedestal Base 5 Unfolding the Single-Hinged Monitor Pedestal Base 6 Rear Components ...7 Cable Management ...9 Connecting the Cables ...10 Adjusting the Monitor ...12 Turning on the Monitor ...14 Connecting USB Devices ...15...
User Guide
Page 7
Avis Canadien ...54 European Union Regulatory Notice ...54 German Ergonomics Notice ...55 Japanese Notice ...55 Korean Notice ...55 Power Cord Set Requirements ...55 Japanese Power Cord Requirements 55 Product Environmental Notices ...56 Energy Star Compliance ...56 Materials Disposal ...56 Disposal of Waste Equipment by Users in Private Household in the European Union ...56 Chemical Substances ...57 Restriction of Hazardous Substances (RoHS 57 Appendix D LCD Monitor Quality and Pixel Policy vii
Avis Canadien ...54 European Union Regulatory Notice ...54 German Ergonomics Notice ...55 Japanese Notice ...55 Korean Notice ...55 Power Cord Set Requirements ...55 Japanese Power Cord Requirements 55 Product Environmental Notices ...56 Energy Star Compliance ...56 Materials Disposal ...56 Disposal of Waste Equipment by Users in Private Household in the European Union ...56 Chemical Substances ...57 Restriction of Hazardous Substances (RoHS 57 Appendix D LCD Monitor Quality and Pixel Policy vii
User Guide
Page 10
...to USB devices) ● USB cable provided to connect the monitor's USB hub to the USB connector on the computer ● Accessory rail on monitor to accept optional mounted devices, such as an HP speaker bar ● Plug and play capability if supported by ...On-Screen Display (OSD) adjustments in several languages for easy setup and screen optimization ● HP Display Assistant for adjusting monitor settings ● Software and documentation CD that includes software, monitor drivers, and product documentation ● Energy saver feature to meet requirements for reduced power consumption ...
...to USB devices) ● USB cable provided to connect the monitor's USB hub to the USB connector on the computer ● Accessory rail on monitor to accept optional mounted devices, such as an HP speaker bar ● Plug and play capability if supported by ...On-Screen Display (OSD) adjustments in several languages for easy setup and screen optimization ● HP Display Assistant for adjusting monitor settings ● Software and documentation CD that includes software, monitor drivers, and product documentation ● Energy saver feature to meet requirements for reduced power consumption ...
User Guide
Page 11
...guide is located on the documentation CD, if one may accidentally step on or trip over them so that is easily accessible at http://www.hp.com/ergo and/or on the Web at all times. • Disconnect power from the electrical outlet. Important Safety Information 3 For information ... reduce the risk of the monitor, as well as the computer, connect all power strips provide surge protection; CAUTION: For the protection of electric shock or damage to the Power Cord Set Requirements on the correct power cord set to use only a power source and connection appropriate for this ability....
...guide is located on the documentation CD, if one may accidentally step on or trip over them so that is easily accessible at http://www.hp.com/ergo and/or on the Web at all times. • Disconnect power from the electrical outlet. Important Safety Information 3 For information ... reduce the risk of the monitor, as well as the computer, connect all power strips provide surge protection; CAUTION: For the protection of electric shock or damage to the Power Cord Set Requirements on the correct power cord set to use only a power source and connection appropriate for this ability....

User Guide
Page 13
...Setting Up the Monitor To set up the monitor, ensure that the power is shipped with the display head facing up on a flat surface with the base attached in an upright position. 1. Lift the monitor from portrait to the monitor... the display head from its normal condition. Unfolding the Double-Hinged Monitor Pedestal Base NOTE: The monitor is turned off to landscape position (1). Figure 3-1 Pivoting the Display...on the monitor display head (3). 4. Unfolding the Double-Hinged Monitor Pedestal Base 5 To begin using the monitor, you must unfold the base and place the monitor in a ...
...Setting Up the Monitor To set up the monitor, ensure that the power is shipped with the display head facing up on a flat surface with the base attached in an upright position. 1. Lift the monitor from portrait to the monitor... the display head from its normal condition. Unfolding the Double-Hinged Monitor Pedestal Base NOTE: The monitor is turned off to landscape position (1). Figure 3-1 Pivoting the Display...on the monitor display head (3). 4. Unfolding the Double-Hinged Monitor Pedestal Base 5 To begin using the monitor, you must unfold the base and place the monitor in a ...
User Guide
Page 14
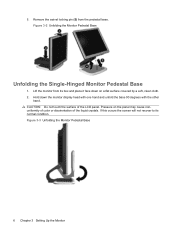
...crystals. Lift the monitor from the pedestal base. Figure 3-3 Unfolding the Monitor Pedestal Base 6 Chapter 3 Setting Up the Monitor Remove the swivel locking pin (5) from its normal condition. If this occurs the screen will not recover to its box and place it face down the monitor display head with one... hand and unfold the base 90 degrees with the other hand. Figure 3-2 Unfolding the Monitor Pedestal Base Unfolding the Single-Hinged Monitor Pedestal Base 1. Hold down on the panel may cause ...
...crystals. Lift the monitor from the pedestal base. Figure 3-3 Unfolding the Monitor Pedestal Base 6 Chapter 3 Setting Up the Monitor Remove the swivel locking pin (5) from its normal condition. If this occurs the screen will not recover to its box and place it face down the monitor display head with one... hand and unfold the base 90 degrees with the other hand. Figure 3-2 Unfolding the Monitor Pedestal Base Unfolding the Single-Hinged Monitor Pedestal Base 1. Hold down on the panel may cause ...

User Guide
Page 16
... (2) Connects optional USB devices to the monitor. Component 1 2 3 4 5 6 Function AC Power Connector Connects the AC power cord to the monitor (2 additional downstream USB connectors are on the left side of the monitor's front panel). 8 Chapter 3 Setting Up the Monitor Audio In (select models) Connects the audio cable to the monitor. VGA Connects the VGA cable to...
... (2) Connects optional USB devices to the monitor. Component 1 2 3 4 5 6 Function AC Power Connector Connects the AC power cord to the monitor (2 additional downstream USB connectors are on the left side of the monitor's front panel). 8 Chapter 3 Setting Up the Monitor Audio In (select models) Connects the audio cable to the monitor. VGA Connects the VGA cable to...

User Guide
Page 18
...have valid video signals. Connect the DVID signal cable to the DVI connector on the rear of the monitor and the other end to the computer using the audio cable. 10 Chapter 3 Setting Up the Monitor The inputs can be selected by the video cable used. NOTE: For models with both VGA and... DVI-D connectors, the monitor is determined by pressing the +/Input button on select models) to the DVI connector on...
...have valid video signals. Connect the DVID signal cable to the DVI connector on the rear of the monitor and the other end to the computer using the audio cable. 10 Chapter 3 Setting Up the Monitor The inputs can be selected by the video cable used. NOTE: For models with both VGA and... DVI-D connectors, the monitor is determined by pressing the +/Input button on select models) to the DVI connector on...

User Guide
Page 20
Figure 3-11 Tilting the Monitor 12 Chapter 3 Setting Up the Monitor Tilt the monitor's panel forward or backward to set it to an electrical wall outlet. 5. Figure 3-10 Connecting the Power Cable Adjusting the Monitor NOTE: Your monitor model may look different than the model in the following illustrations. 1. Connect one end of the power cable to the AC power connector on the back of the monitor, and the other end to a comfortable eye level.
Figure 3-11 Tilting the Monitor 12 Chapter 3 Setting Up the Monitor Tilt the monitor's panel forward or backward to set it to an electrical wall outlet. 5. Figure 3-10 Connecting the Power Cable Adjusting the Monitor NOTE: Your monitor model may look different than the model in the following illustrations. 1. Connect one end of the power cable to the AC power connector on the back of the monitor, and the other end to a comfortable eye level.
User Guide
Page 22
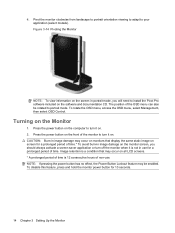
...software and documentation CD. NOTE: If pressing the power button has no effect, the Power Button Lockout feature may occur on monitors that may occur on all LCD screens. * A prolonged period of time is not in portrait mode, you should always activate a screen saver application or ...a condition that display the same static image on screen for 10 seconds. 14 Chapter 3 Setting Up the Monitor CAUTION: Burn-in image damage on . 2. The position of time. Pivot the monitor clockwise from landscape to portrait orientation viewing to adapt to install the Pivot Pro software included on...
...software and documentation CD. NOTE: If pressing the power button has no effect, the Power Button Lockout feature may occur on monitors that may occur on all LCD screens. * A prolonged period of time is not in portrait mode, you should always activate a screen saver application or ...a condition that display the same static image on screen for 10 seconds. 14 Chapter 3 Setting Up the Monitor CAUTION: Burn-in image damage on . 2. The position of time. Pivot the monitor clockwise from landscape to portrait orientation viewing to adapt to install the Pivot Pro software included on...

User Guide
Page 24
... it. 1. a. Figure 3-17 Removing the Double-Hinged Pedestal Base 16 Chapter 3 Setting Up the Monitor Disconnect and remove the signal and power cables from the pedestal base to install the panel on the back of the monitor. 2. Remove the screws on a wall, a swing arm, or other mounting fixture...On the double-hinged base, there are both disconnected. Removing the Monitor Pedestal Base You can remove the monitor panel from the back of the monitor that connect the monitor panel to disassemble the monitor, be sure the monitor is turned off and the power and signal cables are four screws...
... it. 1. a. Figure 3-17 Removing the Double-Hinged Pedestal Base 16 Chapter 3 Setting Up the Monitor Disconnect and remove the signal and power cables from the pedestal base to install the panel on the back of the monitor. 2. Remove the screws on a wall, a swing arm, or other mounting fixture...On the double-hinged base, there are both disconnected. Removing the Monitor Pedestal Base You can remove the monitor panel from the back of the monitor that connect the monitor panel to disassemble the monitor, be sure the monitor is turned off and the power and signal cables are four screws...

User Guide
Page 25
...best performance, it from the pedestal base. Removing the Monitor Pedestal Base 17 Longer screws should not be used because they may damage the monitor. Set the monitor panel down on page 16 steps in the previous section. To install the HP Quick Release: 1. Refer to use the power and... video cables provided with the VESA standard and is important to Removing the Monitor Pedestal Base on a flat,...
...best performance, it from the pedestal base. Removing the Monitor Pedestal Base 17 Longer screws should not be used because they may damage the monitor. Set the monitor panel down on page 16 steps in the previous section. To install the HP Quick Release: 1. Refer to use the power and... video cables provided with the VESA standard and is important to Removing the Monitor Pedestal Base on a flat,...
User Guide
Page 26
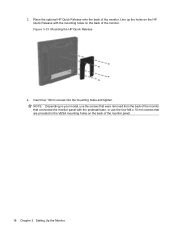
3. Insert four 10mm screws into the mounting holes and tighten. Figure 3-19 Mounting the HP Quick Release 4. Place the optional HP Quick Release onto the back of the monitor. Line up the holes on the HP Quick Release with the pedestal base, or use the screws that were removed from the back of the monitor that connected the monitor panel with the mounting holes on the back of the monitor panel. 18 Chapter 3 Setting Up the Monitor NOTE: Depending on your model, use the four M4 x 10 mm screws that are provided in the VESA mounting holes on the back of the monitor.
3. Insert four 10mm screws into the mounting holes and tighten. Figure 3-19 Mounting the HP Quick Release 4. Place the optional HP Quick Release onto the back of the monitor. Line up the holes on the HP Quick Release with the pedestal base, or use the screws that were removed from the back of the monitor that connected the monitor panel with the mounting holes on the back of the monitor panel. 18 Chapter 3 Setting Up the Monitor NOTE: Depending on your model, use the four M4 x 10 mm screws that are provided in the VESA mounting holes on the back of the monitor.

User Guide
Page 28
Figure 3-22 Locating the Rating Labels 20 Chapter 3 Setting Up the Monitor You may need these numbers when contacting HP about the monitor model. The rating labels are located on the monitor provide the spare part number, product number, and serial number. Locating the Rating Labels The rating labels on the rear panel of the monitor display head.
Figure 3-22 Locating the Rating Labels 20 Chapter 3 Setting Up the Monitor You may need these numbers when contacting HP about the monitor model. The rating labels are located on the monitor provide the spare part number, product number, and serial number. Locating the Rating Labels The rating labels on the rear panel of the monitor display head.

User Guide
Page 31
... exit the test pattern. Press the -/Auto button on page 25 in the disc drive. Using the Auto-Adjustment Function 23 Allow the monitor to Adjusting the Monitor Settings on the monitor front panel. ● You can also press the Menu button, then select Image Control from the OSD Main Menu. Insert the CD...
... exit the test pattern. Press the -/Auto button on page 25 in the disc drive. Using the Auto-Adjustment Function 23 Allow the monitor to Adjusting the Monitor Settings on the monitor front panel. ● You can also press the Menu button, then select Image Control from the OSD Main Menu. Insert the CD...

User Guide
Page 33
... menu or from the OSD Menu, use the + or - To select an item from the HP Display Assistant utility. Adjusting the Monitor Settings The monitor settings can be discarded and the settings will revert to previous settings and exit the menu. Using the On-Screen Display Menu Use the On-Screen Display (OSD) ...item using the + or - To navigate through the OSD Menu, press the + (Plus) button on the monitor's front panel to scroll up, or the - (Minus)/Auto button to save the setting, then select Exit from the Main Menu. After adjusting the function, select Save and Return, or Cancel if ...
... menu or from the OSD Menu, use the + or - To select an item from the HP Display Assistant utility. Adjusting the Monitor Settings The monitor settings can be discarded and the settings will revert to previous settings and exit the menu. Using the On-Screen Display Menu Use the On-Screen Display (OSD) ...item using the + or - To navigate through the OSD Menu, press the + (Plus) button on the monitor's front panel to scroll up, or the - (Minus)/Auto button to save the setting, then select Exit from the Main Menu. After adjusting the function, select Save and Return, or Cancel if ...
User Guide
Page 35
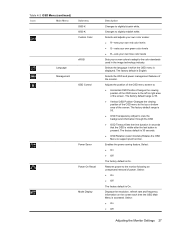
...Off The factory default is English. The factory default is On. The factory default is On. Select: ● On ● Off Adjusting the Monitor Settings 27 Select: ● On ● Off The factory default is 30 seconds. ● OSD Rotation (select models)-Rotates the OSD Menu to... view the background information through the OSD ● OSD Timeout-Sets the time duration in the image technology industry. Displays the resolution, refresh rate and frequency information on the screen each time the ...
...Off The factory default is English. The factory default is On. The factory default is On. Select: ● On ● Off Adjusting the Monitor Settings 27 Select: ● On ● Off The factory default is 30 seconds. ● OSD Rotation (select models)-Rotates the OSD Menu to... view the background information through the OSD ● OSD Timeout-Sets the time duration in the image technology industry. Displays the resolution, refresh rate and frequency information on the screen each time the ...
User Guide
Page 37
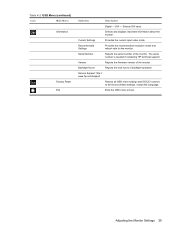
... Reports the serial number of the monitor. Service Support: http:// www.hp.com/support Returns all OSD menu settings and DDC/CI controls to the factory default settings, except the Language. Selects and displays important information about the monitor. Adjusting the Monitor Settings 29 DVI - Exits the OSD menu screen. Current Settings Provides the current input video mode...
... Reports the serial number of the monitor. Service Support: http:// www.hp.com/support Returns all OSD menu settings and DDC/CI controls to the factory default settings, except the Language. Selects and displays important information about the monitor. Adjusting the Monitor Settings 29 DVI - Exits the OSD menu screen. Current Settings Provides the current input video mode...


