HP W17e Support Question
HP W17e Support Question
Find answers below for this question about HP W17e - 17" LCD Monitor.Need a HP W17e manual? We have 16 online manuals for this item!
Question posted by thejoehodnik on September 7th, 2013
Monitor Goes Off About 10 Seconds After You Boot Up?
The person who posted this question about this HP product did not include a detailed explanation. Please use the "Request More Information" button to the right if more details would help you to answer this question.
Current Answers
Answer #1: Posted by DreadPirateRoberts on September 10th, 2013 8:30 AM
DreadPirateRoberts

Member since:
November 19th, 2010 Points: 8,633,403

Member since:
November 19th, 2010 Points: 8,633,403
HP and Compaq Desktop PCs - Monitor or TV is Blank after Starting the Computer This document pertains to HP and Compaq desktop computers. This document is about troubleshooting a video connection from a monitor (or a TV being used an a monitor) to a personal computer. If you have a computer that has the monitor built-in, such as a HP or Compaq All-in-One PC or HP TouchSmart PC , see Screen is Blank after Starting the Computer . This document will help you determine if the blank screen is being caused by the computer hardware, the video signal to the monitor, or the monitor itself. Before you begin Check the following items before using the steps in this document:
- Make sure the monitor has power and the power light comes on when the power button is pressed. If the light on the monitor remains off, the monitor is not receiving power from either the wall outlet or the power adapter.
- If you have a flat panel LCD monitor, unplug the monitor power cable, wait about 30 seconds, reconnect the cable and then turn on the monitor. This resets the electronics on the monitor.
- If the monitor has a detachable video cable, obtain a second monitor cable for testing purposes in case the cable is bad.
- Disconnect all connected devices except the mouse, keyboard, and monitor. This includes removing thumb drives and camera-type memory cards from card reader slots.
- If the computer is make a beeping sound when turned on, a card, cable, memory module, or processor inside the computer may have came loose. Go to Reseat loose internal components to check for loose components.
- Do you hear the computer's fans spinning? If you do not hear noise from the fans and the power lights on the computer are not on, the problem is related to the computer, not the monitor. To continue troubleshooting a computer that does not start, select your operating system below:
- If you can hear the computer's fan spin and see lights on the computer, the problem is probably caused by the video cable connection or the monitor. Continue to the next step.
- If the newly attached monitor does not display anything , disconnect the cable and continue at Step 3: Inspect the video cable and video connectors for damage
- If the newly attached monitor displays the first startup screen(s) but then goes black, there is a problem with Windows starting. Skip to Step 5: Change the display resolution .
- If the new monitor works , the original monitor or its cables are faulty. Do the following:
- Replace the monitor power cable.
- Turn on the monitor. If the monitor displays an image, you are done. If the monitor remains blank, continue using these steps.
- Replace the video cable. Turn on the monitor. If the monitor displays an image, you are done. If the monitor remains blank, continue using these steps.
- If the monitor does not work after replacing the cables, replace or service the monitor.
- Turn on the computer and repeatedly press the F10 key for eight seconds.
- Press the Down arrow three times.
- Press the Enter key two times.
- Restart the computer.
- Turn on the computer and repeatedly press one of the following keyboard keys. Press the key about once every second for 5 seconds after turning the computer on.
- For HP and Compaq computers that came with Windows 7 or Windows Vista, press F10 .
- For HP and Compaq computers that came with Windows XP, press F1 .
- For Compaq Presario desktop computers built prior to 2002, press F10 .
- Wait another 5 seconds.
- Press the F5 key. This restores the default settings of the BIOS.
- Press the Enter key. This accepts the changes.
- Press the F10 key. This saves the changes.
- Press the Enter key. This saves the changes and exits from the BIOS.
- The monitor should display the first screens received from the computer (the logo screens). If not, find and download the latest BIOS update if one is available for your computer.
- If a BIOS update was not available or the monitor is still blank, continue to the next step.
- Unplug all cables except for the power. Write down each cable location if you do not already know where it connects.
- With the power cable removed press the Power button on the front of the computer for 5 seconds.
- Remove the screw(s) that retain the panel or cover from the rear of the computer.
- Slide the side panel off from the rear of the computer.
- Gently press down on the outside edges of cards and memory modules that are inserted into the motherboard to better seat them. Do not press too hard
- Gently press down on the connectors of the flat ribbon cables to seat them.
- Replace the side panel and screw(s), reconnect the computer cables, and turn on the computer.
- If the monitor still displays a black screen, the video hardware may be faulty and needs to be replaced or serviced. If the monitor displays the first startup screen but does not display Windows, continue to the next step.
- Turn on the computer and press the F8 key repeatedly when the first startup screen appears.
- Increase the display resolution as follows.
- Windows 7 If you are using Windows 7 , select Enable low-resolution video (640 x480) , press Enter , and wait until Windows opens. Change the display resolution to match the default setting for the monitor. For help on how to adjust the display resolution, see Changing Display Settings, Background Image, and Screen Saver in Windows 7 .
- Windows Vista If you are using Windows Vista , select Enable low resolution video , press Enter , and wait until Windows opens. Change the display resolution to match the default setting for the monitor. For help on how to adjust the display resolution, see Changing Display Settings, Background Image, and Screen Saver in Windows Vista .
- Windows XP If you are using Windows XP , select Enable VGA Mode , press Enter , and wait until Windows opens. Change the display resolution to match the default setting for the monitor. For help on how to adjust the display resolution, see Changing Display Settings, Background Image, and Screen Saver in Windows 98, ME and XP .
- Windows 98 or ME If you are using Windows 98 or ME , select Safe Mode and perform the following steps to enter into a standard VGA mode:
- Once Windows opens to the desktop in Safe Mode, click Start , and Run .
- In the Open field type msconfig and press Enter . The MS Configuration Utility window appears.
- Click the Advanced button, and select VGA 640 x 480 x 16 if it is available.
- Click OK and restart the computer.
- After Windows opens, click Start , and Run .
- In the Open field type msconfig and press Enter .
- Click the Advanced button, and remove the checkmark next to VGA 640 x 480 x 16 .
- Click OK . DO NOT restart the computer. Change the display resolution to match the default setting for the monitor. For help on how to adjust the display resolution, see one of the following support documents:
- Turn on the computer and repeatedly press one of the following keyboard keys. Press the key about once every second for 5 seconds after turning the computer on.
- For HP and Compaq computers that came with Windows 7 and Vista, press F10 .
- For HP and Compaq computers that came with Windows XP, press F1 .
- For Compaq Presario desktop computers built prior to 2002, press F10 .
- In the Setup screen, press the Right Arrow key and select Power .
- Press the Down Arrow key to select and configure one of the following items depending on what appears on your screen:
- Power Savings , APM , or Advanced Power Management - select Disabled and press the F10 key to save the settings and Exit.
- APIC Interrupt Routing - If the computer is using Windows XP and this setting is disabled, select Enabled and press F10 to save the settings and exit. Let Windows restart and set your power preferences from within Windows. If Windows still does not appear or you are unable to use the power options in Windows, find and download the latest BIOS update if one is available for your computer. Reset the APIC Interrupt back to its previous setting if problems occur.
- Turn on the computer and repeatedly press F10 . Press the key about once every second for 5 seconds after turning the computer on.
- In the BIOS Setup utility, press the Right Arrow key and select the Power tab.
- Press the Down Arrow key to select Hardware Power Management .
- Press the Right Arrow key to disable SATA Power Management .
- Press F10 to save the settings and exit.
- Remove all memory cards, USB flash drives, and CDs/DVDs from the computer, turn off the computer, and then open the computer case. NOTE: If you need product model specific graphics and instructions for opening the computer, search for a support article that pertains to your computer. Enter the computer's model number into the Product field at the top of this page and search for opening the case .
- Locate the video card.
- Disconnect any cables connected to the card and remove the video card. NOTE: Removing the video card can be difficult. If you need more information about replacing the card, do one of the following:If your computer has Windows XP or earlier, see the HP support document Installing or Replacing a Video Card .If your computer came with Windows 7 or Vista, enter the computer's model number into the Product field at the top of this page and search for Removing and Installing an Expansion Card .
- Install the new video card and connect the cables to the card.
- Plug in the power cable and turn on the computer. CAUTION: Keep any items away from the internal area of the computer to avoid damaging the computer.
Related HP W17e Manual Pages
HP Flat Panel Monitors - (English) Users Guide 322638 002 - Page 24

...the On-Screen Display
There are two On-Screen Display menus available;
User's Guide
4-5 buttons on the monitor's front panel. one for basic adjustments, and one for 10 seconds while displaying a menu, new adjustments will be discarded and the settings will revert to select that function.... OSD Menu, use the + or - To select an item from the Basic OSD Menu.
Operating the Monitor
4.
HP Flat Panel Monitors - (English) Users Guide 322638 002 - Page 28

Press the Menu button on the monitor front panel to Sleep-
For 17" monitors, set the timer: 1. If the OSD is locked, the warning message "OSD Lock" displays for five seconds. ❏ If the OSD is locked, press and hold the Menu button
for
10 seconds to lock the OSD. Indicates the screen display is unlocked, press...
HP Pavilion Desktop PCs - (English) F1503 and F1703 LCD Monitor Users Guide - Page 20
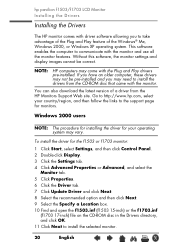
.... 9 Select the Specify a Location box. 10 Find and open the f1503.inf (f1503 15-inch) or the f1703.inf
(f1703 17-inch) file on the CD-ROM disc in the Drivers directory, and click OK. 11 Click Next to communicate with the monitor. hp pavilion f1503/f1703 LCD Monitor Installing the Drivers
Installing the Drivers...
HP Pavilion Desktop PCs - (English) F1503 and F1703 LCD Monitor Users Guide - Page 21
...LCD Monitor Installing the Drivers
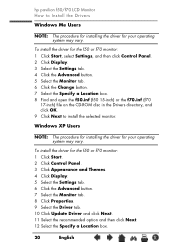
Windows Me users
NOTE: The procedure for installing the driver for the f1503 or f1703 monitor...Advanced button. 7 Select the Monitor tab. 8 Click Properties. 9 Select the Driver tab. 10 Click Update Driver and click ...Monitor tab. 6 Click the Change button. 7 Select the Specify a Location box. 8 Find and open the f1503.inf (f1503 15-inch) or the f1703.inf
(f1703 17...
HP Pavilion Desktop PCs - (English) F1503 and F1703 LCD Monitor Users Guide - Page 42

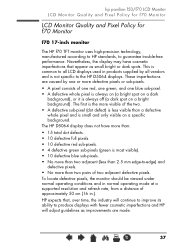
...; 10 defective blue sub-pixels. • No more than two adjacent (less than 2.5 mm edge-to-edge)
defective pixels. • No more than a defective whole pixel and is common to the HP f1703 displays. hp pavilion f1503/f1703 LCD Monitor LCD Monitor Quality and Pixel Policy for f1703 Monitor
LCD Monitor Quality and Pixel Policy for f1703 Monitor
f1703 17...
HP Pavilion Desktop PCs - (English) F1503 and F1703 LCD Monitor Users Guide - Page 43

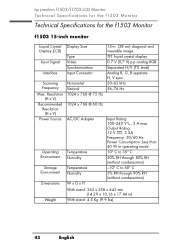
hp pavilion f1503/f1703 LCD Monitor Technical Specifications for the f1503 Monitor
Technical Specifications for the f1503 Monitor
f1503 15-inch monitor
Liquid Crystal Display (LCD)
Display Size Type
15-in...Frequency: 50/60 Hz Power Consumption: Less than 40 W in operating mode 10° C to 35° C 20% RH through 80% RH (without condensation) -10° C to 60° C 5% RH through 90% RH (...
HP Pavilion Desktop PCs - (English) F1503 and F1703 LCD Monitor Users Guide - Page 45

... (without condensation)
Weight
With standard stand: 404 x 274 x 482 mm (15.91 x 10.79 x 18.98 in.)
With standard stand: 7 Kg (15.43 lbs)
45
English
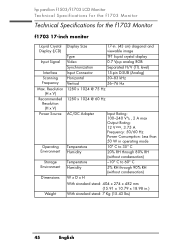
X hp pavilion f1503/f1703 LCD Monitor Technical Specifications for the f1703 Monitor
Technical Specifications for the f1703 Monitor
f1703 17-inch monitor
Liquid Crystal Display (LCD)
Input Signal
Interface Scanning Frequency Max.
HP Pavilion f1503/f1703 15-inch/17-inch LCD Monitor User's Guide - Page 21

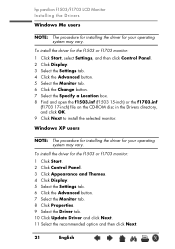
.... 5 Select the Settings tab. 6 Click the Advanced button. 7 Select the Monitor tab. 8 Click Properties. 9 Select the Driver tab. 10 Click Update Driver and click Next. 11 Select the recommended option and then click ...inf
(f1703 17-inch) file on the CD-ROM disc in the Drivers directory, and click OK. 9 Click Next to install the selected monitor.
hp pavilion f1503/f1703 LCD Monitor Installing the ...
HP Pavilion f1503/f1703 15-inch/17-inch LCD Monitor User's Guide - Page 43
hp pavilion f1503/f1703 LCD Monitor Technical Specifications for the f1503 Monitor
Technical Specifications for the f1503 Monitor
f1503 15-inch monitor
Liquid Crystal Display (LCD)
Display Size Type
15-in...Frequency: 50/60 Hz Power Consumption: Less than 40 W in operating mode 10° C to 35° C 20% RH through 80% RH (without condensation) -10° C to 60° C 5% RH through 90% RH (...
HP Pavilion f1503/f1703 15-inch/17-inch LCD Monitor User's Guide - Page 45
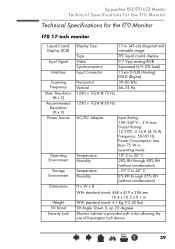
hp pavilion f1503/f1703 LCD Monitor Technical Specifications for the f1703 Monitor
Technical Specifications for the f1703 Monitor
f1703 17-inch monitor
Liquid Crystal Display (LCD)
Input Signal
Interface Scanning Frequency Max. Resolution
(H x V) Recommended
Resolution (H x V)
Power Source
Operating Environment
Storage Environment
Dimensions
Display Size
17-in. (43 cm) diagonal and viewable ...
HP Pavilion F50, F70 LCD Monitor - (English) User Guide - Page 20
...f50/f70 LCD Monitor How to install the selected monitor. To install the driver for the f50 or f70 monitor: 1 Click...Monitor tab. 6 Click the Change button. 7 Select the Specify a Location box. 8 Find and open the f50.inf (f50 15-inch) or the f70.inf (f70
17... Click the Advanced button. 7 Select the Monitor tab. 8 Click Properties. 9 Select the Driver tab. 10 Click Update Driver and click Next. 11 ...
HP Pavilion F50, F70 LCD Monitor - (English) User Guide - Page 37
...and is most visible). • 10 defective blue sub-pixels. • No more than:
• 15 total dot defects. • 10 defective full pixels. • 10 defective red sub-pixels. •...hp pavilion f50/f70 LCD Monitor LCD Monitor Quality and Pixel Policy for f70 Monitor
LCD Monitor Quality and Pixel Policy for f70 Monitor
f70 17-inch monitor
The HP f70 TFT monitor uses high-precision ...
HP Pavilion F50, F70 LCD Monitor - (English) User Guide - Page 39
...: less than 75 W in operating mode
10° C to 35° C
20% RH through 80% RH (without condensation)
-10° C to 60° C
8%...Monitor cabinet is provided with a slot allowing the use of Kensington lock device
X
39 hp pavilion f50/f70 LCD Monitor Technical Specifications for the f70 Monitor
Technical Specifications for the f70 Monitor
f70 17-inch monitor
Liquid Crystal Display (LCD...
HP Pavilion F50, F70 LCD Monitor - (English) User Guide - Page 43
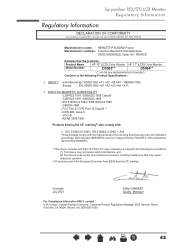
...rules. FRANCE
Declares that the products :
Product Name
HP 15" (LCD) Color Monitor HP 17" (LCD) Color Monitor
Model Number
D5063**
D5064**
(* can be any interference received, ...CISPR24:1997 / EN55024:1998 - ICES-003, Issue 3 - hp pavilion f50/f70 LCD Monitor Regulatory Information
Regulatory Information
DECLARATION OF CONFORMITY
According to the following Directives and carry the CE...
User Guide - HP L156v 15" and L176v 17" LCD Monitors - Page 1
User Guide
HP L156v 15" and L176v 17" LCD Monitors
Document Part Number: 432558-001
July 2006
This guide provides information on setting up the monitor, installing drivers, using the on-screen display menu, troubleshooting and technical specifications.
User Guide - HP L156v 15" and L176v 17" LCD Monitors - Page 2
... technical or editorial errors or omissions contained herein. HP shall not be construed as constituting an additional warranty. User Guide HP L156v 15" and L176v 17" LCD Monitors First Edition (July 2006) Document Part Number: 432558-001
and other countries. This document contains proprietary information that is subject to change without the prior...
User's Guide - HP vs15, vs17, vs19, f1705, f1905 LCD Monitor - Page 5
...
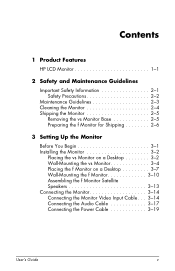
Before You Begin 3-1 Installing the Monitor 3-2
Placing the vs Monitor on a Desktop 3-2 Wall Mounting the vs Monitor 3-4 Placing the f Monitor on a Desktop 3-7 Wall Mounting the f Monitor 3-10 Assembling the f Monitor Satellite Speakers . . 3-13 Connecting the Monitor 3-14 Connecting the Monitor Video Input Cable. . . 3-14 Connecting the Audio Cable 3-17 Connecting the Power Cable 3-19...
User's Guide - HP vs15, vs17, vs19, f1705, f1905 LCD Monitor - Page 54
...:
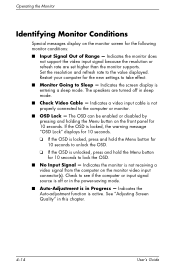
■ Input Signal Out of Range - Check to Sleep - Indicates the Auto-adjustment function is entering a sleep mode. Restart your computer for 10 seconds. The speakers are set higher than the monitor supports. Indicates a video input cable is in this chapter.
4-14
User's Guide See "Adjusting Screen Quality" in Progress - The OSD can...
User's Guide HP vs17, vs19, f1905 LCD Monitors - Page 5
...
Before You Begin 3-1 Installing the Monitor 3-2
Placing the vs Monitor on a Desktop 3-2 Wall-Mounting the vs Monitor 3-4 Placing the f Monitor on a Desktop 3-7 Wall-Mounting the f Monitor 3-10 Assembling the f Monitor Satellite Speakers 3-13 Connecting the Monitor 3-14 Connecting the Monitor Video Input Cable. . . 3-14 Connecting the Audio Cable 3-17 Connecting the Power Cable 3-19...
User's Guide HP vs17, vs19, f1905 LCD Monitors - Page 54
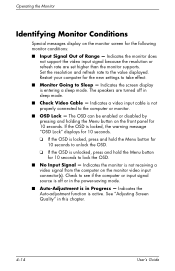
... a video input cable is active. If the OSD is locked, the warning message "OSD Lock" displays for 10 seconds.
❏ If the OSD is locked, press and hold the Menu button for the following monitor conditions:
■ Input Signal Out of Range - Indicates the Auto-adjustment function is not properly connected to the...
Similar Questions

I This Monitor Have Speaker Available?
(Posted by sulfikarali369 2 years ago)

Suddenly The Display Becomes Washed Out And Fully Faded Of My Hp W17e Monitor..
morning it was ok.. but at afternoon i turnon my computer.. the monitor suddenly displayed fully was...
morning it was ok.. but at afternoon i turnon my computer.. the monitor suddenly displayed fully was...
(Posted by rajdeeppaul2009 12 years ago)

Monitor Shutdown Work Only 10 Second After It Look Like Off
monitor work only 10 second after it look like off the model is HP rk283aa
monitor work only 10 second after it look like off the model is HP rk283aa
(Posted by mirkom4 12 years ago)

Monitor Goes Black While In Use But The Green Light Stays On.
Hi, My FB5315 monitor goes black when turn on. It stays on only about 3 seconds and goes black agai...
Hi, My FB5315 monitor goes black when turn on. It stays on only about 3 seconds and goes black agai...
(Posted by floettai 13 years ago)

When I Turn On The Monitor, It Briefly Reads 'vga No Signal' And Turns Off.
(Posted by patm 13 years ago)