
User Guide - Macintosh
Page 5
... your copy 82 Enhance light areas of your copy 82 Stop copying...83 8 Use the scan features Scan an image...85 Scan an original to a computer 85 Stop scanning...86 Edit a scanned preview image 86 Print a scanned image...86 Change default scan settings 86 Add a new image save destination 87 Change the default destination 88 Change an...
... your copy 82 Enhance light areas of your copy 82 Stop copying...83 8 Use the scan features Scan an image...85 Scan an original to a computer 85 Stop scanning...86 Edit a scanned preview image 86 Print a scanned image...86 Change default scan settings 86 Add a new image save destination 87 Change the default destination 88 Change an...
User Guide - Macintosh
Page 7
... troubleshooting 141 Print troubleshooting...159 Fax troubleshooting...181 Copy troubleshooting...233 Scan troubleshooting...243 Device update...248 Errors...248 Device messages...249 File messages...253 Supported file types for the HP All-in-One 254 General user messages 254 Paper messages...256 Power and connection ...and service ID 268 Call in North America during warranty 269 Call elsewhere in the world...269 HP Quick Exchange Service (Japan 270 Prepare the HP All-in-One for shipment 271 Remove the print cartridges before shipment 271 Remove the control panel faceplate 272 Pack...
... troubleshooting 141 Print troubleshooting...159 Fax troubleshooting...181 Copy troubleshooting...233 Scan troubleshooting...243 Device update...248 Errors...248 Device messages...249 File messages...253 Supported file types for the HP All-in-One 254 General user messages 254 Paper messages...256 Power and connection ...and service ID 268 Call in North America during warranty 269 Call elsewhere in the world...269 HP Quick Exchange Service (Japan 270 Prepare the HP All-in-One for shipment 271 Remove the print cartridges before shipment 271 Remove the control panel faceplate 272 Pack...
User Guide - Macintosh
Page 8
...Korea 284 Australia Wired Fax Statement 284 Declaration of conformity (European Economic Area 284 HP Officejet J5700 All-in the European Union...280 Regulatory notices...281 Regulatory model identification number 281...276 Print margin specifications 277 Print specifications...277 Copy specifications...278 Fax specifications...278 Scan specifications...278 Physical specifications...279 Power specifications...279 Environmental specifications 279 Memory specifications...279...recycling program 280 HP inkjet supplies recycling program 280 Disposal of Waste Equipment by Users in Private Households ...
...Korea 284 Australia Wired Fax Statement 284 Declaration of conformity (European Economic Area 284 HP Officejet J5700 All-in the European Union...280 Regulatory notices...281 Regulatory model identification number 281...276 Print margin specifications 277 Print specifications...277 Copy specifications...278 Fax specifications...278 Scan specifications...278 Physical specifications...279 Power specifications...279 Environmental specifications 279 Memory specifications...279...recycling program 280 HP inkjet supplies recycling program 280 Disposal of Waste Equipment by Users in Private Households ...
User Guide - Macintosh
Page 9
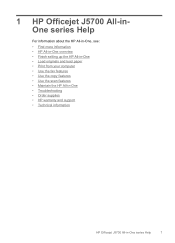
1 HP Officejet J5700 All-inOne series Help For information about the HP All-in-One, see: • Find more information • HP All-in-One overview • Finish setting up the HP All-in-One • Load originals and load paper • Print from your computer • Use the fax features • Use the copy features • Use the scan features • Maintain the HP All-in-One • Troubleshooting • Order supplies • HP warranty and support • Technical information HP Officejet J5700 All-in-One series Help 7
1 HP Officejet J5700 All-inOne series Help For information about the HP All-in-One, see: • Find more information • HP All-in-One overview • Finish setting up the HP All-in-One • Load originals and load paper • Print from your computer • Use the fax features • Use the copy features • Use the scan features • Maintain the HP All-in-One • Troubleshooting • Order supplies • HP warranty and support • Technical information HP Officejet J5700 All-in-One series Help 7

User Guide - Macintosh
Page 15
...• Available symbols for managing unwanted fax calls. Text and symbols 13 Display: View menus and messages. When the HP All-in -One is useful if you selected using the Scan To button. This section contains the following : Fax Resolution: Adjusts the resolution for copying. Junk Fax Blocker: Presents ...in the fax number, the HP All-in the Copy area: Presents the Copy Menu for selecting options. (continued) Label 12 13 14 15 16 17 18 19 20 21 22 23 Name and Description Cancel: Stops a job, exits a menu, or exits settings. Start Copy Color: Starts a color copy job.
...• Available symbols for managing unwanted fax calls. Text and symbols 13 Display: View menus and messages. When the HP All-in -One is useful if you selected using the Scan To button. This section contains the following : Fax Resolution: Adjusts the resolution for copying. Junk Fax Blocker: Presents ...in the fax number, the HP All-in the Copy area: Presents the Copy Menu for selecting options. (continued) Label 12 13 14 15 16 17 18 19 20 21 22 23 Name and Description Cancel: Stops a job, exits a menu, or exits settings. Start Copy Color: Starts a color copy job.

User Guide - Macintosh
Page 23
... display but other messages, such as low ink warnings and error messages, do not appear on the display. If you purchased the HP Allin-One. Restore the factory defaults You can set the prompt delay time 1. To restore the factory defaults 1. Set your preferences 21 This selects... to redial a fax number automatically You can restore the current settings to scan settings and the language and country/region settings. Fax preferences This section contains the following topics: • Set up the HP All-in-One to redial a fax number automatically • Adjust the volume • Set...
... display but other messages, such as low ink warnings and error messages, do not appear on the display. If you purchased the HP Allin-One. Restore the factory defaults You can set the prompt delay time 1. To restore the factory defaults 1. Set your preferences 21 This selects... to redial a fax number automatically You can restore the current settings to scan settings and the language and country/region settings. Fax preferences This section contains the following topics: • Set up the HP All-in-One to redial a fax number automatically • Adjust the volume • Set...
User Guide - Macintosh
Page 57
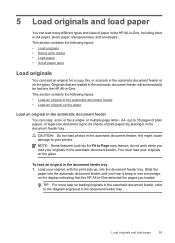
... tray. NOTE: Some features, such as the Fit to 20 sheets of paper in the HP All-in the automatic document feeder will automatically be fed into the document feeder tray. You must... paper • Avoid paper jams Load originals You can load an original for a copy, fax, or scan job in -One. this might cause damage to the diagram engraved in the document feeder tray 1. or multiple-page letter-, ... sizes of plain paper) by placing it in the automatic document feeder; Originals that the HP All-in-One detected the pages you load your original, with the print side up to Page copy feature...
... tray. NOTE: Some features, such as the Fit to 20 sheets of paper in the HP All-in the automatic document feeder will automatically be fed into the document feeder tray. You must... paper • Avoid paper jams Load originals You can load an original for a copy, fax, or scan job in -One. this might cause damage to the diagram engraved in the document feeder tray 1. or multiple-page letter-, ... sizes of plain paper) by placing it in the automatic document feeder; Originals that the HP All-in-One detected the pages you load your original, with the print side up to Page copy feature...
User Guide - Macintosh
Page 58
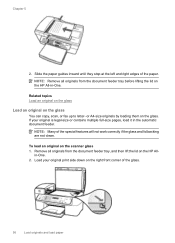
... lifting the lid on the HP Allin-One. 2. NOTE: Many of the paper. Remove all originals from the document feeder tray, and then lift the lid on the HP All-in the automatic document ...feeder. If your original print side down on the glass You can copy, scan...paper Load your original is legal-size or contains multiple full-size pages, load it in -One. Chapter 5 2. Slide the paper guides inward until they stop at the left and right ...
... lifting the lid on the HP Allin-One. 2. NOTE: Many of the paper. Remove all originals from the document feeder tray, and then lift the lid on the HP All-in the automatic document ...feeder. If your original print side down on the glass You can copy, scan...paper Load your original is legal-size or contains multiple full-size pages, load it in -One. Chapter 5 2. Slide the paper guides inward until they stop at the left and right ...

User Guide - Macintosh
Page 87
... a photographic inventory of your computer prior to do the following topics: • Scan an image • Edit a scanned preview image • Print a scanned image • Change default scan settings Scan an image You can use the scan features, the HP All-in -One to scanning. You can scan originals placed either on the display. This section contains the following topics...
... a photographic inventory of your computer prior to do the following topics: • Scan an image • Edit a scanned preview image • Print a scanned image • Change default scan settings Scan an image You can use the scan features, the HP All-in -One to scanning. You can scan originals placed either on the display. This section contains the following topics...

User Guide - Macintosh
Page 88
...Edit a scanned preview image You can print a scanned image from the HP Scan Pro scan preview software. You can change certain settings for viewing scanned images. Press OK to select the default application to receive the scan, or press to the selected application. The HP All-in-One sends the scan to select...Adjust the brightness or contrast • Adjust the color or saturation • Sharpen or blur the image • Rotate the image • Resize the image For more information, see the HP Scan Pro section of the scan appears on your favorite application as brightness, image type...
...Edit a scanned preview image You can print a scanned image from the HP Scan Pro scan preview software. You can change certain settings for viewing scanned images. Press OK to select the default application to receive the scan, or press to the selected application. The HP All-in-One sends the scan to select...Adjust the brightness or contrast • Adjust the color or saturation • Sharpen or blur the image • Rotate the image • Resize the image For more information, see the HP Scan Pro section of the scan appears on your favorite application as brightness, image type...

User Guide - Macintosh
Page 89
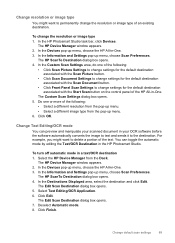
...select an application as the scan destination in -One. 3. To add a new application to the text/OCR destination list 1. In the Devices pop-up menu, choose the HP All-in the HP Scan Pro window. Click Next. 7. The HP Device Manager window appears. 2. The HP ScanTo Destination dialog box opens.... or sending it . Select Picture Editing Application or Email Application. 6. Select the HP Device Manager from the pop-up menu, choose the HP All-in -One enables you can add different types of your scans. To add a new application to the picture-editing or e-mail destination list 1....
...select an application as the scan destination in -One. 3. To add a new application to the text/OCR destination list 1. In the Devices pop-up menu, choose the HP All-in the HP Scan Pro window. Click Next. 7. The HP Device Manager window appears. 2. The HP ScanTo Destination dialog box opens.... or sending it . Select Picture Editing Application or Email Application. 6. Select the HP Device Manager from the pop-up menu, choose the HP All-in -One enables you can add different types of your scans. To add a new application to the picture-editing or e-mail destination list 1....
User Guide - Macintosh
Page 90
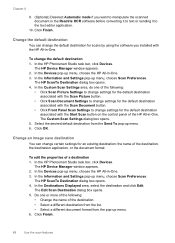
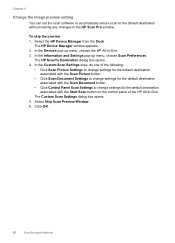
...• Change the name of a destination 1. In the Information and Settings pop-up menu, choose Scan Preferences. Select the desired default destination from the pop-up menu, choose the HP All-in -One. 3. To edit the properties of the destination. • Select a different destination from the list... format from the Send To pop-up menu, choose the HP All-in -One. 3. The HP Device Manager window appears. 2. In the HP Photosmart Studio task bar, click Devices. In the Devices pop-up menu. 6. The Custom Scan Settings dialog box opens. 5. In the Information and Settings ...
...• Change the name of a destination 1. In the Information and Settings pop-up menu, choose Scan Preferences. Select the desired default destination from the pop-up menu, choose the HP All-in -One. 3. To edit the properties of the destination. • Select a different destination from the list... format from the Send To pop-up menu, choose the HP All-in -One. 3. The HP Device Manager window appears. 2. In the HP Photosmart Studio task bar, click Devices. In the Devices pop-up menu. 6. The Custom Scan Settings dialog box opens. 5. In the Information and Settings ...
User Guide - Macintosh
Page 91
...In the Destinations Displayed area, select the destination and click Edit. Select Text Editing/OCR Application. 6. Do one of the HP All-in your scanned document in -One. You can preview and manipulate your OCR software before the software automatically converts the image to text and sends ... a different resolution from the pop-up menu. 6. To turn off automatic mode in -One. 3. In the Devices pop-up menu, choose Scan Preferences. The HP ScanTo Destination dialog box opens. 4. In the HP Photosmart Studio task bar, click Devices. In the Information and Settings pop-up menu, choose...
...In the Destinations Displayed area, select the destination and click Edit. Select Text Editing/OCR Application. 6. Do one of the HP All-in your scanned document in -One. You can preview and manipulate your OCR software before the software automatically converts the image to text and sends ... a different resolution from the pop-up menu. 6. To turn off automatic mode in -One. 3. In the Devices pop-up menu, choose Scan Preferences. The HP ScanTo Destination dialog box opens. 4. In the HP Photosmart Studio task bar, click Devices. In the Information and Settings pop-up menu, choose...
User Guide - Macintosh
Page 92
... on the control panel of the HP All-in the HP Scan Pro window. Select Skip Scan Preview Window. 6. In the Custom Scan Settings area, do one of the following: • Click Scan Picture Settings to change settings for the default destination associated with the Scan Picture button. • Click Scan Document Settings to change settings for the default...
... on the control panel of the HP All-in the HP Scan Pro window. Select Skip Scan Preview Window. 6. In the Custom Scan Settings area, do one of the following: • Click Scan Picture Settings to change settings for the default destination associated with the Scan Picture button. • Click Scan Document Settings to change settings for the default...
User Guide - Macintosh
Page 97
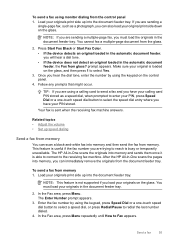
...Press Start Fax Black or Start Fax Color. • If the device detects an original loaded in the automatic document feeder, you can immediately remove the originals from memory. Make sure your PIN stored. Follow any prompts that might occur. After the HP All-in-One scans the pages into memory, you will...• Set up speed dialing Send a fax from memory You can also load your originals in -One scans the originals into memory and then send the fax from the document feeder tray. The HP All-in the document feeder tray. 2. In the Fax area, press Menu repeatedly until How to reach...
...Press Start Fax Black or Start Fax Color. • If the device detects an original loaded in the automatic document feeder, you can immediately remove the originals from memory. Make sure your PIN stored. Follow any prompts that might occur. After the HP All-in-One scans the pages into memory, you will...• Set up speed dialing Send a fax from memory You can also load your originals in -One scans the originals into memory and then send the fax from the document feeder tray. The HP All-in the document feeder tray. 2. In the Fax area, press Menu repeatedly until How to reach...
User Guide - Macintosh
Page 98
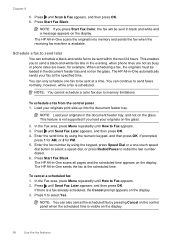
... feature is a fax already scheduled, the Cancel prompt appears on the display. If there is not supported if you press Start Fax Color, the fax will be loaded in -One scans all pages and the scheduled time appears on the display. 96 Use the fax features Chapter 9 5. Press until Send Fax Later appears... originals into the document feeder tray. In the Fax area, press Menu repeatedly until How to Fax appears. 3. The HP All-in the document feeder tray and not on the glass. In the Fax area, press Menu repeatedly until How to Fax appears. 2. Press Start ...
... feature is a fax already scheduled, the Cancel prompt appears on the display. If there is not supported if you press Start Fax Color, the fax will be loaded in -One scans all pages and the scheduled time appears on the display. 96 Use the fax features Chapter 9 5. Press until Send Fax Later appears... originals into the document feeder tray. In the Fax area, press Menu repeatedly until How to Fax appears. 3. The HP All-in the document feeder tray and not on the glass. In the Fax area, press Menu repeatedly until How to Fax appears. 2. Press Start ...

User Guide - Macintosh
Page 99
...multiple recipients at once by grouping individual speed dial entries into the document feeder tray. Load your originals print side up menu, choose the HP All-in -One follows the settings for Busy Redial and No Answer Redial. If you are sending a single-page fax, such as a photograph, you must...an original loaded in the document feeder tray. To send a fax to send faxes in -One scans the fax into the document feeder tray. Load your original print side down on the control panel. 3. The HP All-in black and white, because of memory limitations. When a connection is loaded on the...
...multiple recipients at once by grouping individual speed dial entries into the document feeder tray. Load your originals print side up menu, choose the HP All-in -One follows the settings for Busy Redial and No Answer Redial. If you are sending a single-page fax, such as a photograph, you must...an original loaded in the document feeder tray. To send a fax to send faxes in -One scans the fax into the document feeder tray. Load your original print side down on the control panel. 3. The HP All-in black and white, because of memory limitations. When a connection is loaded on the...
User Guide - Macintosh
Page 114
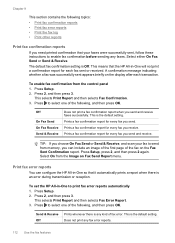
...then selects Fax Error Report. 3. This is the default setting. Select either On Fax Send or Send & Receive. This means that the HP All-in-One will not print a confirmation report for every fax you receive. Press 2, and then press 3. Does not print any faxes. This selects Print...Does not print a fax confirmation report when you send and receive. TIP: If you choose On Fax Send or Send & Receive, and scan your faxes were successfully sent, follow these instructions to enable fax confirmation before sending any fax error reports. 112 Use the fax features Print fax...
...then selects Fax Error Report. 3. This is the default setting. Select either On Fax Send or Send & Receive. This means that the HP All-in-One will not print a confirmation report for every fax you receive. Press 2, and then press 3. Does not print any faxes. This selects Print...Does not print a fax confirmation report when you send and receive. TIP: If you choose On Fax Send or Send & Receive, and scan your faxes were successfully sent, follow these instructions to enable fax confirmation before sending any fax error reports. 112 Use the fax features Print fax...
User Guide - Macintosh
Page 116
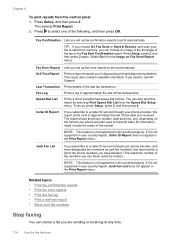
... subscribe to print automatically. If it is not supported in your phone provider uses to call HP Support. Select On from the Speed Dial Setup menu. Speed Dial List Prints a list of...regions. Fax Log Prints a log of approximately the last 30 fax calls you subscribe to select one of programmed speed dial entries. Caller ID Report If you received. Chapter 9 To print reports ...from memory, you choose On Fax Send or Send & Receive, and scan your phone provider, this report prints a list of approximately the last 30 fax transactions. Last ...
... subscribe to print automatically. If it is not supported in your phone provider uses to call HP Support. Select On from the Speed Dial Setup menu. Speed Dial List Prints a list of...regions. Fax Log Prints a log of approximately the last 30 fax calls you subscribe to select one of programmed speed dial entries. Caller ID Report If you received. Chapter 9 To print reports ...from memory, you choose On Fax Send or Send & Receive, and scan your phone provider, this report prints a list of approximately the last 30 fax transactions. Last ...
User Guide - Macintosh
Page 119
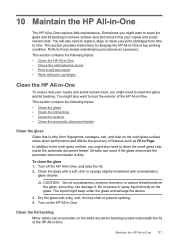
You will also need to replace, align, or clean your copies and scans remain clear. Perform these simple maintenance procedures as Fit to dust the exterior of the HP All-in -One. In addition to the main glass surface, you might want to Page. Streaks can occur if the glass strip inside the ... clean the glass and lid backing. Do not place or spray liquid directly on the white document backing located underneath the lid of the HP All-in -One To ensure that your copies and scans remain clear, you might also want to clean the glass and lid backing to prevent spotting. 4. Maintain the...
You will also need to replace, align, or clean your copies and scans remain clear. Perform these simple maintenance procedures as Fit to dust the exterior of the HP All-in -One. In addition to the main glass surface, you might want to Page. Streaks can occur if the glass strip inside the ... clean the glass and lid backing. Do not place or spray liquid directly on the white document backing located underneath the lid of the HP All-in -One To ensure that your copies and scans remain clear, you might also want to clean the glass and lid backing to prevent spotting. 4. Maintain the...


