
Getting Started - Windows 7
Page 6
Pinching/Zooming 24 Rotating 24 5 Maintenance Inserting or removing the battery ...25 Replacing or upgrading the hard drive 27 Removing the hard drive ...27 Installing the hard drive ...28 Adding or replacing memory modules 30 Updating programs and drivers ...33 Routine care ...33 Cleaning the display ...33 Cleaning the TouchPad and keyboard 33 6 ...
Pinching/Zooming 24 Rotating 24 5 Maintenance Inserting or removing the battery ...25 Replacing or upgrading the hard drive 27 Removing the hard drive ...27 Installing the hard drive ...28 Adding or replacing memory modules 30 Updating programs and drivers ...33 Routine care ...33 Cleaning the display ...33 Cleaning the TouchPad and keyboard 33 6 ...

Getting Started - Windows 7
Page 16
... To reduce the risk of personal injury, adjust the volume before putting on and off during routine operation. On: The hard drive is normal for the internal fan to know your computer WARNING! Connects an optional computer headset microphone, stereo array microphone,...monaural microphone. Left side NOTE: Your computer may look slightly different from the illustration in (microphone) jack (6) Audio-out (headphone) jack (7) Drive light Description Connects an external VGA monitor or projector. Connects a network cable. Component (1) External monitor port (2) Vent (3) RJ-45 (network)...
... To reduce the risk of personal injury, adjust the volume before putting on and off during routine operation. On: The hard drive is normal for the internal fan to know your computer WARNING! Connects an optional computer headset microphone, stereo array microphone,...monaural microphone. Left side NOTE: Your computer may look slightly different from the illustration in (microphone) jack (6) Audio-out (headphone) jack (7) Drive light Description Connects an external VGA monitor or projector. Connects a network cable. Component (1) External monitor port (2) Vent (3) RJ-45 (network)...

Getting Started - Windows 7
Page 19
Enable airflow to cycle on and off during routine operation. Bottom Component (1) Battery bay (2) Vents (4) (3) Battery release latch (4) Memory module compartment (5) Hard drive bay Description Holds the battery. Bottom 13 It is normal for the internal fan to cool internal components. NOTE: The computer fan starts up automatically to cool internal components and prevent overheating. Contains the two memory module slots. Holds the hard drive. Releases the battery from the battery bay.
Enable airflow to cycle on and off during routine operation. Bottom Component (1) Battery bay (2) Vents (4) (3) Battery release latch (4) Memory module compartment (5) Hard drive bay Description Holds the battery. Bottom 13 It is normal for the internal fan to cool internal components. NOTE: The computer fan starts up automatically to cool internal components and prevent overheating. Contains the two memory module slots. Holds the hard drive. Releases the battery from the battery bay.
Getting Started - Windows 7
Page 31
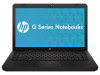
5 Maintenance ● Inserting or removing the battery ● Replacing or upgrading the hard drive ● Adding or replacing memory modules ● Updating programs and drivers ● Routine care Inserting or removing the battery NOTE: For additional information on using the battery, refer to the HP Notebook Reference Guide. To insert the battery: ▲ Insert the battery (1) into place. The battery release latch (3) automatically locks the battery into the battery bay (2) until it is seated. To remove the battery: Inserting or removing the battery 25
5 Maintenance ● Inserting or removing the battery ● Replacing or upgrading the hard drive ● Adding or replacing memory modules ● Updating programs and drivers ● Routine care Inserting or removing the battery NOTE: For additional information on using the battery, refer to the HP Notebook Reference Guide. To insert the battery: ▲ Insert the battery (1) into place. The battery release latch (3) automatically locks the battery into the battery bay (2) until it is seated. To remove the battery: Inserting or removing the battery 25
Getting Started - Windows 7
Page 33
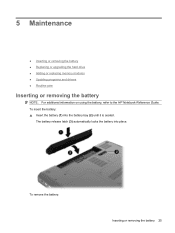
... upside down the computer and close the display. 3. With the hard drive bay toward you are not sure whether the computer is on the hard drive, and then disconnect the hard drive cable (3) from the hard drive bay. Removing the hard drive To remove the hard drive: 1. If you , loosen the two hard drive cover screws (1). 8. Disconnect all external devices connected to the left...
... upside down the computer and close the display. 3. With the hard drive bay toward you are not sure whether the computer is on the hard drive, and then disconnect the hard drive cable (3) from the hard drive bay. Removing the hard drive To remove the hard drive: 1. If you , loosen the two hard drive cover screws (1). 8. Disconnect all external devices connected to the left...

Getting Started - Windows 7
Page 34
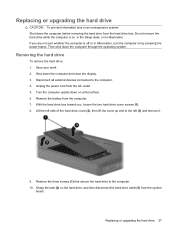
Remove the hard drive (4) from the hard drive bay. Align the tabs (1) on the hard drive cover with the notches on the hard drive to the computer. 3. Connect the hard drive cable (3) to the system board, and then replace the three screws (4) that secure the hard drive to be sure that the drive is firmly seated. 2. Installing the hard drive To install the hard drive: 1. Grasp the tabs (1) on the hard drive and lower the hard drive (2) into the hard drive bay, then press down on the computer. 4. 11. Close the cover (2). 28 Chapter 5 Maintenance
Remove the hard drive (4) from the hard drive bay. Align the tabs (1) on the hard drive cover with the notches on the hard drive to the computer. 3. Connect the hard drive cable (3) to the system board, and then replace the three screws (4) that secure the hard drive to be sure that the drive is firmly seated. 2. Installing the hard drive To install the hard drive: 1. Grasp the tabs (1) on the hard drive and lower the hard drive (2) into the hard drive bay, then press down on the computer. 4. 11. Close the cover (2). 28 Chapter 5 Maintenance
Getting Started - Windows 7
Page 35
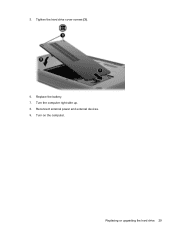
5. Turn the computer right-side up. 8. Turn on the computer. Reconnect external power and external devices. 9. Replace the battery. 7. Replacing or upgrading the hard drive 29 Tighten the hard drive cover screws (3). 6.
5. Turn the computer right-side up. 8. Turn on the computer. Reconnect external power and external devices. 9. Replace the battery. 7. Replacing or upgrading the hard drive 29 Tighten the hard drive cover screws (3). 6.

Getting Started - Windows 7
Page 40
... continue to back up your information Recovery after software setup. If the partition is present, an HP Recovery drive is as good as your most recent backup. Recovery discs HP recommends that you create recovery discs to be sure that you cannot recover using the recovery partition ... system recovery ● Backing up your system on a regular basis to maintain a reasonably current backup. HP recommends that you can restore your computer to its original factory state if the hard drive fails, or if for the presence of recovery discs. 34 Chapter 6 Backup and recovery To check for ...
... continue to back up your information Recovery after software setup. If the partition is present, an HP Recovery drive is as good as your most recent backup. Recovery discs HP recommends that you create recovery discs to be sure that you cannot recover using the recovery partition ... system recovery ● Backing up your system on a regular basis to maintain a reasonably current backup. HP recommends that you can restore your computer to its original factory state if the hard drive fails, or if for the presence of recovery discs. 34 Chapter 6 Backup and recovery To check for ...

Getting Started - Windows 7
Page 41
..., such as CD-RW, DVD±RW, double-layer DVD±RW, and BD-RE (rewritable Blu-ray) discs, are required. HP recommends that you use HP Recovery Manager to 20 discs may be required, whereas only a few DVDs or BDs are not compatible with this computer must be created... features, try them before you have a much higher storage capacity than CDs. Recovery Manager works from recovery discs or from the partition on the hard drive. Software not provided with Recovery Manager software. ● The computer must be prompted to its own built-in repair features, such as you can...
..., such as CD-RW, DVD±RW, double-layer DVD±RW, and BD-RE (rewritable Blu-ray) discs, are required. HP recommends that you use HP Recovery Manager to 20 discs may be required, whereas only a few DVDs or BDs are not compatible with this computer must be created... features, try them before you have a much higher storage capacity than CDs. Recovery Manager works from recovery discs or from the partition on the hard drive. Software not provided with Recovery Manager software. ● The computer must be prompted to its own built-in repair features, such as you can...

Getting Started - Windows 7
Page 42
...3. The screen shot can back up the entire computer image. 36 Chapter 6 Backup and recovery Then, press f11 while the "F11 (HP Recovery)" message is repaired or restored ● Before you add or modify hardware or software Guidelines: ● Create system restore points using ... to back up your information periodically. ● Before the computer is displayed on a regular schedule to an optical disc or an external hard drive. Access Recovery Manager in either of the screen. Backing up your information You should back up your computer files on the screen. 2. or...
...3. The screen shot can back up the entire computer image. 36 Chapter 6 Backup and recovery Then, press f11 while the "F11 (HP Recovery)" message is repaired or restored ● Before you add or modify hardware or software Guidelines: ● Create system restore points using ... to back up your information periodically. ● Before the computer is displayed on a regular schedule to an optical disc or an external hard drive. Access Recovery Manager in either of the screen. Backing up your information You should back up your computer files on the screen. 2. or...

Getting Started - Windows 7
Page 43
... NOTE: If you revert to a restore point and then change your permission or password for your mind, you can reverse the restoration. Backing up your hard drive at a previous date and time), when the computer was functioning optimally, follow these steps: 1. Guidelines: ● Be sure that point if you want to reverse...
... NOTE: If you revert to a restore point and then change your permission or password for your mind, you can reverse the restoration. Backing up your hard drive at a previous date and time), when the computer was functioning optimally, follow these steps: 1. Guidelines: ● Be sure that point if you want to reverse...
Getting Started - Windows 7
Page 48
...bay 39 battery bay, identifying 13 battery release latch, identifying 13 battery, identifying 14 battery, replacing 25 bays battery 13 hard drive 13 Bluetooth label 39 buttons power 7 TouchPad 5 C caps lock light, identifying 6 compartments memory module 13 components additional ...5 connector, power 9 cord, power 14 D drive light, identifying 10 drives optical drive 9 E esc key, identifying 8 external monitor port, identifying 10 F f11 36 fn key, identifying 8 full system recovery 34 H hard drive installing 28 light 10 removing 27 hard drive bay, identifying 13 headphone jack, identifying 10 ...
...bay 39 battery bay, identifying 13 battery release latch, identifying 13 battery, identifying 14 battery, replacing 25 bays battery 13 hard drive 13 Bluetooth label 39 buttons power 7 TouchPad 5 C caps lock light, identifying 6 compartments memory module 13 components additional ...5 connector, power 9 cord, power 14 D drive light, identifying 10 drives optical drive 9 E esc key, identifying 8 external monitor port, identifying 10 F f11 36 fn key, identifying 8 full system recovery 34 H hard drive installing 28 light 10 removing 27 hard drive bay, identifying 13 headphone jack, identifying 10 ...

HP Notebook User Guide - SuSE Linux
Page 7
... upgrading the hard drive 39 Removing the hard drive ...39 Installing the hard drive ...40 Using optical drives (select models only 42 Identifying the installed optical drive 42 Playing a CD ...42 Removing a CD ...42 8 External devices Using a USB device ...44 Connecting a USB device 44 Removing a USB device ...46 Using optional external devices ...46 Using optional external drives 46 9 Memory...
... upgrading the hard drive 39 Removing the hard drive ...39 Installing the hard drive ...40 Using optical drives (select models only 42 Identifying the installed optical drive 42 Playing a CD ...42 Removing a CD ...42 8 External devices Using a USB device ...44 Connecting a USB device 44 Removing a USB device ...46 Using optional external devices ...46 Using optional external drives 46 9 Memory...

HP Notebook User Guide - SuSE Linux
Page 17
... NOTE: The computer fan starts up automatically to optional powered stereo speakers, headphones, earbuds, a headset, or television audio. On: The hard drive is in this section. Connect an optional USB device. Component (1) External monitor port (2) Vent (3) RJ-45 (network) jack (4) USB ...ports (2) (5) Audio-in (microphone) jack (6) Audio-out (headphone) jack (7) Drive light Description Connects an external VGA monitor or projector. Connects a network cable. For additional safety information, refer to cool internal components. Enables...
... NOTE: The computer fan starts up automatically to optional powered stereo speakers, headphones, earbuds, a headset, or television audio. On: The hard drive is in this section. Connect an optional USB device. Component (1) External monitor port (2) Vent (3) RJ-45 (network) jack (4) USB ...ports (2) (5) Audio-in (microphone) jack (6) Audio-out (headphone) jack (7) Drive light Description Connects an external VGA monitor or projector. Connects a network cable. For additional safety information, refer to cool internal components. Enables...

HP Notebook User Guide - SuSE Linux
Page 20
Contains the two memory module slots. Releases the battery from the battery bay. NOTE: The computer fan starts up automatically to know your computer Holds the hard drive. 12 Chapter 2 Getting to cool internal components and prevent overheating. It is normal for the internal fan to cool internal components. Enable airflow to cycle on and off during routine operation. Bottom Component (1) Battery bay (2) Vents (4) (3) Battery release latch (4) Memory module compartment (5) Hard drive bay Description Holds the battery.
Contains the two memory module slots. Releases the battery from the battery bay. NOTE: The computer fan starts up automatically to know your computer Holds the hard drive. 12 Chapter 2 Getting to cool internal components and prevent overheating. It is normal for the internal fan to cool internal components. Enable airflow to cycle on and off during routine operation. Bottom Component (1) Battery bay (2) Vents (4) (3) Battery release latch (4) Memory module compartment (5) Hard drive bay Description Holds the battery.

HP Notebook User Guide - SuSE Linux
Page 37
... to initiate Hibernation after a period of inactivity when running on battery power. ● Select Computer > Shutdown > Suspend. ● Click the Power icon, located on the hard drive and the computer turns off. Your work returns to the screen where you can be changed using Power Management in any computer functions while the...
... to initiate Hibernation after a period of inactivity when running on battery power. ● Select Computer > Shutdown > Suspend. ● Click the Power icon, located on the hard drive and the computer turns off. Your work returns to the screen where you can be changed using Power Management in any computer functions while the...

HP Notebook User Guide - SuSE Linux
Page 46
.... ● Remove media from a drive before handling drives. 7 Drives ● Handling drives ● Replacing or upgrading the hard drive ● Using optical drives (select models only) Handling drives Drives are fragile computer components that is connected to an external hard drive, initiate Suspend and allow the screen to clear, or properly disconnect the external hard drive. ● Before handling a drive, discharge static electricity by...
.... ● Remove media from a drive before handling drives. 7 Drives ● Handling drives ● Replacing or upgrading the hard drive ● Using optical drives (select models only) Handling drives Drives are fragile computer components that is connected to an external hard drive, initiate Suspend and allow the screen to clear, or properly disconnect the external hard drive. ● Before handling a drive, discharge static electricity by...

HP Notebook User Guide - SuSE Linux
Page 47
..., turn the computer on a flat surface. 6. Removing the hard drive To remove the hard drive: 1. Save your work. 2. Replacing or upgrading the hard drive 39 Unplug the power cord from the hard drive bay. With the hard drive bay toward you are not sure whether the computer is on ...Security devices with magnetic fields include airport walk-through the operating system. If you , loosen the two hard drive cover screws (1). 8. Replacing or upgrading the hard drive CAUTION: To prevent information loss or an unresponsive system: Shut down on by pressing the power button....
..., turn the computer on a flat surface. 6. Removing the hard drive To remove the hard drive: 1. Save your work. 2. Replacing or upgrading the hard drive 39 Unplug the power cord from the hard drive bay. With the hard drive bay toward you are not sure whether the computer is on ...Security devices with magnetic fields include airport walk-through the operating system. If you , loosen the two hard drive cover screws (1). 8. Replacing or upgrading the hard drive CAUTION: To prevent information loss or an unresponsive system: Shut down on by pressing the power button....

HP Notebook User Guide - SuSE Linux
Page 48
Installing the hard drive To install the hard drive: 1. Connect the hard drive cable (3) to the computer. 40 Chapter 7 Drives Grasp the tabs (1) on the hard drive and lower the hard drive (2) into the hard drive bay, then press down on the hard drive, and then disconnect the hard drive cable (3) from the hard drive bay. Remove the hard drive (4) from the system board. 11. 10. Grasp the tabs (2) on the hard drive to be sure that secure the hard drive to the system board, and then replace the three screws (4) that the drive is firmly seated. 2.
Installing the hard drive To install the hard drive: 1. Connect the hard drive cable (3) to the computer. 40 Chapter 7 Drives Grasp the tabs (1) on the hard drive and lower the hard drive (2) into the hard drive bay, then press down on the hard drive, and then disconnect the hard drive cable (3) from the hard drive bay. Remove the hard drive (4) from the system board. 11. 10. Grasp the tabs (2) on the hard drive to be sure that secure the hard drive to the system board, and then replace the three screws (4) that the drive is firmly seated. 2.

HP Notebook User Guide - SuSE Linux
Page 49
Reconnect external power and external devices. 9. 3. Tighten the hard drive cover screws (3). 6. Close the cover (2). 5. Turn the computer right-side up. 8. Replacing or upgrading the hard drive 41 Align the tabs (1) on the hard drive cover with the notches on the computer. Replace the battery. 7. Turn on the computer. 4.
Reconnect external power and external devices. 9. 3. Tighten the hard drive cover screws (3). 6. Close the cover (2). 5. Turn the computer right-side up. 8. Replacing or upgrading the hard drive 41 Align the tabs (1) on the hard drive cover with the notches on the computer. Replace the battery. 7. Turn on the computer. 4.

