
Getting Started - Windows 7
Page 6
... or removing the battery ...25 Replacing or upgrading the hard drive 27 Removing the hard drive ...27 Installing the hard drive ...28 Adding or replacing memory modules 30 Updating programs and drivers ...33 Routine care ...33 Cleaning the display ...33 Cleaning the TouchPad and keyboard 33 6 Backup and recovery Recovery discs...
... or removing the battery ...25 Replacing or upgrading the hard drive 27 Removing the hard drive ...27 Installing the hard drive ...28 Adding or replacing memory modules 30 Updating programs and drivers ...33 Routine care ...33 Cleaning the display ...33 Cleaning the TouchPad and keyboard 33 6 Backup and recovery Recovery discs...

Getting Started - Windows 7
Page 19
Contains the two memory module slots. Enable airflow to cool internal components and prevent overheating. Releases the battery from the battery bay. Bottom Component (1) Battery bay (2) Vents (4) (3) Battery release latch (4) Memory module compartment (5) Hard drive bay Description Holds the battery. Bottom 13 Holds the hard drive. NOTE: The computer fan starts up automatically to cool internal components. It is normal for the internal fan to cycle on and off during routine operation.
Contains the two memory module slots. Enable airflow to cool internal components and prevent overheating. Releases the battery from the battery bay. Bottom Component (1) Battery bay (2) Vents (4) (3) Battery release latch (4) Memory module compartment (5) Hard drive bay Description Holds the battery. Bottom 13 Holds the hard drive. NOTE: The computer fan starts up automatically to cool internal components. It is normal for the internal fan to cycle on and off during routine operation.
Getting Started - Windows 7
Page 31
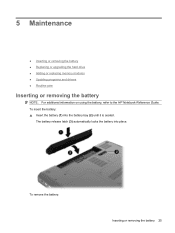
To remove the battery: Inserting or removing the battery 25 The battery release latch (3) automatically locks the battery into the battery bay (2) until it is seated. To insert the battery: ▲ Insert the battery (1) into place. 5 Maintenance ● Inserting or removing the battery ● Replacing or upgrading the hard drive ● Adding or replacing memory modules ● Updating programs and drivers ● Routine care Inserting or removing the battery NOTE: For additional information on using the battery, refer to the HP Notebook Reference Guide.
To remove the battery: Inserting or removing the battery 25 The battery release latch (3) automatically locks the battery into the battery bay (2) until it is seated. To insert the battery: ▲ Insert the battery (1) into place. 5 Maintenance ● Inserting or removing the battery ● Replacing or upgrading the hard drive ● Adding or replacing memory modules ● Updating programs and drivers ● Routine care Inserting or removing the battery NOTE: For additional information on using the battery, refer to the HP Notebook Reference Guide.
Getting Started - Windows 7
Page 36
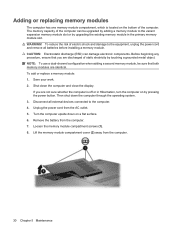
...from the computer. 30 Chapter 5 Maintenance WARNING! To reduce the risk of the computer. To add or replace a memory module: 1. Save your work. 2. Loosen the memory module compartment screws (1). 8. Shut down the computer through the operating system. 3. Turn the computer upside down on the... of the computer can damage electronic components. Then shut down the computer and close the display. The memory capacity of static electricity by upgrading the existing memory module in Hibernation, turn the computer on by pressing the power button. If you are identical. CAUTION...
...from the computer. 30 Chapter 5 Maintenance WARNING! To reduce the risk of the computer. To add or replace a memory module: 1. Save your work. 2. Loosen the memory module compartment screws (1). 8. Shut down the computer through the operating system. 3. Turn the computer upside down on the... of the computer can damage electronic components. Then shut down the computer and close the display. The memory capacity of static electricity by upgrading the existing memory module in Hibernation, turn the computer on by pressing the power button. If you are identical. CAUTION...

Getting Started - Windows 7
Page 37
... compartment, press the module (2) into the memory module slot until it in the memory module slot. If you are replacing a memory module, remove the existing memory module: a. With the memory module at a 45-degree angle from the surface of the memory module. Adding or replacing memory modules 31 The memory module tilts up. CAUTION: To prevent damage to...
... compartment, press the module (2) into the memory module slot until it in the memory module slot. If you are replacing a memory module, remove the existing memory module: a. With the memory module at a 45-degree angle from the surface of the memory module. Adding or replacing memory modules 31 The memory module tilts up. CAUTION: To prevent damage to...
Getting Started - Windows 7
Page 38
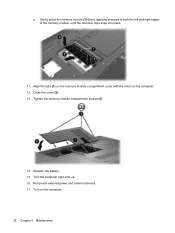
Align the tabs (1) on the memory module compartment cover with the notch on the computer. 32 Chapter 5 Maintenance Tighten the memory module compartment screws (3). 14. Turn the computer right-side up. 16. Reconnect external power and external devices. 17. c. Close the cover (2). 13. Gently press the memory module (3) down, applying pressure to both the left and right edges of the memory module, until the retention clips snap into place. 11. Replace the battery. 15. Turn on the computer. 12.
Align the tabs (1) on the memory module compartment cover with the notch on the computer. 32 Chapter 5 Maintenance Tighten the memory module compartment screws (3). 14. Turn the computer right-side up. 16. Reconnect external power and external devices. 17. c. Close the cover (2). 13. Gently press the memory module (3) down, applying pressure to both the left and right edges of the memory module, until the retention clips snap into place. 11. Replace the battery. 15. Turn on the computer. 12.
Getting Started - Windows 7
Page 48
...battery, identifying 14 battery, replacing 25 bays battery 13 hard drive 13 Bluetooth label 39 buttons power 7 TouchPad 5 C caps lock light, identifying 6 compartments memory module 13 components additional hardware 14 bottom 13 display 11 left-side 10 right-side 9 top 5 connector, power 9 cord, power 14 D drive light, ... 39 WLAN 39 latch, battery release 13 lights caps lock 6 drive light 10 optical drive 9 power 6, 9 TouchPad 5 webcam 11 wireless 6 M memory module inserting 31 removing 31 replacing 30 memory module compartment identifying 13 removing cover 30 replacing cover 32 42 Index
...battery, identifying 14 battery, replacing 25 bays battery 13 hard drive 13 Bluetooth label 39 buttons power 7 TouchPad 5 C caps lock light, identifying 6 compartments memory module 13 components additional hardware 14 bottom 13 display 11 left-side 10 right-side 9 top 5 connector, power 9 cord, power 14 D drive light, ... 39 WLAN 39 latch, battery release 13 lights caps lock 6 drive light 10 optical drive 9 power 6, 9 TouchPad 5 webcam 11 wireless 6 M memory module inserting 31 removing 31 replacing 30 memory module compartment identifying 13 removing cover 30 replacing cover 32 42 Index

Getting Started - Windows 7
Page 49
...-45 (network) jack, identifying 10 rotating TouchPad gesture 24 S scrolling TouchPad gesture 23 security cable slot, identifying 9 serial number 39 setup of WLAN 17 slots memory module 13 security cable 9 speakers, identifying 7 supported discs 35 system failure or instability 34 system recovery 35 system restore points 34, 37 T TouchPad buttons 5 identifying...
...-45 (network) jack, identifying 10 rotating TouchPad gesture 24 S scrolling TouchPad gesture 23 security cable slot, identifying 9 serial number 39 setup of WLAN 17 slots memory module 13 security cable 9 speakers, identifying 7 supported discs 35 system failure or instability 34 system recovery 35 system restore points 34, 37 T TouchPad buttons 5 identifying...

HP Notebook User Guide - SuSE Linux
Page 7
... ...42 8 External devices Using a USB device ...44 Connecting a USB device 44 Removing a USB device ...46 Using optional external devices ...46 Using optional external drives 46 9 Memory modules 10 Security Protecting the computer ...51 Using passwords ...51 Setting passwords in the operating system 52 11 Backup and Recovery Performing a system recovery ...54...
... ...42 8 External devices Using a USB device ...44 Connecting a USB device 44 Removing a USB device ...46 Using optional external devices ...46 Using optional external drives 46 9 Memory modules 10 Security Protecting the computer ...51 Using passwords ...51 Setting passwords in the operating system 52 11 Backup and Recovery Performing a system recovery ...54...

HP Notebook User Guide - SuSE Linux
Page 20
Contains the two memory module slots. Enable airflow to cool internal components and prevent overheating. Releases the battery from the battery bay. Bottom Component (1) Battery bay (2) Vents (4) (3) Battery release latch (4) Memory module compartment (5) Hard drive bay Description Holds the battery. NOTE: The computer fan starts up automatically to cool internal components. Holds the hard drive. 12 Chapter 2 Getting to cycle on and off during routine operation. It is normal for the internal fan to know your computer
Contains the two memory module slots. Enable airflow to cool internal components and prevent overheating. Releases the battery from the battery bay. Bottom Component (1) Battery bay (2) Vents (4) (3) Battery release latch (4) Memory module compartment (5) Hard drive bay Description Holds the battery. NOTE: The computer fan starts up automatically to cool internal components. Holds the hard drive. 12 Chapter 2 Getting to cycle on and off during routine operation. It is normal for the internal fan to know your computer

HP Notebook User Guide - SuSE Linux
Page 37
... and the screen clears. With the computer on the far right of information, do not initiate Suspend or Hibernation while reading from or writing to memory, letting you exit the Suspend state faster than exiting Hibernation.
... and the screen clears. With the computer on the far right of information, do not initiate Suspend or Hibernation while reading from or writing to memory, letting you exit the Suspend state faster than exiting Hibernation.

HP Notebook User Guide - SuSE Linux
Page 55
... sure that you are discharged of static electricity by pressing the power button. Before beginning any procedure, ensure that both memory modules are identical. If you are not sure whether the computer is located on by touching a grounded metal object. The... all external devices connected to the vacant expansion memory module slot or by adding a memory module to the computer. 4. To add or replace a memory module: 1. 9 Memory modules The computer has one memory module compartment, which is off or in the primary memory module slot. WARNING! Shut down the computer ...
... sure that you are discharged of static electricity by pressing the power button. Before beginning any procedure, ensure that both memory modules are identical. If you are not sure whether the computer is located on by touching a grounded metal object. The... all external devices connected to the vacant expansion memory module slot or by adding a memory module to the computer. 4. To add or replace a memory module: 1. 9 Memory modules The computer has one memory module compartment, which is off or in the primary memory module slot. WARNING! Shut down the computer ...

HP Notebook User Guide - SuSE Linux
Page 56
... an electrostatic-safe container. 10. Insert a new memory module: 48 Chapter 9 Memory modules CAUTION: To prevent damage to the memory module, hold the memory module by the edges only. c. If you are replacing a memory module, remove the existing memory module: a. Pull away the retention clips (1) on the memory module. b. The memory module tilts up. Grasp the edge of...
... an electrostatic-safe container. 10. Insert a new memory module: 48 Chapter 9 Memory modules CAUTION: To prevent damage to the memory module, hold the memory module by the edges only. c. If you are replacing a memory module, remove the existing memory module: a. Pull away the retention clips (1) on the memory module. b. The memory module tilts up. Grasp the edge of...

HP Notebook User Guide - SuSE Linux
Page 57
...side up. 49 Gently press the memory module (3) down, applying pressure to the memory module, hold the memory module by the edges only. Replace the battery. 15. b. Do not touch the components on the computer. 12. Align the notched edge (1) of the memory module compartment, press the module ...(2) into place. 11. c. Tighten the memory module compartment screws (3). 14. CAUTION: To prevent damage to both the left and right edges of the...
...side up. 49 Gently press the memory module (3) down, applying pressure to the memory module, hold the memory module by the edges only. Replace the battery. 15. b. Do not touch the components on the computer. 12. Align the notched edge (1) of the memory module compartment, press the module ...(2) into place. 11. c. Tighten the memory module compartment screws (3). 14. CAUTION: To prevent damage to both the left and right edges of the...

HP Notebook User Guide - SuSE Linux
Page 58
Turn on the computer. 50 Chapter 9 Memory modules Reconnect external power and external devices. 17. 16.
Turn on the computer. 50 Chapter 9 Memory modules Reconnect external power and external devices. 17. 16.

HP Notebook User Guide - SuSE Linux
Page 64
... the arrow keys to toggle a field-for the types of peripherals installed, the startup sequence of the computer, and the amount of system and extended memory. Starting Setup Utility ▲ Turn on the system (such as disk drives, display, keyboard, mouse, and printer). When the Startup Menu is displayed, press enter...
... the arrow keys to toggle a field-for the types of peripherals installed, the startup sequence of the computer, and the amount of system and extended memory. Starting Setup Utility ▲ Turn on the system (such as disk drives, display, keyboard, mouse, and printer). When the Startup Menu is displayed, press enter...
HP Notebook User Guide - SuSE Linux
Page 78
... buttons power 6 TouchPad 4 volume 26 C cables LAN 19 USB 44 calculator key, identifying 7 caps lock light, identifying 5 charging batteries 33 checking audio functions 26 compartments memory module 12 components additional hardware 13 bottom 12 display 10 left-side 9 right-side 8 top 4 connecting to a WLAN 17 connector, power 8 conservation, power 35 cord...
... buttons power 6 TouchPad 4 volume 26 C cables LAN 19 USB 44 calculator key, identifying 7 caps lock light, identifying 5 charging batteries 33 checking audio functions 26 compartments memory module 12 components additional hardware 13 bottom 12 display 10 left-side 9 right-side 8 top 4 connecting to a WLAN 17 connector, power 8 conservation, power 35 cord...

HP Notebook User Guide - SuSE Linux
Page 79
...5 local area network (LAN) connecting cable 19 low battery level 34 M media application key, identifying 7 media controls 24 memory module inserting 48 removing 48 memory module compartment identifying 12 removing cover 48 replacing cover 49 microphone jack, identifying 9 monitor port, external 9 mouse, external setting... 56 displaying system information 57 exiting 57 navigating 56 restoring default settings 57 selecting 56 starting 56 shut down 28 slots memory module 12 security cable 8 speakers, identifying 6 start menu key, identifying 7 storing battery 35 Suspend exiting 29 initiating 29...
...5 local area network (LAN) connecting cable 19 low battery level 34 M media application key, identifying 7 media controls 24 memory module inserting 48 removing 48 memory module compartment identifying 12 removing cover 48 replacing cover 49 microphone jack, identifying 9 monitor port, external 9 mouse, external setting... 56 displaying system information 57 exiting 57 navigating 56 restoring default settings 57 selecting 56 starting 56 shut down 28 slots memory module 12 security cable 8 speakers, identifying 6 start menu key, identifying 7 storing battery 35 Suspend exiting 29 initiating 29...
Compaq Presario CQ56 Notebook PC and HP G56 Notebook PC - Maintenance and Service Guide
Page 6
... 32 Equipment guidelines 33 Component replacement procedures 34 Service tag ...34 Computer feet ...35 Battery ...36 Hard drive ...37 Optical drive ...39 WLAN module ...42 Memory module ...44 Keyboard ...46 Top cover ...49 Speaker assembly ...52 Power button board ...54 TouchPad button board ...55 USB board ...56 Power connector ...58 Display...
... 32 Equipment guidelines 33 Component replacement procedures 34 Service tag ...34 Computer feet ...35 Battery ...36 Hard drive ...37 Optical drive ...39 WLAN module ...42 Memory module ...44 Keyboard ...46 Top cover ...49 Speaker assembly ...52 Power button board ...54 TouchPad button board ...55 USB board ...56 Power connector ...58 Display...
Compaq Presario CQ56 Notebook PC and HP G56 Notebook PC - Maintenance and Service Guide
Page 10
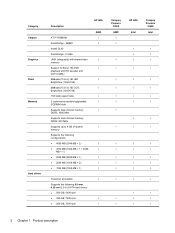
...of system memory Supports the following configurations: ● 4096 MB (2048 MB × 2) ● 3072 MB (1024 MB × 1 + 2048 MB × 1) ● 2048 MB (2048 MB × 1) ● 2048 MB (1024 MB × 2) ● 1024 MB (1024 MB × 1) HP G56 AMD √...; √ √ √ √ Compaq Presario CQ56 AMD √ √ √ √ √ HP G56 Intel √ √ Compaq Presario CQ56 Intel √ √ Customer accessible √ √...
...of system memory Supports the following configurations: ● 4096 MB (2048 MB × 2) ● 3072 MB (1024 MB × 1 + 2048 MB × 1) ● 2048 MB (2048 MB × 1) ● 2048 MB (1024 MB × 2) ● 1024 MB (1024 MB × 1) HP G56 AMD √...; √ √ √ √ Compaq Presario CQ56 AMD √ √ √ √ √ HP G56 Intel √ √ Compaq Presario CQ56 Intel √ √ Customer accessible √ √...


