HP Notebook Hard Drives & Solid State Drives Identifying, Preventing, Diagnosing and Recovering from Drive Failures Care and Mai
Page 4
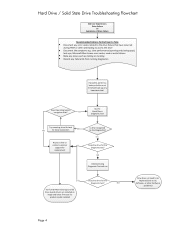
..., Software, or other hardware problems) Page 4 NO Verify Intel Matrix Storage and 3D Drive Guard drivers are installed on image and latest firmware for replacement Is drive recognized by the Diagnostics? Hard Drive / Solid State Drive Troubleshooting Flowchart End User Experiences: Drive Failure Or Symptoms of drive or at minimum back up any error codes related to the...
..., Software, or other hardware problems) Page 4 NO Verify Intel Matrix Storage and 3D Drive Guard drivers are installed on image and latest firmware for replacement Is drive recognized by the Diagnostics? Hard Drive / Solid State Drive Troubleshooting Flowchart End User Experiences: Drive Failure Or Symptoms of drive or at minimum back up any error codes related to the...
User Manual
Page 28
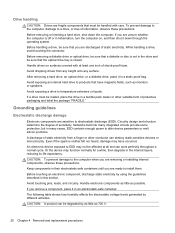
... Avoid touching pins, leads, and circuitry. To prevent damage to the computer, damage to a drive, or loss of static electricity. After removing a hard drive, an optical drive, or a diskette drive, place it in many cases, ESD contains enough power to alter device parameters or melt silicon ...as little as 700 V. 20 Chapter 4 Removal and replacement procedures Handle drives on , and then shut it in the drive and be degraded by different activities. Avoid exposing a drive to temperature extremes or liquids. If a drive must be affected at least one inch of sensitivity. CAUTION...
... Avoid touching pins, leads, and circuitry. To prevent damage to the computer, damage to a drive, or loss of static electricity. After removing a hard drive, an optical drive, or a diskette drive, place it in many cases, ESD contains enough power to alter device parameters or melt silicon ...as little as 700 V. 20 Chapter 4 Removal and replacement procedures Handle drives on , and then shut it in the drive and be degraded by different activities. Avoid exposing a drive to temperature extremes or liquids. If a drive must be affected at least one inch of sensitivity. CAUTION...
User Manual
Page 48
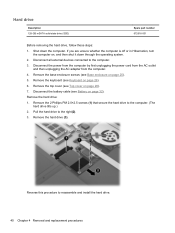
Remove the hard drive: 1. Pull the hard drive to reassemble and install the hard drive. 40 Chapter 4 Removal and replacement procedures If you are unsure whether the computer is off or in Hibernation, turn the computer on, and then shut ...top cover (see Base enclosure on page 28). 7. Remove the hard drive (3). Reverse this procedure to the right(2). 3. Disconnect all external devices connected to the computer. (The hard drive tilts up.) 2. Remove the 2 Phillips PM 2.0×2.5 screws (1) that secure the hard drive to the computer. 3. Remove the base enclosure screws (see Top...
Remove the hard drive: 1. Pull the hard drive to reassemble and install the hard drive. 40 Chapter 4 Removal and replacement procedures If you are unsure whether the computer is off or in Hibernation, turn the computer on, and then shut ...top cover (see Base enclosure on page 28). 7. Remove the hard drive (3). Reverse this procedure to the right(2). 3. Disconnect all external devices connected to the computer. (The hard drive tilts up.) 2. Remove the 2 Phillips PM 2.0×2.5 screws (1) that secure the hard drive to the computer. 3. Remove the base enclosure screws (see Top...
User Manual
Page 51
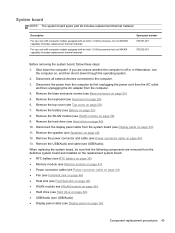
... down the computer. Remove the speaker (see Keyboard on page 42). 12. Component replacement procedures 43 Remove the keyboard (see Speakers on page 26), 6. Remove the battery (see Hard drive on page 32). 8. Remove the hard drive (see Battery on page 40). 10. Remove the USB/Audio and cable (see... from the computer. 4. When replacing the system board, be sure that the following components are unsure whether the computer is off or in Hibernation, turn the computer on page 25). 5. Remove the top cover (see Display panel on page 44). 13. Remove the power connector and cable...
... down the computer. Remove the speaker (see Keyboard on page 42). 12. Component replacement procedures 43 Remove the keyboard (see Speakers on page 26), 6. Remove the battery (see Hard drive on page 32). 8. Remove the hard drive (see Battery on page 40). 10. Remove the USB/Audio and cable (see... from the computer. 4. When replacing the system board, be sure that the following components are unsure whether the computer is off or in Hibernation, turn the computer on page 25). 5. Remove the top cover (see Display panel on page 44). 13. Remove the power connector and cable...
User Manual
Page 60
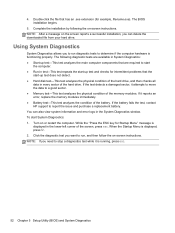
...functioning properly. NOTE: If you need to stop a diagnostics test while it reports an error, replace the memory modules immediately. ● Battery test-This test analyzes the condition of the hard drive. The following the on or restart the computer. When the Startup Menu is displayed in the ... to start the computer. ● Run-in test-This test repeats the start System Diagnostics: 1. If the battery fails the test, contact HP support to a good sector. ● Memory test-This test analyzes the physical condition of the screen, press esc. Complete the installation by ...
...functioning properly. NOTE: If you need to stop a diagnostics test while it reports an error, replace the memory modules immediately. ● Battery test-This test analyzes the condition of the hard drive. The following the on or restart the computer. When the Startup Menu is displayed in the ... to start the computer. ● Run-in test-This test repeats the start System Diagnostics: 1. If the battery fails the test, contact HP support to a good sector. ● Memory test-This test analyzes the physical condition of the screen, press esc. Complete the installation by ...
User Manual
Page 73
... description 2 removal 26 spare part numbers 13, 18, 26 keys Action 6 esc 6 fn 6 Windows applications 6 Windows logo 6 L left-side components 9 light components 7 lights battery 9 caps lock 7 hard drive 9 mute 7 power 7 TouchPad 8 ...drive 1 pointing device 2 ports 2 power requirements 2 processors 1 product name 1 serviceability 2 video 1 wireless 1 product name 1, 24 product number 24 R rear components 8 rear corner covers spare part number 18 recovering from the dedicated recovery partition 56 recovering from the recovery discs 58 recovery discs 55 recovery, system 56 removal/replacement...
... description 2 removal 26 spare part numbers 13, 18, 26 keys Action 6 esc 6 fn 6 Windows applications 6 Windows logo 6 L left-side components 9 light components 7 lights battery 9 caps lock 7 hard drive 9 mute 7 power 7 TouchPad 8 ...drive 1 pointing device 2 ports 2 power requirements 2 processors 1 product name 1 serviceability 2 video 1 wireless 1 product name 1, 24 product number 24 R rear components 8 rear corner covers spare part number 18 recovering from the dedicated recovery partition 56 recovering from the recovery discs 58 recovery discs 55 recovery, system 56 removal/replacement...


