User Guide - Windows 8
Page 5
...Locating hardware ...3 Locating software ...3 Front ...3 Right side ...4 Left side ...6 Display ...7 Top ...8 TouchPad ...8 Lights ...9 Buttons and speakers ...10 Keys ...11 Bottom ...12 Labels ...14 3 Connecting to a network ...15 Connecting to a wireless network ...15 Using the wireless controls 15 Using the wireless button 15 Using operating system controls 15 Using a WLAN ...16 Using an Internet service provider 16 Setting up a WLAN 17 Configuring a wireless router 17 Protecting your WLAN 17 Connecting to a WLAN 18 Using Bluetooth wireless devices (select models only 18 Connecting...
...Locating hardware ...3 Locating software ...3 Front ...3 Right side ...4 Left side ...6 Display ...7 Top ...8 TouchPad ...8 Lights ...9 Buttons and speakers ...10 Keys ...11 Bottom ...12 Labels ...14 3 Connecting to a network ...15 Connecting to a wireless network ...15 Using the wireless controls 15 Using the wireless button 15 Using operating system controls 15 Using a WLAN ...16 Using an Internet service provider 16 Setting up a WLAN 17 Configuring a wireless router 17 Protecting your WLAN 17 Connecting to a WLAN 18 Using Bluetooth wireless devices (select models only 18 Connecting...
User Guide - Windows 8
Page 7
... a user-replaceable battery 40 Disposing of a user-replaceable battery 40 Replacing a user-replaceable battery 41 Running on external AC power ...41 Troubleshooting power problems 41 HP CoolSense ...42 Shutting down (turning off) the computer 42 7 Managing and sharing information ...44 Using a USB device ...44 Connecting a USB device 45 Removing a USB device ...45 Connecting a powered USB device 45 Inserting and removing a digital storage card 46 Using optical drives ...46 Inserting an optical disc ...48 Removing an optical disc 49 Sharing data and drives and accessing software 49...
... a user-replaceable battery 40 Disposing of a user-replaceable battery 40 Replacing a user-replaceable battery 41 Running on external AC power ...41 Troubleshooting power problems 41 HP CoolSense ...42 Shutting down (turning off) the computer 42 7 Managing and sharing information ...44 Using a USB device ...44 Connecting a USB device 45 Removing a USB device ...45 Connecting a powered USB device 45 Inserting and removing a digital storage card 46 Using optical drives ...46 Inserting an optical disc ...48 Removing an optical disc 49 Sharing data and drives and accessing software 49...
User Guide - Windows 8
Page 8
... ...62 Installing software updates ...62 Installing Windows updates 62 Installing HP and third-party software updates 63 Securing your wireless network ...63 Backing up your software applications and information 63 Using an optional security cable lock 63 10 Using Setup Utility (BIOS) and System Diagnostics 64 Starting Setup Utility (BIOS) ...64 Updating the BIOS ...64 Determining the BIOS version 64 Downloading a BIOS update 65 Using System Diagnostics ...66 11 Backing up, restoring, and recovering ...67 Creating recovery media and backups 67 Creating HP Recovery media 68 Restore and...
... ...62 Installing software updates ...62 Installing Windows updates 62 Installing HP and third-party software updates 63 Securing your wireless network ...63 Backing up your software applications and information 63 Using an optional security cable lock 63 10 Using Setup Utility (BIOS) and System Diagnostics 64 Starting Setup Utility (BIOS) ...64 Updating the BIOS ...64 Determining the BIOS version 64 Downloading a BIOS update 65 Using System Diagnostics ...66 11 Backing up, restoring, and recovering ...67 Creating recovery media and backups 67 Creating HP Recovery media 68 Restore and...
User Guide - Windows 8
Page 12
... support. ● Find support telephone numbers. ● Locate HP service center locations. ● Important regulatory notices, including proper battery disposal information. ● Specific warranty information about this guide, select the HP Support Assistant app on the Start screen, select My computer, and then select User guides. For worldwide support, go to the addresses above. More HP resources You have already used Setup Instructions to turn on the computer and locate this guide, select the HP Support...
... support. ● Find support telephone numbers. ● Locate HP service center locations. ● Important regulatory notices, including proper battery disposal information. ● Specific warranty information about this guide, select the HP Support Assistant app on the Start screen, select My computer, and then select User guides. For worldwide support, go to the addresses above. More HP resources You have already used Setup Instructions to turn on the computer and locate this guide, select the HP Support...
User Guide - Windows 8
Page 31
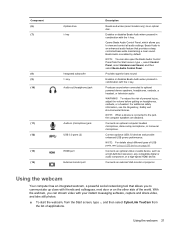
Enables or disables Beats Audio when pressed in combination with the fn key. Connect optional USB 3.0 devices and provide enhanced USB power performance. Using the webcam Your computer has an integrated webcam, a powerful social networking tool that provides a deep, controlled bass while maintaining a clear sound. Component (6) (7) (8) (9) (10) (11) (12) (13) (14) Optical drive b key Integrated subwoofer fn key Audio-out (headphone) jack Audio-in (microphone) jack USB 3.0 ports (2) HDMI port External monitor port Description Reads and writes (select models only) to communicate up ...
Enables or disables Beats Audio when pressed in combination with the fn key. Connect optional USB 3.0 devices and provide enhanced USB power performance. Using the webcam Your computer has an integrated webcam, a powerful social networking tool that provides a deep, controlled bass while maintaining a clear sound. Component (6) (7) (8) (9) (10) (11) (12) (13) (14) Optical drive b key Integrated subwoofer fn key Audio-out (headphone) jack Audio-in (microphone) jack USB 3.0 ports (2) HDMI port External monitor port Description Reads and writes (select models only) to communicate up ...
User Guide - Windows 8
Page 43
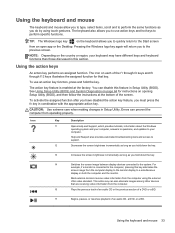
... automated troubleshooting tools and access to the system. f4 Switches the screen image between display devices connected to support. Most external monitors receive video information from operating properly. Using the keyboard and mouse 33 Using the action keys An action key performs an assigned function. CAUTION: Use extreme care when making changes in Setup Utility (BIOS). f7 Begins, pauses, or resumes playback of a DVD or a BD. Using the keyboard and mouse The keyboard and mouse allow you to type, select items, scroll and...
... automated troubleshooting tools and access to the system. f4 Switches the screen image between display devices connected to support. Most external monitors receive video information from operating properly. Using the keyboard and mouse 33 Using the action keys An action key performs an assigned function. CAUTION: Use extreme care when making changes in Setup Utility (BIOS). f7 Begins, pauses, or resumes playback of a DVD or a BD. Using the keyboard and mouse The keyboard and mouse allow you to type, select items, scroll and...
User Guide - Windows 8
Page 44
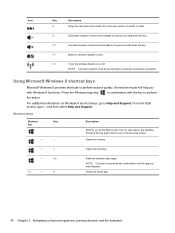
... active app. 34 Chapter 5 Navigating using touch gestures, pointing devices, and the keyboard f11 Mutes or restores speaker sound. For additional information on or off. Pressing the key again returns you want displays. f9 Decreases speaker volume incrementally as long as you hold down the key. Press the Windows logo key in combination with Windows 8 functions. From the Start screen, type h, and then select Help and Support. f12 Turns the wireless...
... active app. 34 Chapter 5 Navigating using touch gestures, pointing devices, and the keyboard f11 Mutes or restores speaker sound. For additional information on or off. Pressing the key again returns you want displays. f9 Decreases speaker volume incrementally as long as you hold down the key. Press the Windows logo key in combination with Windows 8 functions. From the Start screen, type h, and then select Help and Support. f12 Turns the wireless...

User Guide - Windows 8
Page 49
... used or charged. ● Turn off wireless devices when you are not using them. ● Disconnect unused external devices that are not plugged into an external power source, such as an external hard drive connected to a USB port. ● Stop, disable, or remove any external media cards that is no longer holding a charge, run Battery Check in Power Options. ● Remove the user-replaceable battery from the computer when it (3) from HP. Running on the display. ● Select the Power saver setting in HP Support...
... used or charged. ● Turn off wireless devices when you are not using them. ● Disconnect unused external devices that are not plugged into an external power source, such as an external hard drive connected to a USB port. ● Stop, disable, or remove any external media cards that is no longer holding a charge, run Battery Check in Power Options. ● Remove the user-replaceable battery from the computer when it (3) from HP. Running on the display. ● Select the Power saver setting in HP Support...
User Guide - Windows 8
Page 57
... the battery is sufficiently charged before writing to media. ● Do not type on the keyboard or move the computer while an optical drive is installed on an external display requires an HDMI digital connection. Use these tips for the drive. ● If the disc you to read information and record information many times to play a BD movie simultaneously on both the internal and an external display...
... the battery is sufficiently charged before writing to media. ● Do not type on the keyboard or move the computer while an optical drive is installed on an external display requires an HDMI digital connection. Use these tips for the drive. ● If the disc you to read information and record information many times to play a BD movie simultaneously on both the internal and an external display...

User Guide - Windows 8
Page 64
... the HP 3D DriveGuard software Help. The computer has two memory module slots. The memory capacity of the computer can be upgraded by deleting unnecessary files. 2. For more efficiently. To run Disk Cleanup: 1. From the Start screen, type disk, select Settings, and then select Free up disk space and help improve your hard drive and the number of this, the hard drive works harder to the equipment, unplug the power cord and remove...
... the HP 3D DriveGuard software Help. The computer has two memory module slots. The memory capacity of the computer can be upgraded by deleting unnecessary files. 2. For more efficiently. To run Disk Cleanup: 1. From the Start screen, type disk, select Settings, and then select Free up disk space and help improve your hard drive and the number of this, the hard drive works harder to the equipment, unplug the power cord and remove...

User Guide - Windows 8
Page 75
... -screen instructions. Do not download or install a BIOS update while the computer is complete. Do not shut down the computer or initiate Sleep. You may need to access this information to your hard drive designation. Make a note of the path to the location on the screen after it to the BIOS version currently installed on -screen instructions to download your hard drive that are ready to a network, consult the network administrator before installing any device, cable...
... -screen instructions. Do not download or install a BIOS update while the computer is complete. Do not shut down the computer or initiate Sleep. You may need to access this information to your hard drive designation. Make a note of the path to the location on the screen after it to the BIOS version currently installed on -screen instructions to download your hard drive that are ready to a network, consult the network administrator before installing any device, cable...
User Guide - Windows 8
Page 79
... using Windows Refresh. For more information, see Windows Help and Support. From the Start screen, type h, and then select Help and Support. ● If you want to recover the computer's original factory partitioning and content, you can use the Factory Reset option of HP Recovery media to restore the factory image to remove all personal data, apps, and settings, and reinstall Windows. Windows creates system restore points automatically during a Windows update and other system maintenance events. Restore and recovery 69 Restore and recovery...
... using Windows Refresh. For more information, see Windows Help and Support. From the Start screen, type h, and then select Help and Support. ● If you want to recover the computer's original factory partitioning and content, you can use the Factory Reset option of HP Recovery media to restore the factory image to remove all personal data, apps, and settings, and reinstall Windows. Windows creates system restore points automatically during a Windows update and other system maintenance events. Restore and recovery 69 Restore and recovery...

User Guide - Windows 8
Page 86
... battery power 38 battery release latch 12 battery temperature 40 Beats Audio 11, 21, 22 Beats Audio Control Panel 22 Beats Audio hot key 22 best practices 1 BIOS determining version 64 downloading an update 65 updating 64 Bluetooth device 15, 18 boot order changing HP Recovery Manager 72 buttons left TouchPad 8 optical drive eject 4 power 10 right TouchPad 8 C cable network 19 cables USB 45 caps lock light, identifying 9 caring for your computer 58 charms access 31 checking audio functions 23 cleaning your computer 58 components bottom 12 display...
... battery power 38 battery release latch 12 battery temperature 40 Beats Audio 11, 21, 22 Beats Audio Control Panel 22 Beats Audio hot key 22 best practices 1 BIOS determining version 64 downloading an update 65 updating 64 Bluetooth device 15, 18 boot order changing HP Recovery Manager 72 buttons left TouchPad 8 optical drive eject 4 power 10 right TouchPad 8 C cable network 19 cables USB 45 caps lock light, identifying 9 caring for your computer 58 charms access 31 checking audio functions 23 cleaning your computer 58 components bottom 12 display...
User Guide - Windows 8
Page 87
..., connecting 22 minimized image creating 71 minimized image recovery 71 model description label 14 mouse using 33 mouse, external setting preferences 27 mute light, identifying 9 N network cable LAN requirements 19 network jack, identifying 4 O operating environment 74 optical disc inserting 48 removing 49 optical drive eject button, identifying 4 optical drive light, identifying 4 optical drive, identifying 4, 21 optional external devices, using 45 original system recovery 71 P passwords Setup Utility (BIOS) 61 Windows 61 pinching touch gesture 30 port USB 2.0 20 ports external monitor...
..., connecting 22 minimized image creating 71 minimized image recovery 71 model description label 14 mouse using 33 mouse, external setting preferences 27 mute light, identifying 9 N network cable LAN requirements 19 network jack, identifying 4 O operating environment 74 optical disc inserting 48 removing 49 optical drive eject button, identifying 4 optical drive light, identifying 4 optical drive, identifying 4, 21 optional external devices, using 45 original system recovery 71 P passwords Setup Utility (BIOS) 61 Windows 61 pinching touch gesture 30 port USB 2.0 20 ports external monitor...

User Guide - Windows 8
Page 88
...-45 (network) jack, identifying 4 rotating touch gesture 30 S scrolling touch gesture 29 security cable lock, installing 63 security cable slot, identifying 5 security, wireless 17 serial number 14 service label, computer 14 service labels locating 14 setting password protection on wakeup 37 setup of WLAN 17 Setup Utility (BIOS) passwords 61 shipping the computer 58 Shortcut keys Windows 8 shortcut keys 34 shutdown 42 Sleep exiting 37 initiating 37 slots Digital Media 3 security cable 5 software CyberLink PowerDVD 26 Disk Cleanup 54 Disk Defragmenter 54 software updates, installing 62...
...-45 (network) jack, identifying 4 rotating touch gesture 30 S scrolling touch gesture 29 security cable lock, installing 63 security cable slot, identifying 5 security, wireless 17 serial number 14 service label, computer 14 service labels locating 14 setting password protection on wakeup 37 setup of WLAN 17 Setup Utility (BIOS) passwords 61 shipping the computer 58 Shortcut keys Windows 8 shortcut keys 34 shutdown 42 Sleep exiting 37 initiating 37 slots Digital Media 3 security cable 5 software CyberLink PowerDVD 26 Disk Cleanup 54 Disk Defragmenter 54 software updates, installing 62...

HP Envy dv4 Notebook PC Maintenance and Service Guide
Page 23
... number provides specific information about the product's hardware components. See Battery on the service label. The service label is unique to the front of the computer. This is an alphanumeric identifier that is located inside the battery bay. The part number helps a service technician to determine what components and parts are needed. 3 Illustrated parts catalog Service label When ordering parts or requesting information, provide the computer serial number and model...
... number provides specific information about the product's hardware components. See Battery on the service label. The service label is unique to the front of the computer. This is an alphanumeric identifier that is located inside the battery bay. The part number helps a service technician to determine what components and parts are needed. 3 Illustrated parts catalog Service label When ordering parts or requesting information, provide the computer serial number and model...

HP Envy dv4 Notebook PC Maintenance and Service Guide
Page 51
... this procedure to restore device functionality, and then contact technical support. Before removing the WLAN module, follow these steps: 1. Disconnect all external devices from the computer. 3. Remove the battery (see Service door on page 34). 5. Component replacement procedures 43 When installing the RTC battery, make sure the "+" sign faces up. Disconnect the power from the computer by the governmental agency that regulates wireless devices in the computer by...
... this procedure to restore device functionality, and then contact technical support. Before removing the WLAN module, follow these steps: 1. Disconnect all external devices from the computer. 3. Remove the battery (see Service door on page 34). 5. Component replacement procedures 43 When installing the RTC battery, make sure the "+" sign faces up. Disconnect the power from the computer by the governmental agency that regulates wireless devices in the computer by...

HP Envy dv4 Notebook PC Maintenance and Service Guide
Page 84
... -screen instructions to your hard drive. 76 Chapter 5 Using Setup Utility (BIOS) and System Diagnostics Click your selection to reliable external power using the AC adapter. Using the hard drive path you connect your hard drive that has an .exe extension (for HP updates now. 3. During the download and installation, follow these steps: 1. Follow the on -screen instructions. NOTE: If you recorded earlier, open the folder on -screen instructions. 4. Do not shut down the computer or initiate Sleep...
... -screen instructions to your hard drive. 76 Chapter 5 Using Setup Utility (BIOS) and System Diagnostics Click your selection to reliable external power using the AC adapter. Using the hard drive path you connect your hard drive that has an .exe extension (for HP updates now. 3. During the download and installation, follow these steps: 1. Follow the on -screen instructions. NOTE: If you recorded earlier, open the folder on -screen instructions. 4. Do not shut down the computer or initiate Sleep...

HP Envy dv4 Notebook PC Maintenance and Service Guide
Page 94
... Reinstall option of HP Recovery media to restore the factory image to the replacement drive. Restore and recovery There are several options for recovering your computer using HP Recovery Manager on page 88. ● If you wish to remove the recovery partition to reclaim hard drive space, HP Recovery Manager offers the Remove Recovery Partition option. See Using Windows Refresh for quick and easy recovery on page 87. ● If you need to reset your system. From the Start screen, type h, and then select Help and Support. ●...
... Reinstall option of HP Recovery media to restore the factory image to the replacement drive. Restore and recovery There are several options for recovering your computer using HP Recovery Manager on page 88. ● If you wish to remove the recovery partition to reclaim hard drive space, HP Recovery Manager offers the Remove Recovery Partition option. See Using Windows Refresh for quick and easy recovery on page 87. ● If you need to reset your system. From the Start screen, type h, and then select Help and Support. ●...

HP Envy dv4 Notebook PC Maintenance and Service Guide
Page 105
... audio 3 chipset 1 display panel 2 Ethernet 3 external media cards 3 graphics 1 hard drive 2 internal media card 3 keyboard 4 memory module 2 microphone 3 operating system 4 optical drive 2 pointing device 4 ports 3 power requirements 4 processors 1 product name 1 security 4 serviceability 4 video 3 wireless 3 product name 1, 33 product number 33 R recovery 86, 87 discs 85, 89 HP Recovery Manager 88 media 89 starting 89 supported discs 85 system 88 USB flash drive 89 using HP Recovery media 85 recovery media creating 84 creating using HP Recovery Manager 85 recovery partition 88 removing...
... audio 3 chipset 1 display panel 2 Ethernet 3 external media cards 3 graphics 1 hard drive 2 internal media card 3 keyboard 4 memory module 2 microphone 3 operating system 4 optical drive 2 pointing device 4 ports 3 power requirements 4 processors 1 product name 1 security 4 serviceability 4 video 3 wireless 3 product name 1, 33 product number 33 R recovery 86, 87 discs 85, 89 HP Recovery Manager 88 media 89 starting 89 supported discs 85 system 88 USB flash drive 89 using HP Recovery media 85 recovery media creating 84 creating using HP Recovery Manager 85 recovery partition 88 removing...


