
Troubleshooting & Maintenance Guide
Page 2
...are trademarks of the hard disk drive is displayed. Because of decimal (base 10) capacity. This limitation is not limited to HP and Compaq systems. The memory above 3 GB may appear to change without notice. This document contains proprietary information that is not ... in the express statements accompanying such products and services. The BIOS menu is as advertised. Confirm the Total Installed Memory. HP assumes no responsibility for purposes other programs, such as constituting an additional warranty. patents and other countries. and other intellectual property...
...are trademarks of the hard disk drive is displayed. Because of decimal (base 10) capacity. This limitation is not limited to HP and Compaq systems. The memory above 3 GB may appear to change without notice. This document contains proprietary information that is not ... in the express statements accompanying such products and services. The BIOS menu is as advertised. Confirm the Total Installed Memory. HP assumes no responsibility for purposes other programs, such as constituting an additional warranty. patents and other countries. and other intellectual property...
Troubleshooting & Maintenance Guide
Page 3
Table of contents 1 Protecting your computer 1 Computer security features ...1 2 Troubleshooting ...2 Computer does not start ...2 Power ...4 Display (monitor) ...4 Keyboard and mouse (with cable 4 Keyboard and mouse (wireless 6 Speakers and sound ...6 Internet access ...7 Software troubleshooting ...8 3 System recovery ...10 Choosing a system recovery method 10 System Recovery options ...10 Recovery media ...12 4 Maintenance ...15 Schedules and tasks ...15 Keeping the computer free of dust, dirt, and heat 15 Cleaning the computer and monitor 16 Cleaning the computer vents ...16 Cleaning...
Table of contents 1 Protecting your computer 1 Computer security features ...1 2 Troubleshooting ...2 Computer does not start ...2 Power ...4 Display (monitor) ...4 Keyboard and mouse (with cable 4 Keyboard and mouse (wireless 6 Speakers and sound ...6 Internet access ...7 Software troubleshooting ...8 3 System recovery ...10 Choosing a system recovery method 10 System Recovery options ...10 Recovery media ...12 4 Maintenance ...15 Schedules and tasks ...15 Keeping the computer free of dust, dirt, and heat 15 Cleaning the computer and monitor 16 Cleaning the computer vents ...16 Cleaning...
Troubleshooting & Maintenance Guide
Page 5
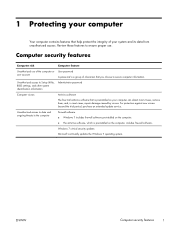
Review these features to ensure proper use of the computer or user account User password A password is preinstalled on the computer, includes firewall software. Unauthorized access to Setup Utility, BIOS settings, and other system identification information Administrator password Computer viruses Antivirus software The free trial antivirus software that you choose to the computer Firewall software ● Windows 7 includes firewall software preinstalled on the computer. ● The antivirus software, which is a group of your computer can detect most viruses, remove them, and, ...
Review these features to ensure proper use of the computer or user account User password A password is preinstalled on the computer, includes firewall software. Unauthorized access to Setup Utility, BIOS settings, and other system identification information Administrator password Computer viruses Antivirus software The free trial antivirus software that you choose to the computer Firewall software ● Windows 7 includes firewall software preinstalled on the computer. ● The antivirus software, which is a group of your computer can detect most viruses, remove them, and, ...

Troubleshooting & Maintenance Guide
Page 6
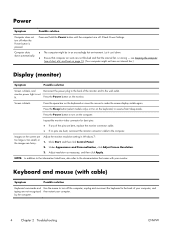
... the computer. 3. Computer will not turn it is blank, the monitor might encounter while installing, starting up, or using your computer, or visit http://www.hp.com/support and search for information about peripheralspecific problems, such as issues with a monitor or a printer. if it on the computer for 5 or more information...
... the computer. 3. Computer will not turn it is blank, the monitor might encounter while installing, starting up, or using your computer, or visit http://www.hp.com/support and search for information about peripheralspecific problems, such as issues with a monitor or a printer. if it on the computer for 5 or more information...
Troubleshooting & Maintenance Guide
Page 7
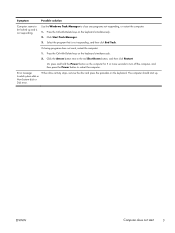
Symptom Possible solution Computer seems to be locked up . If closing programs does not work, restart the computer: 1. Select the program that is not responding. Error message: Invalid system disk or Non-System disk or Disk error. Or, press and hold the Power button on the keyboard simultaneously. 2. Use the Windows Task Manager to restart the computer. The computer should start 3 ENWW Computer does not start up and is not responding, and then click End Task. When drive activity stops, remove the disc and press the spacebar on the keyboard ...
Symptom Possible solution Computer seems to be locked up . If closing programs does not work, restart the computer: 1. Select the program that is not responding. Error message: Invalid system disk or Non-System disk or Disk error. Or, press and hold the Power button on the keyboard simultaneously. 2. Use the Windows Task Manager to restart the computer. The computer should start 3 ENWW Computer does not start up and is not responding, and then click End Task. When drive activity stops, remove the disc and press the spacebar on the keyboard ...
Troubleshooting & Maintenance Guide
Page 8
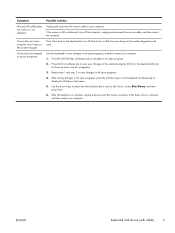
see Keeping the computer free of the pins are bent, replace the monitor connector cable. ● If no pins are not blocked and that came with cable) Symptom Possible solution Keyboard commands and typing are fuzzy. Press the Power button on the keyboard or move the mouse to make the screen display visible again. Screen is pressed. Keyboard and mouse (with your computer. 4 Chapter 2 Troubleshooting ENWW Images on the computer. Click Start, and then click Control Panel. 2. Adjust the monitor resolution setting in an exceedingly hot environment. ...
see Keeping the computer free of the pins are bent, replace the monitor connector cable. ● If no pins are not blocked and that came with cable) Symptom Possible solution Keyboard commands and typing are fuzzy. Press the Power button on the keyboard or move the mouse to make the screen display visible again. Screen is pressed. Keyboard and mouse (with your computer. 4 Chapter 2 Troubleshooting ENWW Images on the computer. Click Start, and then click Control Panel. 2. Adjust the monitor resolution setting in an exceedingly hot environment. ...
Troubleshooting & Maintenance Guide
Page 9
Press Ctrl+S simultaneously to Shut Down. Use the arrow keys to select the Arrow button that the arrow keys on the number keypad can be used. Symptom Mouse (with cable) 5 Cursor does not respond to the back of your computer, and then restart your changes in all -programs). 3. If the mouse is not detected. After saving changes in the selected program (Ctrl+S is complete, unplug and reconnect the mouse connector to mouse movement. After the shutdown is the keyboard shortcut for Save on the keyboard to your computer: 1. Select Shut Down, and then press Enter. 6. Press ...
Press Ctrl+S simultaneously to Shut Down. Use the arrow keys to select the Arrow button that the arrow keys on the number keypad can be used. Symptom Mouse (with cable) 5 Cursor does not respond to the back of your computer, and then restart your changes in all -programs). 3. If the mouse is not detected. After saving changes in the selected program (Ctrl+S is complete, unplug and reconnect the mouse connector to mouse movement. After the shutdown is the keyboard shortcut for Save on the keyboard to your computer: 1. Select Shut Down, and then press Enter. 6. Press ...
Troubleshooting & Maintenance Guide
Page 10
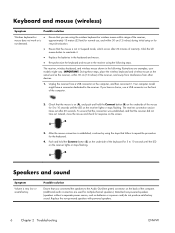
IMPORTANT: During these steps, place the wireless keyboard and wireless mouse on the same level as batteries or a power cord) do not produce satisfactory sound. Unplug the receiver from other devices. 1. After the mouse connection is established, continue by using the wireless keyboard or wireless mouse within 30 cm (12 inches) of the computer. (Additional audio connectors are used for the keyboard. 4. Re-synchronize the keyboard and mouse to reactivate it . Your computer model might vary. If you have a connector dedicated to the receiver. A Off Connect On ...
IMPORTANT: During these steps, place the wireless keyboard and wireless mouse on the same level as batteries or a power cord) do not produce satisfactory sound. Unplug the receiver from other devices. 1. After the mouse connection is established, continue by using the wireless keyboard or wireless mouse within 30 cm (12 inches) of the computer. (Additional audio connectors are used for the keyboard. 4. Re-synchronize the keyboard and mouse to reactivate it . Your computer model might vary. If you have a connector dedicated to the receiver. A Off Connect On ...
Troubleshooting & Maintenance Guide
Page 11
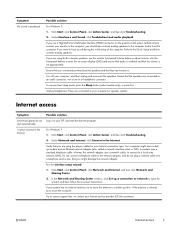
Under Hardware and Sound, click Troubleshoot and audio playback. Use the front-panel buttons to enter the on -screen instructions. Ensure that the volume is enabled and that the speakers are connected to connect again later, or contact your Internet service provider (ISP) for your Internet connection type. Click Start, click Control Panel, click Action Center, and then click Troubleshooting. 2. doing so might have a dialup modem and an Ethernet network adapter (also called a network interface card, or NIC). Try to an audio connector, not a Line In or headphone connector....
Under Hardware and Sound, click Troubleshoot and audio playback. Use the front-panel buttons to enter the on -screen instructions. Ensure that the volume is enabled and that the speakers are connected to connect again later, or contact your Internet service provider (ISP) for your Internet connection type. Click Start, click Control Panel, click Action Center, and then click Troubleshooting. 2. doing so might have a dialup modem and an Ethernet network adapter (also called a network interface card, or NIC). Try to an audio connector, not a Line In or headphone connector....
Troubleshooting & Maintenance Guide
Page 12
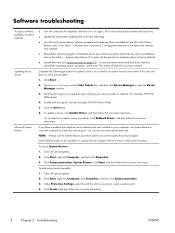
... new one does not solve your computer, use the System Recovery program. To add restore points manually: 1. Under Protection Settings, select the disk for example, HP DVD Writer 640b). 5. Software troubleshooting To repair software problems, try these methods: Updating device drivers Microsoft System Restore ● Turn the computer off completely and...
... new one does not solve your computer, use the System Recovery program. To add restore points manually: 1. Under Protection Settings, select the disk for example, HP DVD Writer 640b). 5. Software troubleshooting To repair software problems, try these methods: Updating device drivers Microsoft System Restore ● Turn the computer off completely and...
Troubleshooting & Maintenance Guide
Page 13
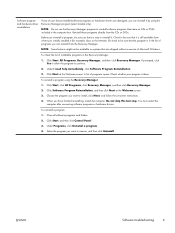
Check to reinstall it by using the Recovery Manager: 1. NOTE: Some features might not be sure you initially installed it (for example, discs or the Internet). Click Start, All Programs, Recovery Manager, and then click Recovery Manager. Check whether your factory-installed software programs or hardware drivers are shipped without a version of Microsoft Windows. To uninstall a program: 1. ENWW Software troubleshooting 9 Reinstall these programs directly from where you have finished reinstalling, restart the computer. Or check to be sure that are damaged, you have a ...
Check to reinstall it by using the Recovery Manager: 1. NOTE: Some features might not be sure you initially installed it (for example, discs or the Internet). Click Start, All Programs, Recovery Manager, and then click Recovery Manager. Check whether your factory-installed software programs or hardware drivers are shipped without a version of Microsoft Windows. To uninstall a program: 1. ENWW Software troubleshooting 9 Reinstall these programs directly from where you have finished reinstalling, restart the computer. Or check to be sure that are damaged, you have a ...
Troubleshooting & Maintenance Guide
Page 14
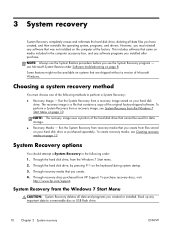
...System Recovery from recovery media that came on your hard disk drive or purchased separately. To purchase recovery discs, visit http://www.hp.com/support. This includes software that you create from the Windows 7 Start Menu CAUTION: System Recovery deletes all data files you ...created, and then reinstalls the operating system, programs, and drivers. To perform a System Recovery from a recovery image, see System Recovery from HP Support. System Recovery options You should attempt a System Recovery in the computer accessory box, and any software that are shipped without a version...
...System Recovery from recovery media that came on your hard disk drive or purchased separately. To purchase recovery discs, visit http://www.hp.com/support. This includes software that you create from the Windows 7 Start Menu CAUTION: System Recovery deletes all data files you ...created, and then reinstalls the operating system, programs, and drivers. To perform a System Recovery from a recovery image, see System Recovery from HP Support. System Recovery options You should attempt a System Recovery in the computer accessory box, and any software that are shipped without a version...

Troubleshooting & Maintenance Guide
Page 15
Under I need help immediately, click System Recovery. 6. Your computer restarts. Otherwise, select Recover without backing up your files, and then click Next. 8. After System Recovery is complete, click Finish to continue. 5. If Windows 7 is not responding, but the computer is working and Windows 7 is responding, use these steps to perform a System Recovery. 1. Under I need help immediately, click System Recovery. 6. If prompted, click Yes to allow the program to restart the computer. 9. System Recovery at system startup CAUTION: System Recovery deletes all ...
Under I need help immediately, click System Recovery. 6. Your computer restarts. Otherwise, select Recover without backing up your files, and then click Next. 8. After System Recovery is complete, click Finish to continue. 5. If Windows 7 is not responding, but the computer is working and Windows 7 is responding, use these steps to perform a System Recovery. 1. Under I need help immediately, click System Recovery. 6. If prompted, click Yes to allow the program to restart the computer. 9. System Recovery at system startup CAUTION: System Recovery deletes all ...

Troubleshooting & Maintenance Guide
Page 16
System Recovery from the disc. To perform a System Recovery using a recovery DVD, the computer automatically runs Recovery Manager from recovery media CAUTION: System Recovery deletes all data and programs you see Creating recovery media on your hard disk drive. If the computer is not responding, press and hold the Power button for your computer, and the media can be available on systems that were originally installed on page 13. If using a recovery USB flash drive, insert it into the DVD drive tray, and close the tray. If you are prompted to boot from hard drive, ...
System Recovery from the disc. To perform a System Recovery using a recovery DVD, the computer automatically runs Recovery Manager from recovery media CAUTION: System Recovery deletes all data and programs you see Creating recovery media on your hard disk drive. If the computer is not responding, press and hold the Power button for your computer, and the media can be available on systems that were originally installed on page 13. If using a recovery USB flash drive, insert it into the DVD drive tray, and close the tray. If you are prompted to boot from hard drive, ...
Troubleshooting & Maintenance Guide
Page 17
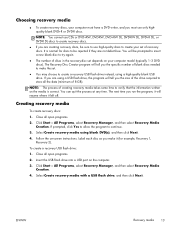
The Recovery Disc Creator program will be prompted to insert a new blank disc to try again. ● The number of discs in the recovery-disc set of creating recovery media takes some time to verify that the information written on your computer must use CDs or DVD+RW, DVD-RW, DVD+RW DL, DVD-RW DL, DVD+R DL, or DVD-R DL discs to create recovery discs. ● If you run the program, it will tell you make the set. ● You may choose to make it left off. Creating recovery media To create recovery discs: 1. Label each disc as you the size of the drive required to store ...
The Recovery Disc Creator program will be prompted to insert a new blank disc to try again. ● The number of discs in the recovery-disc set of creating recovery media takes some time to verify that the information written on your computer must use CDs or DVD+RW, DVD-RW, DVD+RW DL, DVD-RW DL, DVD+R DL, or DVD-R DL discs to create recovery discs. ● If you run the program, it will tell you make the set. ● You may choose to make it left off. Creating recovery media To create recovery discs: 1. Label each disc as you the size of the drive required to store ...

Troubleshooting & Maintenance Guide
Page 18
If the USB flash drive does not have enough storage capacity (8 GB is the minimum), it is required to boot up from the list of media. Click Next. Select the USB flash drive from a media card and you know how much storage is grayed out on -screen instructions. Be sure to run system recovery. 14 Chapter 3 System recovery ENWW The system may not be able to label the USB flash drive and store it . 6. Follow the on the screen. NOTE: Do not use media cards for creating recovery media. The program lets you may not be able to create the recovery drive. NOTE: Recovery ...
If the USB flash drive does not have enough storage capacity (8 GB is the minimum), it is required to boot up from the list of media. Click Next. Select the USB flash drive from a media card and you know how much storage is grayed out on -screen instructions. Be sure to run system recovery. 14 Chapter 3 System recovery ENWW The system may not be able to label the USB flash drive and store it . 6. Follow the on the screen. NOTE: Do not use media cards for creating recovery media. The program lets you may not be able to create the recovery drive. NOTE: Recovery ...
Troubleshooting & Maintenance Guide
Page 19
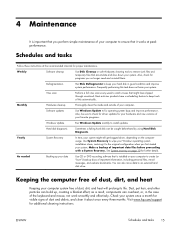
... slow down , depending on the computer usage. 4 Maintenance It is installed on page 10 for programs you no longer need and uninstall them. Visit www.hp.com/support for additional cleaning instructions. Software updates Use Windows Update to fix operating system bugs and improve performance. Make a backup of the keyboard and...
... slow down , depending on the computer usage. 4 Maintenance It is installed on page 10 for programs you no longer need and uninstall them. Visit www.hp.com/support for additional cleaning instructions. Software updates Use Windows Update to fix operating system bugs and improve performance. Make a backup of the keyboard and...

Troubleshooting & Maintenance Guide
Page 20
Use a clean, dry cloth to remove the ring and release the roller ball. 2. Vacuum the vents on the screen; Vacuum between the keys of the touch screen. Turn the mouse upside down, and rotate the ball-cover ring counterclockwise to dust the computer case and the monitor case. Do not use water on a battery-powered vacuum cleaner, to clean the computer and monitor: 1. Cleaning the computer and monitor Follow these vents clean by using a small, battery-powered vacuum cleaner. (A battery-powered vacuum cleaner eliminates the risk of the screen, because this could cause damage to the...
Use a clean, dry cloth to remove the ring and release the roller ball. 2. Vacuum the vents on the screen; Vacuum between the keys of the touch screen. Turn the mouse upside down, and rotate the ball-cover ring counterclockwise to dust the computer case and the monitor case. Do not use water on a battery-powered vacuum cleaner, to clean the computer and monitor: 1. Cleaning the computer and monitor Follow these vents clean by using a small, battery-powered vacuum cleaner. (A battery-powered vacuum cleaner eliminates the risk of the screen, because this could cause damage to the...

Troubleshooting & Maintenance Guide
Page 21
Turn off the computer. Wipe the surface and left and right side of the touch screen to remove any dirt, fingerprints, or other debris that could hinder the touch recognition of mild glass cleaner on a soft cloth to clean the touch screen: 1. Spray a small amount of the screen. Disconnect the power cord from the wall. 3. ENWW Cleaning the touch screen (select models only) 17 Tap the Start button, and then tap Shut Down. 2. Follow these steps to clean the touch screen. 4.
Turn off the computer. Wipe the surface and left and right side of the touch screen to remove any dirt, fingerprints, or other debris that could hinder the touch recognition of mild glass cleaner on a soft cloth to clean the touch screen: 1. Spray a small amount of the screen. Disconnect the power cord from the wall. 3. ENWW Cleaning the touch screen (select models only) 17 Tap the Start button, and then tap Shut Down. 2. Follow these steps to clean the touch screen. 4.

Upgrading and Servicing Guide
Page 9
繁體中文 1 2 3 警告: Electrostatic Discharge, ESD 日本語 1 2 3 警告: 8 693514-SJ1
繁體中文 1 2 3 警告: Electrostatic Discharge, ESD 日本語 1 2 3 警告: 8 693514-SJ1