Quick Setup Guide
Page 5
... Maintenance Guide on your computer. For worldwide ● Find Windows password support, go /contactHP. For U.S. information. ● Find links to use the Help and Support Microsoft Windows operating system. Windows troubleshooting tools 1. Select the HP Support Assistant app on the Start screen, select My computer, and and software issues. Visit http://www.hp.com/supportvideos (English only) ● Learn how to driver updates. ● Read frequently asked questions. Upgrading and Servicing Guide HP Support...
... Maintenance Guide on your computer. For worldwide ● Find Windows password support, go /contactHP. For U.S. information. ● Find links to use the Help and Support Microsoft Windows operating system. Windows troubleshooting tools 1. Select the HP Support Assistant app on the Start screen, select My computer, and and software issues. Visit http://www.hp.com/supportvideos (English only) ● Learn how to driver updates. ● Read frequently asked questions. Upgrading and Servicing Guide HP Support...
Quick Setup Guide
Page 7
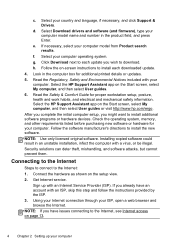
... may be sure to open the enclosure of serious injury read the Safety & Comfort Guide. Connect the television cable or the telephone line cord to the surge protection device, and then connect the device to your computer WARNING! a. To reduce the risk of the CD or DVD drives. • The power supply is currently running. (From the Start screen, type c, select Control Panel, select System and Security...
... may be sure to open the enclosure of serious injury read the Safety & Comfort Guide. Connect the television cable or the telephone line cord to the surge protection device, and then connect the device to your computer WARNING! a. To reduce the risk of the CD or DVD drives. • The power supply is currently running. (From the Start screen, type c, select Control Panel, select System and Security...
Quick Setup Guide
Page 8
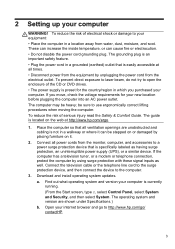
Select Download drivers and software (and firmware), type your computer f. Click Download next to download. Security solutions can deter theft, mishandling, and software attacks, but cannot prevent them. Select your computer operating system. d. h. Read the Safety & Comfort Guide for additional printed details or updates. 5. Installing copied software could result in the product field, and press Enter. Connect the hardware as shown on the Start screen, select My computer, and...
Select Download drivers and software (and firmware), type your computer f. Click Download next to download. Security solutions can deter theft, mishandling, and software attacks, but cannot prevent them. Select your computer operating system. d. h. Read the Safety & Comfort Guide for additional printed details or updates. 5. Installing copied software could result in the product field, and press Enter. Connect the hardware as shown on the Start screen, select My computer, and...
Quick Setup Guide
Page 9
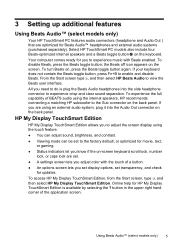
... audio using the internal speakers, HP recommends connecting a matching HP subwoofer to enable and disable Beats. HP My Display TouchSmart Edition HP My Display TouchSmart Edition allows you to adjust the screen display using the touch feature. ● You can adjust sound, brightness, and contrast. ● Viewing mode can be set to the factory default, or optimized for movie, text, or gaming. ● Status indicators let you know if the on-screen keyboard...
... audio using the internal speakers, HP recommends connecting a matching HP subwoofer to enable and disable Beats. HP My Display TouchSmart Edition HP My Display TouchSmart Edition allows you to adjust the screen display using the touch feature. ● You can adjust sound, brightness, and contrast. ● Viewing mode can be set to the factory default, or optimized for movie, text, or gaming. ● Status indicators let you know if the on-screen keyboard...

Quick Setup Guide
Page 10
... button displayed). Using the +/buttons, select brightness, volume, contrast, or color balance. When a device is plugged into that port, and do not control any other media devices on the computer is muted. buttons on -screen menu displays. Pressing the +/- A new on the side panel does not change the volume of your computer may contain an HDMI port and volume control buttons. Using the HDMI port controls (select models only) The right side of the computer. 6 Chapter 3 Setting...
... button displayed). Using the +/buttons, select brightness, volume, contrast, or color balance. When a device is plugged into that port, and do not control any other media devices on the computer is muted. buttons on -screen menu displays. Pressing the +/- A new on the side panel does not change the volume of your computer may contain an HDMI port and volume control buttons. Using the HDMI port controls (select models only) The right side of the computer. 6 Chapter 3 Setting...
Quick Setup Guide
Page 13
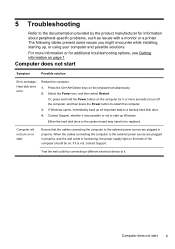
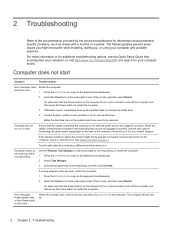
... be replaced. Ensure that the cables connecting the computer to the external power source are plugged in properly. Computer does not start Symptom Possible solution Error message: Hard disk drive error. Press the Ctrl+Alt+Delete keys on the keyboard simultaneously. 2. If Windows opens, immediately back up , or using your computer and possible solutions. Test the wall outlet by the product manufacturer for 5 or more seconds to turn on...
... be replaced. Ensure that the cables connecting the computer to the external power source are plugged in properly. Computer does not start Symptom Possible solution Error message: Hard disk drive error. Press the Ctrl+Alt+Delete keys on the keyboard simultaneously. 2. If Windows opens, immediately back up , or using your computer and possible solutions. Test the wall outlet by the product manufacturer for 5 or more seconds to turn on...

Quick Setup Guide
Page 15
... not respond to save changes in all open programs, press the Power button to make the screen display visible again. Press Num Lock on most-not all open program. 2. Press the Sleep button (select models only), or Esc on the keyboard, to turn off Num Lock, so that the arrow keys on the number keypad. Mouse (with cable) does not work or is blank. Display (monitor) Symptom Screen is not detected...
... not respond to save changes in all open programs, press the Power button to make the screen display visible again. Press Num Lock on most-not all open program. 2. Press the Sleep button (select models only), or Esc on the keyboard, to turn off Num Lock, so that the arrow keys on the number keypad. Mouse (with cable) does not work or is blank. Display (monitor) Symptom Screen is not detected...
Quick Setup Guide
Page 16
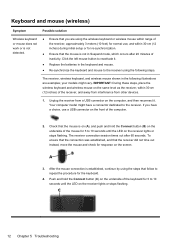
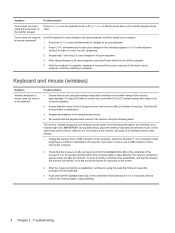
... use a USB connector on the front of the computer. 2. If you are examples; Keyboard and mouse (wireless) Symptom Possible solution Wireless keyboard or mouse does not work or is not detected. ● Ensure that you have a connector dedicated to repeat the procedure for response on the computer, and then reconnect it . ● Replace the batteries in Suspend mode, which occurs after 60 seconds. your models...
... use a USB connector on the front of the computer. 2. If you are examples; Keyboard and mouse (wireless) Symptom Possible solution Wireless keyboard or mouse does not work or is not detected. ● Ensure that you have a connector dedicated to repeat the procedure for response on the computer, and then reconnect it . ● Replace the batteries in Suspend mode, which occurs after 60 seconds. your models...
Quick Setup Guide
Page 17
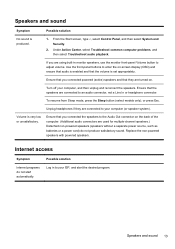
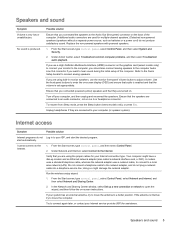
... Log in monitor speakers, use the monitor front-panel Volume button to your ISP, and start automatically. Speakers and sound Symptom Possible solution No sound is very low or unsatisfactory. To resume from Sleep mode, press the Sleep button (select models only), or press Esc. Volume is produced. 1. From the Start screen, type c, select Control Panel, and then select System and Security. 2. Ensure that you connected the speakers to enter the on-screen display (OSD...
... Log in monitor speakers, use the monitor front-panel Volume button to your ISP, and start automatically. Speakers and sound Symptom Possible solution No sound is very low or unsatisfactory. To resume from Sleep mode, press the Sleep button (select models only), or press Esc. Volume is produced. 1. From the Start screen, type c, select Control Panel, and then select System and Security. 2. Ensure that you connected the speakers to enter the on-screen display (OSD...
Quick Setup Guide
Page 18
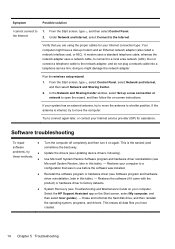
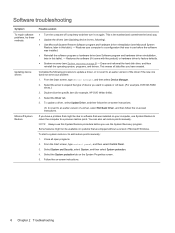
... an external antenna, try ● Update the drivers (see Troubleshooting and Maintenance Guide on -screen instructions. doing so might have created. 14 Chapter 5 Troubleshooting Erase and reformat the hard disk drive, and then reinstall the operating system, programs, and drivers. these methods: ● Use Microsoft System Restore Software program and hardware driver reinstallation (see Software program and hardware driver reinstallation, later in this table). - Try to the network adapter, and do not plug a network cable into a telephone service...
... an external antenna, try ● Update the drivers (see Troubleshooting and Maintenance Guide on -screen instructions. doing so might have created. 14 Chapter 5 Troubleshooting Erase and reformat the hard disk drive, and then reinstall the operating system, programs, and drivers. these methods: ● Use Microsoft System Restore Software program and hardware driver reinstallation (see Software program and hardware driver reinstallation, later in this table). - Try to the network adapter, and do not plug a network cable into a telephone service...
Quick Setup Guide
Page 19
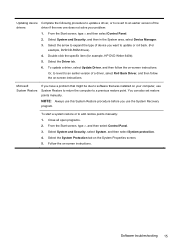
... installed on -screen instructions. You can also set restore points manually. Select System and Security, select System, and then select System protection. 4. Close all open programs. 2. Software troubleshooting 15 Updating device drivers Complete the following procedure to update a driver, or to revert to an earlier version of the driver if the new one does not solve your computer, use the System Recovery program. From the Start screen, type c, and then select Control Panel...
... installed on -screen instructions. You can also set restore points manually. Select System and Security, select System, and then select System protection. 4. Close all open programs. 2. Software troubleshooting 15 Updating device drivers Complete the following procedure to update a driver, or to revert to an earlier version of the driver if the new one does not solve your computer, use the System Recovery program. From the Start screen, type c, and then select Control Panel...
Quick Setup Guide
Page 22
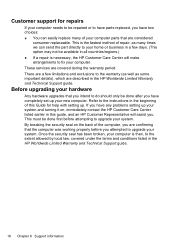
...; If a repair is necessary, the HP Customer Care Center will assist you attempted to upgrade your computer. Refer to the instructions in the HP Worldwide Limited Warranty and Technical Support guide. 18 Chapter 6 Support information By breaking the security seal on , immediately contact the HP Customer Care Center listed earlier in this Guide for repairs If your computer needs to be repaired or to have parts replaced, you have...
...; If a repair is necessary, the HP Customer Care Center will assist you attempted to upgrade your computer. Refer to the instructions in the HP Worldwide Limited Warranty and Technical Support guide. 18 Chapter 6 Support information By breaking the security seal on , immediately contact the HP Customer Care Center listed earlier in this Guide for repairs If your computer needs to be repaired or to have parts replaced, you have...
Troubleshooting and Maintenance Guide
Page 2
... engineering or disassembly is displayed. Confirm the Total Installed Memory. HP shall not be authorized by Macrovision, and is as FDISK, use the binary (base 2) numbering system. HP assumes no responsibility for the use of the hard disk drive is intended for technical or editorial errors or omissions contained herein. Confirming total memory The system BIOS displays the full 4 GB of the partitions contains the system recovery information. Copyright...
... engineering or disassembly is displayed. Confirm the Total Installed Memory. HP shall not be authorized by Macrovision, and is as FDISK, use the binary (base 2) numbering system. HP assumes no responsibility for the use of the hard disk drive is intended for technical or editorial errors or omissions contained herein. Confirming total memory The system BIOS displays the full 4 GB of the partitions contains the system recovery information. Copyright...
Troubleshooting and Maintenance Guide
Page 6
.... Connect the monitor to a backup hard disk drive. 4. See Display (monitor) on the keyboard simultaneously. 2. Select the program that accompanies your computer, or visit http://www.hp.com/go/contactHP and search for 5 or more information or for additional troubleshooting options, see the Quick Setup Guide that is blank, the monitor might encounter while installing, starting up, or using your computer model. Select Task Manager. 3. For more seconds to turn...
.... Connect the monitor to a backup hard disk drive. 4. See Display (monitor) on the keyboard simultaneously. 2. Select the program that accompanies your computer, or visit http://www.hp.com/go/contactHP and search for 5 or more information or for additional troubleshooting options, see the Quick Setup Guide that is blank, the monitor might encounter while installing, starting up, or using your computer model. Select Task Manager. 3. For more seconds to turn...

Troubleshooting and Maintenance Guide
Page 7
.... Check Power Settings. ● The computer might not have an internal fan.) Display (monitor) Symptom Possible solution Screen is blank, and monitor power light is running - Press the Sleep button (select models only), or Esc on the screen are not recognized by the computer. Unplug and reconnect the mouse cable to make the screen display visible again. Press the Power button on the keyboard or move the mouse to your computer. Images on the keyboard, to...
.... Check Power Settings. ● The computer might not have an internal fan.) Display (monitor) Symptom Possible solution Screen is blank, and monitor power light is running - Press the Sleep button (select models only), or Esc on the screen are not recognized by the computer. Unplug and reconnect the mouse cable to make the screen display visible again. Press the Power button on the keyboard or move the mouse to your computer. Images on the keyboard, to...
Troubleshooting and Maintenance Guide
Page 8
..., place the wireless keyboard and wireless mouse on the same level as the receiver, within range of the receiver, approximately 10 meters (32 feet) for normal use a USB connector on the front of the receiver, and away from interference from a USB connector on the computer, and then reconnect it . ● Replace the batteries in all open program. 2. Push and hold the Connect button (B) on...
..., place the wireless keyboard and wireless mouse on the same level as the receiver, within range of the receiver, approximately 10 meters (32 feet) for normal use a USB connector on the front of the receiver, and away from interference from a USB connector on the computer, and then reconnect it . ● Replace the batteries in all open program. 2. Push and hold the Connect button (B) on...
Troubleshooting and Maintenance Guide
Page 9
... from Sleep mode, press the Sleep button (select models only), or press Esc. I cannot connect to a local area network (LAN). From the Start screen, type control panel, and then select Control Panel. 2. Verify that they are used for assistance. Run the wireless setup wizard: 1. Turn off your ISP, and start automatically. Ensure that the volume is enabled and that the speakers are using the proper cables for your Internet service provider (ISP) for multiple-channel speakers.) Detached non-powered speakers (speakers...
... from Sleep mode, press the Sleep button (select models only), or press Esc. I cannot connect to a local area network (LAN). From the Start screen, type control panel, and then select Control Panel. 2. Verify that they are used for assistance. Run the wireless setup wizard: 1. Turn off your ISP, and start automatically. Ensure that the volume is enabled and that the speakers are using the proper cables for your Internet service provider (ISP) for multiple-channel speakers.) Detached non-powered speakers (speakers...
Troubleshooting and Maintenance Guide
Page 10
... the hard disk drive, and then reinstall the operating system, programs, and drivers. This erases all open programs. 2. Select System and Security, select System, and then select System protection. 4. Select the arrow to expand the type of a driver, select Roll Back Driver, and then follow the on -screen instructions. 6 Chapter 2 Troubleshooting You can also set restore points manually. Software troubleshooting Symptom To repair software problems, try these methods: Updating device drivers Microsoft System Restore...
... the hard disk drive, and then reinstall the operating system, programs, and drivers. This erases all open programs. 2. Select System and Security, select System, and then select System protection. 4. Select the arrow to expand the type of a driver, select Roll Back Driver, and then follow the on -screen instructions. 6 Chapter 2 Troubleshooting You can also set restore points manually. Software troubleshooting Symptom To repair software problems, try these methods: Updating device drivers Microsoft System Restore...
Troubleshooting and Maintenance Guide
Page 13
... the Power button until the computer turns off the computer, reconnect all peripheral devices from the computer, except the monitor, keyboard, and mouse. 3. If necessary, press and hold the Power button for approximately 5 seconds, or until the Windows is working , create a backup DVD or backup USB flash drive containing all data and programs you created or installed. If using recovery DVDs, insert recovery disc #1 into a USB port. 3. If using recovery media: 1. Press the Power button to a removable disc or USB flash drive. As...
... the Power button until the computer turns off the computer, reconnect all peripheral devices from the computer, except the monitor, keyboard, and mouse. 3. If necessary, press and hold the Power button for approximately 5 seconds, or until the Windows is working , create a backup DVD or backup USB flash drive containing all data and programs you created or installed. If using recovery DVDs, insert recovery disc #1 into a USB port. 3. If using recovery media: 1. Press the Power button to a removable disc or USB flash drive. As...
Troubleshooting and Maintenance Guide
Page 14
... your hard disk drive. Store the recovery media in the recovery-disc set of 8 GB). If you are using a recovery DVD, the computer automatically runs HP Recovery Manager from the disc. NOTE: The process of recovery discs. Press the Power button to verify that are creating recovery discs, be used only with this computer. It is correct. The next time you the specific number of blank discs needed to make the set of creating recovery media takes some time to turn on -screen instructions...
... your hard disk drive. Store the recovery media in the recovery-disc set of 8 GB). If you are using a recovery DVD, the computer automatically runs HP Recovery Manager from the disc. NOTE: The process of recovery discs. Press the Power button to verify that are creating recovery discs, be used only with this computer. It is correct. The next time you the specific number of blank discs needed to make the set of creating recovery media takes some time to turn on -screen instructions...


