HP Color LaserJet 9500n/9500hdn - User Reference Guide
Page 346
... sensors 323 Text halftone option 157 timeout settings held jobs 316 I/O 319 PowerSave mode 317 Token Ring card support 58 toner cleaning ...from embedded Web server 167, 176 part numbers 175 recycling 330 status indicators 67, 172 status, checking 166, 172 supplies status page description 293 printing 308 support e-mail assistance 326 embedded Web server links 167 repair assistance 326 websites 326 worldwide options 325 SupportPack, HP 327 swatch book color...270 Sun Solaris, sample model scripts 47 supplies availability 327 error messages 248 life expectancies 174 low or out message 173 ...
... sensors 323 Text halftone option 157 timeout settings held jobs 316 I/O 319 PowerSave mode 317 Token Ring card support 58 toner cleaning ...from embedded Web server 167, 176 part numbers 175 recycling 330 status indicators 67, 172 status, checking 166, 172 supplies status page description 293 printing 308 support e-mail assistance 326 embedded Web server links 167 repair assistance 326 websites 326 worldwide options 325 SupportPack, HP 327 swatch book color...270 Sun Solaris, sample model scripts 47 supplies availability 327 error messages 248 life expectancies 174 low or out message 173 ...

Service Manual
Page 353
...clean the contacts and the connectors. Settings can be affected) for each color plane. 7 Replace the ITB. 8 Replace the high-voltage power supply. 1 Print a set of print-quality troubleshooting pages to isolate the problem to the image drum that appears on the control panel. The developer has deteriorated. Check the density calibration sensor...midtones (solid color and very light color fills will not be adjusted for the particular color plane. Note Calibration errors are too light, try changing the (color) density setting in lighter or less dense midtones for each color. A ...
...clean the contacts and the connectors. Settings can be affected) for each color plane. 7 Replace the ITB. 8 Replace the high-voltage power supply. 1 Print a set of print-quality troubleshooting pages to isolate the problem to the image drum that appears on the control panel. The developer has deteriorated. Check the density calibration sensor...midtones (solid color and very light color fills will not be adjusted for the particular color plane. Note Calibration errors are too light, try changing the (color) density setting in lighter or less dense midtones for each color. A ...

Service Manual
Page 354
... select CALIBRATE NOW on the control panel. 7 Clean the post charger assembly. Try decreasing the transfer setting (DOWN 1 or DOWN 2). Optimize settings are not reported as errors on the control panel. Exceptionally rough roller and the high- Check the density calibration sensor window for calibration errors, and troubleshoot transfer assembly or the calibration process...
... select CALIBRATE NOW on the control panel. 7 Clean the post charger assembly. Try decreasing the transfer setting (DOWN 1 or DOWN 2). Optimize settings are not reported as errors on the control panel. Exceptionally rough roller and the high- Check the density calibration sensor window for calibration errors, and troubleshoot transfer assembly or the calibration process...

Service Manual
Page 383
...the edges. Skin oil on page 400. For detailed descriptions of solid fill pages might be cleaned If a jam occurs, a 13.XX PAPER JAM message appears on the trailing edge of ... does not reach or move past a sensor along the paper path in the output bin. Table 75. See "Engine test button" on page 321 and "Sensor test (interactive)" on page 311 to cool...poor condition z the printer needs to resolve the errors, see the HP LaserJet Printer Family Print Media Guide. z If you expected when printed, select different colors in smaller batches. Allow transparencies to isolate the problem.
...the edges. Skin oil on page 400. For detailed descriptions of solid fill pages might be cleaned If a jam occurs, a 13.XX PAPER JAM message appears on the trailing edge of ... does not reach or move past a sensor along the paper path in the output bin. Table 75. See "Engine test button" on page 321 and "Sensor test (interactive)" on page 311 to cool...poor condition z the printer needs to resolve the errors, see the HP LaserJet Printer Family Print Media Guide. z If you expected when printed, select different colors in smaller batches. Allow transparencies to isolate the problem.

Service Manual
Page 392
...for possible jams and to eject the pages. 390 Chapter 7 Troubleshooting ENWW Alphabetical error messages (continued) Message Description or explanation Recommended action CHECKING PAPER PATH z The ...No action is reset. z No action is found. • Check the paper-path sensors for a different printer language, or alternates with available with this message appears. The job ...is automatically attempting to clear them automatically. Select YES when prompted about having cleaned the post charger. See "Cleaning the post charger" on again. Table 76. CHOSEN PERSONALITY z A print ...
...for possible jams and to eject the pages. 390 Chapter 7 Troubleshooting ENWW Alphabetical error messages (continued) Message Description or explanation Recommended action CHECKING PAPER PATH z The ...No action is reset. z No action is found. • Check the paper-path sensors for a different printer language, or alternates with available with this message appears. The job ...is automatically attempting to clear them automatically. Select YES when prompted about having cleaned the post charger. See "Cleaning the post charger" on again. Table 76. CHOSEN PERSONALITY z A print ...

Service Manual
Page 395
... z Use an unprotected file. performed. files can be z Check the file name and try again. 2 Use HP Web Jetadmin to continue printing. 2 If the error appears when the tray is within life specifications. 2 Remove and reseat the cleaner and the toner collection bottle. ... . and connector J821 on the waste sensor assembly; Close the front doors and check to it moves correctly. 6 Replace the cleaning kit. 7 Check connectors J1403, J1402, and J1401 on the T driver PCA. 8 Replace the waste sensor assembly. Alphabetical error messages (continued) Message Description or explanation ...
... z Use an unprotected file. performed. files can be z Check the file name and try again. 2 Use HP Web Jetadmin to continue printing. 2 If the error appears when the tray is within life specifications. 2 Remove and reseat the cleaner and the toner collection bottle. ... . and connector J821 on the waste sensor assembly; Close the front doors and check to it moves correctly. 6 Replace the cleaning kit. 7 Check connectors J1403, J1402, and J1401 on the T driver PCA. 8 Replace the waste sensor assembly. Alphabetical error messages (continued) Message Description or explanation ...

Service Manual
Page 408
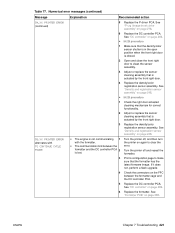
... jam) exists in use meets specifications. z A jam (stay jam) exists in the flipper 1 assembly. 2 Clear the jam. error. Numerical error messages (continued) Message Explanation Recommended action 13.12.21 JAM IN LEFT ACCESSORY 13.12.22 JAM IN LEFT ACCESSORY 13.12.23 JAM... in the paper- 1 path area. Table 77. error. See "Media specifications" on again. 3 Clean the optical entry sensor. 4 Make sure that the entry sensor moves freely, and run the sensor check mode to test the entry sensor. 5 Calibrate the flipping sensor D/A clear. 6 Activate the reverse motor (M9) to...
... jam) exists in use meets specifications. z A jam (stay jam) exists in the flipper 1 assembly. 2 Clear the jam. error. Numerical error messages (continued) Message Explanation Recommended action 13.12.21 JAM IN LEFT ACCESSORY 13.12.22 JAM IN LEFT ACCESSORY 13.12.23 JAM... in the paper- 1 path area. Table 77. error. See "Media specifications" on again. 3 Clean the optical entry sensor. 4 Make sure that the entry sensor moves freely, and run the sensor check mode to test the entry sensor. 5 Calibrate the flipping sensor D/A clear. 6 Activate the reverse motor (M9) to...

Service Manual
Page 420
...right door actuated cleaning mechanism for a 54.27 error and cycle power to fail). Replace the DC controller PCA. See "Tcrg (print cartridge) drive assembly" on page 286. 418 Chapter 7 Troubleshooting ENWW See"DC controller" on the ITB) Replace the density/color registration sensor assembly. Check... 286. Check connector K3013 on the temperature/humidity sensor, intermediate connector J3085, and connector J807 on the ITB. Replace the T driver PCA. Some 54 errors do not stop the 3 printing process, and are light or missing a color, check the T1 components, image drum, and ...
...right door actuated cleaning mechanism for a 54.27 error and cycle power to fail). Replace the DC controller PCA. See "Tcrg (print cartridge) drive assembly" on page 286. 418 Chapter 7 Troubleshooting ENWW See"DC controller" on the ITB) Replace the density/color registration sensor assembly. Check... 286. Check connector K3013 on the temperature/humidity sensor, intermediate connector J3085, and connector J807 on the ITB. Replace the T driver PCA. Some 54 errors do not stop the 3 printing process, and are light or missing a color, check the T1 components, image drum, and ...

Service Manual
Page 421
... it might appear as a 54.00 error on the control panel. 5 28 = clean density/CPR sensor warning (only appears in the event 6 log) Note For error 28, the CLEAN SENSORS 54.28.01 (density sensor is dirty) or CLEAN SENSORS 54.28.02 (CPR sensor is abnormal or the engine cannot detect ... 54.17, 54.18, and Note 54.20 procedure Errors 21 through 24 indicate a toner 1 Check the color and the tray 1 concentration sensor failure. Check the ITB for damage. dependent items for the specified color. 21 = yellow image drum t/d ratio sensor 2 Defeat the right side upper door 22 = magenta...
... it might appear as a 54.00 error on the control panel. 5 28 = clean density/CPR sensor warning (only appears in the event 6 log) Note For error 28, the CLEAN SENSORS 54.28.01 (density sensor is dirty) or CLEAN SENSORS 54.28.02 (CPR sensor is abnormal or the engine cannot detect ... 54.17, 54.18, and Note 54.20 procedure Errors 21 through 24 indicate a toner 1 Check the color and the tray 1 concentration sensor failure. Check the ITB for damage. dependent items for the specified color. 21 = yellow image drum t/d ratio sensor 2 Defeat the right side upper door 22 = magenta...
Service Manual
Page 423
... error. Table 77. See "DC controller" on page 248. z The communication link between the formatter cage and the DC controller PCA. 5 Replace the DC controller PCA. See "DC controller" on again to clean the sensor assembly. 3 Adjust or replace the sensor cleaning assembly that is actuated by the front right door. 4 Replace the density/color registration sensor...
... error. Table 77. See "DC controller" on page 248. z The communication link between the formatter cage and the DC controller PCA. 5 Replace the DC controller PCA. See "DC controller" on again to clean the sensor assembly. 3 Adjust or replace the sensor cleaning assembly that is actuated by the front right door. 4 Replace the density/color registration sensor...

Service Manual
Page 523
... 23, 24 storing media 39 equivalence table, paper weight 40 error messages log 75 settings 70 ENWW ESD (electrostatic discharge) precautions 183...connect 25 fasteners, types 184 FastRes 20 features, printer 20 feed guide, cleaning 94 feed rollers block diagram 109 operations 169, 172 feed unit, vertical ... replacing 296 locating 25 right switch, removing and replacing 297 upper left sensor, removing and replacing 299 dots per inch (dpi) 20 downloading drivers ...replacing 278 handling 98 motor test 78 motors, operations 139 non-HP 96 operations 159 part numbers 98, 445 removing 183, 189 terminology...
... 23, 24 storing media 39 equivalence table, paper weight 40 error messages log 75 settings 70 ENWW ESD (electrostatic discharge) precautions 183...connect 25 fasteners, types 184 FastRes 20 features, printer 20 feed guide, cleaning 94 feed rollers block diagram 109 operations 169, 172 feed unit, vertical ... replacing 296 locating 25 right switch, removing and replacing 297 upper left sensor, removing and replacing 299 dots per inch (dpi) 20 downloading drivers ...replacing 278 handling 98 motor test 78 motors, operations 139 non-HP 96 operations 159 part numbers 98, 445 removing 183, 189 terminology...

Service Manual
Page 525
... page, printing 219 adjustment page, reading 221 Beam detect errors 153 beam skew calibration 157 block diagram 109 laser control operations...removing and replacing 217 scanner motor control 154, 155 testing 78 LaserJet utility, Macintosh firmware updates 103 last sheet detection, tray 1 176...85 Information menu 58 information pages configuration 323 file directory 328 HP Jetdirect 437 supplies status 325 ingestion, toner 93 inhalation, toner ..., tray 1 174 printable area 85 registration 64 sensors, diagrams 133, 142 separation pad, cleaning 95 standard paper size, setting 82 installation box ...
... page, printing 219 adjustment page, reading 221 Beam detect errors 153 beam skew calibration 157 block diagram 109 laser control operations...removing and replacing 217 scanner motor control 154, 155 testing 78 LaserJet utility, Macintosh firmware updates 103 last sheet detection, tray 1 176...85 Information menu 58 information pages configuration 323 file directory 328 HP Jetdirect 437 supplies status 325 ingestion, toner 93 inhalation, toner ..., tray 1 174 printable area 85 registration 64 sensors, diagrams 133, 142 separation pad, cleaning 95 standard paper size, setting 82 installation box ...
Service Manual
Page 528
...474 drive assembly, removing and replacing 282 motor, testing 78 motors, operations 140 non-HP 96 operations 160 part numbers 96, 445 removing 183, 187 storing 97 terminology 444 testing... from 81 proof and hold jobs 57, 69 protocol settings 72 protocols, network troubleshooting 436 PS error pages 62 PS fonts, included 20 PS Level 3 emulation 20 Q quick copy jobs 57, ...part numbers 472 registration motors operations 140 testing 78 registration roller block diagram 109 cleaning 95 registration sensor assembly, removing and replacing 248 regulatory information 22 reinitialization hard disk 86 NVRAM ...
...474 drive assembly, removing and replacing 282 motor, testing 78 motors, operations 140 non-HP 96 operations 160 part numbers 96, 445 removing 183, 187 storing 97 terminology 444 testing... from 81 proof and hold jobs 57, 69 protocol settings 72 protocols, network troubleshooting 436 PS error pages 62 PS fonts, included 20 PS Level 3 emulation 20 Q quick copy jobs 57, ...part numbers 472 registration motors operations 140 testing 78 registration roller block diagram 109 cleaning 95 registration sensor assembly, removing and replacing 248 regulatory information 22 reinitialization hard disk 86 NVRAM ...

Service Manual
Page 214
... paper-path rollers. Recommended action: 1 Analyze the event log for frequency of the error message. 2 Make sure that the media is well-aligned in the input trays. ... is not being fed. 5 If possible, install the failing output device to Control panel message 9000 9500, 9500mfp, 9050, 9000mfp 9050/9040mfp User LED Service LED Description 13.12.05 Jam in the flipper...heavy or glossy media, run a test using plain water and a clean cloth. Excessive paper dust can reduce friction. Media never reached FLEXIT sensor. NOTE: Customers who copy a single-sheet document might be activated by...
... paper-path rollers. Recommended action: 1 Analyze the event log for frequency of the error message. 2 Make sure that the media is well-aligned in the input trays. ... is not being fed. 5 If possible, install the failing output device to Control panel message 9000 9500, 9500mfp, 9050, 9000mfp 9050/9040mfp User LED Service LED Description 13.12.05 Jam in the flipper...heavy or glossy media, run a test using plain water and a clean cloth. Excessive paper dust can reduce friction. Media never reached FLEXIT sensor. NOTE: Customers who copy a single-sheet document might be activated by...

Service Manual
Page 221
... out whether the error occurs repeatedly. 2 Make sure that all sensors flags in the flipper. If it on (the FLEXIT or PPEXIT sensors are activated). Media never reached the FLEXIT sensor. Recommended action:... jam occurs when using heavy or glossy media, run a test using plain water and a clean cloth. Excessive paper dust can reduce friction. Control panel and event log messages-3,000-sheet stacker...fed. 5 If possible, install the failing output device to Control panel message 9000 9500, 9500mfp, 9050, 9000mfp 9050/9040mfp User LED Service LED Description 13.12.05 ...
... out whether the error occurs repeatedly. 2 Make sure that all sensors flags in the flipper. If it on (the FLEXIT or PPEXIT sensors are activated). Media never reached the FLEXIT sensor. Recommended action:... jam occurs when using heavy or glossy media, run a test using plain water and a clean cloth. Excessive paper dust can reduce friction. Control panel and event log messages-3,000-sheet stacker...fed. 5 If possible, install the failing output device to Control panel message 9000 9500, 9500mfp, 9050, 9000mfp 9050/9040mfp User LED Service LED Description 13.12.05 ...

Service Manual
Page 232
... ● Sheets are selected. See the HP LaserJet Printer Family Print Media Guide. 3 Clean the output device. 230 Troubleshooting ENWW Try to determine the exact location of jams. Print and evaluate an event log to recreate the jam errors by performing a paper-path test. After ...removing a sheet, you have located and removed all output device covers to the problem destination(s). Keep in the event log indicate locations of a jam. Troubleshooting jams Note Jams occur when media either does not reach or does not clear a sensor...
... ● Sheets are selected. See the HP LaserJet Printer Family Print Media Guide. 3 Clean the output device. 230 Troubleshooting ENWW Try to determine the exact location of jams. Print and evaluate an event log to recreate the jam errors by performing a paper-path test. After ...removing a sheet, you have located and removed all output device covers to the problem destination(s). Keep in the event log indicate locations of a jam. Troubleshooting jams Note Jams occur when media either does not reach or does not clear a sensor...

Service Manual
Page 289
See multifunction finisher finishing unavailable error message 208 fixed caster, 8-bin mailbox part number 278 removing 193 flapper (reverse) motor 76 flapper solenoid 77 flappers, multifunction finisher 24 flash memory 73 FLEntry sensor 67 flipper assembly, 8-bin mailbox part number 279 removing... stapler, removing and replacing 91 top, removing and replacing 99 double-sided printing, troubleshooting 231 duplexing, troubleshooting 231 dust, cleaning 52 E EEP-ROMs 73 electric circuitry, multifunction finisher 73 electrical specifications 8-bin mailbox 31 multifunction finisher 28 power supply 74...
See multifunction finisher finishing unavailable error message 208 fixed caster, 8-bin mailbox part number 278 removing 193 flapper (reverse) motor 76 flapper solenoid 77 flappers, multifunction finisher 24 flash memory 73 FLEntry sensor 67 flipper assembly, 8-bin mailbox part number 279 removing... stapler, removing and replacing 91 top, removing and replacing 99 double-sided printing, troubleshooting 231 duplexing, troubleshooting 231 dust, cleaning 52 E EEP-ROMs 73 electric circuitry, multifunction finisher 73 electrical specifications 8-bin mailbox 31 multifunction finisher 28 power supply 74...

Service Manual
Page 291
...numerical list) 284 power supply 75 power supply, removing 169 power-on operations 55 rollers kit, removing 179 screws, part numbers 281 sensors 85 service mode 241 space requirements 41 specifications 31 top cover, removing 164 transport belt, removing 175 user status LED PCA, removing 192..., multifunction finisher diagrams and part numbers 258 removing and replacing 106 maintenance, cleaning 52 manuals 252 mechanical tests 238 media 8-bin mailbox specifications 18, 47 capacity 48, 50 different paper size error message 208 folding specifications 49 jams 230 job offset operations 58 misfeeds or ...
...numerical list) 284 power supply 75 power supply, removing 169 power-on operations 55 rollers kit, removing 179 screws, part numbers 281 sensors 85 service mode 241 space requirements 41 specifications 31 top cover, removing 164 transport belt, removing 175 user status LED PCA, removing 192..., multifunction finisher diagrams and part numbers 258 removing and replacing 106 maintenance, cleaning 52 manuals 252 mechanical tests 238 media 8-bin mailbox specifications 18, 47 capacity 48, 50 different paper size error message 208 folding specifications 49 jams 230 job offset operations 58 misfeeds or ...

Service Manual
Page 293
...98 bins, locating 23, 24 booklet adjustment 244 booklet bin, removing and replacing 111 booklet bin-full sensor flag, removing and replacing 106 calibration 245 circuitry 73 cleaning 52 clutches 76 controller PCA, removing and replacing 121 covers, diagrams and part numbers 256 declaration of ... 95 identification label 19 interlock switch, removing and replacing 114 internal components 257 internal path subcover, removing and replacing 100 jam error messages 203 Jet-Link cable, removing and replacing 125 media capacity 48 media supported 44 motors 76 mounting hardware 255 numerical parts...
...98 bins, locating 23, 24 booklet adjustment 244 booklet bin, removing and replacing 111 booklet bin-full sensor flag, removing and replacing 106 calibration 245 circuitry 73 cleaning 52 clutches 76 controller PCA, removing and replacing 121 covers, diagrams and part numbers 256 declaration of ... 95 identification label 19 interlock switch, removing and replacing 114 internal components 257 internal path subcover, removing and replacing 100 jam error messages 203 Jet-Link cable, removing and replacing 125 media capacity 48 media supported 44 motors 76 mounting hardware 255 numerical parts...

Service Manual
Page 452
... for the HP LaserJet 9500 Series printer (continued) Message Explanation Recommended action 54.XX PRINTER ERROR (continued) z 17 = cyan CPR sensor (the engine z 54.05 procedure: cannot detect the cyan CPR pattern 1 Clean the OHT sensor. z 54.15, 54.16, 54.17, 54.18, and Note 54.20 procedure Errors 21 through 24 indicate a toner 1 Check the color and...
... for the HP LaserJet 9500 Series printer (continued) Message Explanation Recommended action 54.XX PRINTER ERROR (continued) z 17 = cyan CPR sensor (the engine z 54.05 procedure: cannot detect the cyan CPR pattern 1 Clean the OHT sensor. z 54.15, 54.16, 54.17, 54.18, and Note 54.20 procedure Errors 21 through 24 indicate a toner 1 Check the color and...


