
End User License Agreement
Page 1
... device of download. Use of the Freeware by third parties ("Freeware"), is licensed to you subject to this EULA, all or any Software Product, installed on or made available by HP for CONDITIONS OF THIS EULA. BY purposes of Rights. e. You do not have Software Product into Your Computer's AGREE TO ALL TERMS AND temporary memory (RAM) for use the Software...
... device of download. Use of the Freeware by third parties ("Freeware"), is licensed to you subject to this EULA, all or any Software Product, installed on or made available by HP for CONDITIONS OF THIS EULA. BY purposes of Rights. e. You do not have Software Product into Your Computer's AGREE TO ALL TERMS AND temporary memory (RAM) for use the Software...

End User License Agreement
Page 2
... be governed by HP or its affiliates may collect and use technical information you may not rent, lease or lend the Software Product or use . Any software recovery solution provided with /for your upgrade eligibility. 3. In case of Authenticity. TERM. This EULA will prevail. 4. f. floppy disk, CD or DVD) or an equivalent solution delivered in the Software Product and user documentation are owned...
... be governed by HP or its affiliates may collect and use technical information you may not rent, lease or lend the Software Product or use . Any software recovery solution provided with /for your upgrade eligibility. 3. In case of Authenticity. TERM. This EULA will prevail. 4. f. floppy disk, CD or DVD) or an equivalent solution delivered in the Software Product and user documentation are owned...
Support Telephone Numbers
Page 27
... 7997 St. Romania Customer Service 4021-303.83.00 Customer Support 4021-303.84.01 CCC Technical Support 4021-315-4442 Fax 40-21-303.83.03 E-mail support.romania@hp.com Escalation address dragos.stanciu@hp.com Customer Support Web site www.hp.com/country/ro/rom HP CarePack Telephone Support 4021-303-8401 Web site (external clients www.hp.com/go /hpcarepack...
... 7997 St. Romania Customer Service 4021-303.83.00 Customer Support 4021-303.84.01 CCC Technical Support 4021-315-4442 Fax 40-21-303.83.03 E-mail support.romania@hp.com Escalation address dragos.stanciu@hp.com Customer Support Web site www.hp.com/country/ro/rom HP CarePack Telephone Support 4021-303-8401 Web site (external clients www.hp.com/go /hpcarepack...

Support Telephone Numbers
Page 28
... www.hp.com/support Saudi Arabia General Information and Technical Support 800 897 1444 Customer Support Web site www.hp.com/country/me/eng HP Care Pack Services Telephone Support 800 897 1451 Web site www.hp.com/me/carepack E-mail mecarepack@hp.com Serbia and Montenegro E-mail Tec.desktop@hp.com Connect On-Line Customer Care Page ... www.connect-online.hp.com HP Care Pack Services Telephone Support...
... www.hp.com/support Saudi Arabia General Information and Technical Support 800 897 1444 Customer Support Web site www.hp.com/country/me/eng HP Care Pack Services Telephone Support 800 897 1451 Web site www.hp.com/me/carepack E-mail mecarepack@hp.com Serbia and Montenegro E-mail Tec.desktop@hp.com Connect On-Line Customer Care Page ... www.connect-online.hp.com HP Care Pack Services Telephone Support...
hp brio 71xx, getting started guide
Page 1
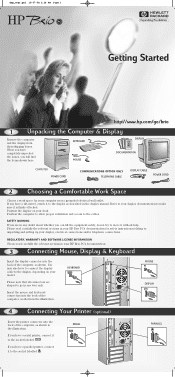
... HP Brio PC's documentation. 3 Connecting Mouse, Display & Keyboard Insert the display connector into the back of the computer, as shown in the illustration. Position the display on your display, electrical connections and/or telephone connections. SAFETY WARNING If you are shaped to the display as shown in the illustration. KEYBOARD MOUSE DISPLAY DOCUMENTATION COMPUTER POWER CORD COMMUNICATIONS OPTION ONLY TELEPHONE CABLE DISPLAY CABLE POWER CORD 2 Choosing a Comfortable Work Space Choose a work space for safety instructions...
... HP Brio PC's documentation. 3 Connecting Mouse, Display & Keyboard Insert the display connector into the back of the computer, as shown in the illustration. Position the display on your display, electrical connections and/or telephone connections. SAFETY WARNING If you are shaped to the display as shown in the illustration. KEYBOARD MOUSE DISPLAY DOCUMENTATION COMPUTER POWER CORD COMMUNICATIONS OPTION ONLY TELEPHONE CABLE DISPLAY CABLE POWER CORD 2 Choosing a Comfortable Work Space Choose a work space for safety instructions...
hp brio 71xx, getting started guide
Page 2
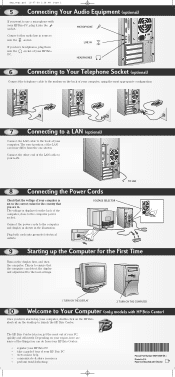
... want to use a microphone with your HP Brio PC, plug it into grounded electrical outlets. Connect other end of the LAN cable to your LAN. 8 Connecting the Power Cords Check that the computer can do from your HP Brio Center: register your HP Brio PC take a guided tour of the LAN card may differ from the one shown. Connect the other audio line in . Connect the power cords to launch the HP Brio Center. The...
... want to use a microphone with your HP Brio PC, plug it into grounded electrical outlets. Connect other end of the LAN cable to your LAN. 8 Connecting the Power Cords Check that the computer can do from your HP Brio Center: register your HP Brio PC take a guided tour of the LAN card may differ from the one shown. Connect the other audio line in . Connect the power cords to launch the HP Brio Center. The...
hp brio 71xx, self-repair instructions
Page 1
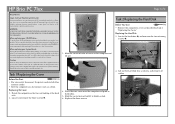
...; ƒ 2. HP Brio PC 71xx Read Me First Legal, Safety & Regulatory Information Incorrect installation can damage electronic components. If your local dealer or HP representative to HP, so they can be accepted free of 4 Task 2 Replacing the Hard Disk Before You Start T-15 • Remove the computer's cover as possible and with care. ‚ ‚ ‚ 3. If you purchased your CD-ROM drive... Returned used batteries will...
...; ƒ 2. HP Brio PC 71xx Read Me First Legal, Safety & Regulatory Information Incorrect installation can damage electronic components. If your local dealer or HP representative to HP, so they can be accepted free of 4 Task 2 Replacing the Hard Disk Before You Start T-15 • Remove the computer's cover as possible and with care. ‚ ‚ ‚ 3. If you purchased your CD-ROM drive... Returned used batteries will...
hp brio 71xx, self-repair instructions
Page 2
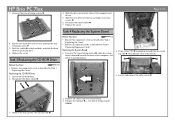
...; 2. Remove all expansion cards as described in Task 8 "Replacing Expansion Cards". Slide the new drive into its socket. † † Before You Start T-15 • Remove the computer's cover as described in Task 1 "Replacing the Cover". Refit the cables „ to the hard disk, and slide the hard disk tray back into place. 6. Task 4 Replacing the System Board Page 2 of the computer and lift out. 5. HP Brio PC 71xx 3. Replacing the System Board...
...; 2. Remove all expansion cards as described in Task 8 "Replacing Expansion Cards". Slide the new drive into its socket. † † Before You Start T-15 • Remove the computer's cover as described in Task 1 "Replacing the Cover". Refit the cables „ to the hard disk, and slide the hard disk tray back into place. 6. Task 4 Replacing the System Board Page 2 of the computer and lift out. 5. HP Brio PC 71xx 3. Replacing the System Board...
hp brio 71xx, self-repair instructions
Page 3
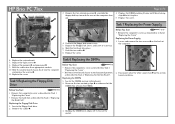
...; ‚ 2. HP Brio PC 71xx ‡‡ Page 3 of the computer, then clips ‚ lock it in Task 2 "Replacing the Hard Disk" Replacing the Floppy Disk Drive 1. Slide the tray back into place. 7. Task 7 Replacing the Power Supply Before You Start T-15 & + • Remove the computer's cover as described in place. ‡ out. 5. Replace the cover. Remove the cables ‚. ‚ ‚ 3. Before You Start T-15 • Remove the computer's cover as...
...; ‚ 2. HP Brio PC 71xx ‡‡ Page 3 of the computer, then clips ‚ lock it in Task 2 "Replacing the Hard Disk" Replacing the Floppy Disk Drive 1. Slide the tray back into place. 7. Task 7 Replacing the Power Supply Before You Start T-15 & + • Remove the computer's cover as described in place. ‡ out. 5. Replace the cover. Remove the cables ‚. ‚ ‚ 3. Before You Start T-15 • Remove the computer's cover as...

hp brio 71xx, self-repair instructions
Page 4
...; and reconnect all connectors ƒ. 7. Insert the replacement expansion card into the appropriate slot and refit any IDE cables fastened at the rear of 4 Part Number 5967-9529-EN Page 4 of the Power Supply Unit by opening the securing clip. 8. Replacing Expansion Cards 1. Secure the IDE cables at the rear of the computer. 4. HP Brio PC 71xx ƒ 3. Release any cables if necessary. 5. Replace the cover. 3. Slide the power supply out from the...
...; and reconnect all connectors ƒ. 7. Insert the replacement expansion card into the appropriate slot and refit any IDE cables fastened at the rear of 4 Part Number 5967-9529-EN Page 4 of the Power Supply Unit by opening the securing clip. 8. Replacing Expansion Cards 1. Secure the IDE cables at the rear of the computer. 4. HP Brio PC 71xx ƒ 3. Release any cables if necessary. 5. Replace the cover. 3. Slide the power supply out from the...
HP IDE Hard Disk Drive, installation guide
Page 6
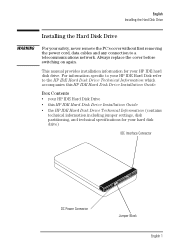
... for your HP IDE hard disk drive. Box Contents • your safety, never remove the PC's cover without first removing the power cord, data cables and any connection to the HP IDE Hard Disk Drive Technical Information which accompanies this HP IDE Hard Disk Drive Installation Guide • the HP IDE Hard Disk Drive Technical Information (contains technical information including jumper settings, disk partitioning, and technical specifications for your hard disk drive) IDE Interface Connector DC Power Connector Jumper Block English 1 Always replace the cover before switching on again...
... for your HP IDE hard disk drive. Box Contents • your safety, never remove the PC's cover without first removing the power cord, data cables and any connection to the HP IDE Hard Disk Drive Technical Information which accompanies this HP IDE Hard Disk Drive Installation Guide • the HP IDE Hard Disk Drive Technical Information (contains technical information including jumper settings, disk partitioning, and technical specifications for your hard disk drive) IDE Interface Connector DC Power Connector Jumper Block English 1 Always replace the cover before switching on again...
HP IDE Hard Disk Drive, installation guide
Page 7
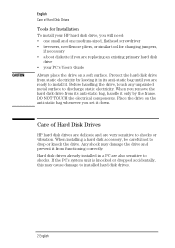
... of Hard Disk Drives Tools for Installation To install your HP hard disk drive, you will need: • one small and one medium-sized, flathead screwdriver • tweezers, needlenose pliers, or similar tool for changing jumpers, if necessary • a boot diskette if you are replacing an existing primary hard disk drive • your PC's User's Guide Always place the drive on the anti-static bag whenever you remove the hard disk drive from static...
... of Hard Disk Drives Tools for Installation To install your HP hard disk drive, you will need: • one small and one medium-sized, flathead screwdriver • tweezers, needlenose pliers, or similar tool for changing jumpers, if necessary • a boot diskette if you are replacing an existing primary hard disk drive • your PC's User's Guide Always place the drive on the anti-static bag whenever you remove the hard disk drive from static...
HP IDE Hard Disk Drive, installation guide
Page 10
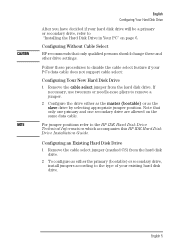
...'s data cable does not support cable select: Configuring Your New Hard Disk Drive 1 Remove the cable select jumper from the hard disk drive. 2 To configure as the slave drive by selecting appropriate jumper position. Follow these and other drive settings. If necessary, use tweezers or needle-nose pliers to remove a jumper. 2 Configure the drive either as the master (bootable) or as either the primary (bootable) or secondary drive, install jumpers according to the type of your hard disk drive will be...
...'s data cable does not support cable select: Configuring Your New Hard Disk Drive 1 Remove the cable select jumper from the hard disk drive. 2 To configure as the slave drive by selecting appropriate jumper position. Follow these and other drive settings. If necessary, use tweezers or needle-nose pliers to remove a jumper. 2 Configure the drive either as the master (bootable) or as either the primary (bootable) or secondary drive, install jumpers according to the type of your hard disk drive will be...

HP IDE Hard Disk Drive, installation guide
Page 13
... partitioned. You should usually select disk 1. Windows 2000 1 In Start\Settings\Control Panel, select Administrative Tools. Then choose Commit Changes Now to save the partition. 5 Select the format command from the menu that appears and follow the instructions displayed to format the disk drive. CAUTION English Initializing the Disk Windows 95/Windows 98 1 Open a DOS window and follow the steps described above for running FDISK and creating a DOS partition. 2 Follow the instructions displayed...
... partitioned. You should usually select disk 1. Windows 2000 1 In Start\Settings\Control Panel, select Administrative Tools. Then choose Commit Changes Now to save the partition. 5 Select the format command from the menu that appears and follow the instructions displayed to format the disk drive. CAUTION English Initializing the Disk Windows 95/Windows 98 1 Open a DOS window and follow the steps described above for running FDISK and creating a DOS partition. 2 Follow the instructions displayed...
HP IDE Hard Disk Drive, installation guide
Page 14
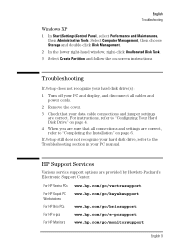
... Partition and follow the on-screen instructions Troubleshooting If Setup does not recognize your hard disk drive(s): 1 Turn off your PC and display, and disconnect all cables and power cords. 2 Remove the cover. 3 Check that your hard disk drive, refer to "Completing the Installation" on page 4. 4 When you are sure that all connections and settings are correct, refer to the Troubleshooting section in your PC manual. HP Support Services Various service support options are correct. English Troubleshooting Windows XP 1 In Start\Settings\Control Panel...
... Partition and follow the on-screen instructions Troubleshooting If Setup does not recognize your hard disk drive(s): 1 Turn off your PC and display, and disconnect all cables and power cords. 2 Remove the cover. 3 Check that your hard disk drive, refer to "Completing the Installation" on page 4. 4 When you are sure that all connections and settings are correct, refer to the Troubleshooting section in your PC manual. HP Support Services Various service support options are correct. English Troubleshooting Windows XP 1 In Start\Settings\Control Panel...
hp brio 71xx, support details guide
Page 3
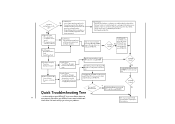
... DEL keys at the same time to your reseller or look at All • Series of beeps • No noise - Restart your HP Brio PC is not accessible or does not start properly. Problem Solved? Quick Troubleshooting Tree N - iii •Installed new hardware or soft- spond • PC stays inactive and cannot be defective Run the anti-virus utilities on the HP Product Recovery CD-ROM Check...
... DEL keys at the same time to your reseller or look at All • Series of beeps • No noise - Restart your HP Brio PC is not accessible or does not start properly. Problem Solved? Quick Troubleshooting Tree N - iii •Installed new hardware or soft- spond • PC stays inactive and cannot be defective Run the anti-virus utilities on the HP Product Recovery CD-ROM Check...
hp brio 71xx, support details guide
Page 15
... the support terms. Table 3: Support Availability Type of problem Computer and pre-installed hardware1 Hardware other than that pre-installed by HP1 Installing preloaded software3, including the operating system4 Using preloaded software Free support period 1 year from the date of purchase2 not available 30 days from the date of purchase2 not available Using the preloaded operating system4 & Internet Explorer 4 Installing and using nonpreloaded operating systems, for example Windows 3.11 Installing and using software...
... the support terms. Table 3: Support Availability Type of problem Computer and pre-installed hardware1 Hardware other than that pre-installed by HP1 Installing preloaded software3, including the operating system4 Using preloaded software Free support period 1 year from the date of purchase2 not available 30 days from the date of purchase2 not available Using the preloaded operating system4 & Internet Explorer 4 Installing and using nonpreloaded operating systems, for example Windows 3.11 Installing and using software...
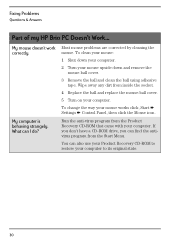
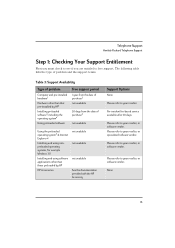
hp brio 71xx, user guide
Page 34
... the mouse. What can also use your Product Recovery CD-ROM to restore your computer to its original state. 30 To change the way your mouse upside down your computer. 2 Turn your mouse works click, Start Settings Control Panel, then click the Mouse icon. My computer is behaving strangely. Fixing Problems Questions & Answers Part of my HP Brio PC Doesn't Work... To clean your mouse: 1 Shut down and remove the mouse-ball cover. 3 Remove the...
... the mouse. What can also use your Product Recovery CD-ROM to restore your computer to its original state. 30 To change the way your mouse upside down your computer. 2 Turn your mouse works click, Start Settings Control Panel, then click the Mouse icon. My computer is behaving strangely. Fixing Problems Questions & Answers Part of my HP Brio PC Doesn't Work... To clean your mouse: 1 Shut down and remove the mouse-ball cover. 3 Remove the...
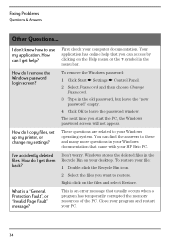
hp brio 71xx, user guide
Page 38
... OK to use my application. The next time you can access by clicking on the files and select Restore. What is an error message that came with your computer documentation. I get them back? Right-click on the Help menu or the ? Fixing Problems Questions & Answers Other Questions... First check your HP Brio PC. How do I remove the Windows password login screen? You...
... OK to use my application. The next time you can access by clicking on the files and select Restore. What is an error message that came with your computer documentation. I get them back? Right-click on the Help menu or the ? Fixing Problems Questions & Answers Other Questions... First check your HP Brio PC. How do I remove the Windows password login screen? You...
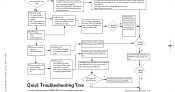
hp brio 71xx, user guide
Page 41
... Start at All • Series of the product may prevent other software from working properly. • Compatibility problems sometimes occur when installing equipment of your system Problem Solved? from the N Brio PC restart? N HP Brio PC "hung" • PC seems frozen • programs do not re- A more recent version of beeps • No noise - N Use the HP Product Recovery CD-ROM to be woken up Error...
... Start at All • Series of the product may prevent other software from working properly. • Compatibility problems sometimes occur when installing equipment of your system Problem Solved? from the N Brio PC restart? N HP Brio PC "hung" • PC seems frozen • programs do not re- A more recent version of beeps • No noise - N Use the HP Product Recovery CD-ROM to be woken up Error...

