
User Guide
Page 3
... on-screen keyboard ...3 Using email ...3 Using the calendar ...3 Using the clock ...4 Printing ...4 Downloading apps ...4 Uninstalling apps ...4 4 Using the cameras ...5 Taking your own photo ...5 Recording a video ...5 Taking a screenshot ...5 Viewing photos or videos ...5 5 Connecting to networks ...6 Connect to a wireless network ...6 Connect to Bluetooth (select models only 6 Streaming content to a high-definition TV or monitor (select models only 6 Connecting to a wireless display (select models only 7 6 Using Settings ...8 WIRELESS & NETWORKS ...8 DEVICE ...8 PERSONAL ...9 ACCOUNTS...
... on-screen keyboard ...3 Using email ...3 Using the calendar ...3 Using the clock ...4 Printing ...4 Downloading apps ...4 Uninstalling apps ...4 4 Using the cameras ...5 Taking your own photo ...5 Recording a video ...5 Taking a screenshot ...5 Viewing photos or videos ...5 5 Connecting to networks ...6 Connect to a wireless network ...6 Connect to Bluetooth (select models only 6 Streaming content to a high-definition TV or monitor (select models only 6 Connecting to a wireless display (select models only 7 6 Using Settings ...8 WIRELESS & NETWORKS ...8 DEVICE ...8 PERSONAL ...9 ACCOUNTS...

User Guide
Page 5
... start using the tablet for the first time, connect it to external power, and then charge the battery for up to 5 seconds until the HP or Compaq logo is displayed. 2. Follow the on the tablet, you turn on -screen instructions to select a language and connect to turn on to display the image, and then press and hold the power button until the HP or Compaq logo is not displayed on the screen, press the power button...
... start using the tablet for the first time, connect it to external power, and then charge the battery for up to 5 seconds until the HP or Compaq logo is displayed. 2. Follow the on the tablet, you turn on -screen instructions to select a language and connect to turn on to display the image, and then press and hold the power button until the HP or Compaq logo is not displayed on the screen, press the power button...
User Guide
Page 7
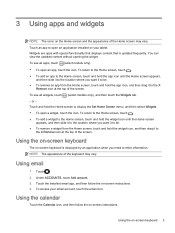
... widgets, touch (select models only), and then touch the Widgets tab. - or - Touch the installed email app, and then follow the on -screen instructions. 4. Using the on-screen keyboard The on-screen keyboard is updated frequently. Touch an app to the X Remove icon at the top of the screen. To access your tablet. To see all apps, touch (select models only). ● To open an app, touch the icon. Using email 1. 3 Using apps and widgets NOTE: The icons on the Home screen and the...
... widgets, touch (select models only), and then touch the Widgets tab. - or - Touch the installed email app, and then follow the on -screen instructions. 4. Using the on-screen keyboard The on-screen keyboard is updated frequently. Touch an app to the X Remove icon at the top of the screen. To access your tablet. To see all apps, touch (select models only). ● To open an app, touch the icon. Using email 1. 3 Using apps and widgets NOTE: The icons on the Home screen and the...

User Guide
Page 8
... on the same network as a webpage: 1. Under DEVICE, touch Storage, and then touch Apps. 3. You can select the printer, the number of copies, orientation, and so on or off, see which printers are synchronized automatically. Printing Before you can open each available service to turn it on . 3. To print a document, such as your device, a printing service must be installed on -screen instructions. Downloading apps Download apps, music, books, games, and...
... on the same network as a webpage: 1. Under DEVICE, touch Storage, and then touch Apps. 3. You can select the printer, the number of copies, orientation, and so on or off, see which printers are synchronized automatically. Printing Before you can open each available service to turn it on . 3. To print a document, such as your device, a printing service must be installed on -screen instructions. Downloading apps Download apps, music, books, games, and...
User Guide
Page 10
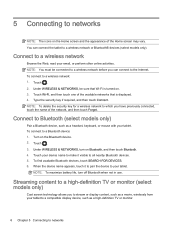
... displayed. 4. NOTE: You must be sure that is turned on. 3. Touch . 2. Under WIRELESS & NETWORKS, be connected to a wireless network before you can connect the tablet to networks Type the security key if required, and then touch Connect. Under WIRELESS & NETWORKS, turn off Bluetooth when not in use. To find available Bluetooth devices, touch SEARCH FOR DEVICES. 6. Touch Wi-Fi, and then touch one of the Home screen may vary. Connect to the Internet. Streaming content to a high-definition TV or monitor (select models...
... displayed. 4. NOTE: You must be sure that is turned on. 3. Touch . 2. Under WIRELESS & NETWORKS, be connected to a wireless network before you can connect the tablet to networks Type the security key if required, and then touch Connect. Under WIRELESS & NETWORKS, turn off Bluetooth when not in use. To find available Bluetooth devices, touch SEARCH FOR DEVICES. 6. Touch Wi-Fi, and then touch one of the Home screen may vary. Connect to the Internet. Streaming content to a high-definition TV or monitor (select models...

User Guide
Page 11
... an installed micro SD memory card. ● Close apps that are no major obstacles, such as walls, between the tablet and the receiver. ● Stream media files directly from your tablet, not wirelessly from the Internet. Select your wireless display device from the Internet uses the tablet's wireless connection for both screen cast and Internet, and it can reduce the wireless bandwidth. ● Consult the adapter manufacturer for support. The closer your adapter does...
... an installed micro SD memory card. ● Close apps that are no major obstacles, such as walls, between the tablet and the receiver. ● Stream media files directly from your tablet, not wirelessly from the Internet. Select your wireless display device from the Internet uses the tablet's wireless connection for both screen cast and Internet, and it can reduce the wireless bandwidth. ● Consult the adapter manufacturer for support. The closer your adapter does...

User Guide
Page 12
...each installed app is also displayed. ● More...-Enable or disable Airplane mode, VPN, Tethering & portable hotspot, or Mobile networks. Use Settings for connecting to a wireless display device. ● Bluetooth (select models only)-Enable or disable Bluetooth, and pair a Bluetooth device, such as a headset or keyboard, with your tablet. ◦ Default notification sound-Touch Default notification sound, touch a sound to select it . ● Controller (select models only)-Enable or disable a game controller. ● Sound-Select notification, touch, and screen lock sound preferences...
...each installed app is also displayed. ● More...-Enable or disable Airplane mode, VPN, Tethering & portable hotspot, or Mobile networks. Use Settings for connecting to a wireless display device. ● Bluetooth (select models only)-Enable or disable Bluetooth, and pair a Bluetooth device, such as a headset or keyboard, with your tablet. ◦ Default notification sound-Touch Default notification sound, touch a sound to select it . ● Controller (select models only)-Enable or disable a game controller. ● Sound-Select notification, touch, and screen lock sound preferences...
User Guide
Page 13
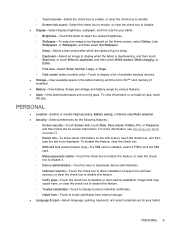
...select models only)-Touch to install certificates from -Touch to display a list of available wireless devices. ● Storage-View available space in the tablet memory and the micro SD™ card memory (if installed). ● Battery-View battery charge percentage and battery usage by various features. ● Apps-View downloaded apps and running apps. PERSONAL ● Location-Enable or disable High accuracy, Battery saving, or Device only Mode selection. ● Security-Select preferences for the following features: ◦ Screen security-Touch Screen lock, touch Slide, Face unlock...
...select models only)-Touch to install certificates from -Touch to display a list of available wireless devices. ● Storage-View available space in the tablet memory and the micro SD™ card memory (if installed). ● Battery-View battery charge percentage and battery usage by various features. ● Apps-View downloaded apps and running apps. PERSONAL ● Location-Enable or disable High accuracy, Battery saving, or Device only Mode selection. ● Security-Select preferences for the following features: ◦ Screen security-Touch Screen lock, touch Slide, Face unlock...

User Guide
Page 14
... account-To remove an account, touch the name of the account, touch it again, and then touch Remove account. ◦ Language-Touch to select a language. ◦ Spell checker-Touch the check box to enable this feature, and then touch to a connected printer. ● About tablet-Display the system status, legal information, model number, and operating system version for system updates, touch Update, and then touch Check now. 10 Chapter 6 Using Settings Clear the check box to disable this feature. ◦ Voice...
... account-To remove an account, touch the name of the account, touch it again, and then touch Remove account. ◦ Language-Touch to select a language. ◦ Spell checker-Touch the check box to enable this feature, and then touch to a connected printer. ● About tablet-Display the system status, legal information, model number, and operating system version for system updates, touch Update, and then touch Check now. 10 Chapter 6 Using Settings Clear the check box to disable this feature. ◦ Voice...

User Guide
Page 16
... tablet, select a screen lock method. 1. Under PERSONAL, touch Security, and then under SCREEN SECURITY, touch Screen lock. 3. 8 Securing your tablet To prevent others from accessing the data on -screen instructions. This option provides the most protection, if a strong password is selected. 12 Chapter 8 Securing your tablet NOTE: If you have previously selected a screen lock, you must unlock the screen before changing the lock settings. ● Slide-Unlock the screen by swiping to the right. ● Face Unlock (select models only)-Unlock...
... tablet, select a screen lock method. 1. Under PERSONAL, touch Security, and then under SCREEN SECURITY, touch Screen lock. 3. 8 Securing your tablet To prevent others from accessing the data on -screen instructions. This option provides the most protection, if a strong password is selected. 12 Chapter 8 Securing your tablet NOTE: If you have previously selected a screen lock, you must unlock the screen before changing the lock settings. ● Slide-Unlock the screen by swiping to the right. ● Face Unlock (select models only)-Unlock...
User Guide
Page 17
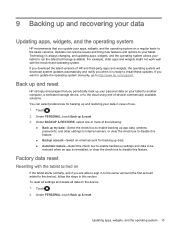
...; Back up my data-Select the check box to enable backing up app data, wireless passwords, and other settings to Internet servers, or clear the check box to disable this feature. ● Backup account-Select an email account for backing up and restoring your tablet. Touch . 2. Technology is ready to install these updates. For example, older apps and widgets might not work well with the tablet turned on If the tablet starts normally, and...
...; Back up my data-Select the check box to enable backing up app data, wireless passwords, and other settings to Internet servers, or clear the check box to disable this feature. ● Backup account-Select an email account for backing up and restoring your tablet. Touch . 2. Technology is ready to install these updates. For example, older apps and widgets might not work well with the tablet turned on If the tablet starts normally, and...
User Guide
Page 18
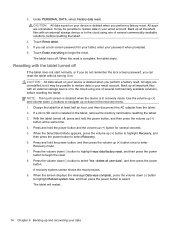
... touch screen is disabled when the device is deleted when you can reset the tablet without turning it may be possible to restore data in your password when prompted. 6. When the Select Boot Mode appears, press the volume up all important files with an external storage device or to select. When the screen displays the message Data wipe complete, press the volume down (-) button to highlight Reboot system now, and then press the power button to...
... touch screen is disabled when the device is deleted when you can reset the tablet without turning it may be possible to restore data in your password when prompted. 6. When the Select Boot Mode appears, press the volume up all important files with an external storage device or to select. When the screen displays the message Data wipe complete, press the volume down (-) button to highlight Reboot system now, and then press the power button to...
User Guide
Page 19
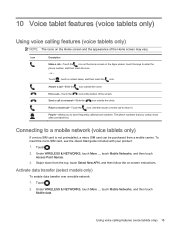
... the Home screen or the Apps screen, touch the keys to store frequently called phone numbers. Connecting to return it. The phone numbers that you to enter the phone number, and then touch the icon. - Activate data transfer (select models only) To enable data transfer over a mobile network: 1. 10 Voice tablet features (voice tablets only) Using voice calling features (voice tablets only) NOTE: The icons on -screen instructions. Icon Description Make a call to a mobile network (voice tablets only) If a micro SIM card is not preinstalled, a micro SIM card can...
... the Home screen or the Apps screen, touch the keys to store frequently called phone numbers. Connecting to return it. The phone numbers that you to enter the phone number, and then touch the icon. - Activate data transfer (select models only) To enable data transfer over a mobile network: 1. 10 Voice tablet features (voice tablets only) Using voice calling features (voice tablets only) NOTE: The icons on -screen instructions. Icon Description Make a call to a mobile network (voice tablets only) If a micro SIM card is not preinstalled, a micro SIM card can...
HP 8 G21411 Tablet - Maintenance and Service Guide
Page 5
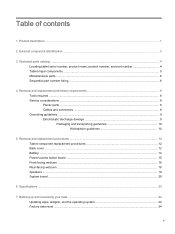
... parts ...8 Cables and connectors ...8 Grounding guidelines ...9 Electrostatic discharge damage 9 Packaging and transporting guidelines 10 Workstation guidelines 10 5 Removal and replacement procedures ...12 Tablet component replacement procedures 12 Back cover ...12 Battery ...14 Power/volume button board ...15 Front-facing webcam ...16 Rear-facing webcam ...18 Speakers ...19 System board ...20 6 Specifications ...23 7 Backing up and recovering your data ...24 Updating apps, widgets, and the operating system 24 Factory data reset...
... parts ...8 Cables and connectors ...8 Grounding guidelines ...9 Electrostatic discharge damage 9 Packaging and transporting guidelines 10 Workstation guidelines 10 5 Removal and replacement procedures ...12 Tablet component replacement procedures 12 Back cover ...12 Battery ...14 Power/volume button board ...15 Front-facing webcam ...16 Rear-facing webcam ...18 Speakers ...19 System board ...20 6 Specifications ...23 7 Backing up and recovering your data ...24 Updating apps, widgets, and the operating system 24 Factory data reset...
HP 8 G21411 Tablet - Maintenance and Service Guide
Page 12
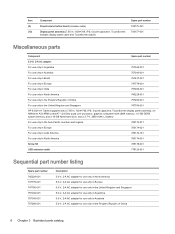
... Spare part number (9) Power/volume button board (includes cable) 785175-001 (10) Display panel assembly (7.85-in, 1024×768, IPS, 5-point capacitive, TouchScreen; 785177-001 includes display panel cable and TouchScreen cable) Miscellaneous parts Component Spare part number 5.0-V, 2-A AC adapter: For use only in Argentina 757042-001 For use only in Australia 757043-001 For use only in Brazil 761437-001 For use only in Europe 747779-001 For use only in...
... Spare part number (9) Power/volume button board (includes cable) 785175-001 (10) Display panel assembly (7.85-in, 1024×768, IPS, 5-point capacitive, TouchScreen; 785177-001 includes display panel cable and TouchScreen cable) Miscellaneous parts Component Spare part number 5.0-V, 2-A AC adapter: For use only in Argentina 757042-001 For use only in Australia 757043-001 For use only in Brazil 761437-001 For use only in Europe 747779-001 For use only in...
HP 8 G21411 Tablet - Maintenance and Service Guide
Page 13
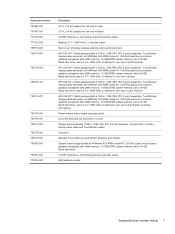
... regions Power/volume button board (includes cable) Cover Kit (includes top and bottom covers) Display panel assembly (7.85-in , 1024×768, IPS, 5-point capacitive, TouchScreen display panel assembly, an AllWinner A33 ARM cortex-A7 1.20-GHz quad core processor, graphics subsystem with UMA memory, 1.0-GB DDR3 system memory, and a 16-GB Nand hard drive 0.3-MP, fixed-focus, front-facing webcam (includes cable) USB extension cable Sequential part number listing 7 Spare part number...
... regions Power/volume button board (includes cable) Cover Kit (includes top and bottom covers) Display panel assembly (7.85-in , 1024×768, IPS, 5-point capacitive, TouchScreen display panel assembly, an AllWinner A33 ARM cortex-A7 1.20-GHz quad core processor, graphics subsystem with UMA memory, 1.0-GB DDR3 system memory, and a 16-GB Nand hard drive 0.3-MP, fixed-focus, front-facing webcam (includes cable) USB extension cable Sequential part number listing 7 Spare part number...

HP 8 G21411 Tablet - Maintenance and Service Guide
Page 18
... whether the tablet is clear of each screw size and location during removal and replacement. Remove the back cover: CAUTION: Before turning the display panel assembly upside down through the operating system. 2. Back cover Description Back cover (includes wireless antenna cable and transceiver) Display panel assembly (7.85-in damage to the tablet. 12 Chapter 5 Removal and replacement procedures includes display panel cable and TouchScreen cable) Spare part number 785173-001 785177-001 Before disassembling the tablet, follow these parts can...
... whether the tablet is clear of each screw size and location during removal and replacement. Remove the back cover: CAUTION: Before turning the display panel assembly upside down through the operating system. 2. Back cover Description Back cover (includes wireless antenna cable and transceiver) Display panel assembly (7.85-in damage to the tablet. 12 Chapter 5 Removal and replacement procedures includes display panel cable and TouchScreen cable) Spare part number 785173-001 785177-001 Before disassembling the tablet, follow these parts can...

HP 8 G21411 Tablet - Maintenance and Service Guide
Page 34
... 3 model name 1 O operating system, product description 2 P packaging guidelines 10 plastic parts, service considerations 8 ports product description 1 USB 2.0 3 power button 3 power cord, set requirements 25 power requirements, product description 1 power/volume button board removal 15 spare part number 6, 7, 15 processor, product description 1 product description audio 1 display panel 1 external expansion 1 graphics 1 mass storage 1 memory module 1 microphone 1 operating system 2 ports 1 power requirements 1 processors 1 product name 1 sensor 1 serviceability 2 video 1 wireless networking...
... 3 model name 1 O operating system, product description 2 P packaging guidelines 10 plastic parts, service considerations 8 ports product description 1 USB 2.0 3 power button 3 power cord, set requirements 25 power requirements, product description 1 power/volume button board removal 15 spare part number 6, 7, 15 processor, product description 1 product description audio 1 display panel 1 external expansion 1 graphics 1 mass storage 1 memory module 1 microphone 1 operating system 2 ports 1 power requirements 1 processors 1 product name 1 sensor 1 serviceability 2 video 1 wireless networking...

Quick Start Guide
Page 1
... replaced by the International Standard for your country or region are installed in fire or water. If required, regulatory markings for Safety of overheating the tablet, do not listen at all times. One or more safety and regulatory information, refer to http://welcome.hp.com/support On the Home screen, touch the HP User Guides app, touch , select your Region and Language, and then select HP...
... replaced by the International Standard for your country or region are installed in fire or water. If required, regulatory markings for Safety of overheating the tablet, do not listen at all times. One or more safety and regulatory information, refer to http://welcome.hp.com/support On the Home screen, touch the HP User Guides app, touch , select your Region and Language, and then select HP...

Quick Start Guide
Page 2
... the power button until the HP logo is displayed. 45 3 Follow the on and slide the icon to select a language and a wireless network. Google is a trademark of its proprietor. Nothing herein should be liable for technical and editorial errors or omissions contained herein. Use GPS To access the GPS feature, touch , touch Location, touch Mode, and then select the Location mode you to type one of several seconds to turn...
... the power button until the HP logo is displayed. 45 3 Follow the on and slide the icon to select a language and a wireless network. Google is a trademark of its proprietor. Nothing herein should be liable for technical and editorial errors or omissions contained herein. Use GPS To access the GPS feature, touch , touch Location, touch Mode, and then select the Location mode you to type one of several seconds to turn...


