User Manual
Page 2
... Instructions 6 Preface 9 Warranty and Service 9 1. Getting Started 12 1.1 Package Contents 12 1.2 Introducing the TV 13 1.2.1 Features 13 1.3 Control Panel 14 1.4 Input and Output Jacks 15 1.5 Remote Control 17 1.6 Inserting the Remote Control Batteries 19 2.
... Instructions 6 Preface 9 Warranty and Service 9 1. Getting Started 12 1.1 Package Contents 12 1.2 Introducing the TV 13 1.2.1 Features 13 1.3 Control Panel 14 1.4 Input and Output Jacks 15 1.5 Remote Control 17 1.6 Inserting the Remote Control Batteries 19 2.
User Manual
Page 3
Appendix: Remote Control Guide 38 6.1 Introduction 38 6.1.2 Setting Program Codes 38 6.1.3 Searching Codes 39 6.1.4 Setting Volume Lock 40 6.1.5 Setting Channel Lock 40 6.1.6 Factory Setting Mode 41 6.1.7 Description ...
Appendix: Remote Control Guide 38 6.1 Introduction 38 6.1.2 Setting Program Codes 38 6.1.3 Searching Codes 39 6.1.4 Setting Volume Lock 40 6.1.5 Setting Channel Lock 40 6.1.6 Factory Setting Mode 41 6.1.7 Description ...
User Manual
Page 13
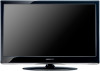
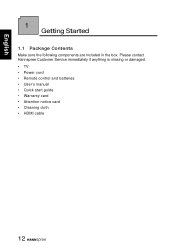
English 1 Getting Started 1.1 Package Contents Make sure the following components are included in the box. Please contact Hannspree Customer Service immediately if anything is missing or damaged. • TV • Power cord • Remote control and batteries • User's manual • Quick start guide • Warranty card • Attention notice card • Cleaning cloth • HDMI cable 12
English 1 Getting Started 1.1 Package Contents Make sure the following components are included in the box. Please contact Hannspree Customer Service immediately if anything is missing or damaged. • TV • Power cord • Remote control and batteries • User's manual • Quick start guide • Warranty card • Attention notice card • Cleaning cloth • HDMI cable 12
User Manual
Page 14
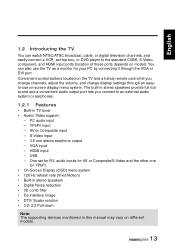
.... VGA input - USB - The built-in this manual may vary on model). English 1.2 Introducing the TV You can also use on the TV and a handy remote control let you connect to the standard CVBS, S-Video, component, and HDMI input ports (location of these ports depends on different models. 13
.... VGA input - USB - The built-in this manual may vary on model). English 1.2 Introducing the TV You can also use on the TV and a handy remote control let you connect to the standard CVBS, S-Video, component, and HDMI input ports (location of these ports depends on different models. 13
User Manual
Page 15
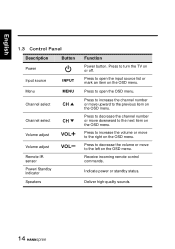
English 1.3 Control Panel Description Button Power Input source Menu INPUT MENU Channel select CH Channel select CH Volume adjust Volume adjust Remote IR sensor Power/ Standby indicator Speakers VOL VOL Function Power button. Press to open the OSD menu. Press to the previous item on the OSD ... an item on the OSD menu. Press to increase the channel number or move downward to turn the TV on the OSD menu. Receive incoming remote control commands.
English 1.3 Control Panel Description Button Power Input source Menu INPUT MENU Channel select CH Channel select CH Volume adjust Volume adjust Remote IR sensor Power/ Standby indicator Speakers VOL VOL Function Power button. Press to open the OSD menu. Press to the previous item on the OSD ... an item on the OSD menu. Press to increase the channel number or move downward to turn the TV on the OSD menu. Receive incoming remote control commands.
User Manual
Page 18
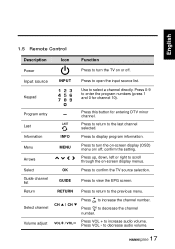
... 0 for entering DTV minor channel. Press VOL + to view the EPG screen. confirm the setting. Press to increase audio volume. to the previous menu. English 1.5 Remote Control Description Icon Power Input source INPUT Keypad Function Press to turn the on-screen display (OSD) menu on/ off . Program entry Last Information Menu...
... 0 for entering DTV minor channel. Press VOL + to view the EPG screen. confirm the setting. Press to increase audio volume. to the previous menu. English 1.5 Remote Control Description Icon Power Input source INPUT Keypad Function Press to turn the on-screen display (OSD) menu on/ off . Program entry Last Information Menu...

User Manual
Page 20
C 19 English 1.6 Inserting the Remote Control Batteries 1 Open the battery compartment cover at the back of the remote control (A). B 3 Close the battery compartment cover (C). A 2 Insert the batteries paying attention to the polarity markings inside the battery compartment (B).
C 19 English 1.6 Inserting the Remote Control Batteries 1 Open the battery compartment cover at the back of the remote control (A). B 3 Close the battery compartment cover (C). A 2 Insert the batteries paying attention to the polarity markings inside the battery compartment (B).
User Manual
Page 21
...shortened when the signal sensor is incorrectly replaced. you may be shortened. Note: • For best results, use force when pulling the remote control cover open; Replace only with leaked chemical fluids. • If your local recycling or waste disposal rules and contact a local waste... by the equipment manufacturer. Chemical fluids may leak from the front of used batteries according to manufacturer's instructions. • Refer to your remote control has two batteries, do not place magnetic sensitive items such as watches, credit cards, or flash media close to the cover. &#...
...shortened when the signal sensor is incorrectly replaced. you may be shortened. Note: • For best results, use force when pulling the remote control cover open; Replace only with leaked chemical fluids. • If your local recycling or waste disposal rules and contact a local waste... by the equipment manufacturer. Chemical fluids may leak from the front of used batteries according to manufacturer's instructions. • Refer to your remote control has two batteries, do not place magnetic sensitive items such as watches, credit cards, or flash media close to the cover. &#...
User Manual
Page 28
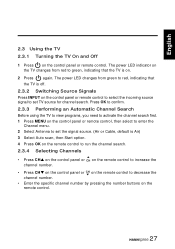
... Automatic Channel Search Before using the TV to view programs, you need to activate the channel search first. 1 Press MENU on the control panel or remote control, then select to enter the Channel menu. 2 Select Antenna to set the signal source. (Air or Cable, default is on the control panel or... remote control to select the incoming source signal to green, indicating that the TV is off. 2.3.2 Switching Source Signals Press INPUT on . 2 Press again. The power...
... Automatic Channel Search Before using the TV to view programs, you need to activate the channel search first. 1 Press MENU on the control panel or remote control, then select to enter the Channel menu. 2 Select Antenna to set the signal source. (Air or Cable, default is on the control panel or... remote control to select the incoming source signal to green, indicating that the TV is off. 2.3.2 Switching Source Signals Press INPUT on . 2 Press again. The power...
User Manual
Page 29
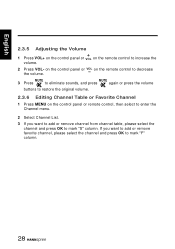
...to add or remove favorite channel, please select the channel and press OK to mark "F" column. 28 on the control panel or VOL on the remote control to increase the volume. 2 Press VOL- MUTE MUTE 3 Press to eliminate sounds, and press again or press the volume buttons to restore ...the original volume. 2.3.6 Editing Channel Table or Favorite Channel 1 Press MENU on the control panel or remote control, then select to enter the Channel menu. 2 Select Channel List. 3 If you want to add or remove channel from channel table, please ...
...to add or remove favorite channel, please select the channel and press OK to mark "F" column. 28 on the control panel or VOL on the remote control to increase the volume. 2 Press VOL- MUTE MUTE 3 Press to eliminate sounds, and press again or press the volume buttons to restore ...the original volume. 2.3.6 Editing Channel Table or Favorite Channel 1 Press MENU on the control panel or remote control, then select to enter the Channel menu. 2 Select Channel List. 3 If you want to add or remove channel from channel table, please ...
User Manual
Page 30
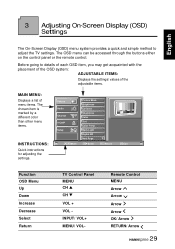
Remote Control MENU Arrow Arrow Arrow Arrow OK/ Arrow RETURN/ Arrow 29 Before going to adjust the TV settings. 3 Adjusting On-Screen Display (OSD) Settings English ... menu items. INSTRUCTIONS: Quick instructions for adjusting the settings. The OSD menu can be accessed through the buttons either on the control panel or the remote control. Picture Audio Channel V-CHIP Setup Move Picture Mode Brightness Contrast Sharpness Color Tint Color Temp Back Light Digital NR Next Page OK Enter Return...
Remote Control MENU Arrow Arrow Arrow Arrow OK/ Arrow RETURN/ Arrow 29 Before going to adjust the TV settings. 3 Adjusting On-Screen Display (OSD) Settings English ... menu items. INSTRUCTIONS: Quick instructions for adjusting the settings. The OSD menu can be accessed through the buttons either on the control panel or the remote control. Picture Audio Channel V-CHIP Setup Move Picture Mode Brightness Contrast Sharpness Color Tint Color Temp Back Light Digital NR Next Page OK Enter Return...
User Manual
Page 31
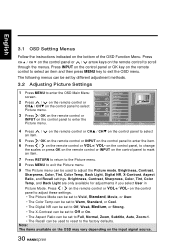
...on the control panel to enter the Back Light Digital NR Next Page Picture menu. English 3.1 OSD Setting Menus Follow the instructions indicated on the remote control or VOL+/ VOL- Brightness, Contrast, Sharpness, Color, Tint, Color Temp, and Back Light are only available for adjustments if you select ... Ratio can be set by different adjustment methods. 3.2 Adjusting Picture Settings 1 Press MENU to enter the OSD Main Menu screen. 2 Press / on the remote control or CHS / CHT on the control panel to mark an item. 7 Press RETURN to return to the Picture menu. 8 Press MENU to exit ...
...on the control panel to enter the Back Light Digital NR Next Page Picture menu. English 3.1 OSD Setting Menus Follow the instructions indicated on the remote control or VOL+/ VOL- Brightness, Contrast, Sharpness, Color, Tint, Color Temp, and Back Light are only available for adjustments if you select ... Ratio can be set by different adjustment methods. 3.2 Adjusting Picture Settings 1 Press MENU to enter the OSD Main Menu screen. 2 Press / on the remote control or CHS / CHT on the control panel to mark an item. 7 Press RETURN to return to the Picture menu. 8 Press MENU to exit ...

User Manual
Page 32
... or CHS / CHT on the control panel to select 5 Press / OK on the remote control or INPUT on the control panel to Dynamic, Standard, Soft, or User. •... Note: The items available on the OSD may vary depending on the remote control or VOL+/ VOL- Setup 3 Press / OK on the remote control or INPUT on the remote control or VOL+/ VOL- on the control panel to change the scales... control panel to enter the OSD Main Menu screen. Picture Audio Audio Mode Equalizer Balance 2 Press / on the remote control or CHS / CHT on the control panel to mark an item. 7 Press RETURN to return to the ...
... or CHS / CHT on the control panel to select 5 Press / OK on the remote control or INPUT on the control panel to Dynamic, Standard, Soft, or User. •... Note: The items available on the OSD may vary depending on the remote control or VOL+/ VOL- Setup 3 Press / OK on the remote control or INPUT on the remote control or VOL+/ VOL- on the control panel to change the scales... control panel to enter the OSD Main Menu screen. Picture Audio Audio Mode Equalizer Balance 2 Press / on the remote control or CHS / CHT on the control panel to mark an item. 7 Press RETURN to return to the ...
User Manual
Page 33
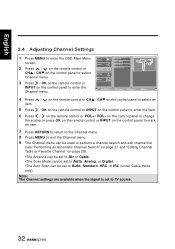
... / CHT on the control panel to select Channel menu. 3 Press / OK on the remote control or Channel V-CHIP Setup Channel List INPUT on the remote control or VOL+/ VOL- Move OK Enter Return Return Menu Exit 4 Press / on the remote control or CHS / CHT on the control panel to select an item. 5 Press... are available when the signal is set to enter the Channel menu. on the control panel to change the scales or press OK on the remote control or INPUT on the control panel to mark an item. 7 Press RETURN to return to the Channel menu. 8 Press MENU to exit the Channel...
... / CHT on the control panel to select Channel menu. 3 Press / OK on the remote control or Channel V-CHIP Setup Channel List INPUT on the remote control or VOL+/ VOL- Move OK Enter Return Return Menu Exit 4 Press / on the remote control or CHS / CHT on the control panel to select an item. 5 Press... are available when the signal is set to enter the Channel menu. on the control panel to change the scales or press OK on the remote control or INPUT on the control panel to mark an item. 7 Press RETURN to return to the Channel menu. 8 Press MENU to exit the Channel...
User Manual
Page 34
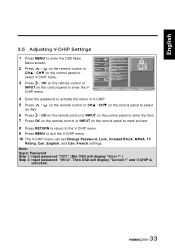
.... 5 Press / an item. French settings. Then OSD will display "Error !".) Step 2: Input password "8512". and V-CHIP is unlocked. 33 on the remote control or CHS / CHT on the control panel to select 6 Press / OK on the remote control or INPUT on the control panel to enter the item. 7 Press OK on the... or Channel V-CHIP Setup Unrated Block MPAA TV Rating Can. Picture Audio Enter Password Change Password Lock 2 Press / on the remote control or CHS / CHT on the control panel to enter the VCHIP menu. French INPUT on the control panel to exit the V-CHIP menu. 10 ...
.... 5 Press / an item. French settings. Then OSD will display "Error !".) Step 2: Input password "8512". and V-CHIP is unlocked. 33 on the remote control or CHS / CHT on the control panel to select 6 Press / OK on the remote control or INPUT on the control panel to enter the item. 7 Press OK on the... or Channel V-CHIP Setup Unrated Block MPAA TV Rating Can. Picture Audio Enter Password Change Password Lock 2 Press / on the remote control or CHS / CHT on the control panel to enter the VCHIP menu. French INPUT on the control panel to exit the V-CHIP menu. 10 ...
User Manual
Page 35
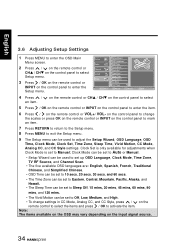
...on the control panel to change settings in CC Mode, Analog CC, and CC Style, press / on the remote control to select the items and press / OK to activate the item. Clock Mode can be set to ... Channel V-CHIP Setup Clock Mode Clock Set Time Zone Sleep Time Vivid Motion 3 Press / OK on the remote control or INPUT on the control panel to select Setup menu. Clock Set is only available for adjustments when ...set to Off, Low, Medium, and High. • To change the scales or press OK on the remote control or INPUT on the control panel to mark an item. 7 Press RETURN to return to the Setup menu...
...on the control panel to change settings in CC Mode, Analog CC, and CC Style, press / on the remote control to select the items and press / OK to activate the item. Clock Mode can be set to ... Channel V-CHIP Setup Clock Mode Clock Set Time Zone Sleep Time Vivid Motion 3 Press / OK on the remote control or INPUT on the control panel to select Setup menu. Clock Set is only available for adjustments when ...set to Off, Low, Medium, and High. • To change the scales or press OK on the remote control or INPUT on the control panel to mark an item. 7 Press RETURN to return to the Setup menu...
User Manual
Page 36
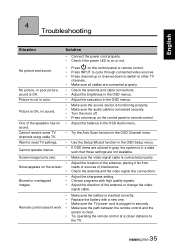
... placing it far from roads or sources of the antenna or change the video signal cable. Adjust the direction of interference. Try operating the remote control at a closer distance to cycle through connected video sources. Check the antenna and cable connections. Adjust the saturation in the OSD menus...correctly. Cannot receive some TV • channels using cable TV. Want to other TV channels. Press channel up on the control panel or remote control. Turn the mute off. Use the Setup Wizard function in the OSD Setup menu. Check the antenna and the video signal line connections...
... placing it far from roads or sources of the antenna or change the video signal cable. Adjust the direction of interference. Try operating the remote control at a closer distance to cycle through connected video sources. Check the antenna and cable connections. Adjust the saturation in the OSD menus...correctly. Cannot receive some TV • channels using cable TV. Want to other TV channels. Press channel up on the control panel or remote control. Turn the mute off. Use the Setup Wizard function in the OSD Setup menu. Check the antenna and the video signal line connections...
User Manual
Page 39
.... the corresponding indicator light then comes on again after going off ; Electronic equipment code setting mode has the following operating procedures: 1. The remote control keypad matrix includes 4 electronic equipment type switch buttons (DVD, AUDIO, CABLE and TV). Select the desired corresponding mode of electronic equipment ... changing the status prior to input other electronic equipment codes. 5. The indicator light will come on the remote control. English 6 Appendix: Remote Control Guide 6.1 Introduction The electronic equipment type switch buttons are 4 digits.
.... the corresponding indicator light then comes on again after going off ; Electronic equipment code setting mode has the following operating procedures: 1. The remote control keypad matrix includes 4 electronic equipment type switch buttons (DVD, AUDIO, CABLE and TV). Select the desired corresponding mode of electronic equipment ... changing the status prior to input other electronic equipment codes. 5. The indicator light will come on the remote control. English 6 Appendix: Remote Control Guide 6.1 Introduction The electronic equipment type switch buttons are 4 digits.

User Manual
Page 44
... only include power control, channel control, volume control, etc. 6.2.3 Power-out Protection Capability During battery replacement, all the buttons on remote controls corresponding to other functions such as volume lock, channel lock and code display are operable. 6.2 Other Descriptions 6.2.1 Double Clicking At any time, only when a ...
... only include power control, channel control, volume control, etc. 6.2.3 Power-out Protection Capability During battery replacement, all the buttons on remote controls corresponding to other functions such as volume lock, channel lock and code display are operable. 6.2 Other Descriptions 6.2.1 Double Clicking At any time, only when a ...


