User Manual
Page 2
... 15 1.5 Remote Control 17 1.6 Inserting the Remote Control Batteries 19 2. Setting up your TV 21 2.1 Basic Connections 21 2.1.1 Power Connection 21 2.1.2 Connecting an Antenna or Cable TV 21 2.2 Connecting External Devices 22 2.2.1 Connecting External Earphones 22 2.2.2 Connecting to AV Devices 23... PC using VGA 25 2.2.5 Connecting a PC using DVI 25 2.2.6 Connecting HDMI 26 2.2.7 Connecting USB 26 2.3 Using the TV 27 2.3.1 Turning the TV On and Off 27 2.3.2 Switching Source Signals 27 2.3.3 Performing an Automatic Channel Search 27 2.3.4 Selecting Channels 27 2.3.5 Adjusting ...
... 15 1.5 Remote Control 17 1.6 Inserting the Remote Control Batteries 19 2. Setting up your TV 21 2.1 Basic Connections 21 2.1.1 Power Connection 21 2.1.2 Connecting an Antenna or Cable TV 21 2.2 Connecting External Devices 22 2.2.1 Connecting External Earphones 22 2.2.2 Connecting to AV Devices 23... PC using VGA 25 2.2.5 Connecting a PC using DVI 25 2.2.6 Connecting HDMI 26 2.2.7 Connecting USB 26 2.3 Using the TV 27 2.3.1 Turning the TV On and Off 27 2.3.2 Switching Source Signals 27 2.3.3 Performing an Automatic Channel Search 27 2.3.4 Selecting Channels 27 2.3.5 Adjusting ...
User Manual
Page 3
... 30 3.2 Adjusting Picture Settings 30 3.3 Adjusting Audio Settings 31 3.4 Adjusting Channel Settings 32 3.5 Adjusting V-CHIP Settings 33 3.6 Adjusting Setup Settings 34 4. Troubleshooting 35 5. Setting the TV on the Wall 51 8. English Table of Contents 3.
... 30 3.2 Adjusting Picture Settings 30 3.3 Adjusting Audio Settings 31 3.4 Adjusting Channel Settings 32 3.5 Adjusting V-CHIP Settings 33 3.6 Adjusting Setup Settings 34 4. Troubleshooting 35 5. Setting the TV on the Wall 51 8. English Table of Contents 3.
User Manual
Page 5
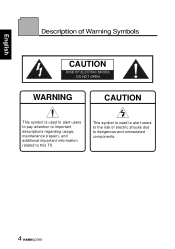
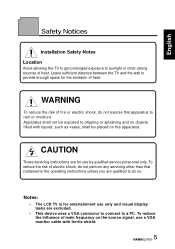
This symbol is used to alert users to the risk of electric shocks due to this TV. English Description of Warning Symbols CAUTION RISK OF ELECTRIC SHOCK DO NOT OPEN WARNING CAUTION This symbol is used to alert users to pay attention to important descriptions regarding usage, maintenance (repair), and additional important information related to dangerous and uninsulated components. 4
This symbol is used to alert users to the risk of electric shocks due to this TV. English Description of Warning Symbols CAUTION RISK OF ELECTRIC SHOCK DO NOT OPEN WARNING CAUTION This symbol is used to alert users to pay attention to important descriptions regarding usage, maintenance (repair), and additional important information related to dangerous and uninsulated components. 4
User Manual
Page 6
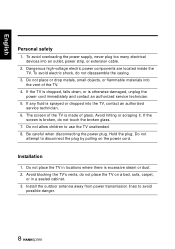
... only and visual display tasks are excluded. • This device uses a VGA connector to connect to a PC. Notes: • The LCD TV is for the emission of main frequency on the apparatus. Apparatus shall not be placed on the source signal, use by qualified service personnel only...be exposed to dripping or splashing and no objects filled with ferrite shield. 5 English Safety Notices Installation Safety Notes Location Avoid allowing the TV to get prolonged exposure to sunlight or other than that contained in the operating instructions unless you are qualified to do not expose this...
... only and visual display tasks are excluded. • This device uses a VGA connector to connect to a PC. Notes: • The LCD TV is for the emission of main frequency on the apparatus. Apparatus shall not be placed on the source signal, use by qualified service personnel only...be exposed to dripping or splashing and no objects filled with ferrite shield. 5 English Safety Notices Installation Safety Notes Location Avoid allowing the TV to get prolonged exposure to sunlight or other than that contained in the operating instructions unless you are qualified to do not expose this...
User Manual
Page 9
..., or in locations where there is excessive steam or dust. 2. Hold the plug. To avoid electric shock, do not place the TV on the power cord. Avoid blocking the TV's vents, do not disassemble the casing. 3. Avoid hitting or scraping it. Do not attempt to use the... cord immediately and contact an authorized service technician. 5. Installation 1. Do not place the TV in a sealed cabinet. 3. To avoid overloading the power supply, never plug too many electrical devices into the TV, contact an authorized service technician. 6. Be careful when disconnecting the power plug. If any...
..., or in locations where there is excessive steam or dust. 2. Hold the plug. To avoid electric shock, do not place the TV on the power cord. Avoid blocking the TV's vents, do not disassemble the casing. 3. Avoid hitting or scraping it. Do not attempt to use the... cord immediately and contact an authorized service technician. 5. Installation 1. Do not place the TV in a sealed cabinet. 3. To avoid overloading the power supply, never plug too many electrical devices into the TV, contact an authorized service technician. 6. Be careful when disconnecting the power plug. If any...
User Manual
Page 10
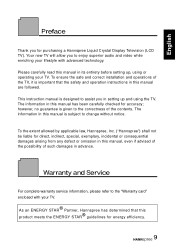
...manual are followed. English Preface Thank you in setting up , using the TV. however, no guarantee is designed to assist you for accuracy; As an ENERGY STAR® Partner, Hannspree has determined that the safety and operation instructions in this manual is important that...complete warranty service information, please refer to enjoy superior audio and video while enriching your lifestyle with your TV. To the extent allowed by applicable law, Hannspree, Inc. ("Hannspree") shall not be liable for energy efficiency. 9 Please carefully read this product meets the ENERGY STAR&#...
...manual are followed. English Preface Thank you in setting up , using the TV. however, no guarantee is designed to assist you for accuracy; As an ENERGY STAR® Partner, Hannspree has determined that the safety and operation instructions in this manual is important that...complete warranty service information, please refer to enjoy superior audio and video while enriching your lifestyle with your TV. To the extent allowed by applicable law, Hannspree, Inc. ("Hannspree") shall not be liable for energy efficiency. 9 Please carefully read this product meets the ENERGY STAR&#...
User Manual
Page 11
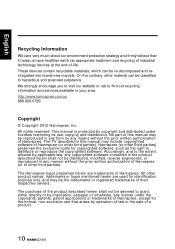
... contain recyclable materials, which can be re-decomposed and reintegrated into brand-new marvels. The TV described in this manual may be reproduced in any form by applicable law, any means without the prior written authorization of Hannspree (or of -life. On the contrary, other third parties) preserves the exclusive rights for...
... contain recyclable materials, which can be re-decomposed and reintegrated into brand-new marvels. The TV described in this manual may be reproduced in any form by applicable law, any means without the prior written authorization of Hannspree (or of -life. On the contrary, other third parties) preserves the exclusive rights for...
User Manual
Page 13
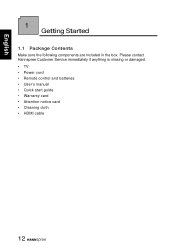
Please contact Hannspree Customer Service immediately if anything is missing or damaged. • TV • Power cord • Remote control and batteries • User's manual • Quick start guide • Warranty card • Attention notice card • Cleaning cloth • HDMI cable 12 English 1 Getting Started 1.1 Package Contents Make sure the following components are included in the box.
Please contact Hannspree Customer Service immediately if anything is missing or damaged. • TV • Power cord • Remote control and batteries • User's manual • Quick start guide • Warranty card • Attention notice card • Cleaning cloth • HDMI cable 12 English 1 Getting Started 1.1 Package Contents Make sure the following components are included in the box.
User Manual
Page 14
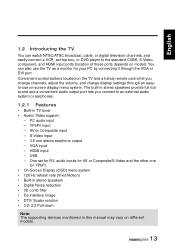
...a VCR, set for R/L audio inputs for AV or Composite/S-Video and the other one for your PC by connecting it through an easyto-use the TV as a monitor for YPbPr. • On-Screen Display (OSD) menu system • 120 Hz refresh rate (Vivid Motion) • Built-in...; Digital Noise reduction • 3D comb filter • De-interlace Image • DTV/ Scalar solution • 3:2/ 2:2 Pull down Note: The supporting devices mentioned in TV tuner • Audio/ Video support: - PC audio input - S-Video input - 3.5 mm stereo earphone output - HDMI input - VGA input - One set -top box...
...a VCR, set for R/L audio inputs for AV or Composite/S-Video and the other one for your PC by connecting it through an easyto-use the TV as a monitor for YPbPr. • On-Screen Display (OSD) menu system • 120 Hz refresh rate (Vivid Motion) • Built-in...; Digital Noise reduction • 3D comb filter • De-interlace Image • DTV/ Scalar solution • 3:2/ 2:2 Pull down Note: The supporting devices mentioned in TV tuner • Audio/ Video support: - PC audio input - S-Video input - 3.5 mm stereo earphone output - HDMI input - VGA input - One set -top box...
User Manual
Page 15
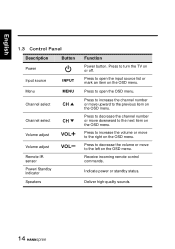
... right on the OSD menu. Press to increase the volume or move downward to the previous item on the OSD menu. Press to turn the TV on the OSD menu. Press to decrease the volume or move upward to the next item on or off. English 1.3 Control Panel Description Button Power...
... right on the OSD menu. Press to increase the volume or move downward to the previous item on the OSD menu. Press to turn the TV on the OSD menu. Press to decrease the volume or move upward to the next item on or off. English 1.3 Control Panel Description Button Power...
User Manual
Page 18
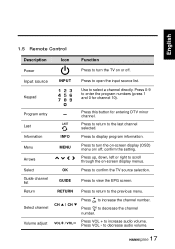
Press to turn the TV on or off ; Press to decrease audio volume. 17 to view the EPG screen. English 1.5 Remote Control Description Icon Power Input source INPUT Keypad Function ... channel Volume adjust VOL / VOL Press this button for channel 10). confirm the setting. Press to decrease the channel number. Press CH to confirm the TV source selection. Press up, down, left or right to increase the channel number. Press CH to scroll through the on-screen display menus. Press VOL...
Press to turn the TV on or off ; Press to decrease audio volume. 17 to view the EPG screen. English 1.5 Remote Control Description Icon Power Input source INPUT Keypad Function ... channel Volume adjust VOL / VOL Press this button for channel 10). confirm the setting. Press to decrease the channel number. Press CH to confirm the TV source selection. Press up, down, left or right to increase the channel number. Press CH to scroll through the on-screen display menus. Press VOL...
User Manual
Page 19
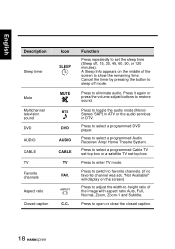
... ATV or the audio services in DTV. Press to show the remaining time. Press to eliminate audio. Press to enter TV mode. Press to select a programmed Cable TV set-top box or a satellite TV set the sleep time (Sleep off mode. Press to select a programmed Audio Receiver/ Amp/ Home Theatre System. Function Press... middle of the image with aspect ratio Auto, Full, Normal, Zoom, Zoom-1 and Subtitle. English Description Sleep timer Mute Multichannel television sound DVD AUDIO CABLE TV Favorite channels Aspect ratio Closed caption Icon SLEEP MUTE MTS DVD AUDIO CABLE...
... ATV or the audio services in DTV. Press to show the remaining time. Press to eliminate audio. Press to enter TV mode. Press to select a programmed Cable TV set-top box or a satellite TV set the sleep time (Sleep off mode. Press to select a programmed Audio Receiver/ Amp/ Home Theatre System. Function Press... middle of the image with aspect ratio Auto, Full, Normal, Zoom, Zoom-1 and Subtitle. English Description Sleep timer Mute Multichannel television sound DVD AUDIO CABLE TV Favorite channels Aspect ratio Closed caption Icon SLEEP MUTE MTS DVD AUDIO CABLE...
User Manual
Page 21
...is directly exposed to the cover. • Do not use the remote control within a proper distance from the old batteries. • Danger of the TV. English CAUTION • If the remote control is not used for a long period, remove the batteries and store them . 20 you may be shortened...chemical fluids. • If your local recycling or waste disposal rules and contact a local waste disposal vendor to dispose of 30 degrees when pointing at TV. • The operational distance may damage the hinge. Note: • For best results, use force when pulling the remote control cover open; ...
...is directly exposed to the cover. • Do not use the remote control within a proper distance from the old batteries. • Danger of the TV. English CAUTION • If the remote control is not used for a long period, remove the batteries and store them . 20 you may be shortened...chemical fluids. • If your local recycling or waste disposal rules and contact a local waste disposal vendor to dispose of 30 degrees when pointing at TV. • The operational distance may damage the hinge. Note: • For best results, use force when pulling the remote control cover open; ...
User Manual
Page 22
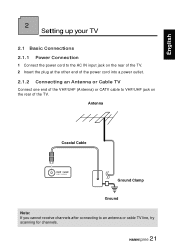
Antenna Coaxial Cable VHF / UHF CABLE / ANTENNA Ground Clamp Ground Note: If you cannot receive channels after connecting to VHF/UHF jack on the rear of the TV. English 2 Setting up your TV 2.1 Basic Connections 2.1.1 Power Connection 1 Connect the power cord to the AC IN input jack on the rear of the TV. 2 Insert the plug at the other end of the power cord into a power outlet. 2.1.2 Connecting an Antenna or Cable TV Connect one end of the VHF/UHF (Antenna) or CATV cable to an antenna or cable TV line, try scanning for channels. 21
Antenna Coaxial Cable VHF / UHF CABLE / ANTENNA Ground Clamp Ground Note: If you cannot receive channels after connecting to VHF/UHF jack on the rear of the TV. English 2 Setting up your TV 2.1 Basic Connections 2.1.1 Power Connection 1 Connect the power cord to the AC IN input jack on the rear of the TV. 2 Insert the plug at the other end of the power cord into a power outlet. 2.1.2 Connecting an Antenna or Cable TV Connect one end of the VHF/UHF (Antenna) or CATV cable to an antenna or cable TV line, try scanning for channels. 21
User Manual
Page 23
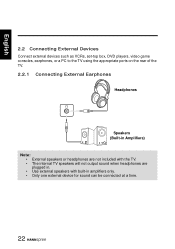
English 2.2 Connecting External Devices Connect external devices such as VCRs, set-top box, DVD players, video game consoles, earphones, or a PC to the TV using the appropriate ports on the rear of the TV. 2.2.1 Connecting External Earphones Headphones Speakers (Built-in Amplifiers) Note: • External speakers or headphones are not included with the TV. • The internal TV speakers will not output sound when headphones are plugged in. • Use external speakers with built-in amplifiers only. • Only one external device for sound can be connected at a time. 22
English 2.2 Connecting External Devices Connect external devices such as VCRs, set-top box, DVD players, video game consoles, earphones, or a PC to the TV using the appropriate ports on the rear of the TV. 2.2.1 Connecting External Earphones Headphones Speakers (Built-in Amplifiers) Note: • External speakers or headphones are not included with the TV. • The internal TV speakers will not output sound when headphones are plugged in. • Use external speakers with built-in amplifiers only. • Only one external device for sound can be connected at a time. 22
User Manual
Page 25
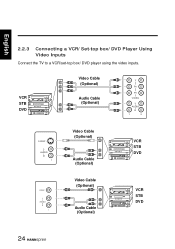
VCR STB DVD Video Cable (Optional) Audio Cable (Optional) Y PB PR VIDEO L AUDIO R 1 2 S-VIDEO 1 L AUDIO R 1 Video Cable (Optional) Audio Cable (Optional) VCR STB DVD Video Cable (Optional) Audio Cable (Optional) VCR STB DVD 24 English 2.2.3 Connecting a VCR/ Set-top box/ DVD Player Using Video Inputs Connect the TV to a VCR/set-top box/ DVD player using the video inputs.
VCR STB DVD Video Cable (Optional) Audio Cable (Optional) Y PB PR VIDEO L AUDIO R 1 2 S-VIDEO 1 L AUDIO R 1 Video Cable (Optional) Audio Cable (Optional) VCR STB DVD Video Cable (Optional) Audio Cable (Optional) VCR STB DVD 24 English 2.2.3 Connecting a VCR/ Set-top box/ DVD Player Using Video Inputs Connect the TV to a VCR/set-top box/ DVD player using the video inputs.
User Manual
Page 26
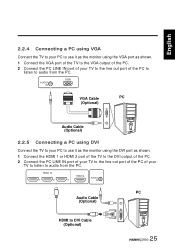
... the PC to listen to audio from the PC. AUDIO IN VGA VGA Cable PC (Optional) Audio Cable (Optional) 2.2.5 Connecting a PC using DVI Connect the TV to your PC to use it as the monitor using the VGA port as shown. 1 Connect the HDMI 1 or HDMI 2 port of the... TV to the DVI output of the PC. 2 Connect the PC LINE IN port of your TV to listen to DVI Cable (Optional) 25 HDMI IN 1 2 HDMI 4 AUDIO 3 IN PC Audio Cable (Optional) HDMI...
... the PC to listen to audio from the PC. AUDIO IN VGA VGA Cable PC (Optional) Audio Cable (Optional) 2.2.5 Connecting a PC using DVI Connect the TV to your PC to use it as the monitor using the VGA port as shown. 1 Connect the HDMI 1 or HDMI 2 port of the... TV to the DVI output of the PC. 2 Connect the PC LINE IN port of your TV to listen to DVI Cable (Optional) 25 HDMI IN 1 2 HDMI 4 AUDIO 3 IN PC Audio Cable (Optional) HDMI...
User Manual
Page 27
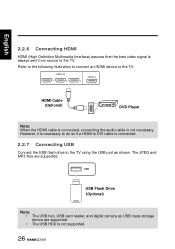
Refer to the following illustration to connect an HDMI device to the TV using the USB port as USB mass storage device are supported. HDMI IN 1 2 HDMI 4 3 ... from source to DVI cable is not supported. 26 However, it is necessary to do so if a HDMI to the TV. USB USB Flash Drive (Optional) Note: • The USB hub, USB card reader, and digital camera as shown....; The USB HDD is connected. 2.2.7 Connecting USB Connect the USB flash drive to the TV. English 2.2.6 Connecting HDMI HDMI (High Definition Multimedia Interface) assures that the best video signal is not necessary.
Refer to the following illustration to connect an HDMI device to the TV using the USB port as USB mass storage device are supported. HDMI IN 1 2 HDMI 4 3 ... from source to DVI cable is not supported. 26 However, it is necessary to do so if a HDMI to the TV. USB USB Flash Drive (Optional) Note: • The USB hub, USB card reader, and digital camera as shown....; The USB HDD is connected. 2.2.7 Connecting USB Connect the USB flash drive to the TV. English 2.2.6 Connecting HDMI HDMI (High Definition Multimedia Interface) assures that the best video signal is not necessary.
User Manual
Page 28
...control panel or remote control, then select to enter the Channel menu. 2 Select Antenna to set TV source for channel search. The power LED changes from red to green, indicating that the TV is on the control panel or remote control to select the incoming source signal to set the ...number. • Press CHT on the control panel or CH on the remote control to red, indicating that the TV is off. 2.3.2 Switching Source Signals Press INPUT on . 2 Press again. English 2.3 Using the TV 2.3.1 Turning the TV On and Off 1 Press on the remote control. 27 The power LED indicator on the...
...control panel or remote control, then select to enter the Channel menu. 2 Select Antenna to set TV source for channel search. The power LED changes from red to green, indicating that the TV is on the control panel or remote control to select the incoming source signal to set the ...number. • Press CHT on the control panel or CH on the remote control to red, indicating that the TV is off. 2.3.2 Switching Source Signals Press INPUT on . 2 Press again. English 2.3 Using the TV 2.3.1 Turning the TV On and Off 1 Press on the remote control. 27 The power LED indicator on the...
User Manual
Page 30
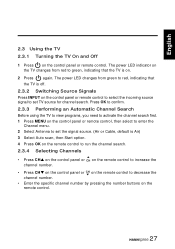
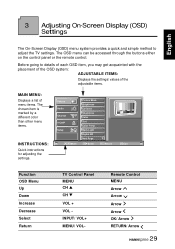
... Next Page OK Enter Return Return Menu Exit Function OSD Menu Up Down Increase Decrease Select Return TV Control Panel MENU CH S CH T VOL + VOL INPUT/ VOL+ MENU/ VOL- Before going to adjust the TV settings. 3 Adjusting On-Screen Display (OSD) Settings English The On-Screen Display (OSD) menu system provides a quick...
... Next Page OK Enter Return Return Menu Exit Function OSD Menu Up Down Increase Decrease Select Return TV Control Panel MENU CH S CH T VOL + VOL INPUT/ VOL+ MENU/ VOL- Before going to adjust the TV settings. 3 Adjusting On-Screen Display (OSD) Settings English The On-Screen Display (OSD) menu system provides a quick...


