User Manual
Page 1
...Contents Regulatory Information 3 Description of Warning Symbols 4 Safety Notices 5 Important Safety Instructions 6 Preface 9 Warranty and Service 9 1. Setting up your TV 21 2.1 Basic Connections 21 2.1.1 Power Connection 21 2.1.2 Connecting an Antenna or Cable TV 21 2.2 Connecting ...External Devices 22 2.2.1 Connecting External Earphones 22 2.2.2 Connecting to AV Devices 23 2.2.3 Connecting a VCR/ Set-top box/ DVD Player Using Video Inputs 24 2.2.4 Connecting a PC using VGA 25 2.2.5 Connecting a PC using DVI 25 2.2.6 Connecting HDMI 26...
...Contents Regulatory Information 3 Description of Warning Symbols 4 Safety Notices 5 Important Safety Instructions 6 Preface 9 Warranty and Service 9 1. Setting up your TV 21 2.1 Basic Connections 21 2.1.1 Power Connection 21 2.1.2 Connecting an Antenna or Cable TV 21 2.2 Connecting ...External Devices 22 2.2.1 Connecting External Earphones 22 2.2.2 Connecting to AV Devices 23 2.2.3 Connecting a VCR/ Set-top box/ DVD Player Using Video Inputs 24 2.2.4 Connecting a PC using VGA 25 2.2.5 Connecting a PC using DVI 25 2.2.6 Connecting HDMI 26...
User Manual
Page 2
... 6.2.1 Double Clicking 43 6.2.2 Buttons Information 43 6.2.3 Power-out Protection Capability 43 6.3 Component Program Codes 44 7. Using the Cable Organizer 52 2 Adjusting On-Screen Display (OSD) Settings 29 3.1 OSD Setting Menus 30 3.2 Adjusting Picture Settings 30 3.3 Adjusting Audio Settings 31 3.4 Adjusting Channel Settings 32 3.5 Adjusting V-CHIP Settings 33 3.6 Adjusting Setup Settings 34 4. Troubleshooting 35 5. English Table of Contents 3.
... 6.2.1 Double Clicking 43 6.2.2 Buttons Information 43 6.2.3 Power-out Protection Capability 43 6.3 Component Program Codes 44 7. Using the Cable Organizer 52 2 Adjusting On-Screen Display (OSD) Settings 29 3.1 OSD Setting Menus 30 3.2 Adjusting Picture Settings 30 3.3 Adjusting Audio Settings 31 3.4 Adjusting Channel Settings 32 3.5 Adjusting V-CHIP Settings 33 3.6 Adjusting Setup Settings 34 4. Troubleshooting 35 5. English Table of Contents 3.
User Manual
Page 3
... of the FCC Rules. This equipment generates, uses and can be determined by turning the equipment off and on a circuit different from digital apparatus as set out in a residential installation. English Regulatory Information FCC Compliance Statement1 This device complies with part 15 of America 2. Operation is no guarantee that interference will...
... of the FCC Rules. This equipment generates, uses and can be determined by turning the equipment off and on a circuit different from digital apparatus as set out in a residential installation. English Regulatory Information FCC Compliance Statement1 This device complies with part 15 of America 2. Operation is no guarantee that interference will...
User Manual
Page 9
... To ensure the safe and correct installation and operations of such damages in setting up , using the TV. The information in this manual are followed. To the extent allowed by applicable law, Hannspree, Inc. ("Hannspree") shall not be liable for direct, indirect, special, exemplary, incidental or... it is designed to assist you for purchasing a Hannspree Liquid Crystal Display Television (LCD TV). The information in its entirety before setting up and using or operating your TV. As an ENERGY STAR® Partner, Hannspree has determined that the safety and operation instructions in ...
... To ensure the safe and correct installation and operations of such damages in setting up , using the TV. The information in this manual are followed. To the extent allowed by applicable law, Hannspree, Inc. ("Hannspree") shall not be liable for direct, indirect, special, exemplary, incidental or... it is designed to assist you for purchasing a Hannspree Liquid Crystal Display Television (LCD TV). The information in its entirety before setting up and using or operating your TV. As an ENERGY STAR® Partner, Hannspree has determined that the safety and operation instructions in ...
User Manual
Page 13
... connect to the standard CVBS, S-Video, component, and HDMI input ports (location of these ports depends on model). AV or Composite input - One set -top box, or DVD player to an external audio system or earphones. 1.2.1 Features • Built-in this manual may vary on -screen display... - The built-in stereo speakers provide full rich sound and a convenient audio output port lets you change channels, adjust the volume, and change display settings through an easyto-use the TV as a monitor for YPbPr. • On-Screen Display (OSD) menu system • Built-in stereo speakers •...
... connect to the standard CVBS, S-Video, component, and HDMI input ports (location of these ports depends on model). AV or Composite input - One set -top box, or DVD player to an external audio system or earphones. 1.2.1 Features • Built-in this manual may vary on -screen display... - The built-in stereo speakers provide full rich sound and a convenient audio output port lets you change channels, adjust the volume, and change display settings through an easyto-use the TV as a monitor for YPbPr. • On-Screen Display (OSD) menu system • Built-in stereo speakers •...
User Manual
Page 16
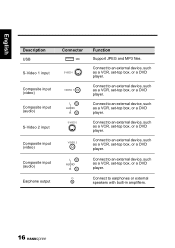
...or a DVD player. Connect to an external device, such as a VCR, set -top box, or a DVD player. Connect to an external device, such as a VCR, set -top box, or a DVD player. Connect to an external device, such as a VCR, set -top box, or a DVD player. Connect to an external device, such ...as a VCR, set -top box, or a DVD player. Connect to an external device, such as a VCR, set -top box, or a DVD player. Connect to earphones or external speakers with...
...or a DVD player. Connect to an external device, such as a VCR, set -top box, or a DVD player. Connect to an external device, such as a VCR, set -top box, or a DVD player. Connect to an external device, such as a VCR, set -top box, or a DVD player. Connect to an external device, such ...as a VCR, set -top box, or a DVD player. Connect to an external device, such as a VCR, set -top box, or a DVD player. Connect to earphones or external speakers with...

User Manual
Page 17
... -screen display menus. Press to confirm the TV source selection. Press 0-9 to enter the program numbers (press 1 and 0 for entering DTV minor channel. confirm the setting.
... -screen display menus. Press to confirm the TV source selection. Press 0-9 to enter the program numbers (press 1 and 0 for entering DTV minor channel. confirm the setting.
User Manual
Page 18
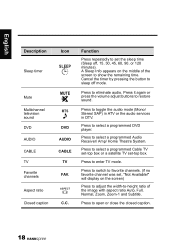
...show the remaining time. Press to open or close the closed caption. 18 Press to select a programmed DVD player. Press to switch to set , "Not Available!" English Description Sleep timer Mute Multichannel television sound DVD AUDIO CABLE TV Favorite channels Aspect ratio Closed caption Icon SLEEP MUTE ...MTS DVD AUDIO CABLE TV FAV. Press to enter TV mode. Function Press repeatedly to favorite channels. (if no favorite channel was set the sleep time (Sleep off mode. Press to restore sound. Press it again or press the volume adjust buttons to select a programmed Cable...
...show the remaining time. Press to open or close the closed caption. 18 Press to select a programmed DVD player. Press to switch to set , "Not Available!" English Description Sleep timer Mute Multichannel television sound DVD AUDIO CABLE TV Favorite channels Aspect ratio Closed caption Icon SLEEP MUTE ...MTS DVD AUDIO CABLE TV FAV. Press to enter TV mode. Function Press repeatedly to favorite channels. (if no favorite channel was set the sleep time (Sleep off mode. Press to restore sound. Press it again or press the volume adjust buttons to select a programmed Cable...

User Manual
Page 21
English 2 Setting up your TV 2.1 Basic Connections 2.1.1 Power Connection 1 Connect the power cord to the AC IN input jack on the rear of the VHF/UHF (Antenna) or CATV cable to an antenna or cable TV line, try scanning for channels. 21 Antenna Coaxial Cable VHF / UHF CABLE / ANTENNA Ground Clamp Ground Note: If you cannot receive channels after connecting to VHF/UHF jack on the rear of the TV. 2 Insert the plug at the other end of the power cord into a power outlet. 2.1.2 Connecting an Antenna or Cable TV Connect one end of the TV.
English 2 Setting up your TV 2.1 Basic Connections 2.1.1 Power Connection 1 Connect the power cord to the AC IN input jack on the rear of the VHF/UHF (Antenna) or CATV cable to an antenna or cable TV line, try scanning for channels. 21 Antenna Coaxial Cable VHF / UHF CABLE / ANTENNA Ground Clamp Ground Note: If you cannot receive channels after connecting to VHF/UHF jack on the rear of the TV. 2 Insert the plug at the other end of the power cord into a power outlet. 2.1.2 Connecting an Antenna or Cable TV Connect one end of the TV.

User Manual
Page 22
English 2.2 Connecting External Devices Connect external devices such as VCRs, set-top box, DVD players, video game consoles, earphones, or a PC to the TV using the appropriate ports on the rear of the TV. 2.2.1 Connecting External Earphones Headphones Speakers (Built-in Amplifiers) Note: • External speakers or headphones are not included with the TV. • The internal TV speakers will not output sound when headphones are plugged in. • Use external speakers with built-in amplifiers only. • Only one external device for sound can be connected at a time. 22
English 2.2 Connecting External Devices Connect external devices such as VCRs, set-top box, DVD players, video game consoles, earphones, or a PC to the TV using the appropriate ports on the rear of the TV. 2.2.1 Connecting External Earphones Headphones Speakers (Built-in Amplifiers) Note: • External speakers or headphones are not included with the TV. • The internal TV speakers will not output sound when headphones are plugged in. • Use external speakers with built-in amplifiers only. • Only one external device for sound can be connected at a time. 22
User Manual
Page 24
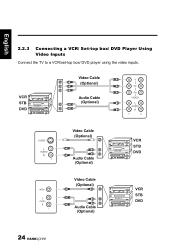
VCR STB DVD Video Cable (Optional) Audio Cable (Optional) Y PB PR VIDEO L AUDIO R 1 2 S-VIDEO 1 L AUDIO R 1 Video Cable (Optional) Audio Cable (Optional) VCR STB DVD Video Cable (Optional) Audio Cable (Optional) VCR STB DVD 24 English 2.2.3 Connecting a VCR/ Set-top box/ DVD Player Using Video Inputs Connect the TV to a VCR/set-top box/ DVD player using the video inputs.
VCR STB DVD Video Cable (Optional) Audio Cable (Optional) Y PB PR VIDEO L AUDIO R 1 2 S-VIDEO 1 L AUDIO R 1 Video Cable (Optional) Audio Cable (Optional) VCR STB DVD Video Cable (Optional) Audio Cable (Optional) VCR STB DVD 24 English 2.2.3 Connecting a VCR/ Set-top box/ DVD Player Using Video Inputs Connect the TV to a VCR/set-top box/ DVD player using the video inputs.
User Manual
Page 27
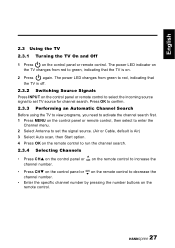
...channel number by pressing the number buttons on the control panel or remote control. The power LED indicator on the TV changes from green to set TV source for channel search. Press OK to confirm. 2.3.3 Performing an Automatic Channel Search Before using the TV to view programs, you ... Channel menu. 2 Select Antenna to red, indicating that the TV is on the control panel or remote control to select the incoming source signal to set the signal source. (Air or Cable, default is off. 2.3.2 Switching Source Signals Press INPUT on . 2 Press again. English 2.3 Using the TV 2.3.1 Turning ...
...channel number by pressing the number buttons on the control panel or remote control. The power LED indicator on the TV changes from green to set TV source for channel search. Press OK to confirm. 2.3.3 Performing an Automatic Channel Search Before using the TV to view programs, you ... Channel menu. 2 Select Antenna to red, indicating that the TV is on the control panel or remote control to select the incoming source signal to set the signal source. (Air or Cable, default is off. 2.3.2 Switching Source Signals Press INPUT on . 2 Press again. English 2.3 Using the TV 2.3.1 Turning ...
User Manual
Page 29
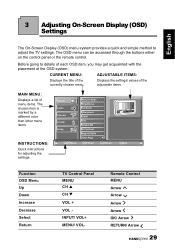
...Function OSD Menu Up Down Increase Decrease Select Return TV Control Panel MENU CH S CH T VOL + VOL INPUT/ VOL+ MENU/ VOL- Displays the settings/ values of the adjustable items. MAIN MENU: Displays a list of the currently chosen menu. Remote Control MENU Arrow Arrow Arrow Arrow OK/ Arrow RETURN/... The OSD menu can be accessed through the buttons either on the control panel or the remote control. 3 Adjusting On-Screen Display (OSD) Settings English The On-Screen Display (OSD) menu system provides a quick and simple method to details of each OSD item, you may get acquainted with...
...Function OSD Menu Up Down Increase Decrease Select Return TV Control Panel MENU CH S CH T VOL + VOL INPUT/ VOL+ MENU/ VOL- Displays the settings/ values of the adjustable items. MAIN MENU: Displays a list of the currently chosen menu. Remote Control MENU Arrow Arrow Arrow Arrow OK/ Arrow RETURN/... The OSD menu can be accessed through the buttons either on the control panel or the remote control. 3 Adjusting On-Screen Display (OSD) Settings English The On-Screen Display (OSD) menu system provides a quick and simple method to details of each OSD item, you may get acquainted with...
User Manual
Page 30
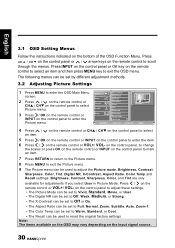
... return to the Picture menu. 8 Press MENU to exit the Picture menu. 9 The Picture menu can be used to reset the original factory settings. on the control panel, to change the scales or press OK on the remote control or INPUT on the remote control or VOL+/ VOL- ...on the control panel to adjust the Picture mode, Brightness, Contrast, Sharpness, Color, Tint, Digital NR, X-Contrast, Aspect Ratio, Color Temp and Recall settings. Picture Audio Channel V-CHIP Picture Mode Brightness Contrast Sharpness Color Tint Digital NR 3 Press / OK on the remote control or Setup INPUT on the bottom...
... return to the Picture menu. 8 Press MENU to exit the Picture menu. 9 The Picture menu can be used to reset the original factory settings. on the control panel, to change the scales or press OK on the remote control or INPUT on the remote control or VOL+/ VOL- ...on the control panel to adjust the Picture mode, Brightness, Contrast, Sharpness, Color, Tint, Digital NR, X-Contrast, Aspect Ratio, Color Temp and Recall settings. Picture Audio Channel V-CHIP Picture Mode Brightness Contrast Sharpness Color Tint Digital NR 3 Press / OK on the remote control or Setup INPUT on the bottom...

User Manual
Page 31
Equalizer is available for adjustment only if you select User in Equalizer and Balance. •The MTS can be set to Dynamic, Standard, Soft, or User. •Press / on the control panel to mark an item. 7 Press RETURN to return to the Audio menu. 8 ...Equalizer Balance 2 Press / on the remote control or CHS / CHT on the control panel to reset the original factory settings. Move OK Enter Return Return Menu Exit 4 Press / an item. English 3.3 Adjusting Audio Settings 1 Press MENU to adjust the Audio Mode, Equalizer, Balance, MTS (ATV only), Auto Volume (ATV only), and Recall...
Equalizer is available for adjustment only if you select User in Equalizer and Balance. •The MTS can be set to Dynamic, Standard, Soft, or User. •Press / on the control panel to mark an item. 7 Press RETURN to return to the Audio menu. 8 ...Equalizer Balance 2 Press / on the remote control or CHS / CHT on the control panel to reset the original factory settings. Move OK Enter Return Return Menu Exit 4 Press / an item. English 3.3 Adjusting Audio Settings 1 Press MENU to adjust the Audio Mode, Equalizer, Balance, MTS (ATV only), Auto Volume (ATV only), and Recall...
User Manual
Page 32
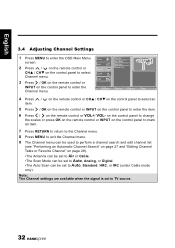
... and "Editing Channel Table or Favorite Channel" on page 28). •The Antenna can be set to Air or Cable. •The Scan Mode can be set to Auto, Analog, or Digital. •The Auto Scan can be set to TV source. 32 Audio Antenna Scan Mode Auto Scan 2 Press / on the remote... an item. 5 Press / OK on the remote control or INPUT on the control panel to enter the OSD Main Menu Picture screen. English 3.4 Adjusting Channel Settings 1 Press MENU to enter the item. 6 Press / on the remote control or VOL+/ VOL- Note: The Channel...
... and "Editing Channel Table or Favorite Channel" on page 28). •The Antenna can be set to Air or Cable. •The Scan Mode can be set to Auto, Analog, or Digital. •The Auto Scan can be set to TV source. 32 Audio Antenna Scan Mode Auto Scan 2 Press / on the remote... an item. 5 Press / OK on the remote control or INPUT on the control panel to enter the OSD Main Menu Picture screen. English 3.4 Adjusting Channel Settings 1 Press MENU to enter the item. 6 Press / on the remote control or VOL+/ VOL- Note: The Channel...
User Manual
Page 33
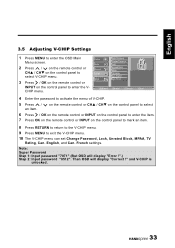
... panel to mark an item. 8 Press RETURN to return to the V-CHIP menu. 9 Press MENU to exit the V-CHIP menu. 10 The V-CHIP menu can set Change Password, Lock, Unrated Block, MPAA, TV Rating, Can. Note: Super Password Step 1: Input password "7071" (But OSD will display "Correct !" Move OK Enter Return... Change Password Lock 2 Press / on the remote control or CHS / CHT on the control panel to activate the menu of V-CHIP. 5 Press / an item. French settings. and V-CHIP is unlocked. 33 English 3.5 Adjusting V-CHIP Settings 1 Press MENU to enter the VCHIP menu. English, and Can.
... panel to mark an item. 8 Press RETURN to return to the V-CHIP menu. 9 Press MENU to exit the V-CHIP menu. 10 The V-CHIP menu can set Change Password, Lock, Unrated Block, MPAA, TV Rating, Can. Note: Super Password Step 1: Input password "7071" (But OSD will display "Correct !" Move OK Enter Return... Change Password Lock 2 Press / on the remote control or CHS / CHT on the control panel to activate the menu of V-CHIP. 5 Press / an item. French settings. and V-CHIP is unlocked. 33 English 3.5 Adjusting V-CHIP Settings 1 Press MENU to enter the VCHIP menu. English, and Can.

User Manual
Page 34
... return to the Setup menu. 8 Press MENU to exit the Setup menu. 9 The Setup menu can be set to select Setup menu. on the control panel to change settings in the Back Light settings. • Hannspree Light can be used to enter the OSD Main Menu screen. English 3.6 Adjusting Setup... Settings 1 Press MENU to adjust the Setup Wizard, OSD Language, OSD TIme, Clock Mode, Clock Set, Time Zone, Sleep Time, Back Light...
... return to the Setup menu. 8 Press MENU to exit the Setup menu. 9 The Setup menu can be set to select Setup menu. on the control panel to change settings in the Back Light settings. • Hannspree Light can be used to enter the OSD Main Menu screen. English 3.6 Adjusting Setup... Settings 1 Press MENU to adjust the Setup Wizard, OSD Language, OSD TIme, Clock Mode, Clock Set, Time Zone, Sleep Time, Back Light...
User Manual
Page 35
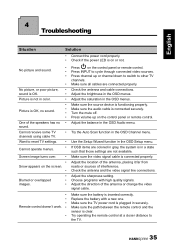
... cables are not available. Make sure the source device is connected properly. Use the Setup Wizard function in securely. Adjust the sharpness setting. Make sure the TV power cord is plugged in the OSD Setup menu. Want to the TV. 35 Press channel up on the... in gray, the system is inserted correctly. Replace the battery with high quality signals. Try operating the remote control at a closer distance to reset TV settings. • Cannot operate menus. • Screen image turns over. • • Snow appears on the screen. • • Blurred or overlapped •...
... cables are not available. Make sure the source device is connected properly. Use the Setup Wizard function in securely. Adjust the sharpness setting. Make sure the TV power cord is plugged in the OSD Setup menu. Want to the TV. 35 Press channel up on the... in gray, the system is inserted correctly. Replace the battery with high quality signals. Try operating the remote control at a closer distance to reset TV settings. • Cannot operate menus. • Screen image turns over. • • Snow appears on the screen. • • Blurred or overlapped •...

User Manual
Page 38
... you wish to switch to the electronic equipment code in the electronic equipment code list of electronic equipment. Electronic equipment code setting mode has the following operating procedures: 1. Press DVD button. The indicator light will flash once each time when a digit... input other electronic equipment codes. 5. The indicator light will be looked up in sequence. Electronic equipment codes can be prompted to setting. 38 English 6 Appendix: Remote Control Guide 6.1 Introduction The electronic equipment type switch buttons are 4 digits. Electronic equipment codes are...
... you wish to switch to the electronic equipment code in the electronic equipment code list of electronic equipment. Electronic equipment code setting mode has the following operating procedures: 1. Press DVD button. The indicator light will flash once each time when a digit... input other electronic equipment codes. 5. The indicator light will be looked up in sequence. Electronic equipment codes can be prompted to setting. 38 English 6 Appendix: Remote Control Guide 6.1 Introduction The electronic equipment type switch buttons are 4 digits. Electronic equipment codes are...


