User Manual
Page 1
... Power Connection 21 2.1.2 Connecting an Antenna or Cable TV 21 2.2 Connecting External Devices 22 2.2.1 Connecting External Earphones 22 2.2.2 Connecting to AV Devices 23 2.2.3 Connecting a VCR/ Set-top box/ DVD Player Using Video Inputs 24 2.2.4 Connecting a PC using VGA 25 2.2.5 Connecting a PC using DVI 25 2.2.6 Connecting HDMI 26 2.2.7 Connecting USB 26 2.3 Using the TV 27 2.3.1 Turning the TV On and Off 27 2.3.2 Switching Source Signals 27 2.3.3 Performing an Automatic Channel Search 27 2.3.4 Selecting Channels 27 2.3.5 Adjusting the Volume 28 2.3.6 Editing Channel Table...
... Power Connection 21 2.1.2 Connecting an Antenna or Cable TV 21 2.2 Connecting External Devices 22 2.2.1 Connecting External Earphones 22 2.2.2 Connecting to AV Devices 23 2.2.3 Connecting a VCR/ Set-top box/ DVD Player Using Video Inputs 24 2.2.4 Connecting a PC using VGA 25 2.2.5 Connecting a PC using DVI 25 2.2.6 Connecting HDMI 26 2.2.7 Connecting USB 26 2.3 Using the TV 27 2.3.1 Turning the TV On and Off 27 2.3.2 Switching Source Signals 27 2.3.3 Performing an Automatic Channel Search 27 2.3.4 Selecting Channels 27 2.3.5 Adjusting the Volume 28 2.3.6 Editing Channel Table...
User Manual
Page 2
... Using the Cable Organizer 52 2 Appendix: Remote Control Guide 38 6.1 Introduction 38 6.1.2 Setting Program Codes 38 6.1.3 Searching Codes 39 6.1.4 Setting Volume Lock 40 6.1.5 Setting Channel Lock 40 6.1.6 Factory Setting Mode 41 6.1.7 Description 43 6.2 Other Descriptions 43 6.2.1 Double Clicking 43 6.2.2 Buttons Information 43 6.2.3 Power-out Protection Capability 43 6.3 Component Program Codes 44 7. Setting the TV on the Wall 51 8. Adjusting On-Screen Display (OSD) Settings 29 3.1 OSD Setting Menus 30 3.2 Adjusting Picture Settings 30 3.3 Adjusting Audio Settings 31...
... Using the Cable Organizer 52 2 Appendix: Remote Control Guide 38 6.1 Introduction 38 6.1.2 Setting Program Codes 38 6.1.3 Searching Codes 39 6.1.4 Setting Volume Lock 40 6.1.5 Setting Channel Lock 40 6.1.6 Factory Setting Mode 41 6.1.7 Description 43 6.2 Other Descriptions 43 6.2.1 Double Clicking 43 6.2.2 Buttons Information 43 6.2.3 Power-out Protection Capability 43 6.3 Component Program Codes 44 7. Setting the TV on the Wall 51 8. Adjusting On-Screen Display (OSD) Settings 29 3.1 OSD Setting Menus 30 3.2 Adjusting Picture Settings 30 3.3 Adjusting Audio Settings 31...

User Manual
Page 5
... These servicing instructions are excluded. • This device uses a VGA connector to connect to a PC. Leave sufficient distance between the TV and the wall to provide enough space for use a VGA monitor cable with liquids, such as vases, shall be placed on the source signal, use by qualified service personnel only. Notes: • The LCD TV is for entertainment use only and visual display tasks...
... These servicing instructions are excluded. • This device uses a VGA connector to connect to a PC. Leave sufficient distance between the TV and the wall to provide enough space for use a VGA monitor cable with liquids, such as vases, shall be placed on the source signal, use by qualified service personnel only. Notes: • The LCD TV is for entertainment use only and visual display tasks...
User Manual
Page 6
... or grounding-type plug. Heed all instructions. 5. Install in accordance with dry cloth. 7. Only use caution when moving the cart/apparatus combination to US only. 10. Clean only with manufacturer's instructions. 8. NOTE: Applies to avoid injury from the apparatus. 11. Use only with the cart, stand, tripod, bracket, or table specified by the manufacturer. 12. When a cart is used, use attachments/accessories...
... or grounding-type plug. Heed all instructions. 5. Install in accordance with dry cloth. 7. Only use caution when moving the cart/apparatus combination to US only. 10. Clean only with manufacturer's instructions. 8. NOTE: Applies to avoid injury from the apparatus. 11. Use only with the cart, stand, tripod, bracket, or table specified by the manufacturer. 12. When a cart is used, use attachments/accessories...
User Manual
Page 9
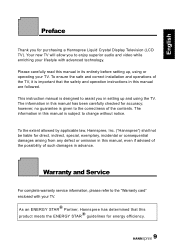
... and operation instructions in its entirety before setting up and using or operating your TV. Your new TV will allow you for energy efficiency. 9 To ensure the safe and correct installation and operations of the TV, it is given to the correctness of such damages in this manual is designed to assist you in setting up , using the TV. Warranty and Service...
... and operation instructions in its entirety before setting up and using or operating your TV. Your new TV will allow you for energy efficiency. 9 To ensure the safe and correct installation and operations of the TV, it is given to the correctness of such damages in this manual is designed to assist you in setting up , using the TV. Warranty and Service...
User Manual
Page 13
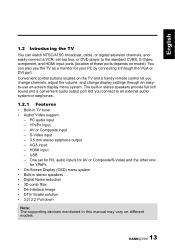
...; Audio/ Video support: - USB - Convenient control buttons located on the TV and a handy remote control let you connect to the standard CVBS, S-Video, component, and HDMI input ports (location of these ports depends on model). PC audio input - YPBPR input - AV or Composite input - VGA input - S-Video input - 3.5 mm stereo earphone output - You can watch NTSC/ATSC broadcast, cable, or digital television channels, and easily connect a VCR, set for R/L audio inputs for AV or Composite/S-Video and the other one for YPbPr. • On-Screen Display (OSD) menu...
...; Audio/ Video support: - USB - Convenient control buttons located on the TV and a handy remote control let you connect to the standard CVBS, S-Video, component, and HDMI input ports (location of these ports depends on model). PC audio input - YPBPR input - AV or Composite input - VGA input - S-Video input - 3.5 mm stereo earphone output - You can watch NTSC/ATSC broadcast, cable, or digital television channels, and easily connect a VCR, set for R/L audio inputs for AV or Composite/S-Video and the other one for YPbPr. • On-Screen Display (OSD) menu...
User Manual
Page 14
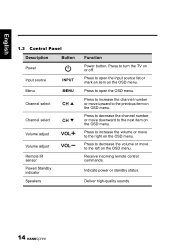
... OSD menu. Receive incoming remote control commands. Press to the next item on or off. Press to increase the channel number or move to the previous item on the OSD menu. Press to increase the volume or move upward to the right on the OSD menu. Deliver high-quality sounds. 14 English 1.3 Control Panel Description Button Power Input source Menu INPUT MENU Channel select CH Channel select CH Volume adjust Volume adjust Remote IR sensor Power/ Standby indicator Speakers VOL...
... OSD menu. Receive incoming remote control commands. Press to the next item on or off. Press to increase the channel number or move to the previous item on the OSD menu. Press to increase the volume or move upward to the right on the OSD menu. Deliver high-quality sounds. 14 English 1.3 Control Panel Description Button Power Input source Menu INPUT MENU Channel select CH Channel select CH Volume adjust Volume adjust Remote IR sensor Power/ Standby indicator Speakers VOL...

User Manual
Page 17
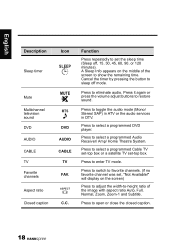
.... Press to select a channel directly. Press CH to increase audio volume. Press VOL + to decrease the channel number. to open the input source list. Press to decrease audio volume. 17 Press to view the EPG screen. Press to turn the TV on -screen display menus. Press to turn the on-screen display (OSD) menu on/ off . English 1.5 Remote Control Description Icon Power Input source INPUT Keypad Function Press to display program information. confirm the setting. Press up, down...
.... Press to select a channel directly. Press CH to increase audio volume. Press VOL + to decrease the channel number. to open the input source list. Press to decrease audio volume. 17 Press to view the EPG screen. Press to turn the TV on -screen display menus. Press to turn the on-screen display (OSD) menu on/ off . English 1.5 Remote Control Description Icon Power Input source INPUT Keypad Function Press to display program information. confirm the setting. Press up, down...
User Manual
Page 18
... screen to select a programmed DVD player. Press to favorite channels. (if no favorite channel was set -top box. will display on the middle of the image with aspect ratio Auto, Full, Normal, Zoom, Zoom-1 and Subtitle. Press to enter TV mode. English Description Sleep timer Mute Multichannel television sound DVD AUDIO CABLE TV Favorite channels Aspect ratio Closed caption Icon SLEEP MUTE MTS DVD AUDIO CABLE TV FAV. Function Press repeatedly to open or close the closed caption...
... screen to select a programmed DVD player. Press to favorite channels. (if no favorite channel was set -top box. will display on the middle of the image with aspect ratio Auto, Full, Normal, Zoom, Zoom-1 and Subtitle. Press to enter TV mode. English Description Sleep timer Mute Multichannel television sound DVD AUDIO CABLE TV Favorite channels Aspect ratio Closed caption Icon SLEEP MUTE MTS DVD AUDIO CABLE TV FAV. Function Press repeatedly to open or close the closed caption...

User Manual
Page 22
English 2.2 Connecting External Devices Connect external devices such as VCRs, set-top box, DVD players, video game consoles, earphones, or a PC to the TV using the appropriate ports on the rear of the TV. 2.2.1 Connecting External Earphones Headphones Speakers (Built-in Amplifiers) Note: • External speakers or headphones are not included with the TV. • The internal TV speakers will not output sound when headphones are plugged in. • Use external speakers with built-in amplifiers only. • Only one external device for sound can be connected at a time. 22
English 2.2 Connecting External Devices Connect external devices such as VCRs, set-top box, DVD players, video game consoles, earphones, or a PC to the TV using the appropriate ports on the rear of the TV. 2.2.1 Connecting External Earphones Headphones Speakers (Built-in Amplifiers) Note: • External speakers or headphones are not included with the TV. • The internal TV speakers will not output sound when headphones are plugged in. • Use external speakers with built-in amplifiers only. • Only one external device for sound can be connected at a time. 22
User Manual
Page 27
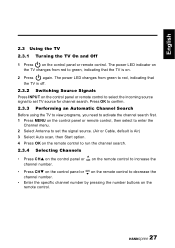
... view programs, you need to activate the channel search first. 1 Press MENU on the remote control. 27 The power LED indicator on the TV changes from green to set TV source for channel search. English 2.3 Using the TV 2.3.1 Turning the TV On and Off 1 Press on . 2 Press again. The power LED changes from red to green, indicating that the TV is off. 2.3.2 Switching Source Signals Press INPUT on the control panel or remote control to select the incoming source signal to set...
... view programs, you need to activate the channel search first. 1 Press MENU on the remote control. 27 The power LED indicator on the TV changes from green to set TV source for channel search. English 2.3 Using the TV 2.3.1 Turning the TV On and Off 1 Press on . 2 Press again. The power LED changes from red to green, indicating that the TV is off. 2.3.2 Switching Source Signals Press INPUT on the control panel or remote control to select the incoming source signal to set...
User Manual
Page 29
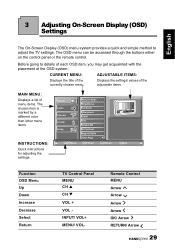
... OSD menu can be accessed through the buttons either on the control panel or the remote control. Picture Audio Channel V-CHIP Setup Move Picture Mode Brightness Contrast Sharpness Color Tint Digital NR X-Contrast Aspect Ratio Next Page OK Enter Return Return Menu Exit Function OSD Menu Up Down Increase Decrease Select Return TV Control Panel MENU CH S CH T VOL + VOL INPUT/ VOL+ MENU/ VOL- 3 Adjusting On-Screen Display (OSD) Settings English The On-Screen Display (OSD) menu system provides a quick...
... OSD menu can be accessed through the buttons either on the control panel or the remote control. Picture Audio Channel V-CHIP Setup Move Picture Mode Brightness Contrast Sharpness Color Tint Digital NR X-Contrast Aspect Ratio Next Page OK Enter Return Return Menu Exit Function OSD Menu Up Down Increase Decrease Select Return TV Control Panel MENU CH S CH T VOL + VOL INPUT/ VOL+ MENU/ VOL- 3 Adjusting On-Screen Display (OSD) Settings English The On-Screen Display (OSD) menu system provides a quick...
User Manual
Page 30
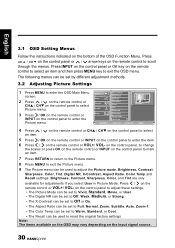
... Picture menu. 8 Press MENU to exit the Picture menu. 9 The Picture menu can be set to Warm, Standard, or Cool. • The Recall can be used to reset the original factory settings. Brightness, Contrast, Sharpness, Color, and Tint are only available for adjustments if you select User in Picture Mode. Press INPUT on the control panel or OK key on the control panel to adjust the Picture mode, Brightness, Contrast, Sharpness, Color, Tint, Digital NR, X-Contrast, Aspect Ratio, Color...
... Picture menu. 8 Press MENU to exit the Picture menu. 9 The Picture menu can be set to Warm, Standard, or Cool. • The Recall can be used to reset the original factory settings. Brightness, Contrast, Sharpness, Color, and Tint are only available for adjustments if you select User in Picture Mode. Press INPUT on the control panel or OK key on the control panel to adjust the Picture mode, Brightness, Contrast, Sharpness, Color, Tint, Digital NR, X-Contrast, Aspect Ratio, Color...

User Manual
Page 31
... remote control or VOL+/ VOL- on the control panel to change the scales or press OK on the remote control or INPUT on the control panel to enter the item. 6 Press / on the input signal source. 31 English 3.3 Adjusting Audio Settings 1 Press MENU to reset the original factory settings. Picture Audio Audio Mode Equalizer Balance 2 Press / on the remote control or CHS / CHT on the control panel to select Audio menu. 3 Press / OK on the remote control or Channel V-CHIP Setup MTS Auto Volume Recall INPUT on the control panel...
... remote control or VOL+/ VOL- on the control panel to change the scales or press OK on the remote control or INPUT on the control panel to enter the item. 6 Press / on the input signal source. 31 English 3.3 Adjusting Audio Settings 1 Press MENU to reset the original factory settings. Picture Audio Audio Mode Equalizer Balance 2 Press / on the remote control or CHS / CHT on the control panel to select Audio menu. 3 Press / OK on the remote control or Channel V-CHIP Setup MTS Auto Volume Recall INPUT on the control panel...
User Manual
Page 32
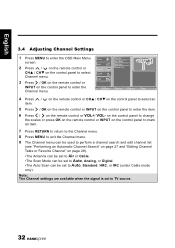
... the remote control or Channel V-CHIP Setup Channel List INPUT on page 28). •The Antenna can be set to Air or Cable. •The Scan Mode can be set to Auto, Analog, or Digital. •The Auto Scan can be set to enter the OSD Main Menu Picture screen. Note: The Channel settings are available when the signal is set to Auto, Standard, HRC, or IRC (under Cable mode only). English 3.4 Adjusting Channel Settings 1 Press MENU to TV source. 32 on the control panel to change...
... the remote control or Channel V-CHIP Setup Channel List INPUT on page 28). •The Antenna can be set to Air or Cable. •The Scan Mode can be set to Auto, Analog, or Digital. •The Auto Scan can be set to enter the OSD Main Menu Picture screen. Note: The Channel settings are available when the signal is set to Auto, Standard, HRC, or IRC (under Cable mode only). English 3.4 Adjusting Channel Settings 1 Press MENU to TV source. 32 on the control panel to change...

User Manual
Page 34
... Manual. • Setup Wizard can be set to activate the item. Channel V-CHIP Setup Clock Mode Clock Set Time Zone Sleep Time Back Light 3 Press / OK on the remote control or INPUT on the control panel to change settings in the Back Light settings. • Hannspree Light can be used to adjust the Setup Wizard, OSD Language, OSD TIme, Clock Mode, Clock Set, Time Zone, Sleep Time, Back Light, CC Mode, Analog CC, CC Style, and Hannspree Light settings. on the control panel to enter the OSD Main Menu screen. Clock Set...
... Manual. • Setup Wizard can be set to activate the item. Channel V-CHIP Setup Clock Mode Clock Set Time Zone Sleep Time Back Light 3 Press / OK on the remote control or INPUT on the control panel to change settings in the Back Light settings. • Hannspree Light can be used to adjust the Setup Wizard, OSD Language, OSD TIme, Clock Mode, Clock Set, Time Zone, Sleep Time, Back Light, CC Mode, Analog CC, CC Style, and Hannspree Light settings. on the control panel to enter the OSD Main Menu screen. Clock Set...
User Manual
Page 35
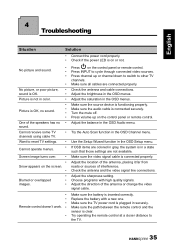
... the video signal cable is connected securely. Make sure the source device is plugged in securely. Turn the mute off. Adjust the sharpness setting. Want to other TV channels. Adjust the balance in the OSD Audio menu. Check the antenna and the video signal line connections. Make sure the TV power cord is functioning properly. Try operating the remote control at a closer distance to cycle through connected video sources. 4 Troubleshooting English Situation Solution • Connect the power cord properly...
... the video signal cable is connected securely. Make sure the source device is plugged in securely. Turn the mute off. Adjust the sharpness setting. Want to other TV channels. Adjust the balance in the OSD Audio menu. Check the antenna and the video signal line connections. Make sure the TV power cord is functioning properly. Try operating the remote control at a closer distance to cycle through connected video sources. 4 Troubleshooting English Situation Solution • Connect the power cord properly...

User Manual
Page 40
... the electronic equipment button, press CH- Buttons other electronic equipment modes). Press the corresponding electronic equipment button. twice consecutively to cancel channel lock under current mode (for example, if volume lock was set under TV mode and you wish to the assigned electronic equipment even under current DVD mode, just perform this unlock operation, while those electronic equipment modes not operated still have volume locked up). English 6.1.4 Setting Volume Lock Operating procedures are...
... the electronic equipment button, press CH- Buttons other electronic equipment modes). Press the corresponding electronic equipment button. twice consecutively to cancel channel lock under current mode (for example, if volume lock was set under TV mode and you wish to the assigned electronic equipment even under current DVD mode, just perform this unlock operation, while those electronic equipment modes not operated still have volume locked up). English 6.1.4 Setting Volume Lock Operating procedures are...

User Manual
Page 42
...code, whereas AUDIO and DVD continue to transmit TV code. 42 and Mute TV Transmit TV code CABLE Transmit CABLE code AUDIO Transmit AUDIO code DVD Transmit DVD code 7. TV Transmit TV code CABLE AUDIO DVD Transmit CABLE code Transmit AUDIO code Transmit DVD code Note Provided by manufacturer Unlocked Unlocked Unlocked Note Provided by manufacturer Unlocked Unlocked Unlocked Note: Each re-powering restores factory setting, and all electronic equipment modes transmit TV-mode infrared (IR) signal until being set up through code setting. English 6. Default volume lock setting...
...code, whereas AUDIO and DVD continue to transmit TV code. 42 and Mute TV Transmit TV code CABLE Transmit CABLE code AUDIO Transmit AUDIO code DVD Transmit DVD code 7. TV Transmit TV code CABLE AUDIO DVD Transmit CABLE code Transmit AUDIO code Transmit DVD code Note Provided by manufacturer Unlocked Unlocked Unlocked Note Provided by manufacturer Unlocked Unlocked Unlocked Note: Each re-powering restores factory setting, and all electronic equipment modes transmit TV-mode infrared (IR) signal until being set up through code setting. English 6. Default volume lock setting...

User Manual
Page 51
... a VESA compatible wall bracket: VESA 200 X 200, 4 holes, M5, 12 mm, 20kg. 2 Locate your specific wall bracket to properly wall mount the TV. • The pitch of the mounting holes is 200mm horizontally and 200mm vertically. • The screws type required is metric: M5, 12mm length. • The 32" TV stand base can ask a qualified service personnel about using the hole on the back of the stand base. *Installing the LCD TV...
... a VESA compatible wall bracket: VESA 200 X 200, 4 holes, M5, 12 mm, 20kg. 2 Locate your specific wall bracket to properly wall mount the TV. • The pitch of the mounting holes is 200mm horizontally and 200mm vertically. • The screws type required is metric: M5, 12mm length. • The 32" TV stand base can ask a qualified service personnel about using the hole on the back of the stand base. *Installing the LCD TV...


