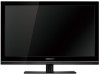
User Manual
Page 4
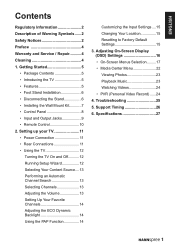
...; Rear Connections 11 • Using the TV 12 Turning the TV On and Off...........12 Running Setup Wizard 12 Selecting Your Content Source....13 Performing an Automatic Channel Search 13 Selecting Channels 13 Adjusting the Volume 13 Setting Up Your Favorite Channels 14 Adjusting the ECO Dynamic Backlight 14 Using the PAP Function 14 Customizing the Input Settings.....15 Changing Your Location 15 Resetting to Factory Default Settings 15 3. Troubleshooting 25 5. Adjusting On-Screen Display (OSD) Settings...
...; Rear Connections 11 • Using the TV 12 Turning the TV On and Off...........12 Running Setup Wizard 12 Selecting Your Content Source....13 Performing an Automatic Channel Search 13 Selecting Channels 13 Adjusting the Volume 13 Setting Up Your Favorite Channels 14 Adjusting the ECO Dynamic Backlight 14 Using the PAP Function 14 Customizing the Input Settings.....15 Changing Your Location 15 Resetting to Factory Default Settings 15 3. Troubleshooting 25 5. Adjusting On-Screen Display (OSD) Settings...
User Manual
Page 5
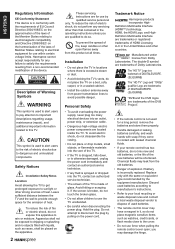
.... Safety Notices Installation Safety Notes Location Avoid allowing the TV to get prolonged exposure to the risk of glass. Leave sufficient distance between the TV and the wall to the cover. • Do not use the TV unattended. • Be careful when disconnecting the power plug. Installation • Do not place the TV in the operating instructions unless you...
.... Safety Notices Installation Safety Notes Location Avoid allowing the TV to get prolonged exposure to the risk of glass. Leave sufficient distance between the TV and the wall to the cover. • Do not use the TV unattended. • Be careful when disconnecting the power plug. Installation • Do not place the TV in the operating instructions unless you...
User Manual
Page 7
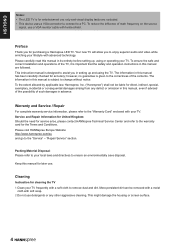
.... This instruction manual is given to the warranty card for later use detergents or any defect or omission in this manual, even if advised of the possibility of main frequency on the source signal, use a VGA monitor cable with soft soap. 2 Do not use . To the extent allowed by applicable law, Hannspree, Inc. ("Hannspree") shall not be removed with a moist cloth with ferrite shield. "Repair Service...
.... This instruction manual is given to the warranty card for later use detergents or any defect or omission in this manual, even if advised of the possibility of main frequency on the source signal, use a VGA monitor cable with soft soap. 2 Do not use . To the extent allowed by applicable law, Hannspree, Inc. ("Hannspree") shall not be removed with a moist cloth with ferrite shield. "Repair Service...
User Manual
Page 8
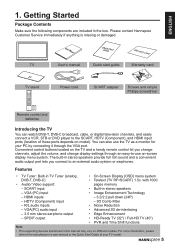
... audio output port lets you change channels, adjust the volume, and change display settings through the VGA port. Please contact Hannspree Customer Service immediately if anything is missing or damaged. R/L audio inputs - SPDIF output • On-Screen Display (OSD) menu system • Teletext (TV RF+SCART) 1.5v. User's Manual QGuuicidkeStart Warranty Card TV User's manual Quick start guide Warranty card TV stand Power cord SCART adapter Screws and simple Phillips screwdriver Remote control and batteries Introducing the TV You can also use on model). SCART input...
... audio output port lets you change channels, adjust the volume, and change display settings through the VGA port. Please contact Hannspree Customer Service immediately if anything is missing or damaged. R/L audio inputs - SPDIF output • On-Screen Display (OSD) menu system • Teletext (TV RF+SCART) 1.5v. User's Manual QGuuicidkeStart Warranty Card TV User's manual Quick start guide Warranty card TV stand Power cord SCART adapter Screws and simple Phillips screwdriver Remote control and batteries Introducing the TV You can also use on model). SCART input...
User Manual
Page 9
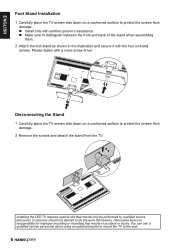
... a cross screw driver. ENGLISH Foot Stand Installation 1 Carefully place the TV screen side down on a cushioned surface to protect the screen from the TV. Disconnecting the Stand 1 Carefully place the TV screen side down on a cushioned surface to the wall. 6 Customers should only be performed by qualified service personnel. You can ask a qualified service personnel about using an optional bracket to mount the TV...
... a cross screw driver. ENGLISH Foot Stand Installation 1 Carefully place the TV screen side down on a cushioned surface to protect the screen from the TV. Disconnecting the Stand 1 Carefully place the TV screen side down on a cushioned surface to the wall. 6 Customers should only be performed by qualified service personnel. You can ask a qualified service personnel about using an optional bracket to mount the TV...
User Manual
Page 10
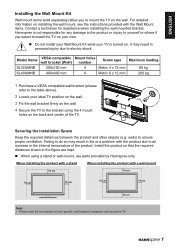
... SL32UMNB SL40UMNB VESA-compatible wall bracket (WxH) 200x100 mm 400x400 mm Mount holes number 4 4 Screw type Metric 4 x 12 mm Metric 6 x 12 mm Maximum loading 60 kg 200 kg 1 Purchase a VESA compatible wall bracket (please refer to the table above). 2 Locate your specific wall bracket to the bracket using a stand or wall-mount, use parts provided by Hannspree only. When installing the product with a stand When installing the product with the product due to an increase in fire or a problem with a wall-mount...
... SL32UMNB SL40UMNB VESA-compatible wall bracket (WxH) 200x100 mm 400x400 mm Mount holes number 4 4 Screw type Metric 4 x 12 mm Metric 6 x 12 mm Maximum loading 60 kg 200 kg 1 Purchase a VESA compatible wall bracket (please refer to the table above). 2 Locate your specific wall bracket to the bracket using a stand or wall-mount, use parts provided by Hannspree only. When installing the product with a stand When installing the product with the product due to an increase in fire or a problem with a wall-mount...
User Manual
Page 12
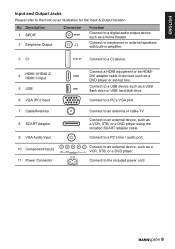
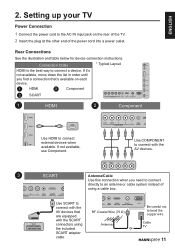
...) Input Connect a HDMI equipment or an HDMI- No. Connect to an external device, such as a USB USB flash drive or USB hard disk drive. Connect to earphones or external speakers with built-in amplifier. 3 CI CI SLOT Connect to the included power cord. 9 ENGLISH Input and Output Jacks Please refer to a digital audio output device such as a home theater. HDMI DVI adapter cable to an external device, such as a DVD player or set-top box. Connect to a PC's line / audio port. 10 Component Inputs 11 Power...
...) Input Connect a HDMI equipment or an HDMI- No. Connect to an external device, such as a USB USB flash drive or USB hard disk drive. Connect to earphones or external speakers with built-in amplifier. 3 CI CI SLOT Connect to the included power cord. 9 ENGLISH Input and Output Jacks Please refer to a digital audio output device such as a home theater. HDMI DVI adapter cable to an external device, such as a DVD player or set-top box. Connect to a PC's line / audio port. 10 Component Inputs 11 Power...
User Manual
Page 13
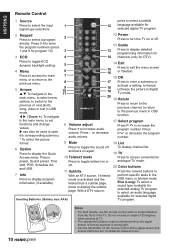
... audio volume. 9 Mute Press to toggle the sound off . 11 Subtitle 20 Color buttons Press the colored buttons to 7 Info Press to display the subtitle page. Blue (Lang): To select a sound type available for selected analog TV program, to strong light. • Aim the transmitter on the remote control at the signal sensor and ensure that there are no obstacles between them. 10 Notes: • For best results, use...
... audio volume. 9 Mute Press to toggle the sound off . 11 Subtitle 20 Color buttons Press the colored buttons to 7 Info Press to display the subtitle page. Blue (Lang): To select a sound type available for selected analog TV program, to strong light. • Aim the transmitter on the remote control at the signal sensor and ensure that there are no obstacles between them. 10 Notes: • For best results, use...
User Manual
Page 14
... Antenna Cable Or TV SCART adapter cable. 11 HDMI 2 1 HDMI 2 Component HDMI 3 3 SCART Pr/Cr Pb/Cb Y R COMPONENT L VGA SCART DTV/TV AUDIO ADAPTER CABLE/ANTENNA VGA USB 1 HDMI 2 Component HDMI 1 HDMI 2 HDMI HDMI 3 Use HDMI to connect a device. Use SCART to the AC IN input jack on each HDMI 1 device. SCART with the SCART connectors using a cable box. Setting up your TV Power Connection 1 Connect the power cord to connect with the AV devices. ENGLISH 2. Rear Connections See the illustration and table below for device connection instructions...
... Antenna Cable Or TV SCART adapter cable. 11 HDMI 2 1 HDMI 2 Component HDMI 3 3 SCART Pr/Cr Pb/Cb Y R COMPONENT L VGA SCART DTV/TV AUDIO ADAPTER CABLE/ANTENNA VGA USB 1 HDMI 2 Component HDMI 1 HDMI 2 HDMI HDMI 3 Use HDMI to connect a device. Use SCART to the AC IN input jack on each HDMI 1 device. SCART with the SCART connectors using a cable box. Setting up your TV Power Connection 1 Connect the power cord to connect with the AV devices. ENGLISH 2. Rear Connections See the illustration and table below for device connection instructions...
User Manual
Page 15
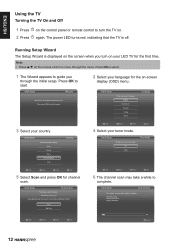
... tuner mode: Air Cable Tuner Mode Back Select Next Exit Exit 6 The channel scan may take a while to use the Wizard for channel scan. The power LED turns red, indicating that the TV is displayed on the screen when you turn the TV on. ENGLISH Using the TV Turning the TV On and Off 1 Press 2 Press on the control panel or remote control to guide you through the menu. If you skip this step, the channel scan...
... tuner mode: Air Cable Tuner Mode Back Select Next Exit Exit 6 The channel scan may take a while to use the Wizard for channel scan. The power LED turns red, indicating that the TV is displayed on the screen when you turn the TV on. ENGLISH Using the TV Turning the TV On and Off 1 Press 2 Press on the control panel or remote control to guide you through the menu. If you skip this step, the channel scan...
User Manual
Page 16
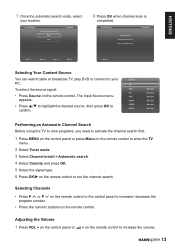
... control panel to increase / decrease the program number. • Press the numeric buttons on the remote control to run the channel search. Completed Initial Setup. The Input Source menu VGA appears. ENGLISH 7 Once the automatic search ends, select your location: Home Shop Location 8 Press OK when channel scan is completed. Initial Setup Please select your location. Adjusting the Volume 1 Press VOL + on the control panel or + on the remote control. TV To select the source signal...
... control panel to increase / decrease the program number. • Press the numeric buttons on the remote control to run the channel search. Completed Initial Setup. The Input Source menu VGA appears. ENGLISH 7 Once the automatic search ends, select your location: Home Shop Location 8 Press OK when channel scan is completed. Initial Setup Please select your location. Adjusting the Volume 1 Press VOL + on the control panel or + on the remote control. TV To select the source signal...
User Manual
Page 17
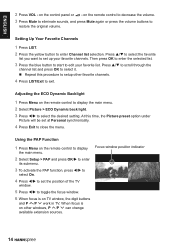
... Favorite Channels 1 Press LIST. 2 Press the yellow button to select it. When focus is on the remote control to display the main menu. 2 Select Picture > ECO Dynamic back light. 3 Press t/u to restore the original volume. on the remote control to close the menu. n Repeat this time, the Picture preset option under Picture will be set at Personal synchronically. 4 Press Exit to display the main menu. Focus window position indicator 2 Select Setup...
... Favorite Channels 1 Press LIST. 2 Press the yellow button to select it. When focus is on the remote control to display the main menu. 2 Select Picture > ECO Dynamic back light. 3 Press t/u to restore the original volume. on the remote control to close the menu. n Repeat this time, the Picture preset option under Picture will be set at Personal synchronically. 4 Press Exit to display the main menu. Focus window position indicator 2 Select Setup...
User Manual
Page 18
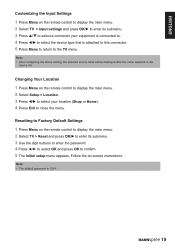
... Resetting to Factory Default Settings 1 Press Menu on the remote control to display the main menu. 2 Select TV > Reset and press OK/u to enter its submenu. 3 Press p/q to select a connector your location (Shop or Home). 4 Press Exit to close the menu. ENGLISH Customizing the Input Settings 1 Press Menu on the remote control to display the main menu. 2 Select TV > Input settings and press OK/u to enter its submenu. 3 Use the digit buttons to enter the password...
... Resetting to Factory Default Settings 1 Press Menu on the remote control to display the main menu. 2 Select TV > Reset and press OK/u to enter its submenu. 3 Press p/q to select a connector your location (Shop or Home). 4 Press Exit to close the menu. ENGLISH Customizing the Input Settings 1 Press Menu on the remote control to display the main menu. 2 Select TV > Input settings and press OK/u to enter its submenu. 3 Use the digit buttons to enter the password...
User Manual
Page 20
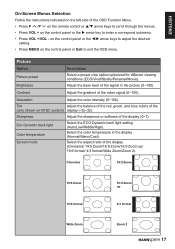
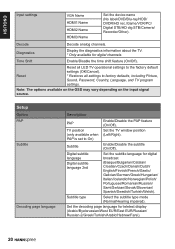
... control panel or the u arrow key to exit the OSD menu. Tint Adjust the balance of the red, green, and blue colors of the display (0~7). Contrast Adjust the gradient of the signal in the display (Normal/Warm/Cool). Eco Dynamic back light Color temperature Screen mode Select the ECO Dynamic back light setting (Auto/Low/Middle/High). Adjust the base level of the video signal (0~100). Picture Option Picture preset Brightness Description Select a preset view...
... control panel or the u arrow key to exit the OSD menu. Tint Adjust the balance of the red, green, and blue colors of the display (0~7). Contrast Adjust the gradient of the signal in the display (Normal/Warm/Cool). Eco Dynamic back light Color temperature Screen mode Select the ECO Dynamic back light setting (Auto/Low/Middle/High). Adjust the base level of the video signal (0~100). Picture Option Picture preset Brightness Description Select a preset view...
User Manual
Page 22
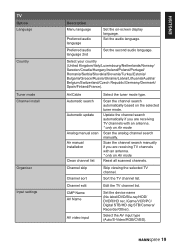
... antenna. * only on Air mode Reset all scanned channels. Preferred audio language 2nd Set the second audio language. Sort the TV channel list. Scan the channel search automatically based on -screen display language. Select the AV input type (Auto/S-Video/RGB/CVBS). 19 ENGLISH Update the channel search automatically if you are receiving TV channels with an antenna. * only on Air mode Scan the analog channel search manually. Set the device name (No label/DVD/Blu-ray/HDD/ DVDR/HD rec./Game...
... antenna. * only on Air mode Reset all scanned channels. Preferred audio language 2nd Set the second audio language. Sort the TV channel list. Scan the channel search automatically based on -screen display language. Select the AV input type (Auto/S-Video/RGB/CVBS). 19 ENGLISH Update the channel search automatically if you are receiving TV channels with an antenna. * only on Air mode Scan the analog channel search manually. Set the device name (No label/DVD/Blu-ray/HDD/ DVDR/HD rec./Game...
User Manual
Page 23
... is set to factory defaults, including Picture, Sound, Password, Country, Language, and TV program settings. Decode Decode analog channels. Time Shift Enable/Disable the time shift feature (On/Off). Note: The options available on the OSD may vary depending on the input signal source. ENGLISH Input settings VGA Name HDMI1 Name HDMI2 Name HDMI3 Name Set the device name (No label/DVD/Blu-ray/HDD/ DVDR/HD rec./Game/VCR/PC/ Digital...
... is set to factory defaults, including Picture, Sound, Password, Country, Language, and TV program settings. Decode Decode analog channels. Time Shift Enable/Disable the time shift feature (On/Off). Note: The options available on the OSD may vary depending on the input signal source. ENGLISH Input settings VGA Name HDMI1 Name HDMI2 Name HDMI3 Name Set the device name (No label/DVD/Blu-ray/HDD/ DVDR/HD rec./Game/VCR/PC/ Digital...

User Manual
Page 24
Clock Set the clock settings. - Power off timer (Off/Daily/Once) Sleep timer Set the timer to synchronize the sound with the picture (0~250). Select the SPDIF type mode (PCM/Off/Dolby D). Auto synchronization (On/Off) - Access common interface services. * This menu option is only available if the common interface module is correctly inserted and activated. Enable you to install the latest version of the TV and enable...
Clock Set the clock settings. - Power off timer (Off/Daily/Once) Sleep timer Set the timer to synchronize the sound with the picture (0~250). Select the SPDIF type mode (PCM/Off/Dolby D). Auto synchronization (On/Off) - Access common interface services. * This menu option is only available if the common interface module is correctly inserted and activated. Enable you to install the latest version of the TV and enable...
User Manual
Page 27
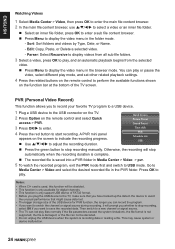
... main file content browser, use p/q/t/u to play, and an automatic playback begins from the selected video. n Press Menu to stop automatically when the recording duration is recording data or reading a file. Quick Access Picture Preset Sound Preset Time shift PVR Schedule List USB n Press the green button to display the video menu in the browser mode. Notes: • When CI+ card is used, this function will stop recording manually.
... main file content browser, use p/q/t/u to play, and an automatic playback begins from the selected video. n Press Menu to stop automatically when the recording duration is recording data or reading a file. Quick Access Picture Preset Sound Preset Time shift PVR Schedule List USB n Press the green button to display the video menu in the browser mode. Notes: • When CI+ card is used, this function will stop recording manually.
User Manual
Page 28
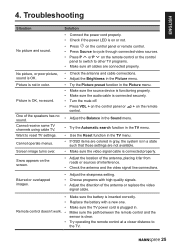
... in color. Picture is plugged in a state such that those settings are connected properly. Solution • Connect the power cord properly. • Check if the power LED is inserted correctly. Picture is connected properly. • Adjust the location of the antenna, placing it far from roads or sources of interference. • Check the antenna and the video signal line connections. Try operating the remote control at a closer distance to reset TV settings. Cannot receive some TV channels using cable...
... in color. Picture is plugged in a state such that those settings are connected properly. Solution • Connect the power cord properly. • Check if the power LED is inserted correctly. Picture is connected properly. • Adjust the location of the antenna, placing it far from roads or sources of interference. • Check the antenna and the video signal line connections. Try operating the remote control at a closer distance to reset TV settings. Cannot receive some TV channels using cable...
User Manual
Page 30
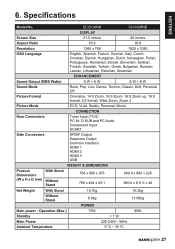
...:9 format, 4:3 format, Wide Zoom, Zoom 2 Picture Mode ECO, Vivid, Studio, Personal, Movie CONNECTION Rear Connectors Tuner Input (75 Ω) PC IN: D-SUB and PC Audio Component Input SCART Side Connectors SPDIF Output Earphone Output Common Interface HDMI 1 HDMI 2 HDMI 3 USB WEIGHT & DIMENSIONS Product Dimensions (W x H x D mm) With Stand Without Stand 768 x 560 x 205 768 x 494 x 45.1 960.8 x 680 x 226 960.8 x 611.5 x 48 Net Weight With Stand 10.7kg 16.2kg Without Stand 8.9kg 13.66kg POWER Main power - Operation...
...:9 format, 4:3 format, Wide Zoom, Zoom 2 Picture Mode ECO, Vivid, Studio, Personal, Movie CONNECTION Rear Connectors Tuner Input (75 Ω) PC IN: D-SUB and PC Audio Component Input SCART Side Connectors SPDIF Output Earphone Output Common Interface HDMI 1 HDMI 2 HDMI 3 USB WEIGHT & DIMENSIONS Product Dimensions (W x H x D mm) With Stand Without Stand 768 x 560 x 205 768 x 494 x 45.1 960.8 x 680 x 226 960.8 x 611.5 x 48 Net Weight With Stand 10.7kg 16.2kg Without Stand 8.9kg 13.66kg POWER Main power - Operation...


