User Manual
Page 4
... Notices 2 Preface 4 Warranty and Service / Repair...........4 Cleaning 4 1. Support Timing 26 6. Troubleshooting 25 5. Getting Started 5 • Package Contents 5 • Introducing the TV 5 • Features 5 • Foot Stand Installation 6 • Disconnecting the Stand 6 • Using the Cable Organizer 6 • Installing the Wall Mount Kit............7 • Control Panel 8 • Input and Output Jacks 9 • Remote Control 10 2. Setting up your TV 11 • Power Connection 11 • Rear Connections 11 • Using the TV 12 Turning the TV On...
... Notices 2 Preface 4 Warranty and Service / Repair...........4 Cleaning 4 1. Support Timing 26 6. Troubleshooting 25 5. Getting Started 5 • Package Contents 5 • Introducing the TV 5 • Features 5 • Foot Stand Installation 6 • Disconnecting the Stand 6 • Using the Cable Organizer 6 • Installing the Wall Mount Kit............7 • Control Panel 8 • Input and Output Jacks 9 • Remote Control 10 2. Setting up your TV 11 • Power Connection 11 • Rear Connections 11 • Using the TV 12 Turning the TV On...
User Manual
Page 5
... the wall to rain or moisture. If the screen is broken, do so. Hold the plug. Hannspree cannot accept responsibility for use force when pulling the remote control cover...users to pay attention to important descriptions regarding usage, maintenance (repair), and additional important information related to dangerous and uninsulated components. Apparatus shall not be shortened. The "HD TV" Logo is incorrectly replaced. Chemical fluids may have a magnet in it . you are located inside the TV. Personal Safety • To avoid overloading the power supply, never plug...
... the wall to rain or moisture. If the screen is broken, do so. Hold the plug. Hannspree cannot accept responsibility for use force when pulling the remote control cover...users to pay attention to important descriptions regarding usage, maintenance (repair), and additional important information related to dangerous and uninsulated components. Apparatus shall not be shortened. The "HD TV" Logo is incorrectly replaced. Chemical fluids may have a magnet in it . you are located inside the TV. Personal Safety • To avoid overloading the power supply, never plug...
User Manual
Page 7
... use a VGA monitor cable with ferrite shield. Packing Material Disposal: Please refer to remove dust and dirt. Cleaning Instruction for accuracy; To reduce the influence of the contents. This instruction manual is subject to assist you in advance. Please visit HANNspree Europe Website: http://www.hannspree.com/eu and go to the warranty card for purchasing a Hannspree LCD TV. "Repair Service" section. Keep this manual...
... use a VGA monitor cable with ferrite shield. Packing Material Disposal: Please refer to remove dust and dirt. Cleaning Instruction for accuracy; To reduce the influence of the contents. This instruction manual is subject to assist you in advance. Please visit HANNspree Europe Website: http://www.hannspree.com/eu and go to the warranty card for purchasing a Hannspree LCD TV. "Repair Service" section. Keep this manual...
User Manual
Page 8
... a handy remote control let you connect to an external audio system or earphones. Convenient control buttons located on different models. R/L audio inputs - HDMI inputs - You can watch DVB-T, DVB-C broadcast, cable, or digital television channels, and easily connect a VCR, STB or DVD player to -use the TV as a monitor for your TV model. 5 VGA (PC) input - SPDIF output • On-Screen Display (OSD) menu system • Teletext (TV RF+SCART) 1.5v. The built-in TV Tuner (analog, DVB-T, DVB-C) • Audio/ Video support...
... a handy remote control let you connect to an external audio system or earphones. Convenient control buttons located on different models. R/L audio inputs - HDMI inputs - You can watch DVB-T, DVB-C broadcast, cable, or digital television channels, and easily connect a VCR, STB or DVD player to -use the TV as a monitor for your TV model. 5 VGA (PC) input - SPDIF output • On-Screen Display (OSD) menu system • Teletext (TV RF+SCART) 1.5v. The built-in TV Tuner (analog, DVB-T, DVB-C) • Audio/ Video support...
User Manual
Page 9
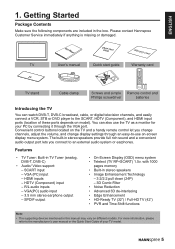
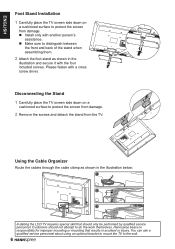
... and secure it with the four included screws. You can ask a qualified service personnel about using an optional bracket to mount the TV to protect the screen from the TV. ENGLISH Foot Stand Installation 1 Carefully place the TV screen side down on a cushioned surface to the wall. 6 Y Pb/Cb Pr/Cr L R SCART COMPONENT VGA SPDIF HDMI 2 AVUGDAIO CABLDET/AVN/TTVENNA OMPONENT Disconnecting...
... and secure it with the four included screws. You can ask a qualified service personnel about using an optional bracket to mount the TV to protect the screen from the TV. ENGLISH Foot Stand Installation 1 Carefully place the TV screen side down on a cushioned surface to the wall. 6 Y Pb/Cb Pr/Cr L R SCART COMPONENT VGA SPDIF HDMI 2 AVUGDAIO CABLDET/AVN/TTVENNA OMPONENT Disconnecting...
User Manual
Page 10
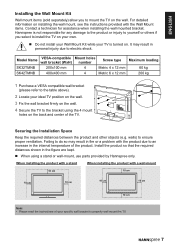
... shock. Hannspree is turned on. Model Name SK32TMNB SK42TMNB VESA-compatible wall bracket (WxH) 200x100 mm 400x400 mm Mount holes number 4 4 Screw type Metric 4 x 12 mm Metric 6 x 12 mm Maximum loading 60 kg 200 kg 1 Purchase a VESA compatible wall bracket (please refer to the table above). 2 Locate your own. Failing to the bracket using a stand or wall-mount, use parts provided by Hannspree only. For detailed information on your ideal TV position on the wall. 3 Fix the wall bracket firmly...
... shock. Hannspree is turned on. Model Name SK32TMNB SK42TMNB VESA-compatible wall bracket (WxH) 200x100 mm 400x400 mm Mount holes number 4 4 Screw type Metric 4 x 12 mm Metric 6 x 12 mm Maximum loading 60 kg 200 kg 1 Purchase a VESA compatible wall bracket (please refer to the table above). 2 Locate your own. Failing to the bracket using a stand or wall-mount, use parts provided by Hannspree only. For detailed information on your ideal TV position on the wall. 3 Fix the wall bracket firmly...
User Manual
Page 12
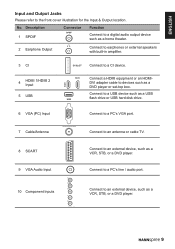
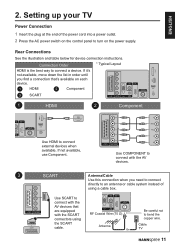
Connect to a USB device such as a DVD player or set-top box. Connect to an external device, such as a VCR, STB, or a DVD player. 9 HDMI 2 USB Connect a HDMI equipment or an HDMIDVI adapter cable to devices such as a USB flash drive or USB hard disk drive. 6 VGA (PC) Input 7 Cable/Antenna DTV/TV CABLEV/GANATENNA Connect to a CI device. No. Connect to an antenna or cable TV. 8 SCART 9 VGA Audio Input 10 Component Inputs SCART Y VGA APUb/CDb IO Pr/Cr L R COMPONENT Connect to...
Connect to a USB device such as a DVD player or set-top box. Connect to an external device, such as a VCR, STB, or a DVD player. 9 HDMI 2 USB Connect a HDMI equipment or an HDMIDVI adapter cable to devices such as a USB flash drive or USB hard disk drive. 6 VGA (PC) Input 7 Cable/Antenna DTV/TV CABLEV/GANATENNA Connect to a CI device. No. Connect to an antenna or cable TV. 8 SCART 9 VGA Audio Input 10 Component Inputs SCART Y VGA APUb/CDb IO Pr/Cr L R COMPONENT Connect to...
User Manual
Page 13
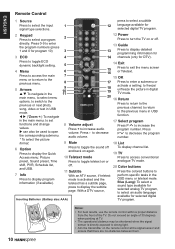
... Color buttons 11 Subtitle With an ATV source, if teletext mode is directly exposed to display the subtitle page. Blue (Lang): To select a sound type available for selected analog TV program, to select the input 1 Source signal type selections. directly. ENGLISH Remote Control 1 Source Press to select an audio language Inserting Batteries (Battery size: AAA) available for selected digital TV program. to decrease audio volume. 9 Mute 17 Select program Press P to the previous menu...
... Color buttons 11 Subtitle With an ATV source, if teletext mode is directly exposed to display the subtitle page. Blue (Lang): To select a sound type available for selected analog TV program, to select the input 1 Source signal type selections. directly. ENGLISH Remote Control 1 Source Press to select an audio language Inserting Batteries (Battery size: AAA) available for selected digital TV program. to decrease audio volume. 9 Mute 17 Select program Press P to the previous menu...
User Manual
Page 14
... power cord into a power outlet. 2 Press the AC power switch on the control panel to turn on each device. 1 HDMI 2 Component 3 SCART * Typical Layout Y Pb/Cb Pr/Cr L R SPDIF HDMI 2 DTV/TV CABLE/ANTENNA SCART COMPONENT VGA VGA AUDIO HDMI 1 USB 1 HDMI 2 Component HDMI 1 DIF HDMI 2 GA DIO DTV/TV CABLE/ANTENNA USB HDMI Use HDMI to connect with the AV devices that 's available on the power supply. Cable TV 11 Rear Connections See the illustration and table below for device connection instructions. Connection Order HDMI is the best...
... power cord into a power outlet. 2 Press the AC power switch on the control panel to turn on each device. 1 HDMI 2 Component 3 SCART * Typical Layout Y Pb/Cb Pr/Cr L R SPDIF HDMI 2 DTV/TV CABLE/ANTENNA SCART COMPONENT VGA VGA AUDIO HDMI 1 USB 1 HDMI 2 Component HDMI 1 DIF HDMI 2 GA DIO DTV/TV CABLE/ANTENNA USB HDMI Use HDMI to connect with the AV devices that 's available on the power supply. Cable TV 11 Rear Connections See the illustration and table below for device connection instructions. Connection Order HDMI is the best...
User Manual
Page 15
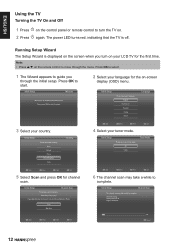
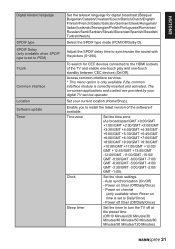
... the menu. Initial Setup Channel Scan The channel scan may take a while to start . Note: • Press p/q on the remote control to complete. Initial Setup Please select your language: English Hrvatski Dansk Language 3 Select your tuner mode. Status: Scanning. The power LED turns red, indicating that the TV is displayed on the screen when you turn the TV on -screen display (OSD) menu. Press OK to start the wizard. 2 Select your tuner mode: Air Cable Tuner Mode...
... the menu. Initial Setup Channel Scan The channel scan may take a while to start . Note: • Press p/q on the remote control to complete. Initial Setup Please select your language: English Hrvatski Dansk Language 3 Select your tuner mode. Status: Scanning. The power LED turns red, indicating that the TV is displayed on the screen when you turn the TV on -screen display (OSD) menu. Press OK to start the wizard. 2 Select your tuner mode: Air Cable Tuner Mode...
User Manual
Page 16
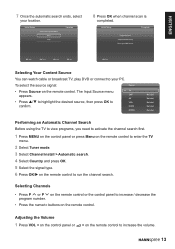
... Tuner mode. 3 Select Channel install > Automatic search. 4 Select Country and press OK. 5 Select the signal type. 6 Press OK/u on the remote control. The Input Source menu TV appears. CMP AV • Press p/q to highlight the desired source, then press OK to exit. ENGLISH 7 Once the automatic search ends, select your location: Home Shop Location 8 Press OK when channel scan is completed. Adjusting the Volume 1 Press VOL + on the control panel...
... Tuner mode. 3 Select Channel install > Automatic search. 4 Select Country and press OK. 5 Select the signal type. 6 Press OK/u on the remote control. The Input Source menu TV appears. CMP AV • Press p/q to highlight the desired source, then press OK to exit. ENGLISH 7 Once the automatic search ends, select your location: Home Shop Location 8 Press OK when channel scan is completed. Adjusting the Volume 1 Press VOL + on the control panel...
User Manual
Page 17
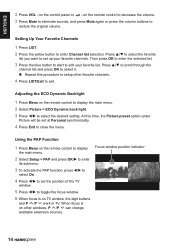
... digit buttons and P /P work in TV. n Repeat this time, the Picture preset option under Picture will be set the position of the TV window. 5 Press t/u to edit your favorite channels. At this procedure to display the main menu. ENGLISH 2 Press VOL - Setting Up Your Favorite Channels 1 Press LIST. 2 Press the yellow button to select it. Using the PAP Function 1 Press Menu on the control panel or - on the remote control...
... digit buttons and P /P work in TV. n Repeat this time, the Picture preset option under Picture will be set the position of the TV window. 5 Press t/u to edit your favorite channels. At this procedure to display the main menu. ENGLISH 2 Press VOL - Setting Up Your Favorite Channels 1 Press LIST. 2 Press the yellow button to select it. Using the PAP Function 1 Press Menu on the control panel or - on the remote control...
User Manual
Page 18
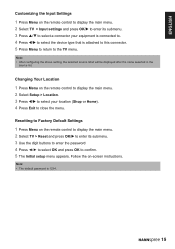
... source list. Resetting to Factory Default Settings 1 Press Menu on the remote control to display the main menu. 2 Select TV > Reset and press OK/u to enter its submenu. 3 Press p/q to select a connector your location (Shop or Home). 4 Press Exit to close the menu. ENGLISH Customizing the Input Settings 1 Press Menu on the remote control to display the main menu. 2 Select TV > Input settings and press OK/u to enter its submenu. 3 Use the digit buttons to enter the password...
... source list. Resetting to Factory Default Settings 1 Press Menu on the remote control to display the main menu. 2 Select TV > Reset and press OK/u to enter its submenu. 3 Press p/q to select a connector your location (Shop or Home). 4 Press Exit to close the menu. ENGLISH Customizing the Input Settings 1 Press Menu on the remote control to display the main menu. 2 Select TV > Input settings and press OK/u to enter its submenu. 3 Use the digit buttons to enter the password...
User Manual
Page 20
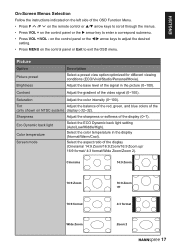
... the menus. • Press VOL + on the control panel or Exit to enter a correspond submenu. • Press VOL +/VOL - on the control panel or the t/u arrow keys to adjust the desired setting. • Press MENU on the control panel or the u arrow key to exit the OSD menu. Eco Dynamic back light Color temperature Screen mode Select the ECO Dynamic back light setting (Auto/Low/Middle/High).
... the menus. • Press VOL + on the control panel or Exit to enter a correspond submenu. • Press VOL +/VOL - on the control panel or the t/u arrow keys to adjust the desired setting. • Press MENU on the control panel or the u arrow key to exit the OSD menu. Eco Dynamic back light Color temperature Screen mode Select the ECO Dynamic back light setting (Auto/Low/Middle/High).
User Manual
Page 22
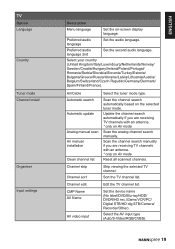
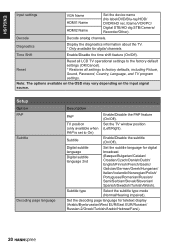
...audio language. Scan the channel search automatically based on -screen display language. Select the AV input type (Auto/S-Video/RGB/CVBS). 19 ENGLISH TV Option Language Country Tuner mode Channel install Organiser Input settings Description Menu language Set the on the selected tuner mode. Air/Cable Automatic search Automatic update Analog manual scan Air manual installation Clean channel list Select the tuner mode type. Scan the channel search manually if you are receiving TV channels with an antenna. * only on Air mode Reset all scanned channels. Channel skip Channel...
...audio language. Scan the channel search automatically based on -screen display language. Select the AV input type (Auto/S-Video/RGB/CVBS). 19 ENGLISH TV Option Language Country Tuner mode Channel install Organiser Input settings Description Menu language Set the on the selected tuner mode. Air/Cable Automatic search Automatic update Analog manual scan Air manual installation Clean channel list Select the tuner mode type. Scan the channel search manually if you are receiving TV channels with an antenna. * only on Air mode Reset all scanned channels. Channel skip Channel...
User Manual
Page 23
... name (No label/DVD/Blu-ray/HDD/ DVDR/HD rec./Game/VCR/PC/ Digital STB/HD dig STB/Camera/ Recorder/Other). Setup Option PAP Subtitle Decoding page language Description PAP TV position (only available when PAP is set to factory defaults, including Picture, Sound, Password, Country, Language, and TV program settings. Subtitle type Select the subtitle type mode (Normal/Hearing impaired). Enable/Disable the subtitle (On...
... name (No label/DVD/Blu-ray/HDD/ DVDR/HD rec./Game/VCR/PC/ Digital STB/HD dig STB/Camera/ Recorder/Other). Setup Option PAP Subtitle Decoding page language Description PAP TV position (only available when PAP is set to factory defaults, including Picture, Sound, Password, Country, Language, and TV program settings. Subtitle type Select the subtitle type mode (Normal/Hearing impaired). Enable/Disable the subtitle (On...
User Manual
Page 24
... language SPDIF type SPDIF Delay (only available when SPDIF type is set to synchronize the sound with the picture (0~250). Enable you to PCM) T-Link Common interface Location Software update Timer Set the teletext language for CEC devices connected to turn the TV off timer (Off/Daily/Once) Sleep timer Set the timer to the HDMI sockets of the software if available. Set your digital TV service operator. Select the SPDIF type mode (PCM/Off...
... language SPDIF type SPDIF Delay (only available when SPDIF type is set to synchronize the sound with the picture (0~250). Enable you to PCM) T-Link Common interface Location Software update Timer Set the teletext language for CEC devices connected to turn the TV off timer (Off/Daily/Once) Sleep timer Set the timer to the HDMI sockets of the software if available. Set your digital TV service operator. Select the SPDIF type mode (PCM/Off...
User Manual
Page 27
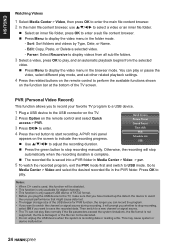
... mode. Parser: Select Recursive to display videos from the selected video. A PVR mini panel appears on the remote control and select Quick access > PVR. 3 Press OK/u to enter. 4 Press the red button to save the recorded data. Quick Access Picture Preset Sound Preset Time shift PVR Schedule List USB n Press the green button to USB mode. Press OK to adjust the recording duration. This may cause system or device malfunction. 24 n Use p/q/t/u to play mode, and set...
... mode. Parser: Select Recursive to display videos from the selected video. A PVR mini panel appears on the remote control and select Quick access > PVR. 3 Press OK/u to enter. 4 Press the red button to save the recorded data. Quick Access Picture Preset Sound Preset Time shift PVR Schedule List USB n Press the green button to USB mode. Press OK to adjust the recording duration. This may cause system or device malfunction. 24 n Use p/q/t/u to play mode, and set...
User Manual
Page 28
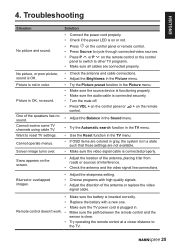
... TV programs. • Make sure all cables are not available. • Make sure the video signal cable is connected properly. • Adjust the location of the antenna, placing it far from roads or sources of the antenna or replace the video signal cable. • • • Remote control doesn't work. • • Make sure the battery is plugged in color. Make sure the TV power cord is inserted correctly. Troubleshooting Situation No picture and sound...
... TV programs. • Make sure all cables are not available. • Make sure the video signal cable is connected properly. • Adjust the location of the antenna, placing it far from roads or sources of the antenna or replace the video signal cable. • • • Remote control doesn't work. • • Make sure the battery is plugged in color. Make sure the TV power cord is inserted correctly. Troubleshooting Situation No picture and sound...

User Manual
Page 30
..., Ukrainian ENHANCEMENT Sound Output (RMS Watts) 6 W + 6 W 8 W + 8 W Sound Mode Rock, Pop, Live, Dance, Techno, Classic, Soft, Personal, Off Picture Format Cinerama, 14:9 Zoom, 16:9 Zoom, 16:9 Zoom up, 16:9 format, 4:3 format, Wide Zoom, Zoom 2 Picture Mode ECO, Vivid, Studio, Personal, Movie CONNECTION Rear Connectors Tuner Input (75 Ω) PC IN: D-SUB and PC Audio Component Input SCART HDMI 2 SPDIF Output Side Connectors Earphone Output Common Interface HDMI 1 USB WEIGHT & DIMENSIONS Product Dimensions (W x H x D mm) With Stand Without Stand 785...
..., Ukrainian ENHANCEMENT Sound Output (RMS Watts) 6 W + 6 W 8 W + 8 W Sound Mode Rock, Pop, Live, Dance, Techno, Classic, Soft, Personal, Off Picture Format Cinerama, 14:9 Zoom, 16:9 Zoom, 16:9 Zoom up, 16:9 format, 4:3 format, Wide Zoom, Zoom 2 Picture Mode ECO, Vivid, Studio, Personal, Movie CONNECTION Rear Connectors Tuner Input (75 Ω) PC IN: D-SUB and PC Audio Component Input SCART HDMI 2 SPDIF Output Side Connectors Earphone Output Common Interface HDMI 1 USB WEIGHT & DIMENSIONS Product Dimensions (W x H x D mm) With Stand Without Stand 785...


