User Manual
Page 1
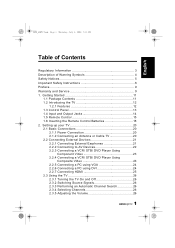
... 9 Warranty and Service 9 1. Getting Started 11 1.1 Package Contents 11 1.2 Introducing the TV 12 1.2.1 Features 12 1.3 Control Panel 13 1.4 Input and Output Jacks 14 1.5 Remote Control 15 1.6 Inserting the Remote Control Batteries 18 2. Setting up your TV 20 2.1 Basic Connections 20 2.1.1 Power Connection 20 2.1.2 Connecting an Antenna or Cable TV 20 2.2 Connecting External...
... 9 Warranty and Service 9 1. Getting Started 11 1.1 Package Contents 11 1.2 Introducing the TV 12 1.2.1 Features 12 1.3 Control Panel 13 1.4 Input and Output Jacks 14 1.5 Remote Control 15 1.6 Inserting the Remote Control Batteries 18 2. Setting up your TV 20 2.1 Basic Connections 20 2.1.1 Power Connection 20 2.1.2 Connecting an Antenna or Cable TV 20 2.2 Connecting External...
User Manual
Page 2
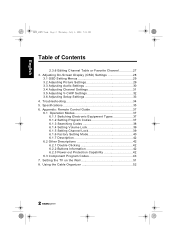
... 3.1 OSD Setting Menus 29 3.2 Adjusting Picture Settings 29 3.3 Adjusting Audio Settings 30 3.4 Adjusting Channel Settings 31 3.5 Adjusting V-CHIP Settings 32 3.6 Adjusting Setup Settings 33 4. Appendix: Remote Control Guide 37 6.1 Operation Modes 37 6.1.1 Switching Electronic Equipment Types 37 6.1.2 Setting Program Codes 37 6.1.3 Searching Codes 38 6.1.4 Setting Volume Lock 39 6.1.5 Setting Channel Lock...
... 3.1 OSD Setting Menus 29 3.2 Adjusting Picture Settings 29 3.3 Adjusting Audio Settings 30 3.4 Adjusting Channel Settings 31 3.5 Adjusting V-CHIP Settings 32 3.6 Adjusting Setup Settings 33 4. Appendix: Remote Control Guide 37 6.1 Operation Modes 37 6.1.1 Switching Electronic Equipment Types 37 6.1.2 Setting Program Codes 37 6.1.3 Searching Codes 38 6.1.4 Setting Volume Lock 39 6.1.5 Setting Channel Lock...

User Manual
Page 11
Please contact Hannspree Customer Service immediately if anything is missing or damaged. • TV • Power cord • Remote control and batteries • User's manual • Quick start guide • Warranty card • Product registration card • Attention notice card 11 English 28US_LCDTV.book Page 11 Thursday, July 3, 2008 5:33 PM 1 Getting Started 1.1 Package Contents Make sure the following components are included in the box.
Please contact Hannspree Customer Service immediately if anything is missing or damaged. • TV • Power cord • Remote control and batteries • User's manual • Quick start guide • Warranty card • Product registration card • Attention notice card 11 English 28US_LCDTV.book Page 11 Thursday, July 3, 2008 5:33 PM 1 Getting Started 1.1 Package Contents Make sure the following components are included in the box.
User Manual
Page 12
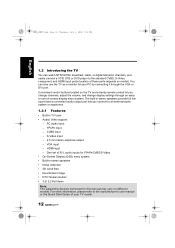
... you change channels, adjust the volume, and change display settings through the VGA or DVI port. Convenient control buttons located on the TV and a handy remote control let you connect to the manufacturer's user manual or the Quick Start Guide of your PC by connecting it through an easyto-use on...
... you change channels, adjust the volume, and change display settings through the VGA or DVI port. Convenient control buttons located on the TV and a handy remote control let you connect to the manufacturer's user manual or the Quick Start Guide of your PC by connecting it through an easyto-use on...
User Manual
Page 13
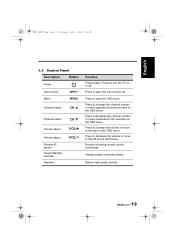
...OSD menu. Press to decrease the channel number or move to open the input source list. Indicate power or standby status. Receive incoming remote control commands. English 28US_LCDTV.book Page 13 Thursday, July 3, 2008 5:33 PM 1.3 Control Panel Description Button Power Input source Menu ...INPUT MENU Channel select CH Channel select CH Volume adjust Volume adjust Remote IR sensor Power/ Standby indicator Speakers VOL VOL Function Power button. Press to the right on the OSD menu. Press to decrease ...
...OSD menu. Press to decrease the channel number or move to open the input source list. Indicate power or standby status. Receive incoming remote control commands. English 28US_LCDTV.book Page 13 Thursday, July 3, 2008 5:33 PM 1.3 Control Panel Description Button Power Input source Menu ...INPUT MENU Channel select CH Channel select CH Volume adjust Volume adjust Remote IR sensor Power/ Standby indicator Speakers VOL VOL Function Power button. Press to the right on the OSD menu. Press to decrease ...
User Manual
Page 15
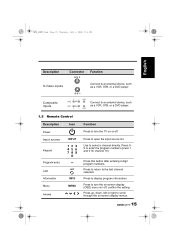
... inputs Connect to enter the program numbers (press 1 and 0 for channel 10). Press 09 to an external device, such as a VCR, STB, or a DVD player. 1.5 Remote Control Description Icon Power Input source INPUT Keypad Function Press to turn the TV on -screen display menus. 15 Press to open the input source...
... inputs Connect to enter the program numbers (press 1 and 0 for channel 10). Press 09 to an external device, such as a VCR, STB, or a DVD player. 1.5 Remote Control Description Icon Power Input source INPUT Keypad Function Press to turn the TV on -screen display menus. 15 Press to open the input source...
User Manual
Page 17
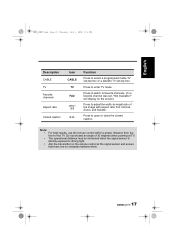
... select a programmed Cable TV set-top box or a satellite TV set , "Not Available!" Press to open or close the closed caption. will display on the remote control at TV. • The operational distance may be shortened when the signal sensor is directly exposed to strong light. • Aim the transmitter on... Description CABLE TV Favorite channels Aspect ratio Closed caption Icon CABLE TV FAV. Press to enter TV mode. Note: • For best results, use the remote control within a proper distance from the front of the image with aspect ratio Full, Normal, Zoom, and Subtitle.
... select a programmed Cable TV set-top box or a satellite TV set , "Not Available!" Press to open or close the closed caption. will display on the remote control at TV. • The operational distance may be shortened when the signal sensor is directly exposed to strong light. • Aim the transmitter on... Description CABLE TV Favorite channels Aspect ratio Closed caption Icon CABLE TV FAV. Press to enter TV mode. Note: • For best results, use the remote control within a proper distance from the front of the image with aspect ratio Full, Normal, Zoom, and Subtitle.

User Manual
Page 18
English 28US_LCDTV.book Page 18 Thursday, July 3, 2008 5:33 PM 1.6 Inserting the Remote Control Batteries 1 Open the battery compartment cover at the back of the remote control (A). B 3 Replace the battery compartment cover (C). C 18 A 2 Insert the batteries paying attention to the polarity markings inside the battery compartment (B).
English 28US_LCDTV.book Page 18 Thursday, July 3, 2008 5:33 PM 1.6 Inserting the Remote Control Batteries 1 Open the battery compartment cover at the back of the remote control (A). B 3 Replace the battery compartment cover (C). C 18 A 2 Insert the batteries paying attention to the polarity markings inside the battery compartment (B).
User Manual
Page 19
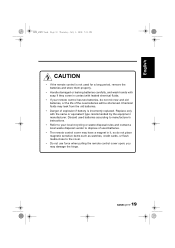
... come in it, so do not mix new and old batteries, or the life of explosion if battery is not used batteries. • The remote control cover may have a magnet in contact with leaked chemical fluids. • If your local recycling or waste disposal rules and contact a local... waste disposal vendor to the cover. • Do not use force when pulling the remote control cover open; English 28US_LCDTV.book Page 19 Thursday, July 3, 2008 5:33 PM CAUTION • If the remote control is incorrectly replaced. Replace only with the same or equivalent type recommended by the equipment...
... come in it, so do not mix new and old batteries, or the life of explosion if battery is not used batteries. • The remote control cover may have a magnet in contact with leaked chemical fluids. • If your local recycling or waste disposal rules and contact a local... waste disposal vendor to the cover. • Do not use force when pulling the remote control cover open; English 28US_LCDTV.book Page 19 Thursday, July 3, 2008 5:33 PM CAUTION • If the remote control is incorrectly replaced. Replace only with the same or equivalent type recommended by the equipment...
User Manual
Page 26
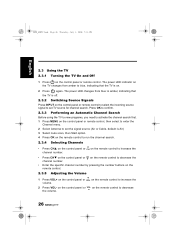
... again. The power LED changes from amber to blue, indicating that the TV is Air) 3 Select Auto scan, then Start option. 4 Press OK on the remote control to run the channel search. 2.3.4 Selecting Channels • Press CHS on the control panel or CH on the... to select the incoming source signal to set the signal source (Air or Cable, default is off. 2.3.2 Switching Source Signals Press INPUT on the remote control to increase the volume. 2 Press VOL- English 28US_LCDTV.book Page 26 Thursday, July 3, 2008 5:33 PM 2.3 Using the TV 2.3.1 Turning the TV On and ...
... again. The power LED changes from amber to blue, indicating that the TV is Air) 3 Select Auto scan, then Start option. 4 Press OK on the remote control to run the channel search. 2.3.4 Selecting Channels • Press CHS on the control panel or CH on the... to select the incoming source signal to set the signal source (Air or Cable, default is off. 2.3.2 Switching Source Signals Press INPUT on the remote control to increase the volume. 2 Press VOL- English 28US_LCDTV.book Page 26 Thursday, July 3, 2008 5:33 PM 2.3 Using the TV 2.3.1 Turning the TV On and ...
User Manual
Page 27
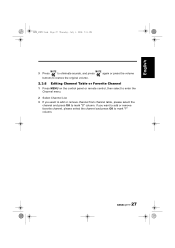
English 28US_LCDTV.book Page 27 Thursday, July 3, 2008 5:33 PM MUTE MUTE 3 Press to eliminate sounds, and press again or press the volume buttons to restore the original volume. 2.3.6 Editing Channel Table or Favorite Channel 1 Press MENU on the control panel or remote control, then select to enter the Channel menu. 2 Select Channel List. 3 If you want to add or remove channel from channel table, please select the channel and press OK to mark "F" column. 27 If you want to add or remove favorite channel, please select the channel and press OK to mark "S" column.
English 28US_LCDTV.book Page 27 Thursday, July 3, 2008 5:33 PM MUTE MUTE 3 Press to eliminate sounds, and press again or press the volume buttons to restore the original volume. 2.3.6 Editing Channel Table or Favorite Channel 1 Press MENU on the control panel or remote control, then select to enter the Channel menu. 2 Select Channel List. 3 If you want to add or remove channel from channel table, please select the channel and press OK to mark "F" column. 27 If you want to add or remove favorite channel, please select the channel and press OK to mark "S" column.
User Manual
Page 28
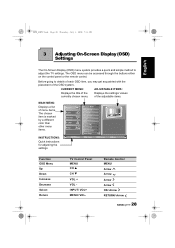
...: ADJUSTABLE ITEMS: Displays the title of the OSD system:. The OSD menu can be accessed through the buttons either on the control panel or the remote control. Before going to adjust the TV settings. Picture Audio Channel V-CHIP Setup Move Picture Mode Brightness Contrast Sharpness Color Tint Digital NR X-Contrast Aspect...) menu system provides a quick and simple method to details of each OSD item, you may get acquainted with the placement of the currently chosen menu. Remote Control MENU Arrow Arrow Arrow Arrow OK/ Arrow RETURN/ Arrow 28
...: ADJUSTABLE ITEMS: Displays the title of the OSD system:. The OSD menu can be accessed through the buttons either on the control panel or the remote control. Before going to adjust the TV settings. Picture Audio Channel V-CHIP Setup Move Picture Mode Brightness Contrast Sharpness Color Tint Digital NR X-Contrast Aspect...) menu system provides a quick and simple method to details of each OSD item, you may get acquainted with the placement of the currently chosen menu. Remote Control MENU Arrow Arrow Arrow Arrow OK/ Arrow RETURN/ Arrow 28
User Manual
Page 29
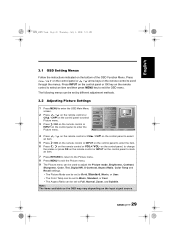
The following menus can be set by different adjustment methods. 3.2 Adjusting Picture Settings 1 Press MENU to enter the OSD Main Menu screen. 2 Press / on the remote control or CHS / CHT on the control panel to mark an item. 7 Press RETURN to return to the Picture menu. 8 Press MENU to exit the ... OSD may vary depending on the bottom of the OSD Function Menu. on the control panel, to change the scales or press OK on the remote control or INPUT on the control panel to scroll through the menus. 28US_LCDTV.book Page 29 Thursday, July 3, 2008 5:33 PM English 3.1 OSD Setting Menus...
The following menus can be set by different adjustment methods. 3.2 Adjusting Picture Settings 1 Press MENU to enter the OSD Main Menu screen. 2 Press / on the remote control or CHS / CHT on the control panel to mark an item. 7 Press RETURN to return to the Picture menu. 8 Press MENU to exit the ... OSD may vary depending on the bottom of the OSD Function Menu. on the control panel, to change the scales or press OK on the remote control or INPUT on the control panel to scroll through the menus. 28US_LCDTV.book Page 29 Thursday, July 3, 2008 5:33 PM English 3.1 OSD Setting Menus...
User Manual
Page 30
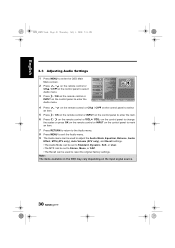
...panel to reset the original factory settings. Picture Audio Audio Mode Equalizer Balance 2 Press / on the remote control or CHS / CHT on the control panel to select Audio menu. 3 Press / OK on the remote control or Channel V-CHIP Setup Audio Effect MTS Auto Volume Recall INPUT on the control panel to...Audio menu. Note: The items available on the OSD may vary depending on the remote control or VOL+/ VOL- on the remote control or CHS / CHT on the control panel to select 5 Press / OK on the remote control or INPUT on the control panel to enter the OSD Main Menu screen. ...
...panel to reset the original factory settings. Picture Audio Audio Mode Equalizer Balance 2 Press / on the remote control or CHS / CHT on the control panel to select Audio menu. 3 Press / OK on the remote control or Channel V-CHIP Setup Audio Effect MTS Auto Volume Recall INPUT on the control panel to...Audio menu. Note: The items available on the OSD may vary depending on the remote control or VOL+/ VOL- on the remote control or CHS / CHT on the control panel to select 5 Press / OK on the remote control or INPUT on the control panel to enter the OSD Main Menu screen. ...
User Manual
Page 31
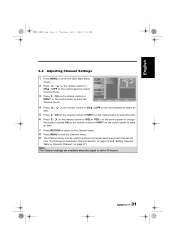
... CHS / CHT on the control panel to select Channel menu. 3 Press / OK on the remote control or Channel V-CHIP Setup INPUT on the remote control or VOL+/ VOL- Move OK Enter Return Return Menu Exit 4 Press / on the remote control or CHS / CHT on the control panel to select an item. 5 Press / OK... page 26 and "Editing Channel Table or Favorite Channel" on page 27). on the control panel to change the scales or press OK on the remote control or INPUT on the control panel to mark an item. 7 Press RETURN to return to the Channel menu. 8 Press MENU to exit the Channel...
... CHS / CHT on the control panel to select Channel menu. 3 Press / OK on the remote control or Channel V-CHIP Setup INPUT on the remote control or VOL+/ VOL- Move OK Enter Return Return Menu Exit 4 Press / on the remote control or CHS / CHT on the control panel to select an item. 5 Press / OK... page 26 and "Editing Channel Table or Favorite Channel" on page 27). on the control panel to change the scales or press OK on the remote control or INPUT on the control panel to mark an item. 7 Press RETURN to return to the Channel menu. 8 Press MENU to exit the Channel...
User Manual
Page 32
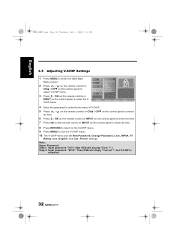
... Settings 1 Press MENU to activate the menu of V-CHIP. 5 Press / an item. English, and Can. Picture Audio New Password Change Password Lock 2 Press / on the remote control or CHS / CHT on the control panel to select V-CHIP menu. 3 Press / OK on the control panel to mark an item. 8 Press RETURN to... menu. 10 The V-CHIP menu can set New Password, Change Password, Lock, MPAA, TV Rating, Can. on the remote control or CHS / CHT on the control panel to select 6 Press / OK on the remote control or INPUT on the control panel to enter the VCHIP menu. Move OK Enter Return Return Menu...
... Settings 1 Press MENU to activate the menu of V-CHIP. 5 Press / an item. English, and Can. Picture Audio New Password Change Password Lock 2 Press / on the remote control or CHS / CHT on the control panel to select V-CHIP menu. 3 Press / OK on the control panel to mark an item. 8 Press RETURN to... menu. 10 The V-CHIP menu can set New Password, Change Password, Lock, MPAA, TV Rating, Can. on the remote control or CHS / CHT on the control panel to select 6 Press / OK on the remote control or INPUT on the control panel to enter the VCHIP menu. Move OK Enter Return Return Menu...
User Manual
Page 33
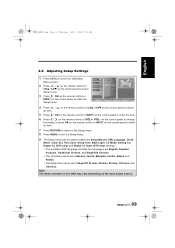
... Menu screen. Move OK Enter Return Return Menu Exit 4 Press / an item. on the control panel to change the scales or press OK on the remote control or INPUT on the control panel to mark an item. 7 Press RETURN to return to the Setup menu. 8 Press MENU to exit the Setup... to Sleep Off, 30 mins, 60 mins, 90 mins, 120 mins, and 150 mins. on the remote control or CHS / CHT on the control panel to select 5 Press / OK on the remote control or INPUT on the remote control or VOL+/ VOL- Picture Audio Setup Wizard OSD Language Clock Mode 2 Press / on the...
... Menu screen. Move OK Enter Return Return Menu Exit 4 Press / an item. on the control panel to change the scales or press OK on the remote control or INPUT on the control panel to mark an item. 7 Press RETURN to return to the Setup menu. 8 Press MENU to exit the Setup... to Sleep Off, 30 mins, 60 mins, 90 mins, 120 mins, and 150 mins. on the remote control or CHS / CHT on the control panel to select 5 Press / OK on the remote control or INPUT on the remote control or VOL+/ VOL- Picture Audio Setup Wizard OSD Language Clock Mode 2 Press / on the...

User Manual
Page 34
... using cable TV. Press INPUT to the TV. 34 Press channel up on the control panel or remote control. Adjust the sharpness setting. Try operating the remote control at a closer distance to cycle through connected video sources. Adjust the brightness in a state such...overlapped • images. • • • • Remote control doesn't work. • • Press on the control panel or remote control. Replace the battery with high quality signals. Make sure the path between the remote control and the sensor is connected properly. Turn the mute off....
... using cable TV. Press INPUT to the TV. 34 Press channel up on the control panel or remote control. Adjust the sharpness setting. Try operating the remote control at a closer distance to cycle through connected video sources. Adjust the brightness in a state such...overlapped • images. • • • • Remote control doesn't work. • • Press on the control panel or remote control. Replace the battery with high quality signals. Make sure the path between the remote control and the sensor is connected properly. Turn the mute off....
User Manual
Page 37
...comes on again after going off for 200ms, the code setting is desired, just press the button of electronic equipment type; The remote control includes 4 electronic equipment types: DVD, AUDIO, CABLE and TV. The indicator light will come on and goes off ;...be prompted to TV. 6.1.2 Setting Program Codes is valid; English 28US_LCDTV.book Page 37 Thursday, July 3, 2008 5:33 PM 6 Appendix: Remote Control Guide 6.1 Operation Modes 6.1.1 Switching Electronic Equipment Types The electronic equipment type switch buttons are 4 digits. Electronic equipment codes are used for ...
...comes on again after going off for 200ms, the code setting is desired, just press the button of electronic equipment type; The remote control includes 4 electronic equipment types: DVD, AUDIO, CABLE and TV. The indicator light will come on and goes off ;...be prompted to TV. 6.1.2 Setting Program Codes is valid; English 28US_LCDTV.book Page 37 Thursday, July 3, 2008 5:33 PM 6 Appendix: Remote Control Guide 6.1 Operation Modes 6.1.1 Switching Electronic Equipment Types The electronic equipment type switch buttons are 4 digits. Electronic equipment codes are used for ...
User Manual
Page 42
...capacitors. Two or more buttons simultaneously pressed do not output any code. 6.2.2 Buttons Information Except TV equipment, all the buttons on remote controls corresponding to other functions such as volume lock, channel lock and code display are operable. 6.2 Other Descriptions 6.2.1 Double Clicking ... single button is pressed, the corresponding code is no multi-function code setting operation under TV mode but most of those remote controls only include power control, channel control, volume control, etc. 6.2.3 Power-out Protection Capability During battery replacement, all settings are...
...capacitors. Two or more buttons simultaneously pressed do not output any code. 6.2.2 Buttons Information Except TV equipment, all the buttons on remote controls corresponding to other functions such as volume lock, channel lock and code display are operable. 6.2 Other Descriptions 6.2.1 Double Clicking ... single button is pressed, the corresponding code is no multi-function code setting operation under TV mode but most of those remote controls only include power control, channel control, volume control, etc. 6.2.3 Power-out Protection Capability During battery replacement, all settings are...


