

Product Manual
Page 5
...technician for a Class B digital device, pursuant to Part 15 of the user to radio communications. However, there is encouraged to try to operate the equipment. 2. Shielded interface cables and AC power cord, if any radio or...manual thoroughly.This manual should be retained for any , must be determined by turning the equipment off and on a circuit different from that interference will not occur in order to comply with the instructions, may cause harmful interference to correct such interference. FCC Class B Radio Frequency Interference Statement WARNING: (FOR FCC CERTIFIED MODELS...
...technician for a Class B digital device, pursuant to Part 15 of the user to radio communications. However, there is encouraged to try to operate the equipment. 2. Shielded interface cables and AC power cord, if any radio or...manual thoroughly.This manual should be retained for any , must be determined by turning the equipment off and on a circuit different from that interference will not occur in order to comply with the instructions, may cause harmful interference to correct such interference. FCC Class B Radio Frequency Interference Statement WARNING: (FOR FCC CERTIFIED MODELS...
Product Manual
Page 7
... your dealer or local power company. 16. Protect the power cord from being walked on the label. Do not block any heat sources such as radiators, heat registers, stoves, or other . Use only with the cart, stand, tripod, bracket, or table specified by the manufacturer. 12. Heed all instructions. 5. The TV should be connected to qualified service personnel. Install in any way...
... your dealer or local power company. 16. Protect the power cord from being walked on the label. Do not block any heat sources such as radiators, heat registers, stoves, or other . Use only with the cart, stand, tripod, bracket, or table specified by the manufacturer. 12. Heed all instructions. 5. The TV should be connected to qualified service personnel. Install in any way...

Product Manual
Page 8
... No. 70-1984, provides information with an antenna because of the Nation's transition to the receiver, be located away from the top of the lead-in the operating instructions unless you are for use only with UL Listed Wall Mount Bracket with only an analog broadcast tuner will require a converter box after June 12 2009, a television receiver with minimum weight/load: Please see page 27. 20...
... No. 70-1984, provides information with an antenna because of the Nation's transition to the receiver, be located away from the top of the lead-in the operating instructions unless you are for use only with UL Listed Wall Mount Bracket with only an analog broadcast tuner will require a converter box after June 12 2009, a television receiver with minimum weight/load: Please see page 27. 20...
Product Manual
Page 9
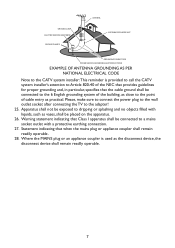
... system installer:This reminder is used as close to the point of the NEC that provides guidelines for proper grounding and, in particular, specifies that when the mains plug or appliance coupler shall remain readily operable. 28. Statement indicating that the cable ground shall be connected to the adapter! 25. Please, make sure to connect the power plug to the wall outlet...
... system installer:This reminder is used as close to the point of the NEC that provides guidelines for proper grounding and, in particular, specifies that when the mains plug or appliance coupler shall remain readily operable. 28. Statement indicating that the cable ground shall be connected to the adapter! 25. Please, make sure to connect the power plug to the wall outlet...
Product Manual
Page 11
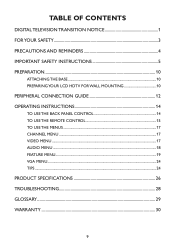
TABLE OF CONTENTS DIGITAL TELEVISION TRANSITION NOTICE 1 FOR YOUR SAFETY 3 PRECAUTIONS AND REMINDERS 4 IMPORTANT SAFETY INSTRUCTIONS 5 PREPARATION 10 ATTACHING THE BASE 10 PREPARING YOUR LCD HDTV FOR WALL MOUNTING 10 PERIPHERAL CONNECTION GUIDE 12 OPERATING INSTRUCTIONS 14 TO USE THE BACK PANEL CONTROL 14 TO USE THE REMOTE CONTROL 15 TO USE THE MENUS 17 CHANNEL MENU 17 VIDEO MENU 17 AUDIO MENU 18 FEATURE MENU 19 VGA MENU 24 TIPS 24 PRODUCT SPECIFICATIONS 26 TROUBLESHOOTING 28 GLOSSARY 29 WARRANTY 30 9
TABLE OF CONTENTS DIGITAL TELEVISION TRANSITION NOTICE 1 FOR YOUR SAFETY 3 PRECAUTIONS AND REMINDERS 4 IMPORTANT SAFETY INSTRUCTIONS 5 PREPARATION 10 ATTACHING THE BASE 10 PREPARING YOUR LCD HDTV FOR WALL MOUNTING 10 PERIPHERAL CONNECTION GUIDE 12 OPERATING INSTRUCTIONS 14 TO USE THE BACK PANEL CONTROL 14 TO USE THE REMOTE CONTROL 15 TO USE THE MENUS 17 CHANNEL MENU 17 VIDEO MENU 17 AUDIO MENU 18 FEATURE MENU 19 VGA MENU 24 TIPS 24 PRODUCT SPECIFICATIONS 26 TROUBLESHOOTING 28 GLOSSARY 29 WARRANTY 30 9
Product Manual
Page 12
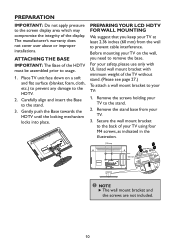
... LCD HDTV FOR WALL MOUNTING We suggest that you need to the HDTV. 2. Remove the screws holding your TV at least 2.36 inches (60 mm) from your TV on a soft and flat surface (blanket, foam, cloth, etc.) to prevent any damage to remove the base. ATTACHING THE BASE IMPORTANT: The Base of the display. Gently push the Base towards the HDTV until the locking mechanism locks into place. Remove the stand base...
... LCD HDTV FOR WALL MOUNTING We suggest that you need to the HDTV. 2. Remove the screws holding your TV at least 2.36 inches (60 mm) from your TV on a soft and flat surface (blanket, foam, cloth, etc.) to prevent any damage to remove the base. ATTACHING THE BASE IMPORTANT: The Base of the display. Gently push the Base towards the HDTV until the locking mechanism locks into place. Remove the stand base...
Product Manual
Page 13
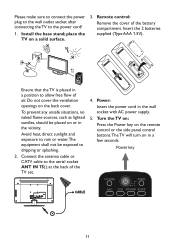
Install the base stand; Connect the antenna cable or CATV cable to allow free flow of air. Power key 11 Insert the 2 batteries supplied (Type AAA 1.5V). place the TV on the back cover. Avoid heat, direct sunlight and exposure...sources, such as lighted candles, should be exposed to the power cord! 1. Remote control: Remove the cover of the TV set. 4. Min 1 m HTR-D09 HTR-D09 Ensure that the TV is placed in a few seconds. Turn the TV on: Press the Power key on the remote control or the side panel control buttons.The TV will turn on or in the wall socket with AC power supply...
Install the base stand; Connect the antenna cable or CATV cable to allow free flow of air. Power key 11 Insert the 2 batteries supplied (Type AAA 1.5V). place the TV on the back cover. Avoid heat, direct sunlight and exposure...sources, such as lighted candles, should be exposed to the power cord! 1. Remote control: Remove the cover of the TV set. 4. Min 1 m HTR-D09 HTR-D09 Ensure that the TV is placed in a few seconds. Turn the TV on: Press the Power key on the remote control or the side panel control buttons.The TV will turn on or in the wall socket with AC power supply...
Product Manual
Page 15
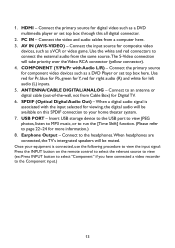
... view the input signal: Press the INPUT button on this all digital connector. 2. Use red for Pr, blue for Pb, green for Y, red for right audio (R) and white for composite video devices, such as a DVD Player or set top box through this SPDIF connection to page 22~24 for Digital TV. 6. When a digital audio signal is connected, use the following procedure to the Component input.) 13 USB PORT - Earphone Output - Connect to the headphones.When headphones are connected, the TV's intergrated speakers...
... view the input signal: Press the INPUT button on this all digital connector. 2. Use red for Pr, blue for Pb, green for Y, red for right audio (R) and white for composite video devices, such as a DVD Player or set top box through this SPDIF connection to page 22~24 for Digital TV. 6. When a digital audio signal is connected, use the following procedure to the Component input.) 13 USB PORT - Earphone Output - Connect to the headphones.When headphones are connected, the TV's intergrated speakers...
Product Manual
Page 16
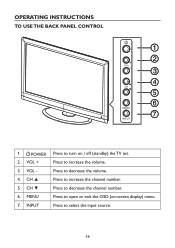
Press to decrease the volume. VOL + 3. Press to decrease the channel number. VOL 4. CH ▲ 5. Press to open or exit the OSD (on / off (standby) the TV set. MENU 7. Press to select the input source. 14 Press to increase the channel number. Press to turn on -screen display) menu. CH ▼ 6. OPERATING INSTRUCTIONS TO USE THE BACK PANEL CONTROL 1 2 VOL 3 4 CH 5 6 MENU 7 INPUT 1. POWER 2. INPUT Press to increase the volume.
Press to decrease the volume. VOL + 3. Press to decrease the channel number. VOL 4. CH ▲ 5. Press to open or exit the OSD (on / off (standby) the TV set. MENU 7. Press to select the input source. 14 Press to increase the channel number. Press to turn on -screen display) menu. CH ▼ 6. OPERATING INSTRUCTIONS TO USE THE BACK PANEL CONTROL 1 2 VOL 3 4 CH 5 6 MENU 7 INPUT 1. POWER 2. INPUT Press to increase the volume.
Product Manual
Page 17
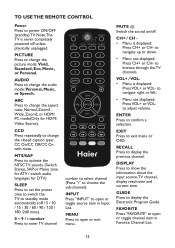
..., or HDMI PC mode(Only for DTV.) SLEEP Press to set the preset time to switch the TV to choose the sub-channel). MTS/SAP Press to activate the NTSC TV sounds. (Switch Stereo, SAP or Mono tone for ATV / switch audio languages for HDMI Video Source). INPUT Press "INPUT" to open or exit menu. MENU Press to open or toggle channel item in Input List. GUIDE Press to change the closed caption type: CC On...
..., or HDMI PC mode(Only for DTV.) SLEEP Press to set the preset time to switch the TV to choose the sub-channel). MTS/SAP Press to activate the NTSC TV sounds. (Switch Stereo, SAP or Mono tone for ATV / switch audio languages for HDMI Video Source). INPUT Press "INPUT" to open or exit menu. MENU Press to open or toggle channel item in Input List. GUIDE Press to change the closed caption type: CC On...
Product Manual
Page 19
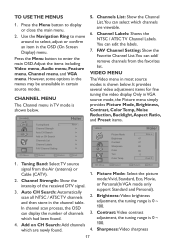
... VGA source mode, the Picture menu simply provides Picture Mode, Brightness, Contrast, Color Temp, Noise Reduction, Backlight, Aspect Ratio, and Preset items. VIDEO Picture Mode Brightness Contrast Sharpness Color Tint Color Temp Eco 47 47 65 65 0 Cool 1. However, some options in the menus may be unavailable in the OSD (On Screen Display) menu. can add/ remove channels from the Air (antenna) or Cable (CATV). 1. CHANNEL Tuning Band Air Channel Strength Auto...
... VGA source mode, the Picture menu simply provides Picture Mode, Brightness, Contrast, Color Temp, Noise Reduction, Backlight, Aspect Ratio, and Preset items. VIDEO Picture Mode Brightness Contrast Sharpness Color Tint Color Temp Eco 47 47 65 65 0 Cool 1. However, some options in the menus may be unavailable in the OSD (On Screen Display) menu. can add/ remove channels from the Air (antenna) or Cable (CATV). 1. CHANNEL Tuning Band Air Channel Strength Auto...

Product Manual
Page 20
... Off to auto matically adjust the backlight of supported audio languages depends on / off .The default setting is 0 ~ 100. 5. SPDIF: Digital audio output format. AVL: Choose On or Off to adjust volume to turn on the ATSC TV program. (English / Spanish / French) 7. Color Temp: Three color temperature modes. (Cool / Normal / Warm) 8. AUDIO Move Sound Mode Bass Treble Balance Audio Language SPDIF Speaker Personal 32 32 0 English PCM On ENTER Select Menu Return Exit...
... Off to auto matically adjust the backlight of supported audio languages depends on / off .The default setting is 0 ~ 100. 5. SPDIF: Digital audio output format. AVL: Choose On or Off to adjust volume to turn on the ATSC TV program. (English / Spanish / French) 7. Color Temp: Three color temperature modes. (Cool / Normal / Warm) 8. AUDIO Move Sound Mode Bass Treble Balance Audio Language SPDIF Speaker Personal 32 32 0 English PCM On ENTER Select Menu Return Exit...

Product Manual
Page 21
... and, Time manually. [Time Zone] - Enter the Parental Lock item, then you can be available. This menu contains options to restrict viewing of certain programs. The blocked channels or source signals can set the language, time, and other settings. Menu Language: Select the menu display language. (English / Français / Español) 2. FEATURE Menu Language Time Password Setting Parental Control Closed Captions Analog Captions Digital Captions English Off CC1 SERVICE1 Move ENTER Select Menu Return Exit Exit FEATURE Time Time Mode Time Zone...
... and, Time manually. [Time Zone] - Enter the Parental Lock item, then you can be available. This menu contains options to restrict viewing of certain programs. The blocked channels or source signals can set the language, time, and other settings. Menu Language: Select the menu display language. (English / Français / Español) 2. FEATURE Menu Language Time Password Setting Parental Control Closed Captions Analog Captions Digital Captions English Off CC1 SERVICE1 Move ENTER Select Menu Return Exit Exit FEATURE Time Time Mode Time Zone...

Product Manual
Page 22
... Parental Locks] - password. Digital Captions Setup: Provides numerous options for digital channels that are received. Digital Captions: Select digital caption options. (SERVICE 1-6) Note:This feature is set to lock or unlock the control buttons on the side panel of the sub-menu OSD. [Size] - If Customer mode is an advanced V-Chip rating system for setting the digital closed caption font style, which can only be controlled by program with RRT5 rating information. 5. Digital closed caption options. (Off / On / With Mute) 6. The rating table...
... Parental Locks] - password. Digital Captions Setup: Provides numerous options for digital channels that are received. Digital Captions: Select digital caption options. (SERVICE 1-6) Note:This feature is set to lock or unlock the control buttons on the side panel of the sub-menu OSD. [Size] - If Customer mode is an advanced V-Chip rating system for setting the digital closed caption font style, which can only be controlled by program with RRT5 rating information. 5. Digital closed caption options. (Off / On / With Mute) 6. The rating table...
Product Manual
Page 23
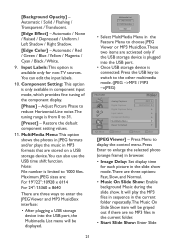
... is from 0 to the other multimedia mode. (JPEG ->MP3 / MP3 ->JPEG) FEATURE Analog Captions Digital Captions Digital Captions Setup Input Labels Component Setting MultiMedia Menu Reset To Default CC1 SERVICE1 Move ENTER Select Menu Return Exit Exit [JPEG Viewer] - Multimedia List 1. Component Setting: This option is connected: Press the USB key to switch to 31. [Preset] - MP3 MusicBox Exit • Select MultiMedia Menu in the Feature Menu to enlarge the selected photo (orange...
... is from 0 to the other multimedia mode. (JPEG ->MP3 / MP3 ->JPEG) FEATURE Analog Captions Digital Captions Digital Captions Setup Input Labels Component Setting MultiMedia Menu Reset To Default CC1 SERVICE1 Move ENTER Select Menu Return Exit Exit [JPEG Viewer] - Multimedia List 1. Component Setting: This option is connected: Press the USB key to switch to 31. [Preset] - MP3 MusicBox Exit • Select MultiMedia Menu in the Feature Menu to enlarge the selected photo (orange...

Product Manual
Page 24
... Time Press any key except POWER and the TV backlight will be needed. Save your original data before Time Shift. • USB Drive Storage Format: Select to format the USB drive and locate an area for enabling (On) or disabling (Off) the auto turn-off the TV or remove the USB drive during formatting. • During formatting, a speed test will take at the bottom): This part contains play list...
... Time Press any key except POWER and the TV backlight will be needed. Save your original data before Time Shift. • USB Drive Storage Format: Select to format the USB drive and locate an area for enabling (On) or disabling (Off) the auto turn-off the TV or remove the USB drive during formatting. • During formatting, a speed test will take at the bottom): This part contains play list...

Product Manual
Page 25
... Rally2 USB 2.0 Flash Drive - 8GB OCZUSBR2DC-8GB 11. This Key Is Unavailable During Time Shift Operation ! Not all digital TV, such as Video playback may be compatible, but it had been set before Time Shift. 7. Do Not remove the signal source during Time Shift operations. Close Caption setting is a list of recommended USB drvies. This occurs even for USB devices larger than 4GB. Below is not available during Time Shift mode. 10...
... Rally2 USB 2.0 Flash Drive - 8GB OCZUSBR2DC-8GB 11. This Key Is Unavailable During Time Shift Operation ! Not all digital TV, such as Video playback may be compatible, but it had been set before Time Shift. 7. Do Not remove the signal source during Time Shift operations. Close Caption setting is a list of recommended USB drvies. This occurs even for USB devices larger than 4GB. Below is not available during Time Shift mode. 10...

Product Manual
Page 29
LE19C1320 LE22C1380 LE24C1380 Side Connectors HDMI 2 Earphone Output USB PORT HDMI 2 HDMI 2 Earphone Output Earphone Output USB PORT USB PORT WEIGHT & DIMENSIOIN Dimensions with Stand 18.48x13.92x5.91 (W x H x D)(inch) Dimensions without Stand 18.48x12.35x1.63 (W x H x D)(inch) 21.11x15.40x6.30 22.87x16.42x6.30 21.11x13.84x1.63 22.87x14.84x1.63 Weight with Stand 7.08 (lbs) 8.78 (lbs) 9.61 (lbs) Weight without Stand and Base 6.56 (lbs) 8.18 (lbs) 9.00 (lbs) WALL MOUNTING VESA-compatible wall bracket 100 x 100...
LE19C1320 LE22C1380 LE24C1380 Side Connectors HDMI 2 Earphone Output USB PORT HDMI 2 HDMI 2 Earphone Output Earphone Output USB PORT USB PORT WEIGHT & DIMENSIOIN Dimensions with Stand 18.48x13.92x5.91 (W x H x D)(inch) Dimensions without Stand 18.48x12.35x1.63 (W x H x D)(inch) 21.11x15.40x6.30 22.87x16.42x6.30 21.11x13.84x1.63 22.87x14.84x1.63 Weight with Stand 7.08 (lbs) 8.78 (lbs) 9.61 (lbs) Weight without Stand and Base 6.56 (lbs) 8.18 (lbs) 9.00 (lbs) WALL MOUNTING VESA-compatible wall bracket 100 x 100...
Product Manual
Page 30
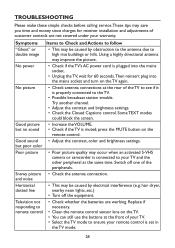
... for receiver installation and adjustments of customer controls are working. Using a highly directional antenna may improve the picture. Some TEXT modes could block the screen. Switch off the equipment. hair dryer, nearby neon lights, etc.) • Turn off one of your remote control is plugged into the mains socket and turn on the remote control. press the MUTE button on the TV again. Replace if necessary. • Clean the remote control sensor lens on...
... for receiver installation and adjustments of customer controls are working. Using a highly directional antenna may improve the picture. Some TEXT modes could block the screen. Switch off the equipment. hair dryer, nearby neon lights, etc.) • Turn off one of your remote control is plugged into the mains socket and turn on the remote control. press the MUTE button on the TV again. Replace if necessary. • Clean the remote control sensor lens on...
Product Manual
Page 31
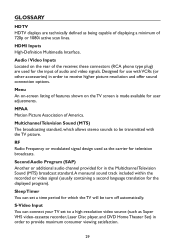
... offer sound connection options. Audio / Video Inputs Located on the rear of the receiver, these connectors (RCA phono type plug) are technically defined as Super VHS video-cassette recorder, Laser Disc player, and DVD Home Theater Set) in the Multichannel Television Sound (MTS) broadcast standard. Designed for user adjustments. S-Video Input You can set to a high-resolution video source (such as being capable of displaying a minimum of audio and video signals. MPAA Motion Picture Association of features shown on -screen listing...
... offer sound connection options. Audio / Video Inputs Located on the rear of the receiver, these connectors (RCA phono type plug) are technically defined as Super VHS video-cassette recorder, Laser Disc player, and DVD Home Theater Set) in the Multichannel Television Sound (MTS) broadcast standard. Designed for user adjustments. S-Video Input You can set to a high-resolution video source (such as being capable of displaying a minimum of audio and video signals. MPAA Motion Picture Association of features shown on -screen listing...


