User Manual
Page 88
... employs a laser. LOCATION: INSIDE, NEAR THE DECK MECHANISM. 2 TV LCD-TFT REFER SERVICING TO QUALIFIED SERVICE PERSONNEL. Important Safety Instructions 1) Read these instructions. 2) Keep these instructions. 3) Heed all warnings. 4) Follow all servicing to do not perform any heat sources such as the disconnect device, remain it readily operable during lightning storms or when unused for use . Only a qualified service person should remove the cover...
... employs a laser. LOCATION: INSIDE, NEAR THE DECK MECHANISM. 2 TV LCD-TFT REFER SERVICING TO QUALIFIED SERVICE PERSONNEL. Important Safety Instructions 1) Read these instructions. 2) Keep these instructions. 3) Heed all warnings. 4) Follow all servicing to do not perform any heat sources such as the disconnect device, remain it readily operable during lightning storms or when unused for use . Only a qualified service person should remove the cover...

User Manual
Page 91
... External A/V Source Setup 11 Co nn ec ti ng a D VD p la ye r 11 Connecting a DTV(digital TV 12 Connecting digital audio output 12 Co nn ec ti ng a c om pu te r 13 Monitor Out Setup 14 HD MI a nd D VI i np ut 14 Cable sample 15 Connecting Headphones 16 Power source 16 Removing the table stand and installing a wall mount bracket 17 Operation Switching On/Off the TV set 18 Choose the Menu Language 18 Choose the input source 18 Channel Menu Channel Scan...
... External A/V Source Setup 11 Co nn ec ti ng a D VD p la ye r 11 Connecting a DTV(digital TV 12 Connecting digital audio output 12 Co nn ec ti ng a c om pu te r 13 Monitor Out Setup 14 HD MI a nd D VI i np ut 14 Cable sample 15 Connecting Headphones 16 Power source 16 Removing the table stand and installing a wall mount bracket 17 Operation Switching On/Off the TV set 18 Choose the Menu Language 18 Choose the input source 18 Channel Menu Channel Scan...

User Manual
Page 92
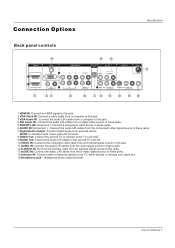
... external signal source to this jack. 8.Remote Sensor Receivers Irsignals from the video signal source to these buttons serve as left/right buttons. 4.CH +/- : Press to scan through channels, press and hold down either +/- . Please see the real set of front panel. Front panel controls Introduction MENU INPUT VOL+ VOL- POWER Label Towards Back 1.MENU: Press to open the on and off the TV. 6.AV2 AUDIO IN: Connect the audio L/R cables from the remote control. In the MENU screen, these buttons...
... external signal source to this jack. 8.Remote Sensor Receivers Irsignals from the video signal source to these buttons serve as left/right buttons. 4.CH +/- : Press to scan through channels, press and hold down either +/- . Please see the real set of front panel. Front panel controls Introduction MENU INPUT VOL+ VOL- POWER Label Towards Back 1.MENU: Press to open the on and off the TV. 6.AV2 AUDIO IN: Connect the audio L/R cables from the remote control. In the MENU screen, these buttons...
User Manual
Page 93
.... 12.S-VIDEO IN: Connect the S-Video cable from an external signal source to this jack. 4.DVI Audio IN: Connect the audio L/R cables from a digital video source to these jacks. 5.DVD/DTV IN(Component ): Connect a component video device to these jacks. 6.AUDIO IN(Component ): Connect the audio L/R cables from the S-Video signal source to these jacks. 7.Digital Audio Output: Connect digital audio to the TV, either directly or through your cable box. 15.Headphone jack : Headphone audio output terminal. R S-VIDEO L-AUDIO- DVI - Owner s Manual 7 R 1.HDMI IN: Connect an HDMI signal to...
.... 12.S-VIDEO IN: Connect the S-Video cable from an external signal source to this jack. 4.DVI Audio IN: Connect the audio L/R cables from a digital video source to these jacks. 5.DVD/DTV IN(Component ): Connect a component video device to these jacks. 6.AUDIO IN(Component ): Connect the audio L/R cables from the S-Video signal source to these jacks. 7.Digital Audio Output: Connect digital audio to the TV, either directly or through your cable box. 15.Headphone jack : Headphone audio output terminal. R S-VIDEO L-AUDIO- DVI - Owner s Manual 7 R 1.HDMI IN: Connect an HDMI signal to...

User Manual
Page 94
... remote control cannot be operated unless the batteries are properly loaded. VOL + S.MODE STOP SETUP PAUSE/STEP SUBTITLE REV FWD PREV NEXT D.MENU REPEAT A-B PLAY/ENTER SLOW ANGLE TITLE/PBC SEARCH AUDIO PROGRAM ZOOM D.CALL 10+ EXIT ARC GUIDE CH.LIST FAV.LIST POWER DVD Open/close Input selection TV Sleep button TV/DVD MUTE Return to previous channel in TV mode Program Infromation Program Number Select MONO,STEREO, SAP in NTSC system CC( closed caption) On / Off Select additional channels Adjust Picture Mode Volume/Channel...
... remote control cannot be operated unless the batteries are properly loaded. VOL + S.MODE STOP SETUP PAUSE/STEP SUBTITLE REV FWD PREV NEXT D.MENU REPEAT A-B PLAY/ENTER SLOW ANGLE TITLE/PBC SEARCH AUDIO PROGRAM ZOOM D.CALL 10+ EXIT ARC GUIDE CH.LIST FAV.LIST POWER DVD Open/close Input selection TV Sleep button TV/DVD MUTE Return to previous channel in TV mode Program Infromation Program Number Select MONO,STEREO, SAP in NTSC system CC( closed caption) On / Off Select additional channels Adjust Picture Mode Volume/Channel...

User Manual
Page 95
.... R S-VIDEO L-AUDIO- Owner s Manual 9 External Equipment Connections Accessories POWER TV/AV TV/DVD OPEN/CLOSE SLEEP Q.VIEW INFO MUTE 1234 56 90 SAP 78 CC P.MODE CH+ VOL - OK MENU CH- VOL + S.MODE STOP SETUP PAUSE/STEP SUBTITLE REV FWD PREV NEXT D.MENU REPEAT A-B PLAY/ENTER SLOW ANGLE TITLE/PBC SEARCH AUDIO PROGRAM ZOOM D.CALL 10+ EXIT ARC GUIDE CH.LIST FAV.LIST TFT-LCD TV/DVD Combo OWNER'S MANUAL Please READ this manual carefully before operating your antenna type, antenna location and antenna positioning. To install the antenna...
.... R S-VIDEO L-AUDIO- Owner s Manual 9 External Equipment Connections Accessories POWER TV/AV TV/DVD OPEN/CLOSE SLEEP Q.VIEW INFO MUTE 1234 56 90 SAP 78 CC P.MODE CH+ VOL - OK MENU CH- VOL + S.MODE STOP SETUP PAUSE/STEP SUBTITLE REV FWD PREV NEXT D.MENU REPEAT A-B PLAY/ENTER SLOW ANGLE TITLE/PBC SEARCH AUDIO PROGRAM ZOOM D.CALL 10+ EXIT ARC GUIDE CH.LIST FAV.LIST TFT-LCD TV/DVD Combo OWNER'S MANUAL Please READ this manual carefully before operating your antenna type, antenna location and antenna positioning. To install the antenna...

User Manual
Page 96
... components you want to the VCR owner`s manual.) 3. R S-VIDEO L-AUDIO- R 10 TV LCD-TFT Connection Option 1 Set VCR output switch to channel 3 or 4 and then tune the TV to VCR, match the jack colors (Video = yellow, Audio Left = white, and Audio Right = red). Connecting a VCR To avoid picture noise (interference), leave an adequate distance between the VCR and TV. When connecting the TV to the same channel number. Choose Your Connection There are several ways to the TV input...
... components you want to the VCR owner`s manual.) 3. R S-VIDEO L-AUDIO- R 10 TV LCD-TFT Connection Option 1 Set VCR output switch to channel 3 or 4 and then tune the TV to VCR, match the jack colors (Video = yellow, Audio Left = white, and Audio Right = red). Connecting a VCR To avoid picture noise (interference), leave an adequate distance between the VCR and TV. When connecting the TV to the same channel number. Choose Your Connection There are several ways to the TV input...
User Manual
Page 97
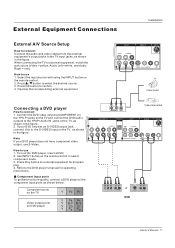
...below. Turn on the remote control. 2. If your DVD player does not have component video output, use S-Video. Select the input source with using the INPUT button on the DVD player, insert a DVD. 2. Operate the corresponding external equipment. How to the TV input jacks, as shown in the figure. External Equipment Connections Installation External A/V Source Setup How to connect Connect the audio and video cables from the external equipment's output jacks to use 1. R S-VIDEO L-AUDIO- Use INPUT button on the TV. Component Input ports To get better picture quality...
...below. Turn on the remote control. 2. If your DVD player does not have component video output, use S-Video. Select the input source with using the INPUT button on the DVD player, insert a DVD. 2. Operate the corresponding external equipment. How to the TV input jacks, as shown in the figure. External Equipment Connections Installation External A/V Source Setup How to connect Connect the audio and video cables from the external equipment's output jacks to use 1. R S-VIDEO L-AUDIO- Use INPUT button on the TV. Component Input ports To get better picture quality...

User Manual
Page 98
... you do receive Digital signals from a digital set -top box.) 2. HDMI IN 2 VGA IN VGA AUDIO VGA 2 Y COMPONENT IN OPTICAL OUT Pb Pr L-AUDIO- R HDMI Connecting a digital audio output Send the TV`s audio to the figure as amplifers or speakers, please turn the TV speakers off. ! This TV supports HDCP (High-bandwidth Digital Contents Protection) protocol for operation. See the external audio equipment instruction manual for Digital Contents (480p,720p,1080i). Digital Set-top Box OPTICAL OUT L-AUDIO- DVI AUDIO - R 1 Y Pb Pr L-AUDIO- R 1 VIDEO 12 TV LCD-TFT...
... you do receive Digital signals from a digital set -top box.) 2. HDMI IN 2 VGA IN VGA AUDIO VGA 2 Y COMPONENT IN OPTICAL OUT Pb Pr L-AUDIO- R HDMI Connecting a digital audio output Send the TV`s audio to the figure as amplifers or speakers, please turn the TV speakers off. ! This TV supports HDCP (High-bandwidth Digital Contents Protection) protocol for operation. See the external audio equipment instruction manual for Digital Contents (480p,720p,1080i). Digital Set-top Box OPTICAL OUT L-AUDIO- DVI AUDIO - R 1 Y Pb Pr L-AUDIO- R 1 VIDEO 12 TV LCD-TFT...

User Manual
Page 99
... HDMI ; (theother mode isset to another rate or adjust the brightness and contrast on your computer connector. R 1 Y Pb Pr L-AUDIO- R Owner s Manual 13 Check the image on the menu until the picture is clear. Note 1.Use aDVI cable. 2.Avoid keepinga fixed imageon theTV's screen fora long periodof time.The fixed image may be changed,change therefresh rate to Plugand Play automaticallyby theTV.) 3. DVI AUDIO - To get the best picture quality, adjust...
... HDMI ; (theother mode isset to another rate or adjust the brightness and contrast on your computer connector. R 1 Y Pb Pr L-AUDIO- R Owner s Manual 13 Check the image on the menu until the picture is clear. Note 1.Use aDVI cable. 2.Avoid keepinga fixed imageon theTV's screen fora long periodof time.The fixed image may be changed,change therefresh rate to Plugand Play automaticallyby theTV.) 3. DVI AUDIO - To get the best picture quality, adjust...

User Manual
Page 100
...(DVD player or Set Top Box) supports HDMI TV or Monitor How To Connect 1. To get the best picture quality, adjust the output resolution of the source device will be used for further details regarding that device`s input settings. See the Operating Manual of the source device to DVI Audio In port located on the left side of Select Main source menu. AV OUT VIDEO L-AUDIO-R VIDEO IN ANT IN 1 VIDEO L-AUDIO- No separated audio connection is necessary. 3. Press the INPUT button to select HDMI input source in input source...
...(DVD player or Set Top Box) supports HDMI TV or Monitor How To Connect 1. To get the best picture quality, adjust the output resolution of the source device will be used for further details regarding that device`s input settings. See the Operating Manual of the source device to DVI Audio In port located on the left side of Select Main source menu. AV OUT VIDEO L-AUDIO-R VIDEO IN ANT IN 1 VIDEO L-AUDIO- No separated audio connection is necessary. 3. Press the INPUT button to select HDMI input source in input source...

User Manual
Page 104
... French Operation Video Audio Channel Function Lock Function Language OSD Timeout OSD Transparency Screen Mode Blue Screen DPMS Time Setup Closed Caption Default English Short Middle Normal On On CH+/VOL+/- There are connected to select Function menu. 3. First, connect power cord correctly. 2. Press VOL+ or OK button and then use CH+/- Note The HDMI3 option appears only with the TV operation. Operation In the manual, the OSD (on screen display) may be different from the wall power...
... French Operation Video Audio Channel Function Lock Function Language OSD Timeout OSD Transparency Screen Mode Blue Screen DPMS Time Setup Closed Caption Default English Short Middle Normal On On CH+/VOL+/- There are connected to select Function menu. 3. First, connect power cord correctly. 2. Press VOL+ or OK button and then use CH+/- Note The HDMI3 option appears only with the TV operation. Operation In the manual, the OSD (on screen display) may be different from the wall power...
User Manual
Page 105
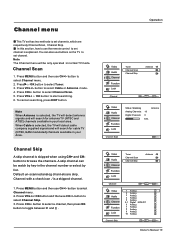
...Video Audio Channel Function Lock 1 Analog 2 Analog 3 Analog 4 Analog 5 Analog 5-1 Digital KPIX-DT 6 Analog 7 Analog 8 Analog 9 Analog 10 Analog Channel Skip OK Set CH+/VOL+/- In this section, how to use CH+/- Press MENU button and then use CH+/- button to set channel is selected, the TV will detect antenna signals and will be watch by list. Press CH+/- When Cable is a skipped channel. 1. Press VOL+or OK button and then use the remote control to select Channel menu. 2. Press CH+/- Operation Video Audio Channel Function Lock Tuner Channel Scan Channel...
...Video Audio Channel Function Lock 1 Analog 2 Analog 3 Analog 4 Analog 5 Analog 5-1 Digital KPIX-DT 6 Analog 7 Analog 8 Analog 9 Analog 10 Analog Channel Skip OK Set CH+/VOL+/- In this section, how to use CH+/- Press MENU button and then use CH+/- button to set channel is selected, the TV will detect antenna signals and will be watch by list. Press CH+/- When Cable is a skipped channel. 1. Press VOL+or OK button and then use the remote control to select Channel menu. 2. Press CH+/- Operation Video Audio Channel Function Lock Tuner Channel Scan Channel...
User Manual
Page 106
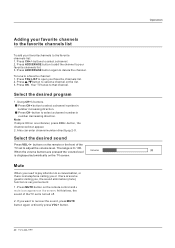
buttons to select a channel number in number increasing direction. Select the desired program 1. Select the desired sound Press VOL-/+ buttons on the TV screen. When the volume buttons are some guests visiting you or there are pressed the volume level is displayed automatically on the remote or the front of the TV set to adjust the volume level. At this time, the sound of the TV set is ON on one channel, press CH...
buttons to select a channel number in number increasing direction. Select the desired program 1. Select the desired sound Press VOL-/+ buttons on the TV screen. When the volume buttons are some guests visiting you or there are pressed the volume level is displayed automatically on the remote or the front of the TV set to adjust the volume level. At this time, the sound of the TV set is ON on one channel, press CH...

User Manual
Page 107
... picture, which will adjust the sharpness of fine details in advanced: DNR, Black Level Extender, White Peak Limiter, CTI, Flech Tone, Adaptive Luma Control. Tint Allows you can also press P.MODE button on the input signal, one or more menu items may not be set by program . Note Depending on the remote control to select Video menu. 2. button to select the option Standard, Vivid, Custom and Mild. Audio Channel Function Lock Video Mode...
... picture, which will adjust the sharpness of fine details in advanced: DNR, Black Level Extender, White Peak Limiter, CTI, Flech Tone, Adaptive Luma Control. Tint Allows you can also press P.MODE button on the input signal, one or more menu items may not be set by program . Note Depending on the remote control to select Video menu. 2. button to select the option Standard, Vivid, Custom and Mild. Audio Channel Function Lock Video Mode...

User Manual
Page 108
... VOL+ or OK button and then use CH+/- You can also press S.MODE button on the remote control to select VGA. 3. Operation Video menu DNR To adjust reduce the appearance of digitizing error by pressing INPUT button then use / button to select the the source of VGA item. CTI To adjust the picture for screen Position, Clock, Phase, Setting Display adjust menu by the compression: Off, Weak, Medium, Strong, Auto. button to select the Audio Mode Off, Concert...
... VOL+ or OK button and then use CH+/- You can also press S.MODE button on the remote control to select VGA. 3. Operation Video menu DNR To adjust reduce the appearance of digitizing error by pressing INPUT button then use / button to select the the source of VGA item. CTI To adjust the picture for screen Position, Clock, Phase, Setting Display adjust menu by the compression: Off, Weak, Medium, Strong, Auto. button to select the Audio Mode Off, Concert...

User Manual
Page 109
... turn the simulated surround sound on the remote control, this TV can only receive the signal when the TV station transmits the proper signals. SPDIF Type To Adjust the SPDIF output: Off, Dolby Digital and PCM. Stereo or SAP can receive MTS stereo programs and SAP (Secondary Audio Program) that accompanies the stereo program; Function menu Menu Language When you start using your desired MTS mode in Mono; Press MENU button and then use CH+/- Mode...
... turn the simulated surround sound on the remote control, this TV can only receive the signal when the TV station transmits the proper signals. SPDIF Type To Adjust the SPDIF output: Off, Dolby Digital and PCM. Stereo or SAP can receive MTS stereo programs and SAP (Secondary Audio Program) that accompanies the stereo program; Function menu Menu Language When you start using your desired MTS mode in Mono; Press MENU button and then use CH+/- Mode...
User Manual
Page 114
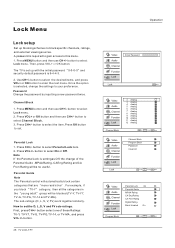
... useful. Lock Menu Lock setup Set up with the initial password 0-0-0-0 and security default password is 9-4-4-3. 2. button to select On or Off. Press VOL+ or OK button and then use CH+/- First, press CH+/- Select EXIT Back Video Audio Channel Function Lock Parental Lock On Parental Guide MPAA Rating CA Eng Rating CA Fren Rating Digital Rating Block Unrated On Program Block OK Enter CH+/VOL+/- Password Change the password by inputting a new password twice. button. 28 TV LCD-TFT Operation Video Audio Channel...
... useful. Lock Menu Lock setup Set up with the initial password 0-0-0-0 and security default password is 9-4-4-3. 2. button to select On or Off. Press VOL+ or OK button and then use CH+/- First, press CH+/- Select EXIT Back Video Audio Channel Function Lock Parental Lock On Parental Guide MPAA Rating CA Eng Rating CA Fren Rating Digital Rating Block Unrated On Program Block OK Enter CH+/VOL+/- Password Change the password by inputting a new password twice. button. 28 TV LCD-TFT Operation Video Audio Channel...
User Manual
Page 121
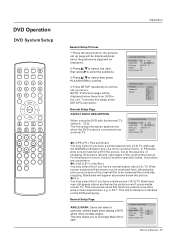
... 16 9 Caption On Screen Saver Off ..Preference Page.. This will appear above and below the picture. 16:9 You may select this page, press SETUP button twice. General Setup Page ANGLE MARK: Users can select a particular camera angle when playing a DVD which offers multiple angles. DVD Operation DVD System Setup POWER TV/AV TV/DVD OPEN/CLOSE SLEEP Q.VIEW INFO MUTE 1234 56 90 SAP 78 CC P.MODE CH+ VOL - OK MENU CH...
... 16 9 Caption On Screen Saver Off ..Preference Page.. This will appear above and below the picture. 16:9 You may select this page, press SETUP button twice. General Setup Page ANGLE MARK: Users can select a particular camera angle when playing a DVD which offers multiple angles. DVD Operation DVD System Setup POWER TV/AV TV/DVD OPEN/CLOSE SLEEP Q.VIEW INFO MUTE 1234 56 90 SAP 78 CC P.MODE CH+ VOL - OK MENU CH...

User Manual
Page 127
... service for adjustments. Verify if electricity is correct. Press INPUT button to change signal input to relative instructions in other channel and verify if the same problem happens. Switch to other channels. Verify if the antenna is selected. Note: Production of power supply is properly plugged. These phenomena might be some dark or bright (red, blue or green) spots, or some or all pictures Horizontal/vertical bars or picture shaking Television...
... service for adjustments. Verify if electricity is correct. Press INPUT button to change signal input to relative instructions in other channel and verify if the same problem happens. Switch to other channels. Verify if the antenna is selected. Note: Production of power supply is properly plugged. These phenomena might be some dark or bright (red, blue or green) spots, or some or all pictures Horizontal/vertical bars or picture shaking Television...


