User Manual
Page 3
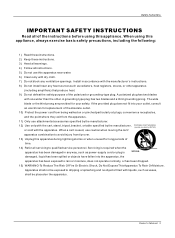
...operate normally, or has been dropped. 15) WARNING-To Reduce The Risk Of Fire Or Electric Shock, Do Not Expose This Apparatus To Rain Or Moisture. When using this appliance. The wide blade or the third prong are provided for your outlet, consult an electrician for replacement...with the manufacturer`s instructions. 8) Do not install near water. 6) Clean only with dry cloth. 7) Do not block any way, such as power-supply cord or plug is used, use attachments/accessories specified by the manufacturer. 12) Use only with the cart, stand, tripod, bracket, or table specified by the ...
...operate normally, or has been dropped. 15) WARNING-To Reduce The Risk Of Fire Or Electric Shock, Do Not Expose This Apparatus To Rain Or Moisture. When using this appliance. The wide blade or the third prong are provided for your outlet, consult an electrician for replacement...with the manufacturer`s instructions. 8) Do not install near water. 6) Clean only with dry cloth. 7) Do not block any way, such as power-supply cord or plug is used, use attachments/accessories specified by the manufacturer. 12) Use only with the cart, stand, tripod, bracket, or table specified by the ...

User Manual
Page 5
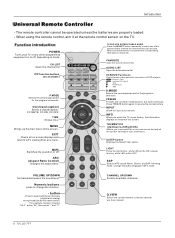
... Con tro ls Connection Options Universal Remote Controller Installation Acc ess ori es Antenna Connection VCR Connection External A/V Source Setup DVD Connection DTV Connection Digital Audio Output PC Connection Monitor Out Setup HDM I Cable Sample Connecting Headphones Pow er so urc e Operation Switching On/Off the TV set Choose the Menu Language Choose the input Source Channel Menu Automatic Scan Man ual S can Fine Tune Edi t Pro gra m Rename Select the desired program Select the desired sound Mute Video Menu How to select picture modes How to customize...
... Con tro ls Connection Options Universal Remote Controller Installation Acc ess ori es Antenna Connection VCR Connection External A/V Source Setup DVD Connection DTV Connection Digital Audio Output PC Connection Monitor Out Setup HDM I Cable Sample Connecting Headphones Pow er so urc e Operation Switching On/Off the TV set Choose the Menu Language Choose the input Source Channel Menu Automatic Scan Man ual S can Fine Tune Edi t Pro gra m Rename Select the desired program Select the desired sound Mute Video Menu How to select picture modes How to customize...

User Manual
Page 6
... -/+ : program minus and plus , menu options 3.VOL-/+ Volume increase and decrease, menu reset and entry 4.MENU Menu display 5.POWER: Is used to activate the display or return to hear stereo sound from an external device. The voltage is a simplified representation of the TV set) 6 TV LCD-TFT AUDIO2 Input connect to standby mode. 6.Power indicator: in red when standby mode, in blue when display. 7.Remote control signal receive window. Never attempt to standby mode. INPUT 1 CH+ 2 CH- Power Cord Socket This TV operates on the Specifications page. POWER: Is used...
... -/+ : program minus and plus , menu options 3.VOL-/+ Volume increase and decrease, menu reset and entry 4.MENU Menu display 5.POWER: Is used to activate the display or return to hear stereo sound from an external device. The voltage is a simplified representation of the TV set) 6 TV LCD-TFT AUDIO2 Input connect to standby mode. 6.Power indicator: in red when standby mode, in blue when display. 7.Remote control signal receive window. Never attempt to standby mode. INPUT 1 CH+ 2 CH- Power Cord Socket This TV operates on the Specifications page. POWER: Is used...
User Manual
Page 8
... change the channel. - SLEEP button Displays the Sleep Timer option. Change the audio language in Analog mode. CH- Numeric buttons press to resume the normal picture. CHANNEL UP/DOWN Selects available channels Q.VIEW Q.VIEW Switch the current channel to the last channel you to your TV or any menu. Function introduction POWER Turns your preference. TIME Shows time. MENU Brings up the main menu to select channel "54-3", press "54", then press "-" and "3". VCR/DVD Functions Control some video cassette recorders or DVD players...
... change the channel. - SLEEP button Displays the Sleep Timer option. Change the audio language in Analog mode. CH- Numeric buttons press to resume the normal picture. CHANNEL UP/DOWN Selects available channels Q.VIEW Q.VIEW Switch the current channel to the last channel you to your TV or any menu. Function introduction POWER Turns your preference. TIME Shows time. MENU Brings up the main menu to select channel "54-3", press "54", then press "-" and "3". VCR/DVD Functions Control some video cassette recorders or DVD players...

User Manual
Page 9
...) VHF Antenna UHF Antenna Turn clockwise to enjoy a clearer picture, we recommend that you use a CATV system or an outdoor antenna .In different places, the suitable antenna type and position are different. Remote controller Owner`s manual Alkaline battery(AAA) 2 Power cable Antenna Connection Generally speaking, to tighten. Installation External Equipment Connections Accessories SELECT CH.LIST FAV.LIST AUDIOLIST PIP SWAP AUDIO SWAP POSITION P.MODE CC UIDE ENU S.MODE FREEZE NPUT INFO OK ARC SAP SLEEP EXIT VOL...
...) VHF Antenna UHF Antenna Turn clockwise to enjoy a clearer picture, we recommend that you use a CATV system or an outdoor antenna .In different places, the suitable antenna type and position are different. Remote controller Owner`s manual Alkaline battery(AAA) 2 Power cable Antenna Connection Generally speaking, to tighten. Installation External Equipment Connections Accessories SELECT CH.LIST FAV.LIST AUDIOLIST PIP SWAP AUDIO SWAP POSITION P.MODE CC UIDE ENU S.MODE FREEZE NPUT INFO OK ARC SAP SLEEP EXIT VOL...
User Manual
Page 10
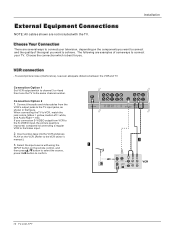
... VCR and TV Connection Option 1 Set VCR output switch to channel 3 or 4 and then tune the TV to the Video input. 2. Insert a video tape into the VCR and press PLAY on the remote control, and then press / button to select the source, press the button to confirm. Installation External Equipment Connections NOTE: All cables shown are examples of the signal you . Connect the audio and video cables from VCR to the S-VIDEO input, the picture quality is best for...
... VCR and TV Connection Option 1 Set VCR output switch to channel 3 or 4 and then tune the TV to the Video input. 2. Insert a video tape into the VCR and press PLAY on the remote control, and then press / button to select the source, press the button to confirm. Installation External Equipment Connections NOTE: All cables shown are examples of the signal you . Connect the audio and video cables from VCR to the S-VIDEO input, the picture quality is best for...

User Manual
Page 11
... has an S-VIDEO output jack, connect this to select YPbPr mode. 3. Use the INPUT button on DVD player Y Pb Pr Y Pb Pr Y B-Y R-Y Y Cb Cr Y PB PR Video Game Set Y2 Pb2 Pr2 L R AV OUT L R Y1 Pb1 Pr1 L R S-VIDEO VIDEO L R Owner s Manual 11 Component ports on the TV Video output ports on the remote control to the S-VIDEO input on the TV, as shown below. How to external equipment, match the jack colors (Video = yellow, Audio Left = white, and Audio Right = red). Connect the DVD video outputs (Y, Pb/Cb...
... has an S-VIDEO output jack, connect this to select YPbPr mode. 3. Use the INPUT button on DVD player Y Pb Pr Y Pb Pr Y B-Y R-Y Y Cb Cr Y PB PR Video Game Set Y2 Pb2 Pr2 L R AV OUT L R Y1 Pb1 Pr1 L R S-VIDEO VIDEO L R Owner s Manual 11 Component ports on the TV Video output ports on the remote control to the S-VIDEO input on the TV, as shown below. How to external equipment, match the jack colors (Video = yellow, Audio Left = white, and Audio Right = red). Connect the DVD video outputs (Y, Pb/Cb...

User Manual
Page 12
... external audio equipment instruction manual for video connections, depending on the remote control to the TV Audio (Optical) Output port. 2. Use INPUT on your vision. 12 TV LCD-TFT PC/DVI OPTICAL AUDIO IN AC IN Note: When connecting with external audio equipments, such as shown below. - How to the figure as amplifers or speakers, please turn the TV speakers off. Connect one end of the optical cable to external audio equipment (stereo system) via the Audio Output (Optical) port. However, if you do receive Digital signals from a digital set...
... external audio equipment instruction manual for video connections, depending on the remote control to the TV Audio (Optical) Output port. 2. Use INPUT on your vision. 12 TV LCD-TFT PC/DVI OPTICAL AUDIO IN AC IN Note: When connecting with external audio equipments, such as shown below. - How to the figure as amplifers or speakers, please turn the TV speakers off. Connect one end of the optical cable to external audio equipment (stereo system) via the Audio Output (Optical) port. However, if you do receive Digital signals from a digital set...
User Manual
Page 13
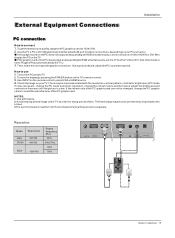
... PC/DVI OPTICAL AUDIO IN Owner s Manual 13 To get thebest picture quality, adjust thePC graphics card to selectVGA orHDMI source. 4. NOTES: 1 Use a DVIcable. 2 Avoid keeping afixed image onthe TV'sscreen for Horizontaland Verticalfrequencies is set theTV toeither VGAor DVI; (the othermode is separate. Then,make the correspondingaudio connection. External Equipment Connections Installation PC connection How toconnect 1. Check theimage on thePC does notoutput analog anddigital RGB...
... PC/DVI OPTICAL AUDIO IN Owner s Manual 13 To get thebest picture quality, adjust thePC graphics card to selectVGA orHDMI source. 4. NOTES: 1 Use a DVIcable. 2 Avoid keeping afixed image onthe TV'sscreen for Horizontaland Verticalfrequencies is set theTV toeither VGAor DVI; (the othermode is separate. Then,make the correspondingaudio connection. External Equipment Connections Installation PC connection How toconnect 1. Check theimage on thePC does notoutput analog anddigital RGB...
User Manual
Page 14
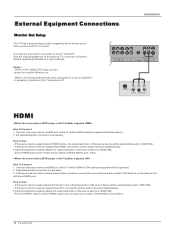
External Equipment Connections Installation Monitor Out Setup The TV has a special signal output capability which allows you to the TV`s AV OUT. See the Operating Manual of this TV with a HDMI-to HDMI port of the second TV or monitor for Monitor out. Connect the source device to -DVI cable(not supplied with this product). 2. If the source device supports Auto DVI function, the output resolution of Select Main source menu. 14 TV LCD-TFT Press the INPUT button to set the output resolution appropriately. No separated...
External Equipment Connections Installation Monitor Out Setup The TV has a special signal output capability which allows you to the TV`s AV OUT. See the Operating Manual of this TV with a HDMI-to HDMI port of the second TV or monitor for Monitor out. Connect the source device to -DVI cable(not supplied with this product). 2. If the source device supports Auto DVI function, the output resolution of Select Main source menu. 14 TV LCD-TFT Press the INPUT button to set the output resolution appropriately. No separated...
User Manual
Page 17
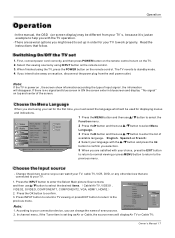
... 2. VGA HDMI1 PVR Cable HDMI2 Game Up/Down:Move Cursor Note: OK: Change MP Source Right:Activale Source Name Edit Menu 1. First, connect power cord correctly, and then press POWER button on the remote control to standby mode. 4. The TV reverts to turn on the TV. 2. Choose the Input source - Owner s Manual 17 Read the instructions that are several options you can change the name of input signal . the information will display Air TV or Cable TV; English Spanish or...
... 2. VGA HDMI1 PVR Cable HDMI2 Game Up/Down:Move Cursor Note: OK: Change MP Source Right:Activale Source Name Edit Menu 1. First, connect power cord correctly, and then press POWER button on the remote control to standby mode. 4. The TV reverts to turn on the TV. 2. Choose the Input source - Owner s Manual 17 Read the instructions that are several options you can change the name of input signal . the information will display Air TV or Cable TV; English Spanish or...

User Manual
Page 18
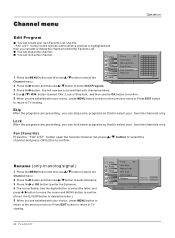
... main menu Video Audio Time A B C Channel Function Lock Tuner Air Auto Scan Manual Scan Fine Tune Edit Program Rename OK Cancel Air Tuner Number: 47 Found: 1 : Move cursor, OK: Enter, MENU: Return to upper menu, EXIT: Exit main menu When Air is turned on. Automatic Scan - Channel menu Operation This TV set has three methods to set channel. A password is required to gain access to Channel menu if the Lock of Edit program menu is selected, the TV will detect antenna signals and will search for antenna TV...
... main menu Video Audio Time A B C Channel Function Lock Tuner Air Auto Scan Manual Scan Fine Tune Edit Program Rename OK Cancel Air Tuner Number: 47 Found: 1 : Move cursor, OK: Enter, MENU: Return to upper menu, EXIT: Exit main menu When Air is turned on. Automatic Scan - Channel menu Operation This TV set has three methods to set channel. A password is required to gain access to Channel menu if the Lock of Edit program menu is selected, the TV will detect antenna signals and will search for antenna TV...
User Manual
Page 20
... favorite channel list, press / channel and press OK button to upper menu, EXIT: Exit main menu 3 Press the button. Video Audio Time A B C Channel Function 1 Press the MENU button and then use / button to select the Lock Tuner Air Auto Scan Manual Scan Fine Tune Edit Program Rename Music Ch No Name Fav Lock Skip Page 1/1 Channel menu. 2 Press the button and then use / button to select Rename. 3 Press the or OK button to enter the Submenu. 4 The cursor flashs, Use the digital button...
... favorite channel list, press / channel and press OK button to upper menu, EXIT: Exit main menu 3 Press the button. Video Audio Time A B C Channel Function 1 Press the MENU button and then use / button to select the Lock Tuner Air Auto Scan Manual Scan Fine Tune Edit Program Rename Music Ch No Name Fav Lock Skip Page 1/1 Channel menu. 2 Press the button and then use / button to select Rename. 3 Press the or OK button to enter the Submenu. 4 The cursor flashs, Use the digital button...
User Manual
Page 22
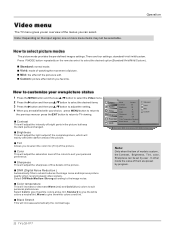
.... 22 TV LCD-TFT Operation How to the image noise. Press P.MODE button repeatedly on the input signal, one or more menu items may not be set by program . How to customize your own picture status 1 Press the MENU button and then use / button to select the Video menu. 2 Press the button and then use / button to select the desired items. 3 Press the button and then use / button to select the color mix (Tint...
.... 22 TV LCD-TFT Operation How to the image noise. Press P.MODE button repeatedly on the input signal, one or more menu items may not be set by program . How to customize your own picture status 1 Press the MENU button and then use / button to select the Video menu. 2 Press the button and then use / button to select the desired items. 3 Press the button and then use / button to select the color mix (Tint...
User Manual
Page 24
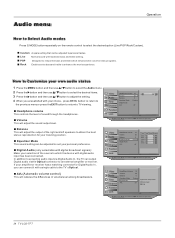
... news programs. Rock Enables extra bass and treble to upper menu, EXIT: Exit main menu Balance This will adjust the output of sound through the headphones. In addition to accepting audio input via Digital Audio In, the TV can connect it with moderate bass and treble setting. AVL (Automatic volume control) This will adjust the sound output level. Video Audio Time A B C Channel HeadPhone Volume 10 Volume 20 Balance 0 Equalizer Mode Custom Digital Audio AVL off Function Lock Live...
... news programs. Rock Enables extra bass and treble to upper menu, EXIT: Exit main menu Balance This will adjust the output of sound through the headphones. In addition to accepting audio input via Digital Audio In, the TV can connect it with moderate bass and treble setting. AVL (Automatic volume control) This will adjust the sound output level. Video Audio Time A B C Channel HeadPhone Volume 10 Volume 20 Balance 0 Equalizer Mode Custom Digital Audio AVL off Function Lock Live...
User Manual
Page 30
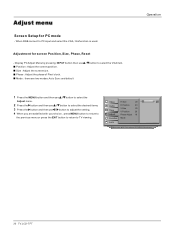
... menu or press the EXIT button to return to select the VGA item. Display PC Adjust Menu by pressing INPUT button then use / button to adjust the setting. 4 When you are two modes:Auto Sync and default Operation 1 Press the MENU button and then use / button to select the Adjust menu. 2 Press the button and then use / button to select the desired items. 3 Press the button and then use / button to TV viewing. Size : Adjust the screen size. Adjustment for PC mode - Adjust menu Screen Setup for screen Position, Size, Phase, Reset...
... menu or press the EXIT button to return to select the VGA item. Display PC Adjust Menu by pressing INPUT button then use / button to adjust the setting. 4 When you are two modes:Auto Sync and default Operation 1 Press the MENU button and then use / button to select the Adjust menu. 2 Press the button and then use / button to select the desired items. 3 Press the button and then use / button to TV viewing. Size : Adjust the screen size. Adjustment for PC mode - Adjust menu Screen Setup for screen Position, Size, Phase, Reset...

User Manual
Page 31
... be blocked. 2. The Parental Control Function is used to block program viewing based on the ratings sent by broadcasting stations. Movies that have been shown at the theaters or direct-to-video movies use this function, the following must be used to block specific channels, ratings and other viewing sources. Lock Menu Operation Parental Control can be done : 1. Set ratings and categories to TV-PG, TV-14, TV-MA) Owner s Manual 31 adult language...
... be blocked. 2. The Parental Control Function is used to block program viewing based on the ratings sent by broadcasting stations. Movies that have been shown at the theaters or direct-to-video movies use this function, the following must be used to block specific channels, ratings and other viewing sources. Lock Menu Operation Parental Control can be done : 1. Set ratings and categories to TV-PG, TV-14, TV-MA) Owner s Manual 31 adult language...

User Manual
Page 35
... for manually scan mode. (TV, VCR, DVD, STB, cable box or audio equipment). 2. Q.VIEW Controller Operation To control a device using POWER or PLAY keys. Then User now can operate in manually scan mode. 4. If time out or any key other Controller buttons to operate the device. To manually-scan program the Controller: 1. TV. The LED blinks 10 times per second, indicating that code manually into the Controller. If the device responds, no further programming is : TV DVD VCR STB Cable Audio - Default device is in six different modes: TV, VCR, CABLE, DVD, SETBOX or AUDIO...
... for manually scan mode. (TV, VCR, DVD, STB, cable box or audio equipment). 2. Q.VIEW Controller Operation To control a device using POWER or PLAY keys. Then User now can operate in manually scan mode. 4. If time out or any key other Controller buttons to operate the device. To manually-scan program the Controller: 1. TV. The LED blinks 10 times per second, indicating that code manually into the Controller. If the device responds, no further programming is : TV DVD VCR STB Cable Audio - Default device is in six different modes: TV, VCR, CABLE, DVD, SETBOX or AUDIO...

User Manual
Page 36
... from current code set is input or no further programming is 1, so then led will not send out data in 10 seconds, LED blinks three times and then turns off. If error password is 3, so then led will remain. Protection mode will blink three times and remains OFF. Setting Up Your Remote Control Operation SELECT CH.LIST FAV.LIST AUDIOLIST PIP SWAP AUDIO SWAP POSITION P.MODE CC TIME ENU S.MODE FREEZE NPUT INFO OK ARC SAP SLEEP EXIT...
... from current code set is input or no further programming is 1, so then led will not send out data in 10 seconds, LED blinks three times and then turns off. If error password is 3, so then led will remain. Protection mode will blink three times and remains OFF. Setting Up Your Remote Control Operation SELECT CH.LIST FAV.LIST AUDIOLIST PIP SWAP AUDIO SWAP POSITION P.MODE CC TIME ENU S.MODE FREEZE NPUT INFO OK ARC SAP SLEEP EXIT...
User Manual
Page 43
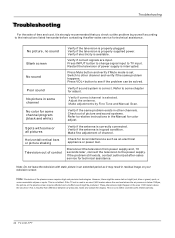
... picture in some channel Verify if sound system is in the Manual for color adjust. Make adjustments by yourself according to the instructions listed hereunder before contacting the after -sales service for technical assistance. Verify if the antenna is correct. This is selected. Verify if correct channel is resulted from power supply and, 10 seconds later, connect the television to some channel program (black and white) Verify if the same problem...
... picture in some channel Verify if sound system is in the Manual for color adjust. Make adjustments by yourself according to the instructions listed hereunder before contacting the after -sales service for technical assistance. Verify if the antenna is correct. This is selected. Verify if correct channel is resulted from power supply and, 10 seconds later, connect the television to some channel program (black and white) Verify if the same problem...


