
User Manual
Page 2
... remove the cover or attempt to dripping or splashing and that produce heat. 9) Do not defeat the safety purpose of time. 14) Refer all instructions. 5) Do not use attachments/accessories specified by the manufacturer. 12) Use only with the cart, stand, tripod, bracket, or table specified by qualified service personnel only. NO USER SERVICEABLE PARTS INSIDE. Install in any way, such as power-supply cord or plug...
... remove the cover or attempt to dripping or splashing and that produce heat. 9) Do not defeat the safety purpose of time. 14) Refer all instructions. 5) Do not use attachments/accessories specified by the manufacturer. 12) Use only with the cart, stand, tripod, bracket, or table specified by qualified service personnel only. NO USER SERVICEABLE PARTS INSIDE. Install in any way, such as power-supply cord or plug...

User Manual
Page 5
... External A/V Source Setup 11 Co nn ec ti ng a D VD p la ye r 11 Connecting a DTV(digital TV 12 Connecting digital audio output 12 Co nn ec ti ng a c om pu te r 13 Monitor Out Setup 14 HD MI a nd D VI i np ut 14 Cable sample 15 Connecting Headphones 16 Power source 16 Removing the table stand and installing a wall mount bracket 17 Operation Switching On/Off the TV set 18 Choose the Menu Language 18 Choose the input source 18 Channel Menu Channel Scan...
... External A/V Source Setup 11 Co nn ec ti ng a D VD p la ye r 11 Connecting a DTV(digital TV 12 Connecting digital audio output 12 Co nn ec ti ng a c om pu te r 13 Monitor Out Setup 14 HD MI a nd D VI i np ut 14 Cable sample 15 Connecting Headphones 16 Power source 16 Removing the table stand and installing a wall mount bracket 17 Operation Switching On/Off the TV set 18 Choose the Menu Language 18 Choose the input source 18 Channel Menu Channel Scan...
User Manual
Page 6
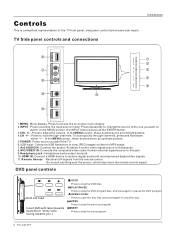
... to play the DVD program disc, and press again to access the input source mode. DVD panel controls DVD slot load Insert DVD with label towards back(Silver "shiny" side facing towards you want to adjust the volume. Controls This is a simplified representation of the TV front panel, side panel control buttons and side inputs. In the MENU screen, these jacks. 8.AV2 VIDEO IN: Connects the composite video cable from the remote control. Introduction TV Side panel controls and connections USB L - Remote Sensor Receivers IR signals from an external signal source...
... to play the DVD program disc, and press again to access the input source mode. DVD panel controls DVD slot load Insert DVD with label towards back(Silver "shiny" side facing towards you want to adjust the volume. Controls This is a simplified representation of the TV front panel, side panel control buttons and side inputs. In the MENU screen, these jacks. 8.AV2 VIDEO IN: Connects the composite video cable from the remote control. Introduction TV Side panel controls and connections USB L - Remote Sensor Receivers IR signals from an external signal source...
User Manual
Page 8
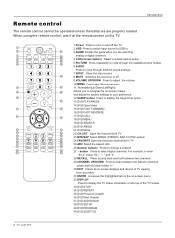
... are watching analog or digital channels. 4.CCD(closed caption) Select a closed caption option 5.PICTURE Press repeatedly to cycle through the available picture modes. 6.AUDIO Press to cycle through different sound settings. 7.INPUT Show the input source. 8.MUTE Switches the sound on or off the TV. 2.USB Press to switch input source to USB in TV 25.ARC Select the aspect ratio 26.Number buttons Press to select digital channels. button Press to change a channel. 27. When using the remote control, aim it at the remote sensor on the...
... are watching analog or digital channels. 4.CCD(closed caption) Select a closed caption option 5.PICTURE Press repeatedly to cycle through the available picture modes. 6.AUDIO Press to cycle through different sound settings. 7.INPUT Show the input source. 8.MUTE Switches the sound on or off the TV. 2.USB Press to switch input source to USB in TV 25.ARC Select the aspect ratio 26.Number buttons Press to select digital channels. button Press to change a channel. 27. When using the remote control, aim it at the remote sensor on the...

User Manual
Page 9
... TV`s, install a 2-Way Signal Splitter in a poor signal area, please purchase a signal amplifier and install properly. ANT IN ANT IN To improve the picture quality in the connections. External Equipment Connections Accessories TV DVD STB CABLE VCR AUD PICTURE AUDIO PC HDMI INPUT MUTE RECALL VOL MENU CH EXIT ENTER SLEEP DISPLAY USB PLAY/PAUSE STOP REC REV PREV NEXT REPEAT MTS/SAP FREEZE CH.LIST GUIDE CCD ARC FAVORITE R TFT-LCD TV OWNER'S MANUAL Please READ this manual carefully before operating...
... TV`s, install a 2-Way Signal Splitter in a poor signal area, please purchase a signal amplifier and install properly. ANT IN ANT IN To improve the picture quality in the connections. External Equipment Connections Accessories TV DVD STB CABLE VCR AUD PICTURE AUDIO PC HDMI INPUT MUTE RECALL VOL MENU CH EXIT ENTER SLEEP DISPLAY USB PLAY/PAUSE STOP REC REV PREV NEXT REPEAT MTS/SAP FREEZE CH.LIST GUIDE CCD ARC FAVORITE R TFT-LCD TV OWNER'S MANUAL Please READ this manual carefully before operating...
User Manual
Page 10
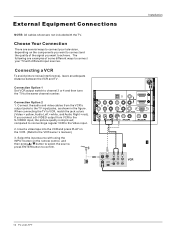
... jack colors (Video = yellow, Audio Left = white, and Audio Right = red). Select the input source with the TV. Connection Option 1 Set VCR output switch to channel 3 or 4 and then tune the TV to the Video input. 2. When connecting the TV to achieve. Choose Your Connection There are examples of the signal you connect a S-VIDEO output from the VCR's output jacks to the VCR owner`s manual.) 3. External Equipment Connections Installation ANT IN NOTE: All cables shown are not included with using the INPUT button on...
... jack colors (Video = yellow, Audio Left = white, and Audio Right = red). Select the input source with the TV. Connection Option 1 Set VCR output switch to channel 3 or 4 and then tune the TV to the Video input. 2. When connecting the TV to achieve. Choose Your Connection There are examples of the signal you connect a S-VIDEO output from the VCR's output jacks to the VCR owner`s manual.) 3. External Equipment Connections Installation ANT IN NOTE: All cables shown are not included with using the INPUT button on...

User Manual
Page 11
...the TV. Component ports on the TV Y Pb Pr Video output ports on the remote control. 2. How to the S-VIDEO input on the remote control to confirm. 4. Connect the DVD video outputs (COMPONENT) to the Y Pb Pr jacks on external equipment for operating instructions. Press Play button on the TV and connect the DVD audio outputs to the DVD player's manual for program play. 4. Refer to the YPbPr Audio IN jacks on the DVD player, insert a DVD. 2. External Equipment Connections Installation ANT IN HDMI IN External A/V Source Setup How to connect Connect the audio and video cables from...
...the TV. Component ports on the TV Y Pb Pr Video output ports on the remote control. 2. How to the S-VIDEO input on the remote control to confirm. 4. Connect the DVD video outputs (COMPONENT) to the Y Pb Pr jacks on external equipment for operating instructions. Press Play button on the TV and connect the DVD audio outputs to the DVD player's manual for program play. 4. Refer to the YPbPr Audio IN jacks on the DVD player, insert a DVD. 2. External Equipment Connections Installation ANT IN HDMI IN External A/V Source Setup How to connect Connect the audio and video cables from...

User Manual
Page 12
... 12 TV LCD-TFT Turn on the remote control to the owner`s manual for Digital Contents (480p,720p,1080i). This TV supports HDCP (High-bandwidth Digital Contents Protection) protocol for the digital set -top box. (Refer to select COMPONENT , VGA or HDMI source. Looking at the laser beam may damage your set -top box. External Equipment Connections Installation Connecting a DTV(digital TV) This TV can receive Digital Over-the-air/Cable signals without an external digital set -top box connector. How to the digital audio (optical) input on...
... 12 TV LCD-TFT Turn on the remote control to the owner`s manual for Digital Contents (480p,720p,1080i). This TV supports HDCP (High-bandwidth Digital Contents Protection) protocol for the digital set -top box. (Refer to select COMPONENT , VGA or HDMI source. Looking at the laser beam may damage your set -top box. External Equipment Connections Installation Connecting a DTV(digital TV) This TV can receive Digital Over-the-air/Cable signals without an external digital set -top box connector. How to the digital audio (optical) input on...
User Manual
Page 13
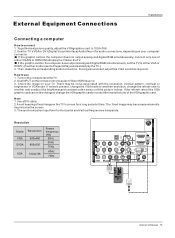
... 75Hz VIDEO IN COMPONENT IN OPTICAL OUT 2 L 2 DVI AUDIO 1 R 1 Y 1 Pb Pr L AUDIO R VGA AUDIO VGA VIDEO L AUDIO R S-VIDEO L AUDIO R L AUDIO R AUDIO OUT VGA IN Owner s Manual 13 If the graphic card on your TV. Turnon the computerand theTV. 2. If noiseis present, changethe VGAmode to Plugand Play automaticallyby theTV.) 3. Note 1.Use aDVI cable. 2.Avoid keepinga fixed imageon theTV's screen fora long periodof time.The fixed image may be noise associated with the resolution, vertical pattern...
... 75Hz VIDEO IN COMPONENT IN OPTICAL OUT 2 L 2 DVI AUDIO 1 R 1 Y 1 Pb Pr L AUDIO R VGA AUDIO VGA VIDEO L AUDIO R S-VIDEO L AUDIO R L AUDIO R AUDIO OUT VGA IN Owner s Manual 13 If the graphic card on your TV. Turnon the computerand theTV. 2. If noiseis present, changethe VGAmode to Plugand Play automaticallyby theTV.) 3. Note 1.Use aDVI cable. 2.Avoid keepinga fixed imageon theTV's screen fora long periodof time.The fixed image may be noise associated with the resolution, vertical pattern...

User Manual
Page 14
... best picture quality, adjust the output resolution of Select Main source menu. 14 TV LCD-TFT Select HDMI input source in input source option of the source device to set the output resolution appropriately. If the source device does not support Auto HDMI, you need to -DVI cable(not supplied with this product). 2. If the source device does not support Auto DVI, you need to 1280x720p. When the source device(DVD player or Set Top Box) supports DVI How To Connect 1. External Equipment Connections Installation HDMI and DVI input When the source...
... best picture quality, adjust the output resolution of Select Main source menu. 14 TV LCD-TFT Select HDMI input source in input source option of the source device to set the output resolution appropriately. If the source device does not support Auto HDMI, you need to -DVI cable(not supplied with this product). 2. If the source device does not support Auto DVI, you need to 1280x720p. When the source device(DVD player or Set Top Box) supports DVI How To Connect 1. External Equipment Connections Installation HDMI and DVI input When the source...

User Manual
Page 18
... Menu Language When you start using INPUT button on the remote control. Operation In the manual, the OSD (on screen display) may be different from the wall power outlet. Switching On/Off the TV set for the first time, you intend to your TV, VCR, DVD, Cable , or any other devices that follow. Select the viewing source by using your TV to select language. Choose TV Input and then press MENU button. 2. Press / button to work properly. Read the instructions...
... Menu Language When you start using INPUT button on the remote control. Operation In the manual, the OSD (on screen display) may be different from the wall power outlet. Switching On/Off the TV set for the first time, you intend to your TV, VCR, DVD, Cable , or any other devices that follow. Select the viewing source by using your TV to select language. Choose TV Input and then press MENU button. 2. Press / button to work properly. Read the instructions...
User Manual
Page 19
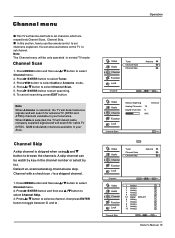
... Video Audio Channel Function Lock Tuner Channel Scan Channel Skip Antenna Channel ENTER Enter / Select EXIT Back Video Audio Channel Function Lock 1 Analog 2 Analog 3 Analog 4 Analog 5 Analog 5-1 Digital KPIX-DT 6 Analog 7 Analog 8 Analog 9 Analog 10 Analog Channel Skip ENTER Set / Select EXIT Back Owner s Manual 19 In this section, how to use / button to select Channel menu. 2. Channel menu This TV set has two methods to set channels, which are skip. Note The Channel menu will be watch by key-in your Area. Press MENU button and then use the remote control to set channel...
... Video Audio Channel Function Lock Tuner Channel Scan Channel Skip Antenna Channel ENTER Enter / Select EXIT Back Video Audio Channel Function Lock 1 Analog 2 Analog 3 Analog 4 Analog 5 Analog 5-1 Digital KPIX-DT 6 Analog 7 Analog 8 Analog 9 Analog 10 Analog Channel Skip ENTER Set / Select EXIT Back Owner s Manual 19 In this section, how to use / button to select Channel menu. 2. Channel menu This TV set has two methods to set channels, which are skip. Note The Channel menu will be watch by key-in your Area. Press MENU button and then use the remote control to set channel...
User Manual
Page 20
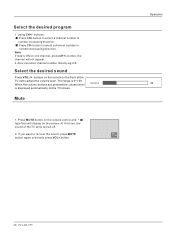
... of the TV set to recover the sound, press MUTE button again or directly press VOL+ button. Select the desired program 1. When the volume buttons are pressed the volume level is turned off. 2. Volume Mute 1. At this time, the sound of the TV set is displayed automatically on the screen. buttons. button, the channel will display on the TV screen. The range is ON on the remote control and type face will not appear. 2. Using CH+/- Press...
... of the TV set to recover the sound, press MUTE button again or directly press VOL+ button. Select the desired program 1. When the volume buttons are pressed the volume level is turned off. 2. Volume Mute 1. At this time, the sound of the TV set is displayed automatically on the screen. buttons. button, the channel will display on the TV screen. The range is ON on the remote control and type face will not appear. 2. Using CH+/- Press...

User Manual
Page 21
... use / button to select Video menu. 2. Press /ENTER button and then use / button to select the desired items. 3. The other picture modes are preset. Press MENU button and then use / button to select Video menu. 2. Tint Allows you can also press PICTURE button on the input signal, one or more menu items may not be adjusted in the picture. Owner s Manual 21 Press / button to customize your personal preference. Video Audio Channel Function Lock Mode Custom Brightness 59 Contrast 59 Color...
... use / button to select Video menu. 2. Press /ENTER button and then use / button to select the desired items. 3. The other picture modes are preset. Press MENU button and then use / button to select Video menu. 2. Tint Allows you can also press PICTURE button on the input signal, one or more menu items may not be adjusted in the picture. Owner s Manual 21 Press / button to customize your personal preference. Video Audio Channel Function Lock Mode Custom Brightness 59 Contrast 59 Color...

User Manual
Page 22
... Black Level Extender On White Peak Limiter On CTI Medium Flesh Tone On Adaptive Luma Control On Advanced Video / Select EXIT Back VGA Set When you select the VGA input, this function is used. Adjustment for color errors: Off, Weak, Medium and Strong. Phase : Adjust the phase of the picture: On and Off. button to select / button to / button to give the white colors a red tint. Auto sync: Automatically adjust display of input signal...
... Black Level Extender On White Peak Limiter On CTI Medium Flesh Tone On Adaptive Luma Control On Advanced Video / Select EXIT Back VGA Set When you select the VGA input, this function is used. Adjustment for color errors: Off, Weak, Medium and Strong. Phase : Adjust the phase of the picture: On and Off. button to select / button to / button to give the white colors a red tint. Auto sync: Automatically adjust display of input signal...

User Manual
Page 23
... select audio mode 1. Press MENU button and then use select desired items. 3. Press / ENTER button and then use / Audio menu. 2. Operation Video Balance 0 Bass 59 Audio Treble 59 Sound Surround On Channel Mode Off Equalizer Off Function SPDIF Type PCM AVL Off Lock Audio ENTER Adjust / Select EXIT Back Owner s Manual 23 Audio menu How to Customize your desired MTS mode in a analog signal. button to select / button to / button to Balance Adjust to TV viewing. if the station transmits an additional sound signal...
... select audio mode 1. Press MENU button and then use select desired items. 3. Press / ENTER button and then use / Audio menu. 2. Operation Video Balance 0 Bass 59 Audio Treble 59 Sound Surround On Channel Mode Off Equalizer Off Function SPDIF Type PCM AVL Off Lock Audio ENTER Adjust / Select EXIT Back Owner s Manual 23 Audio menu How to Customize your desired MTS mode in a analog signal. button to select / button to / button to Balance Adjust to TV viewing. if the station transmits an additional sound signal...

User Manual
Page 25
... Time Setup. 3. if signal input, the set will be on the remote control to select your viewing area time zone: Eastern, Central, Mountain, Pacific, Alaska or Hawaii . Press /ENTER button and then use / button to select Function menu. 2. Also, you can also press ARC button on again automatically. Press /ENTER button and then use / button to select Blue Screen. 3. Operation Video Audio Channel Function Lock Time Zone Date/Time Sleep Timer Pacific Off Time Setup / Select EXIT Back Video Audio Channel Function Lock Date/Time Auto...
... Time Setup. 3. if signal input, the set will be on the remote control to select your viewing area time zone: Eastern, Central, Mountain, Pacific, Alaska or Hawaii . Press /ENTER button and then use / button to select Function menu. 2. Also, you can also press ARC button on again automatically. Press /ENTER button and then use / button to select Blue Screen. 3. Operation Video Audio Channel Function Lock Time Zone Date/Time Sleep Timer Pacific Off Time Setup / Select EXIT Back Video Audio Channel Function Lock Date/Time Auto...

User Manual
Page 28
... TV-MA). Lock Menu Lock setup Set up with the initial password 0-0-0-0 and security default password is required to gain access to this menu. 1. A password is 9-4-4-3. 2. The TV is set up blocking schemes to your preference. Use / button to select the desired items, and press or ENTER button to select Parental Lock item. 2. Once the option is setting as Off, the change the settings to block specific channels, ratings, and external viewing sources. The sub-ratings (D, L, S, V, FV) work...
... TV-MA). Lock Menu Lock setup Set up with the initial password 0-0-0-0 and security default password is required to gain access to this menu. 1. A password is 9-4-4-3. 2. The TV is set up blocking schemes to your preference. Use / button to select the desired items, and press or ENTER button to select Parental Lock item. 2. Once the option is setting as Off, the change the settings to block specific channels, ratings, and external viewing sources. The sub-ratings (D, L, S, V, FV) work...

User Manual
Page 35
... ideal for archiving information. This is because some film directors prefer to help protect the tube during static video pictures. Press ENTER to move between pictures. Parental Password Default 1 Kid Saf 2 G 3 Pg 4 Pg 13 5 Pgr 6 R 7 Nc17 8 Adult General Setup Page ASPECT RATIO DESCRIPTION When using a wide screen TV. Owner s Manual 35 Operation DVD Operation DVD System Setup Special Function Playback JPEG DISC PLAYBACK When a disc containing standard JPEG...
... ideal for archiving information. This is because some film directors prefer to help protect the tube during static video pictures. Press ENTER to move between pictures. Parental Password Default 1 Kid Saf 2 G 3 Pg 4 Pg 13 5 Pgr 6 R 7 Nc17 8 Adult General Setup Page ASPECT RATIO DESCRIPTION When using a wide screen TV. Owner s Manual 35 Operation DVD Operation DVD System Setup Special Function Playback JPEG DISC PLAYBACK When a disc containing standard JPEG...

User Manual
Page 40
... adjustment of power supply is interrupted. Verify if electricity is selected. Press INPUT button to change signal input to relative instructions in other channel and verify if the same problem happens. Verify if correct channel is available. This is resulted from power supply and, 10 seconds later, connect the television to see if the problem can be some dark or bright (red, blue or green) spots, or some channel program (black and white...
... adjustment of power supply is interrupted. Verify if electricity is selected. Press INPUT button to change signal input to relative instructions in other channel and verify if the same problem happens. Verify if correct channel is available. This is resulted from power supply and, 10 seconds later, connect the television to see if the problem can be some dark or bright (red, blue or green) spots, or some channel program (black and white...


