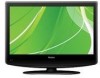
User Manual
Page 2
.... To reduce the risk of important operating and maintenance (servicing) instructions in the operating instructions unless you are for TV with arrowhead symbol, within an equilateral triangle is intended to alert the user to constitute a risk of electric shock. ! The lightning flash with DVD models.) CAUTION: These servicing instructions are qualified to do not perform any servicing other than that may be of...
.... To reduce the risk of important operating and maintenance (servicing) instructions in the operating instructions unless you are for TV with arrowhead symbol, within an equilateral triangle is intended to alert the user to constitute a risk of electric shock. ! The lightning flash with DVD models.) CAUTION: These servicing instructions are qualified to do not perform any servicing other than that may be of...
User Manual
Page 5
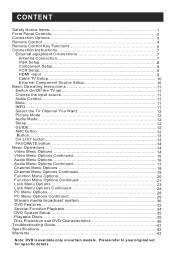
... the input source 11 Audio Control 11 Mute...11 INFO...11 Select the TV Channel You Want 12 Picture Mode 12 Audio Mode 12 Sleep...12 GUIDE 12 ARC button 12 .Button 13 CH.LIST button 13 FAVORATE button 1..3. CONTENT Safety Notice Items 1 Front Panel Controls 2 Connection Options 3 Remote Control 4 Remote Control Key Functions 5 Connection Instructions 7 External equipment Connections 7 Antenna Connection 7 VGA Setup 8.. Menu Operations 14 Video Menu Options 14 Video Menu Options Continued 15 Audio Menu Options 16 Audio Menu Options Continued 17 Channel Menu Options...
... the input source 11 Audio Control 11 Mute...11 INFO...11 Select the TV Channel You Want 12 Picture Mode 12 Audio Mode 12 Sleep...12 GUIDE 12 ARC button 12 .Button 13 CH.LIST button 13 FAVORATE button 1..3. CONTENT Safety Notice Items 1 Front Panel Controls 2 Connection Options 3 Remote Control 4 Remote Control Key Functions 5 Connection Instructions 7 External equipment Connections 7 Antenna Connection 7 VGA Setup 8.. Menu Operations 14 Video Menu Options 14 Video Menu Options Continued 15 Audio Menu Options 16 Audio Menu Options Continued 17 Channel Menu Options...

User Manual
Page 6
... the power source, then wipe the set with the instructions provided; l Please do as required when you are not recommended by manufacturer: l Before operation, please make sure that are installing, using : l Please read and understand all the instructions before using and cleaning this manual for proper ventilation; If water comes in contact with the LCD-TV, disconnect the power cord from the LCD-TV . If service is...
... the power source, then wipe the set with the instructions provided; l Please do as required when you are not recommended by manufacturer: l Before operation, please make sure that are installing, using : l Please read and understand all the instructions before using and cleaning this manual for proper ventilation; If water comes in contact with the LCD-TV, disconnect the power cord from the LCD-TV . If service is...
User Manual
Page 8
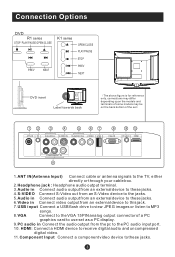
HDMI: Connect a HDMI device to receive digital audio and uncompressed digital video. 11. Component Input Connect a component video device to these jacks. 6.Video in Connect video output from an external device to this jack. 7.USB input Connect a USB flash drive to view JPEG images or listen to MP3 songs. 8.VGA Connect to the VGA 15PIN analog output connector of the set ATN IN R-AUDIO-L S-VIDEO IN R-AUDIO IN-L VIDEO USB VGA IN PC AUDIO IN HDMI Pr Pb Y COMPONENT IN 1.ANT IN(Antenna Input) Connect cable or antenna signals to the TV, either directly...
HDMI: Connect a HDMI device to receive digital audio and uncompressed digital video. 11. Component Input Connect a component video device to these jacks. 6.Video in Connect video output from an external device to this jack. 7.USB input Connect a USB flash drive to view JPEG images or listen to MP3 songs. 8.VGA Connect to the VGA 15PIN analog output connector of the set ATN IN R-AUDIO-L S-VIDEO IN R-AUDIO IN-L VIDEO USB VGA IN PC AUDIO IN HDMI Pr Pb Y COMPONENT IN 1.ANT IN(Antenna Input) Connect cable or antenna signals to the TV, either directly...
User Manual
Page 9
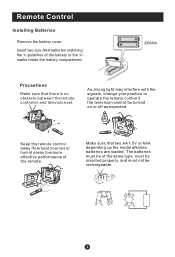
... loaded. As strong light may interfere with the signals, change your position to the +/marks inside the battery compartment. Make sure that there is no obstacle between the remote controller and television set. The batteries must be of the same type, must be inserted properly, and must not be turned on or off as expected. Remote Control Installing Batteries Remove the battery cover.
... loaded. As strong light may interfere with the signals, change your position to the +/marks inside the battery compartment. Make sure that there is no obstacle between the remote controller and television set. The batteries must be of the same type, must be inserted properly, and must not be turned on or off as expected. Remote Control Installing Batteries Remove the battery cover.

User Manual
Page 10
... 17 D.MENU D.CALL D.AUDIO SETUP 37 18 38 SEARCH ANGLE SUBTITLE PROGRAM 23.Select MONO, STEREO, SAP in NTSC system 24.Open the favourite channel list in the on-screen menu 32.Press to display the TV status information on and off the TV 2.Press to switch input source to USB in 1 USB DVD 3.Display the guide when you are watching analog or 2 21 digital channels GUIDE CCD MTS/SAP CH.LIST 4.Select a closed caption 3 22 4 PICTURE AUDIO ARC FAVORITE...
... 17 D.MENU D.CALL D.AUDIO SETUP 37 18 38 SEARCH ANGLE SUBTITLE PROGRAM 23.Select MONO, STEREO, SAP in NTSC system 24.Open the favourite channel list in the on-screen menu 32.Press to display the TV status information on and off the TV 2.Press to switch input source to USB in 1 USB DVD 3.Display the guide when you are watching analog or 2 21 digital channels GUIDE CCD MTS/SAP CH.LIST 4.Select a closed caption 3 22 4 PICTURE AUDIO ARC FAVORITE...

User Manual
Page 11
... the channel list in TV 28.Open the favorite channel list in TV Note: the instruction on the TV PICTURE 14 AUDIO 1 15 ARC CCD MTS/SAP SLEEP 2 16 3 17 1 23 4 56 18 7 89 4 INPUT 0 19 MENU 5 MUTE 20 CH+ 6 VOL- Remote Control Key Functions When using the remote control, aim it towards the remote sensor on this manual takes remote of the TV screen 13.Shows program schedule in TV 14.Press to turn on and off 21.Accesses...
... the channel list in TV 28.Open the favorite channel list in TV Note: the instruction on the TV PICTURE 14 AUDIO 1 15 ARC CCD MTS/SAP SLEEP 2 16 3 17 1 23 4 56 18 7 89 4 INPUT 0 19 MENU 5 MUTE 20 CH+ 6 VOL- Remote Control Key Functions When using the remote control, aim it towards the remote sensor on this manual takes remote of the TV screen 13.Shows program schedule in TV 14.Press to turn on and off 21.Accesses...
User Manual
Page 13
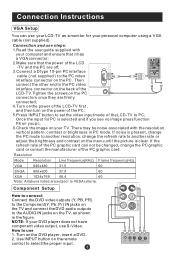
... the menu until the picture is clear. Connection Instructions VGA Setup You can not be noise associated with your DVD player does not have component video output, use S-Video. If noise is selected and if you see no image press function F8 on you pc. 6.Check the image on the power of the PC; 5.Press INPUT button to set the video input mode of the LCD-TV first , and then turn on...
... the menu until the picture is clear. Connection Instructions VGA Setup You can not be noise associated with your DVD player does not have component video output, use S-Video. If noise is selected and if you see no image press function F8 on you pc. 6.Check the image on the power of the PC; 5.Press INPUT button to set the video input mode of the LCD-TV first , and then turn on...
User Manual
Page 14
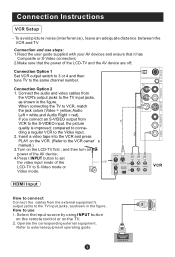
... HDMI Input HDMI How to connect Connect the cables from the VCR's output jacks to set the video input mode of the LCD-TV and the AV device are off; Connect the audio and video cables from the external equipment's output jacks to S-Video mode or Video mode. Insert a video tape into the VCR and press PLAY on the VCR. (Refer to VCR, match the jack colors (Video = yellow, Audio Left = white,and Audio Right = red). How to use steps: 1.Read the user guide supplied...
... HDMI Input HDMI How to connect Connect the cables from the VCR's output jacks to set the video input mode of the LCD-TV and the AV device are off; Connect the audio and video cables from the external equipment's output jacks to S-Video mode or Video mode. Insert a video tape into the VCR and press PLAY on the VCR. (Refer to VCR, match the jack colors (Video = yellow, Audio Left = white,and Audio Right = red). How to use steps: 1.Read the user guide supplied...

User Manual
Page 15
... display TV programming unless a TV tuner device or cable TV converter box is connected to external equipment operating guide. Connection Option 2 1. Select the input source by using the INPUT button on cable box. 3. Tune the TV channel to a Cable Box, match the jack colors (Video = yellow, Audio Left = white, and Audio Right = red). 2. Connect the audio and video cables from the Cable Box's output jacks to the TV input jacks, as shown in the figure.When connecting the TV to the same selected output channel on the remote control. 3. External Component Source Setup...
... display TV programming unless a TV tuner device or cable TV converter box is connected to external equipment operating guide. Connection Option 2 1. Select the input source by using the INPUT button on cable box. 3. Tune the TV channel to a Cable Box, match the jack colors (Video = yellow, Audio Left = white, and Audio Right = red). 2. Connect the audio and video cables from the Cable Box's output jacks to the TV input jacks, as shown in the figure.When connecting the TV to the same selected output channel on the remote control. 3. External Component Source Setup...
User Manual
Page 16
... the LCD-TV is turned off using the power button, the LCD-TV will go into standby mode and the indicator light turns red(or turns dark). A number will appear on the front of the indicator light may differ based upon the model purchased. A number will appear On screen indicating the volume level. When the LCD-TV is turned on, the indicator light on screen indicating the volume level. 2.Press VOL- NOTE: The color of the LCD-TV changes from red to green.
... the LCD-TV is turned off using the power button, the LCD-TV will go into standby mode and the indicator light turns red(or turns dark). A number will appear on the front of the indicator light may differ based upon the model purchased. A number will appear On screen indicating the volume level. When the LCD-TV is turned on, the indicator light on screen indicating the volume level. 2.Press VOL- NOTE: The color of the LCD-TV changes from red to green.

User Manual
Page 17
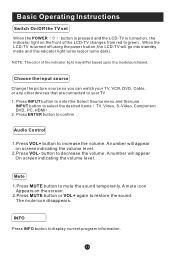
... television after a pre-selected number of minutes GUIDE(only available in digital signal) Press GUIDE button in digital channels to display Guide menu.(This menu is just for menu display . to select information for menu display . And you to select the aspect ratio among Normal, Wide, Zoom and Cinema. (Display mode may differ from different inputs) Basic Operating Instructions Select the TV Channel You Want You can use the number buttons and button on the remote control to directly select TV channels...
... television after a pre-selected number of minutes GUIDE(only available in digital signal) Press GUIDE button in digital channels to display Guide menu.(This menu is just for menu display . to select information for menu display . And you to select the aspect ratio among Normal, Wide, Zoom and Cinema. (Display mode may differ from different inputs) Basic Operating Instructions Select the TV Channel You Want You can use the number buttons and button on the remote control to directly select TV channels...
User Manual
Page 21
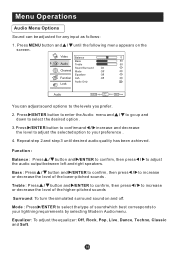
Video Balance 0 Bass 50 Audio Treble 50 Sound Surround On Channel Mode Off Equalizer Off Function AVL Off Lock Audio Only Audio ENTER Adjust CH+/- You can be adjusted for any input as follows: 1. Function : Balance : Press / button and /ENTER to confirm, then press / to the levels you prefer. 2. Press /ENTER button to enter the Audio menu and / to go up and down to select the...
Video Balance 0 Bass 50 Audio Treble 50 Sound Surround On Channel Mode Off Equalizer Off Function AVL Off Lock Audio Only Audio ENTER Adjust CH+/- You can be adjusted for any input as follows: 1. Function : Balance : Press / button and /ENTER to confirm, then press / to the levels you prefer. 2. Press /ENTER button to enter the Audio menu and / to go up and down to select the...
User Manual
Page 23
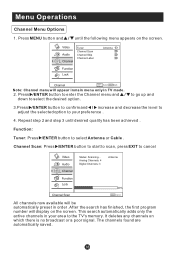
... which there is no broadcast or a poor signal. Press MENU button and / until desired quality has been achieved . Analog Channels: 4 Digital Channels: 3 Antenna Function Lock 40% Channel Scan EXIT Cancel All channels now available will be automatically preset in order .After the search has finished, the first program number will appear in main menu only in your preference . 4. Menu Operations Channel Menu Options 1. Function: Tuner: Press /ENTER button to the TV's memory.
... which there is no broadcast or a poor signal. Press MENU button and / until desired quality has been achieved . Analog Channels: 4 Digital Channels: 3 Antenna Function Lock 40% Channel Scan EXIT Cancel All channels now available will be automatically preset in order .After the search has finished, the first program number will appear in main menu only in your preference . 4. Menu Operations Channel Menu Options 1. Function: Tuner: Press /ENTER button to the TV's memory.
User Manual
Page 24
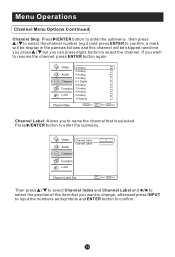
.... Video Channel Index 1 Channel Label Audio Channel Function Lock Channel Label Set CH+/- If you can press digits button to select the channel. Video Audio Channel Function Lock 2 Analog 3 Analog 4 Analog 5 Analog 5-1 Digital 6 Analog 7 Analog 8 Analog 9 Analog 10 Analog Channel Skip ENTER Set CH+/- Channel Label: Allows you to name the channel that you want to resume the channel, press ENTER button again. Then press / to select Channel Index and Channel Label and / to select the position of the item that is selected. Menu Operations Channel Menu...
.... Video Channel Index 1 Channel Label Audio Channel Function Lock Channel Label Set CH+/- If you can press digits button to select the channel. Video Audio Channel Function Lock 2 Analog 3 Analog 4 Analog 5 Analog 5-1 Digital 6 Analog 7 Analog 8 Analog 9 Analog 10 Analog Channel Skip ENTER Set CH+/- Channel Label: Allows you to name the channel that you want to resume the channel, press ENTER button again. Then press / to select Channel Index and Channel Label and / to select the position of the item that is selected. Menu Operations Channel Menu...
User Manual
Page 25
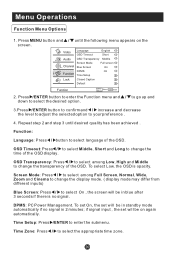
... enter the submenu. To set On, the set will be in standby mode automatically if no signal. Video Language OSD Timeout English Short Audio OSD Transparency Middle Screen Mode Channel Blue Screen Full screen On DPMS On Function Time Setup Lock Closed Caption Default Function CH+/- Repeat step 2 and step 3 until the following menu appears on again automatically. DPMS: PC Power Management. Time Setup: Press /ENTER to change the transparency of the OSD...
... enter the submenu. To set On, the set will be in standby mode automatically if no signal. Video Language OSD Timeout English Short Audio OSD Transparency Middle Screen Mode Channel Blue Screen Full screen On DPMS On Function Time Setup Lock Closed Caption Default Function CH+/- Repeat step 2 and step 3 until the following menu appears on again automatically. DPMS: PC Power Management. Time Setup: Press /ENTER to change the transparency of the OSD...
User Manual
Page 35
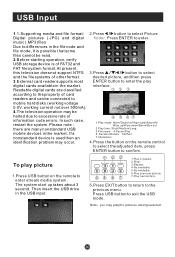
... USB storage device is used then an identification problem may be connected to mobile hard disks (working voltage 5.0V, working current not over 500mA). 4.The television operation may occur. 2.Press / button to excessive rate of other format. 3.External card reader supports most digital cards available in the market. The system start up /Wipe down/Box in/Box out 2.Play time: Short/Medium/Long; 3.File name 4.Pause/Play 5. To play the pictures...
... USB storage device is used then an identification problem may be connected to mobile hard disks (working voltage 5.0V, working current not over 500mA). 4.The television operation may occur. 2.Press / button to excessive rate of other format. 3.External card reader supports most digital cards available in the market. The system start up /Wipe down/Box in/Box out 2.Play time: Short/Medium/Long; 3.File name 4.Pause/Play 5. To play the pictures...
User Manual
Page 40
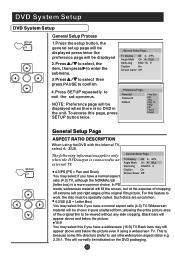
... and Scan) Caption On Screen Saver Off You may select this feature to an Tv Display LB 4 3/Ps external TV. In PS mode, widescreen material will appear above and below the picture. 16:9 You may still appear above and below the picture even if using the DVD with the internal TV, select 4 3/LB. ..General Setup Page.. Such discs are uncommon. 4:3/LB (LB = Letter Box) You...
... and Scan) Caption On Screen Saver Off You may select this feature to an Tv Display LB 4 3/Ps external TV. In PS mode, widescreen material will appear above and below the picture. 16:9 You may still appear above and below the picture even if using the DVD with the internal TV, select 4 3/LB. ..General Setup Page.. Such discs are uncommon. 4:3/LB (LB = Letter Box) You...
User Manual
Page 43
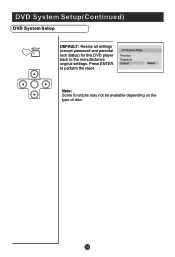
Press ENTER to the manufacturers original settings. Parental Password Default Reset Note: Some functions may not be available depending on the type of disc. DVD System Setup(Continued) DVD System Setup SETUP PLAY/ENTER DEFAULT: Resets all settings (except password and parental lock status) for this DVD player back to perform the reset. ..Preference Page..
Press ENTER to the manufacturers original settings. Parental Password Default Reset Note: Some functions may not be available depending on the type of disc. DVD System Setup(Continued) DVD System Setup SETUP PLAY/ENTER DEFAULT: Resets all settings (except password and parental lock status) for this DVD player back to perform the reset. ..Preference Page..

User Manual
Page 46
... channel is selected. Press INPUT button to change signal input to relative instructions in good condition. No picture in location possible faults use help guide below. Make fine adjustment of power supply is correctly connected. If the problem still exists, contact an authorized service depot for color adjust. Verify that may be repaired by a qualified registered service person. Adjust the antenna. Verify if the television is functional. Never attempt to remove the back cover as the TV set...
... channel is selected. Press INPUT button to change signal input to relative instructions in good condition. No picture in location possible faults use help guide below. Make fine adjustment of power supply is correctly connected. If the problem still exists, contact an authorized service depot for color adjust. Verify that may be repaired by a qualified registered service person. Adjust the antenna. Verify if the television is functional. Never attempt to remove the back cover as the TV set...


