
User Manual
Page 2
... flash with DVD models.) The exclamation point within an equilateral triangle is intended to alert the user to the presence of important operating and maintenance (servicing) instructions in the operating instructions unless you are for TV with arrowhead symbol, within an equilateral triangle is only for use by qualified service personnel only. To reduce the risk of electric shock, do so. CAUTION: USE...
... flash with DVD models.) The exclamation point within an equilateral triangle is intended to alert the user to the presence of important operating and maintenance (servicing) instructions in the operating instructions unless you are for TV with arrowhead symbol, within an equilateral triangle is only for use by qualified service personnel only. To reduce the risk of electric shock, do so. CAUTION: USE...
User Manual
Page 3
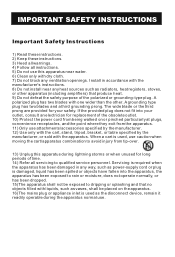
... an electrician for replacement of the obsolete outlet. 10) Protect the power cord from being walked on the apparatus. 16)The mains plug or appliance inlet is used as the disconnect device, remain it readily operable during lightning storms or when unused for long periods of time. 14) Refer all servicing to qualified service personnel. Servicing is required when the...
... an electrician for replacement of the obsolete outlet. 10) Protect the power cord from being walked on the apparatus. 16)The mains plug or appliance inlet is used as the disconnect device, remain it readily operable during lightning storms or when unused for long periods of time. 14) Refer all servicing to qualified service personnel. Servicing is required when the...

User Manual
Page 5
... 28 PC Menu Options Continued 29 DVD Features 30-31 Special Function Playback 32 DVD System Setup 33-36 Playable Discs 38 Disc Protection and DVD Characteristics 38 Troubleshooting Guide 39 Specifications 40 Warranty 41 Note: DVD is available only on certain models. Component Setup 8 VCR Setup 9 HDMI Input 9 Cable TV Setup 10 External Component Source Setup 10 Basic Operating Instructions 11 Switch On/Off the TV set for specific details. CONTENT Safety Notice Items 1 Front Panel Controls 2 Connection Options 3 Remote Control 4 Remote Control Key Functions...
... 28 PC Menu Options Continued 29 DVD Features 30-31 Special Function Playback 32 DVD System Setup 33-36 Playable Discs 38 Disc Protection and DVD Characteristics 38 Troubleshooting Guide 39 Specifications 40 Warranty 41 Note: DVD is available only on certain models. Component Setup 8 VCR Setup 9 HDMI Input 9 Cable TV Setup 10 External Component Source Setup 10 Basic Operating Instructions 11 Switch On/Off the TV set for specific details. CONTENT Safety Notice Items 1 Front Panel Controls 2 Connection Options 3 Remote Control 4 Remote Control Key Functions...

User Manual
Page 6
... remove the back cover. If water comes in direct sunlight or near heat sources; To ensure your safety and extend the life-span of your unit is needed, please contact an Authorized service technician. l Do not place the unit on the machine and in this manual for proper ventilation; l Please comply with the LCD-TV, disconnect the power cord...
... remove the back cover. If water comes in direct sunlight or near heat sources; To ensure your safety and extend the life-span of your unit is needed, please contact an Authorized service technician. l Do not place the unit on the machine and in this manual for proper ventilation; l Please comply with the LCD-TV, disconnect the power cord...

User Manual
Page 8
... the back bottom of the set Component Input ANT IN(Antenna Input) Connect a component Connect cable or video device to these PC audio in antenna signals to HDMI output of a PC graphics card to use Audio in set as a PC display Connect audio output from an external device to these jacks Video in Connect audio output from an external device to these jacks HDMI Connect to the TV, either directly or through your cable box. S-VIDEO jacks Connect S-Video out from an S-Video device to the jacks.
... the back bottom of the set Component Input ANT IN(Antenna Input) Connect a component Connect cable or video device to these PC audio in antenna signals to HDMI output of a PC graphics card to use Audio in set as a PC display Connect audio output from an external device to these jacks Video in Connect audio output from an external device to these jacks HDMI Connect to the TV, either directly or through your cable box. S-VIDEO jacks Connect S-Video out from an S-Video device to the jacks.

User Manual
Page 9
Remote Control Installing Batteries ! Image 1 ! Insert two size AAA batteries matching the +/-polarities of the battery to ensure effective performance of TV without DVD) . Remove the battery cover. ! Keep the remote control away from heat sources or humid areas to the +/marks inside the battery compartment (see image 2-for remote of the same type, must be inserted properly, and must be turned on or...
Remote Control Installing Batteries ! Image 1 ! Insert two size AAA batteries matching the +/-polarities of the battery to ensure effective performance of TV without DVD) . Remove the battery cover. ! Keep the remote control away from heat sources or humid areas to the +/marks inside the battery compartment (see image 2-for remote of the same type, must be inserted properly, and must be turned on or...
User Manual
Page 10
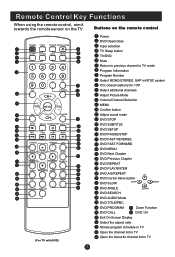
... remote control POWER TV/AV TV/DVD OPEN/CLOSE SLEEP Q.VIEW INFO MUTE 1234 5678 CC 90 SAP P.MODE CH+ VOL - PREV NEXT D.MENU REPEAT A-B PLAY/ENTER SLOW ANGLE TITLE/PBC SEARCH AUDIO PROGRAM ZOOM D.CALL 10+ EXIT ARC GUIDE CH.LIST FAV.LIST (For TV with DVD) Power DVD Open/close Input selection TV Sleep button TV/DVD Mute Return to previous channel in TV mode Program Infromation Program Number Select MONO,STEREO, SAP in NTSC system CC( closed caption) On / Off Select additional channels Adjust Picture Mode Volume/Channel Selection MENU Confirm button Adjust...
... remote control POWER TV/AV TV/DVD OPEN/CLOSE SLEEP Q.VIEW INFO MUTE 1234 5678 CC 90 SAP P.MODE CH+ VOL - PREV NEXT D.MENU REPEAT A-B PLAY/ENTER SLOW ANGLE TITLE/PBC SEARCH AUDIO PROGRAM ZOOM D.CALL 10+ EXIT ARC GUIDE CH.LIST FAV.LIST (For TV with DVD) Power DVD Open/close Input selection TV Sleep button TV/DVD Mute Return to previous channel in TV mode Program Infromation Program Number Select MONO,STEREO, SAP in NTSC system CC( closed caption) On / Off Select additional channels Adjust Picture Mode Volume/Channel Selection MENU Confirm button Adjust...

User Manual
Page 13
... of the LCD-TV.Tighten the screws on the power of the PC; 5.Press the TV/AV button to set the video input mode of the LCD -TV and the PC are off; 3.Connect a D type 15-pin PC interface cable ( not supplied ) to the PC video interface connector on the remote control to VESAcriteria. Connection and use steps: 1.Read the user guide supplied with the resolution, vertical pattern, contrast or brightness in the figure. Use the TV/AV button on...
... of the LCD-TV.Tighten the screws on the power of the PC; 5.Press the TV/AV button to set the video input mode of the LCD -TV and the PC are off; 3.Connect a D type 15-pin PC interface cable ( not supplied ) to the PC video interface connector on the remote control to VESAcriteria. Connection and use steps: 1.Read the user guide supplied with the resolution, vertical pattern, contrast or brightness in the figure. Use the TV/AV button on...

User Manual
Page 14
... remote control or on the power of the AV device; 4.Press the TV/AV button to the S-VIDEO input, the picture quality is improved; HDMI compared to the VCR owner s 2 manual.) 3.T.urn on the VCR. (Refer to conne- Insert a video tape into the VCR and press PLAY on the LCD-TV first ; Refer to the Video input. 1 2. Connection Option 2 1. Connect the audio and video cables from the VCR's output jacks to S-Video mode or Video mode. VCR HDMI Input...
... remote control or on the power of the AV device; 4.Press the TV/AV button to the S-VIDEO input, the picture quality is improved; HDMI compared to the VCR owner s 2 manual.) 3.T.urn on the VCR. (Refer to conne- Insert a video tape into the VCR and press PLAY on the LCD-TV first ; Refer to the Video input. 1 2. Connection Option 2 1. Connect the audio and video cables from the VCR's output jacks to S-Video mode or Video mode. VCR HDMI Input...
User Manual
Page 15
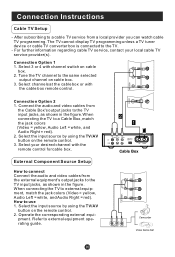
... equipment operating guide. Select the input source by using the TV/AV button on the remote control. 3. Connection Option 2 1. Connect the audio and video cables from the external equipment's output jacks to the same selected output channel on cable box. 2. Refer to external equipment, match the jack colors (Video = yellow, Audio Left = white, and Audio Right = red). External Component Source Setup How to connect Connect the audio and video cables from the Cable Box's output jacks to the TV input jacks, as shown in the figure.When connecting the TV to a cable TV service from...
... equipment operating guide. Select the input source by using the TV/AV button on the remote control. 3. Connection Option 2 1. Connect the audio and video cables from the external equipment's output jacks to the same selected output channel on cable box. 2. Refer to external equipment, match the jack colors (Video = yellow, Audio Left = white, and Audio Right = red). External Component Source Setup How to connect Connect the audio and video cables from the Cable Box's output jacks to the TV input jacks, as shown in the figure.When connecting the TV to a cable TV service from...

User Manual
Page 16
... color of the LCD-TV changes from red to green. Choose the input source Change the picture source so you can watch your TV, VCR, DVD, Cable , or any other devices that are connected to display current program information. Audio Control 1.Press the VOL+ button to confirm . Press the OK button to increase the volume. Mute 1.Press the MUTE button to select the desired items TV, Video, S-Video, Component DVD, PC, HDMI . 2. Press the TV/AV button to enter the Select Source menu...
... color of the LCD-TV changes from red to green. Choose the input source Change the picture source so you can watch your TV, VCR, DVD, Cable , or any other devices that are connected to display current program information. Audio Control 1.Press the VOL+ button to confirm . Press the OK button to increase the volume. Mute 1.Press the MUTE button to select the desired items TV, Video, S-Video, Component DVD, PC, HDMI . 2. Press the TV/AV button to enter the Select Source menu...
User Manual
Page 17
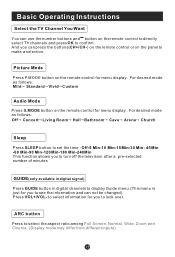
... digital signal) Press GUIDE button in digital channels to display Guide menu.(This menu is just for menu display . For desired mode as follows: Mild Standard Vivid Custom Audio Mode Press S.MODE button on the remote control for you can use the number buttons and button on the remote control to directly select TV channels and press OK to select the aspect ratio among Full Screen, Normal, Wide, Zoom and Cinema. (Display mode may differ from different inputs) Basic Operating Instructions Select the TV Channel...
... digital signal) Press GUIDE button in digital channels to display Guide menu.(This menu is just for menu display . For desired mode as follows: Mild Standard Vivid Custom Audio Mode Press S.MODE button on the remote control for you can use the number buttons and button on the remote control to directly select TV channels and press OK to select the aspect ratio among Full Screen, Normal, Wide, Zoom and Cinema. (Display mode may differ from different inputs) Basic Operating Instructions Select the TV Channel...
User Manual
Page 18
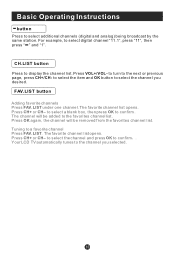
... box, then press OK to select the channel you selected. The favorite channel list opens. The favorite channel list opens. Press OK again, the channel will be removed from the favorites channel list. For example, to display the channel list. CH.LIST button Press to select digital channel "11.1", press "11", then press " " and "1". Tuning to the channel you desired. Your LCD TV automatically tunes to a favorite channel Press FAV.LIST. to turn...
... box, then press OK to select the channel you selected. The favorite channel list opens. The favorite channel list opens. Press OK again, the channel will be removed from the favorites channel list. For example, to display the channel list. CH.LIST button Press to select digital channel "11.1", press "11", then press " " and "1". Tuning to the channel you desired. Your LCD TV automatically tunes to a favorite channel Press FAV.LIST. to turn...
User Manual
Page 21
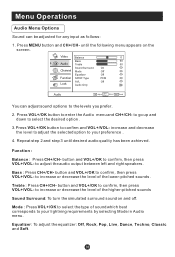
... increase or decrease the level of sound which best corresponds to adjust the audio output between left and right speakers. Mode : Press VOL+/OK to select the type of the higher-pitched sounds Sound Surround: To turn the simulated surround sound on the screen. to your preference . 4. button and VOL+/OK to confirm, then press VOL+/VOL- Menu Operations Audio Menu Options Sound can adjust sound options to confirm and VOL...
... increase or decrease the level of sound which best corresponds to adjust the audio output between left and right speakers. Mode : Press VOL+/OK to select the type of the higher-pitched sounds Sound Surround: To turn the simulated surround sound on the screen. to your preference . 4. button and VOL+/OK to confirm, then press VOL+/VOL- Menu Operations Audio Menu Options Sound can adjust sound options to confirm and VOL...
User Manual
Page 24
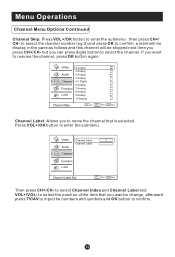
to resume the channel, press OK button again. Video Audio Channel Function Lock 2 Analog 3 Analog 4 Analog 5 Analog 5-1 Digital 6 Analog 7 Analog 8 Analog 9 Analog 10 Analog Channel Skip OK Set CH+/- Video Channel Index 1 Channel Label Audio Channel Function Lock Channel Label Set CH+/- Menu Operations Channel Menu Options Continued Channel Skip: Press VOL+/OK button to enter the submenu. to select the channel number (eg.2) and press OK to confirm, a mark will be display in the pane as follows and this channel will be skipped next time you want...
to resume the channel, press OK button again. Video Audio Channel Function Lock 2 Analog 3 Analog 4 Analog 5 Analog 5-1 Digital 6 Analog 7 Analog 8 Analog 9 Analog 10 Analog Channel Skip OK Set CH+/- Video Channel Index 1 Channel Label Audio Channel Function Lock Channel Label Set CH+/- Menu Operations Channel Menu Options Continued Channel Skip: Press VOL+/OK button to enter the submenu. to select the channel number (eg.2) and press OK to confirm, a mark will be display in the pane as follows and this channel will be skipped next time you want...
User Manual
Page 25
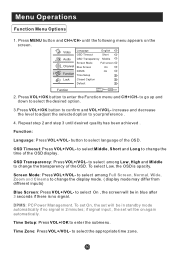
... Cinema to change the time of the OSD. DPMS: PC Power Management. Video Language OSD Timeout English Short Audio OSD Transparency Middle Screen Mode Channel Blue Screen Full screen On DPMS On Function Time Setup Lock Closed Caption Default Function CH+/- OSD Timeout: Press VOL+/VOL- if signal input , the set will be in standby mode automatically if no signal. Time Setup: Press VOL+/OK to enter the Function menu and CH+/CH- button to select...
... Cinema to change the time of the OSD. DPMS: PC Power Management. Video Language OSD Timeout English Short Audio OSD Transparency Middle Screen Mode Channel Blue Screen Full screen On DPMS On Function Time Setup Lock Closed Caption Default Function CH+/- OSD Timeout: Press VOL+/VOL- if signal input , the set will be in standby mode automatically if no signal. Time Setup: Press VOL+/OK to enter the Function menu and CH+/CH- button to select...

User Manual
Page 29
... types of TV programs and movies. and Canadian Movies and TV PROGRAMS Guide ratings to lock all the system following . Menu Operations Lock Menu Options Continued Channel Block: Press VOL+/OK to resume it. Video Audio Channel Function Lock 10-1 Digital WCAU-DT 11 Analog 11-1 Digital MBC DTV 12 Analog 13 Analog 14 Analog 14-1 Digital ATSC-1 14-2 Digital ATSC-2 14-3 Digital ATSC-3 15 Analog Channel Lock OK Set CH+/- to select the channel you to confirm. The channel is locked and a lock...
... types of TV programs and movies. and Canadian Movies and TV PROGRAMS Guide ratings to lock all the system following . Menu Operations Lock Menu Options Continued Channel Block: Press VOL+/OK to resume it. Video Audio Channel Function Lock 10-1 Digital WCAU-DT 11 Analog 11-1 Digital MBC DTV 12 Analog 13 Analog 14 Analog 14-1 Digital ATSC-1 14-2 Digital ATSC-2 14-3 Digital ATSC-3 15 Analog Channel Lock OK Set CH+/- to select the channel you to confirm. The channel is locked and a lock...
User Manual
Page 38
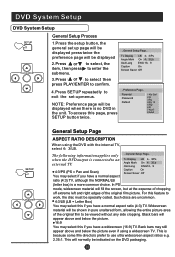
..., then press to an Tv Display LB 4 3/Ps external TV. NOTE: Preference page will be indicated on the DVD packaging. To access this feature to exit the set up menus. For this page, press SETUP button twice. ..Preference Page.. Parental Password Default 1 Kid Saf 2 G 3 Pg 4 Pg 13 5 Pgr 6 R 7 Nc17 8 Adult SETUP PLAY/ENTER General Setup Page ASPECT RATIO DESCRIPTION When using a widescreen TV. Widescreen material will be...
..., then press to an Tv Display LB 4 3/Ps external TV. NOTE: Preference page will be indicated on the DVD packaging. To access this feature to exit the set up menus. For this page, press SETUP button twice. ..Preference Page.. Parental Password Default 1 Kid Saf 2 G 3 Pg 4 Pg 13 5 Pgr 6 R 7 Nc17 8 Adult SETUP PLAY/ENTER General Setup Page ASPECT RATIO DESCRIPTION When using a widescreen TV. Widescreen material will be...

User Manual
Page 41
DVD System Setup(Continued) DVD System Setup SETUP PLAY/ENTER DEFAULT: Resets all settings (except password and parental lock status) for this DVD player back to perform the reset. ..Preference Page.. Parental Password Default Reset Note: Some functions may not be available depending on the type of disc. Press ENTER to the manufacturers original settings.
DVD System Setup(Continued) DVD System Setup SETUP PLAY/ENTER DEFAULT: Resets all settings (except password and parental lock status) for this DVD player back to perform the reset. ..Preference Page.. Parental Password Default Reset Note: Some functions may not be available depending on the type of disc. Press ENTER to the manufacturers original settings.

User Manual
Page 44
... connected. Blank screen No sound Poor sound Verify if correct signals are input. Verify if the antenna is interrupted. Restart the television of channel. Make fine adjustment of power supply is in the Manual for color adjust. Press VOL+ button to chapter on . Never attempt to remove the back cover as the TV set must only be repaired using the above guide consult with some channel Check picture and sound systems. program (black and white) Refer to another channel...
... connected. Blank screen No sound Poor sound Verify if correct signals are input. Verify if the antenna is interrupted. Restart the television of channel. Make fine adjustment of power supply is in the Manual for color adjust. Press VOL+ button to chapter on . Never attempt to remove the back cover as the TV set must only be repaired using the above guide consult with some channel Check picture and sound systems. program (black and white) Refer to another channel...


